


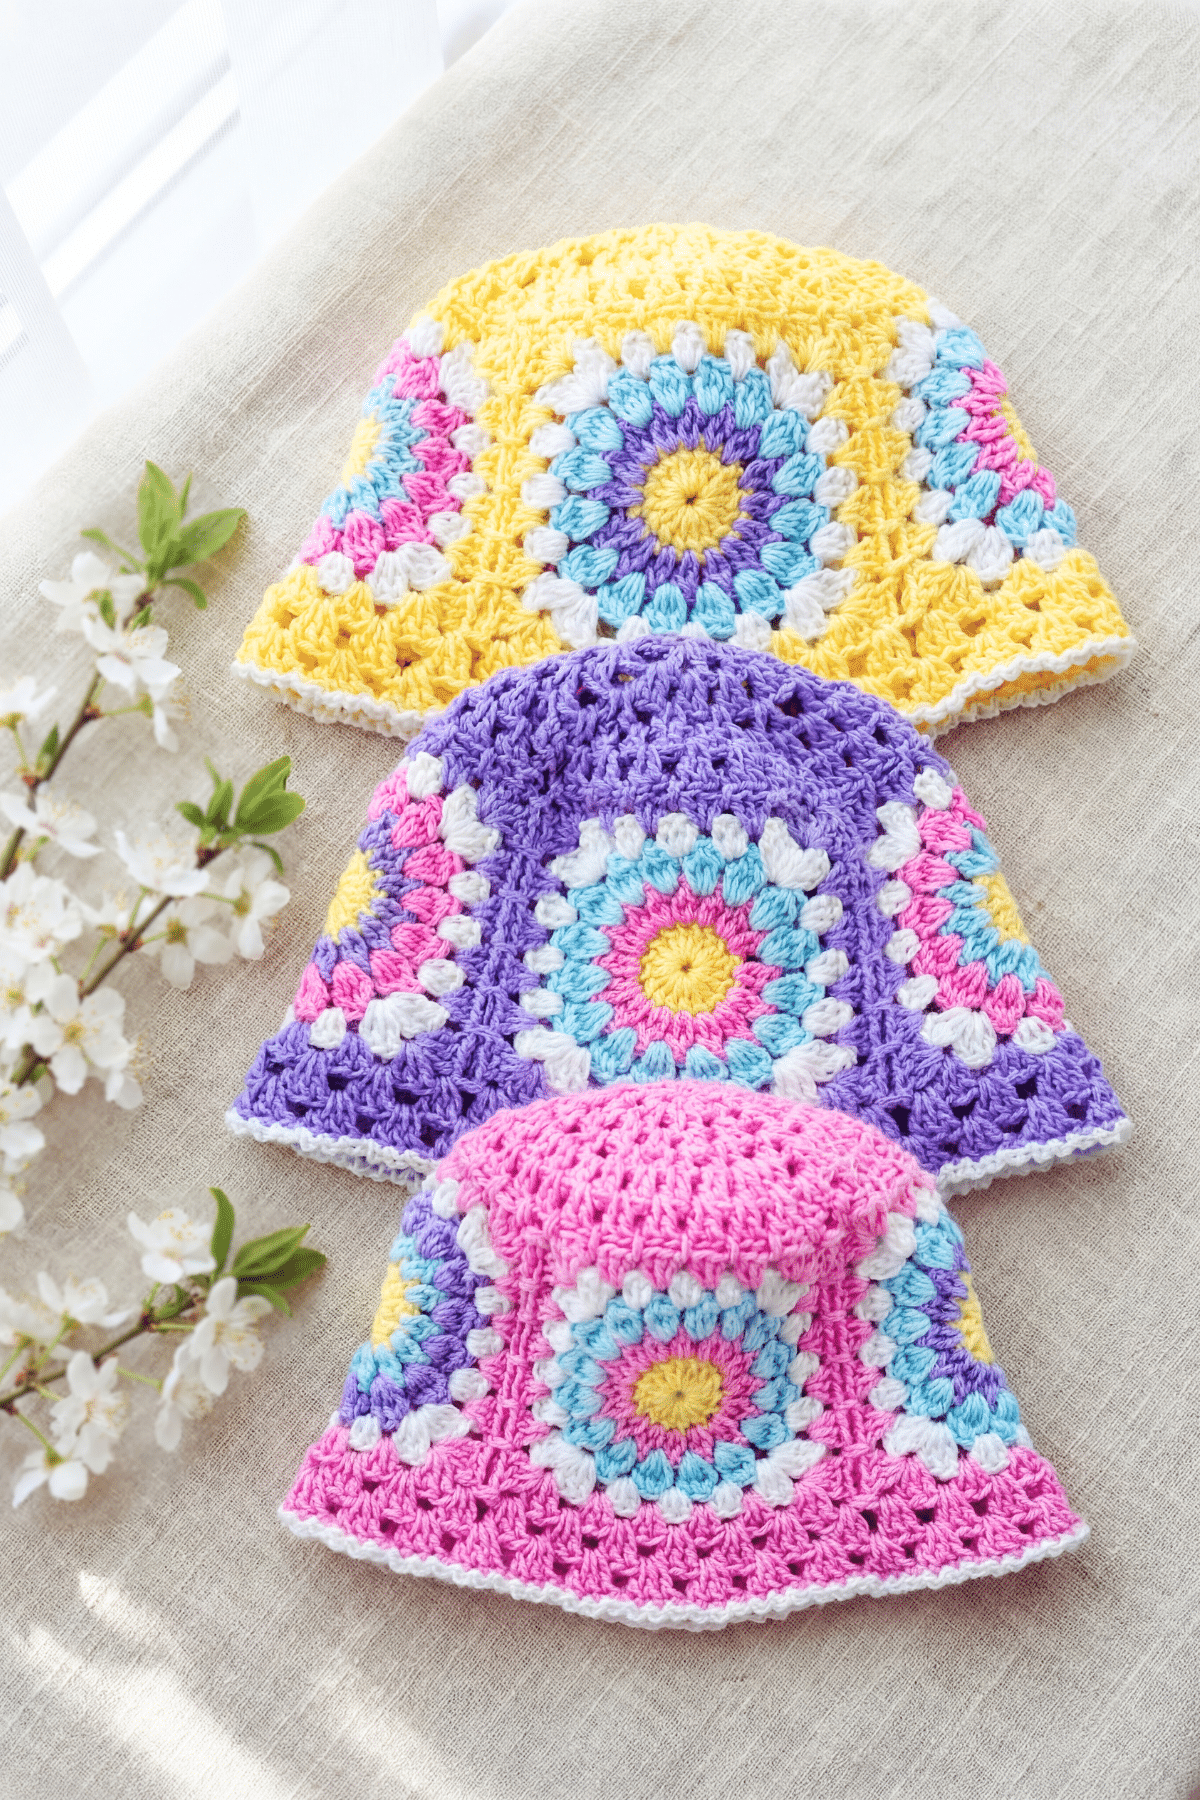
Looking for a fun, colourful, and beginner-friendly crochet project? Well, you’re in for a treat with the Sunny Stitches Hat – a Free Crochet Bucket Hat Pattern!
This free crochet pattern is available right here on the blog, but if you prefer a printable, ad-free PDF version, you can grab it in my Etsy shop! Perfect for easy offline access and crocheting on the go.
Why This One’s a Favourite
- Sizes for Everyone – From babies (0+) to adults, this pattern includes instructions for all ages so you can make matching hats for the whole family.
- Colourful & Customizable – The sunburst granny squares are perfect for playing with colours – follow the recommended colour scheme or create your own.
- Beginner-Friendly – Simple stitches and clear instructions (US Terms) make this pattern ideal for confident beginners and up.
- Trendy Bucket Hat Style – Combines the timeless charm of granny squares with a modern bucket hat silhouette.
- Perfect Handmade Gift – Great for birthdays, baby showers, festivals, or just because – handmade hats are always a hit!
- Great for All Seasons – Light and airy for summer but easy to adapt for cooler months with different yarns.
- Step-by-Step Tutorial Available – Pair it with the matching video tutorial to follow along with confidence.
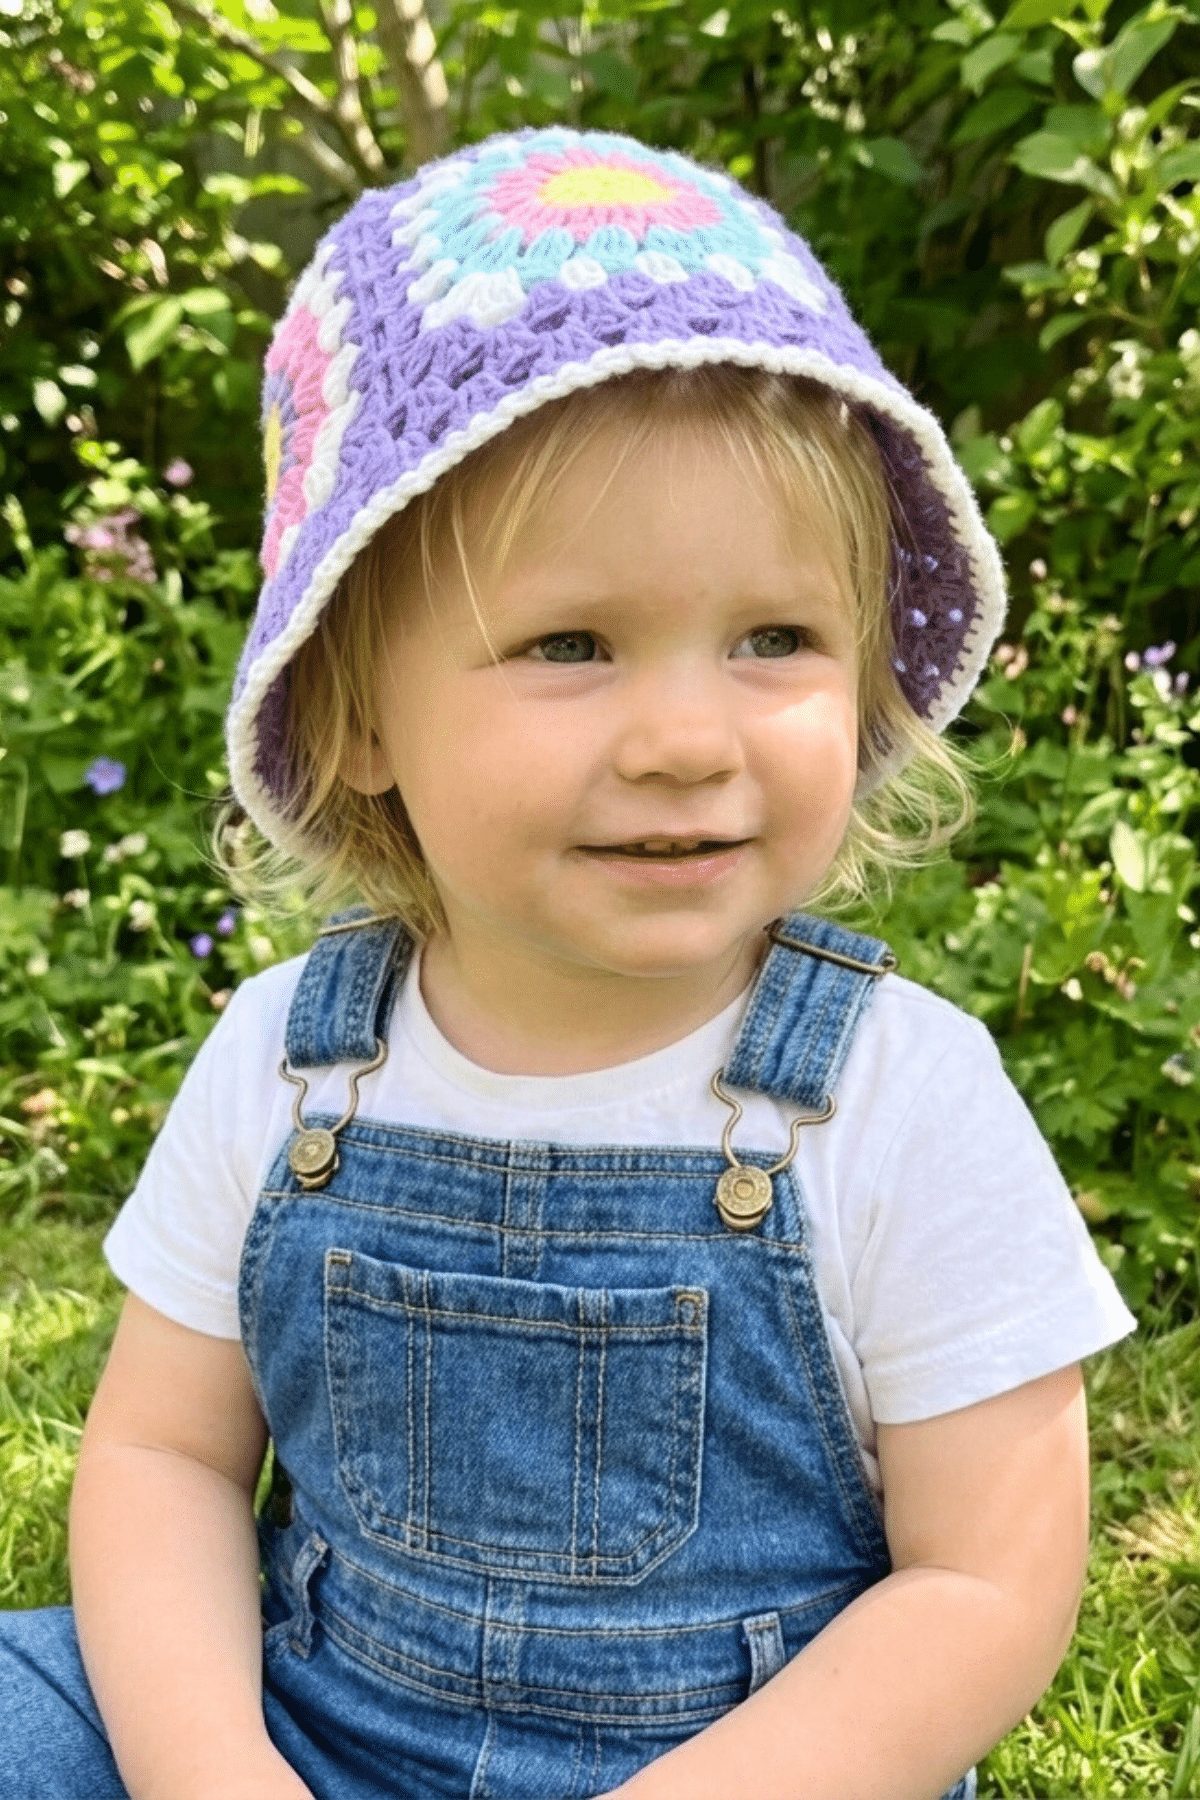
On-Trend Style
Granny square bucket hats are all the rage right now. And the Sunny Stitches Hat is the perfect blend of playful style and nostalgic charm. Crochet fashion has never looked so fun!
Whether you’re crocheting for a summer vacation, a festival outfit, or just love a good stash-busting project, this hat is a joyful accessory that turns heads and sparks smiles.

Sizing Information
This free crochet bucket hat pattern is available in sizes from newborn to adult, so you can make a Sunny Stitches Hat for every member of the family!
In total, there are 6 sizes:
- 0-3 months
- 3-6 months
- 6-12 months
- 1-3 years
- 3-10 years
- Adult
Each size is designed for a comfortable fit with a structured brim that adds that classic bucket hat flair.

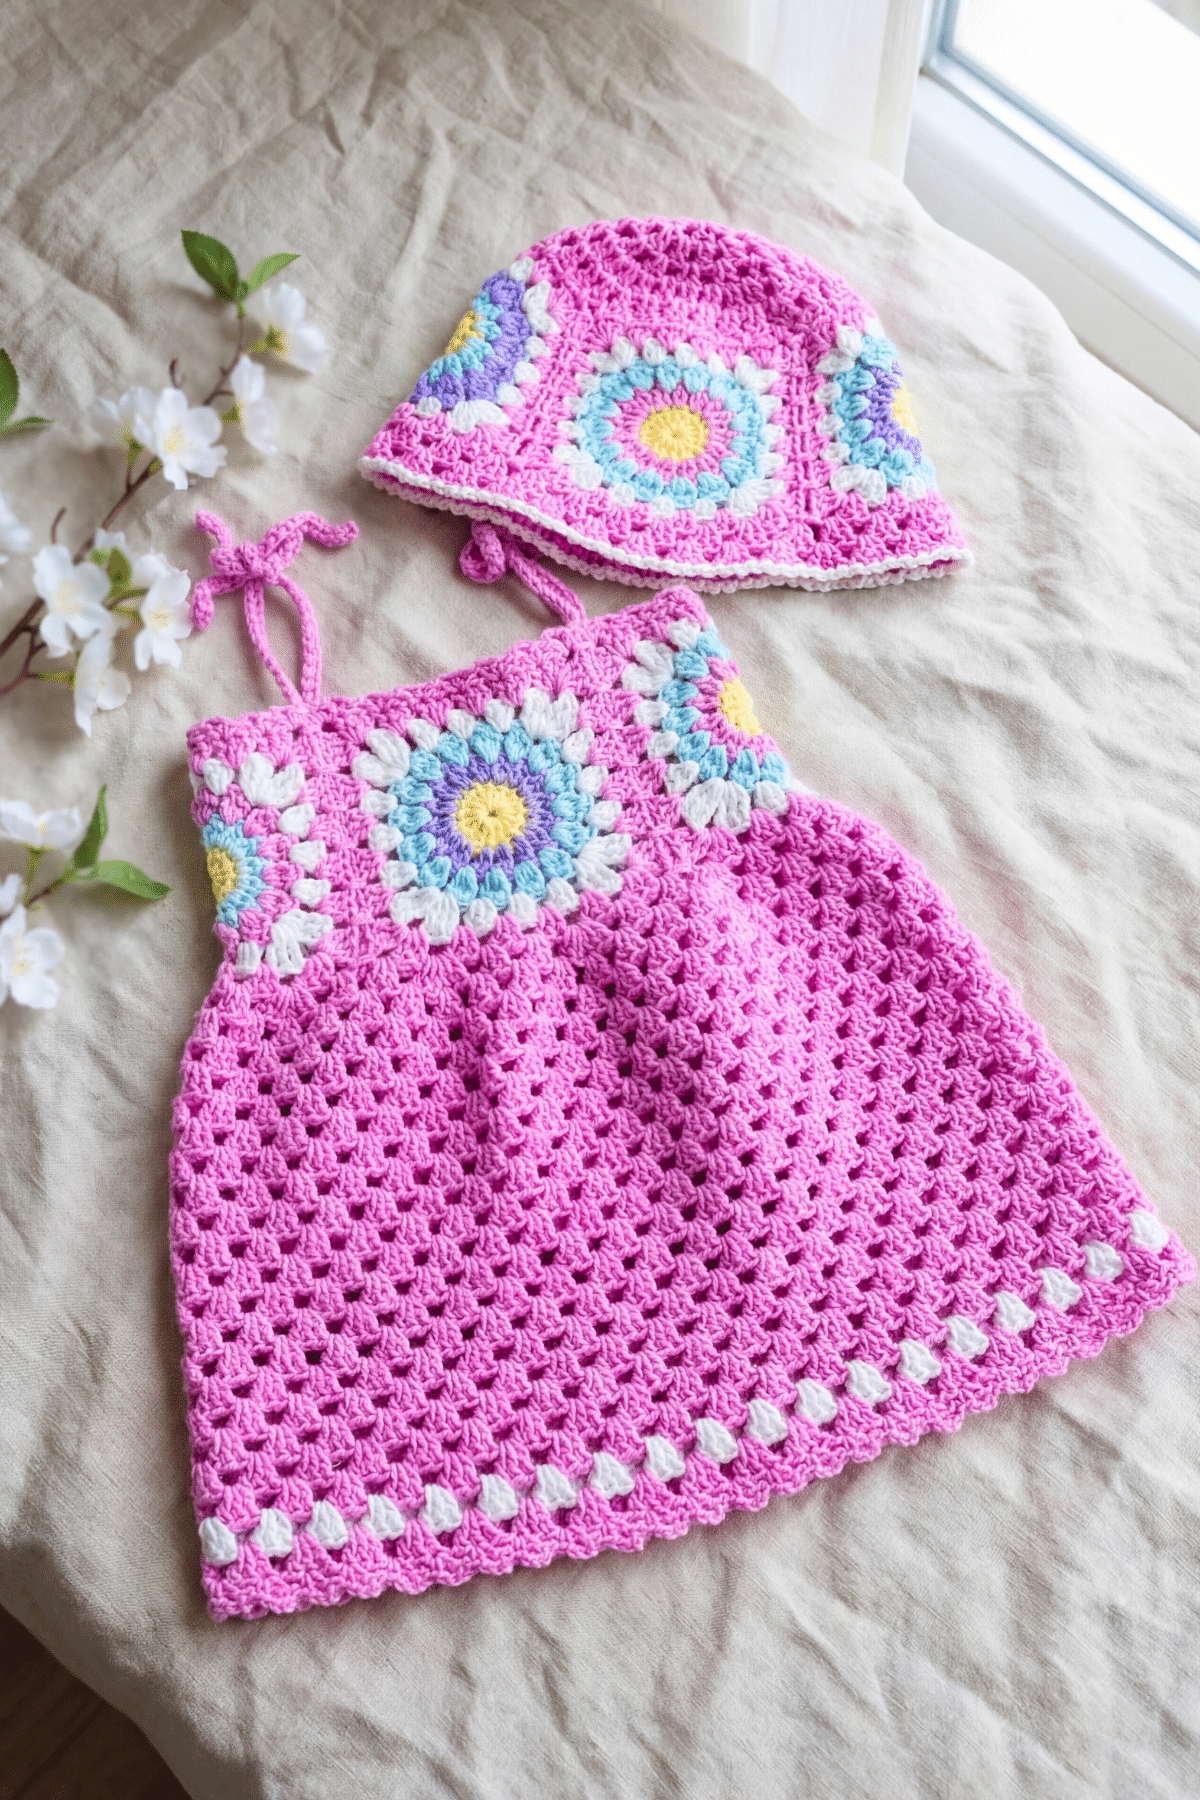
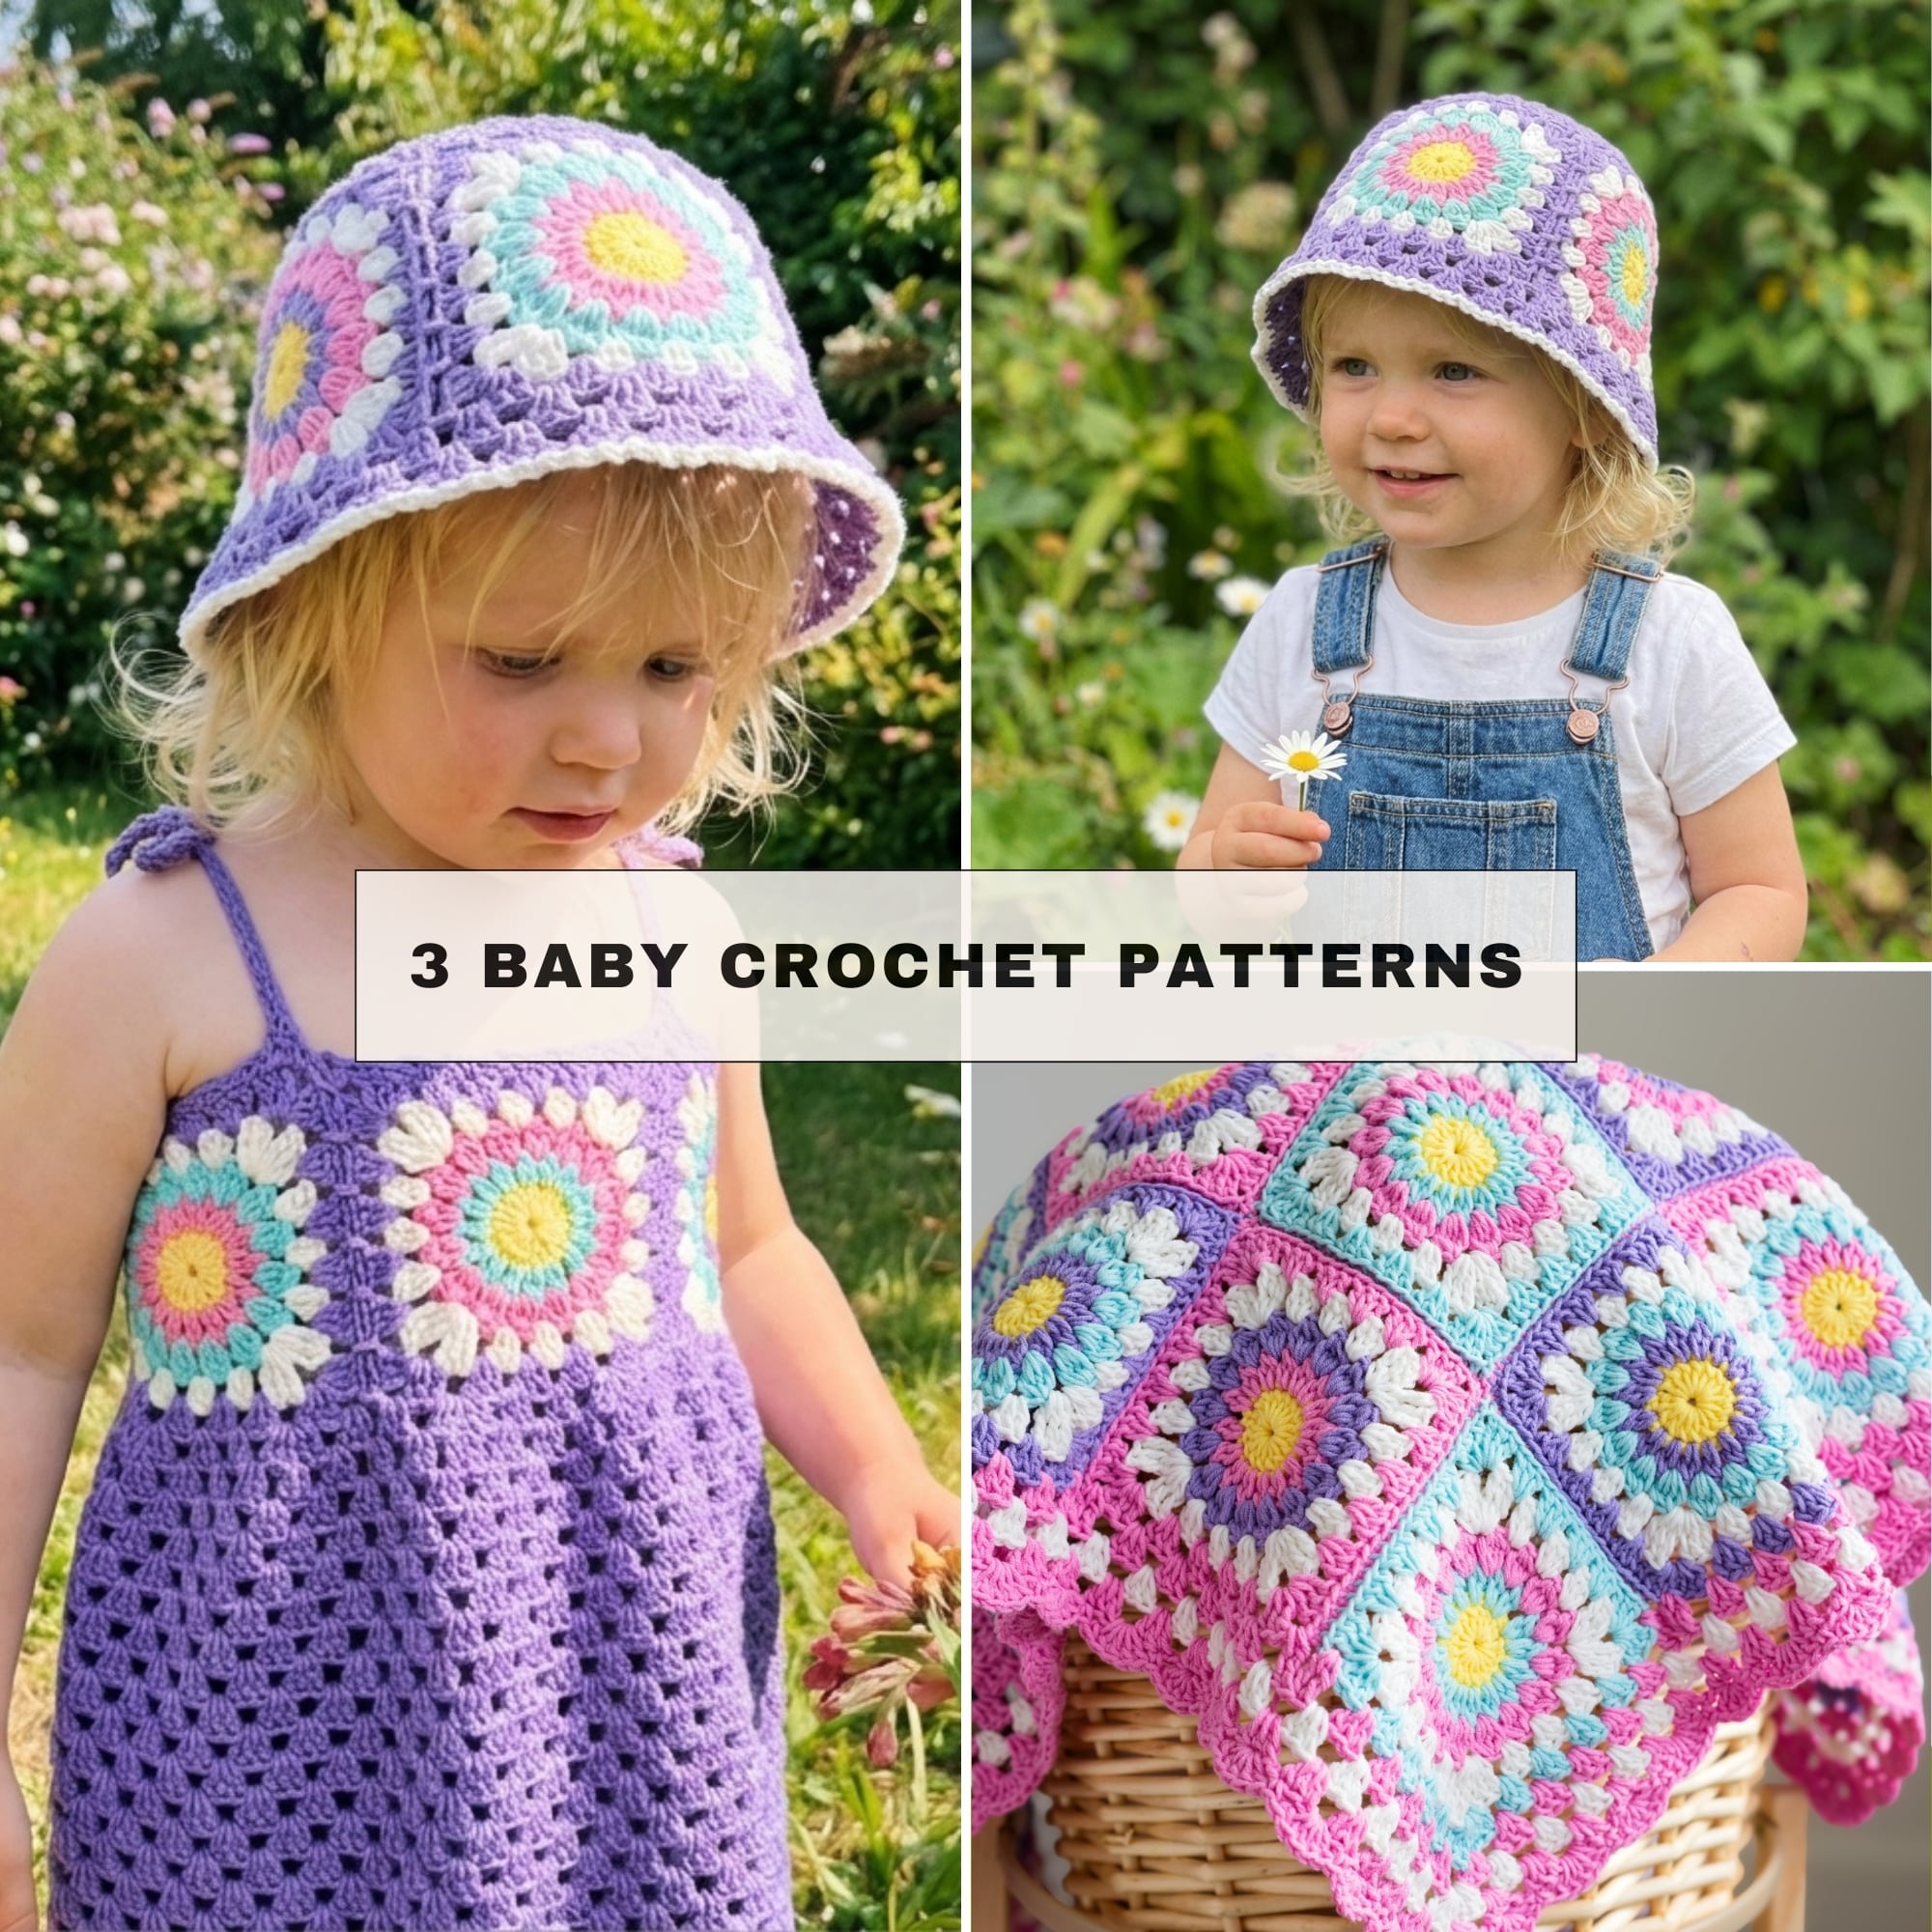
Pair the Sunny Stitches Hat with the Delightful Days Dress
Yarn Spotlight: Perfect Blend For A Hat
For this bucket hat, I used Sirdar Stories DK a weight 3 (DK / 8 ply) yarn. It’s a 60% cotton / 40% acrylic yarn blend—and it was a dream to work with! The cotton gives the hat that breathable, soft texture that’s perfect for warm weather, while the acrylic adds just the right amount of stretch and structure to help the hat hold its shape.
It glides smoothly on the hook, doesn’t split easily, and creates beautifully defined stitches—especially for those eye-catching sunburst granny squares. Plus, the color options were so fun to mix and match!
Whether you’re making one for a toddler or an adult, the yarn blend makes this crochet bucket hat pattern both comfortable to wear and durable for everyday use. Highly recommend it for any crochet accessories!

Yarn Substitutes
If you can’t get your hands on Sirdar Stories DK, don’t worry — here are some great yarn substitutes that work just as well for this pattern!

Make the matching Radiant Rays Blanket
Pin It For Later!
Save this free crochet bucket hat pattern on Pinterest!


Ready? Let’s dive in to the pattern now!

Print This Pattern
Prefer a Printable Version? You can purchase the ad-free, printable PDF of this crochet bucket hat pattern! It includes all the same information as the free version + lots more. It’s just in a more convenient, easy-to-read format… perfect for crocheting on-the-go (or on the couch!).
This crochet bucket hat pattern is also part of a matching bundle available in my Etsy shop! The bundle includes the Sunny Stitches Hat, Delightful Days Dress, and Radiant Rays Blanket—perfect for handmade gifts or a complete summer look.

Ad-Free Download
PDF PRINTABLE PATTERN
- Easy-to-read (no ads!)
- Print-friendly & tablet-friendly
- Bonus sections: Sunburst motif, schematic & extra colour photos
Thank you for supporting my shop!
Free Crochet Bucket Hat Pattern: Sunny Stitches Hat
Please carefully read all the information below in order to make the Sunny Stitches Hat – a free crochet bucket hat pattern.
Level

“Projects may include simple stitch patterns, color work, and/or shaping”.
Source: Craft Yarn Council of America’s www.YarnStandards.com
Watch The
VIDEO TUTORIAL
Crochet along with me to make the Sunny Stitches Hat! Just click on the play button below (you can view the full tutorial on the Maisie and Ruth YouTube channel).
Pattern Notes
- US crochet terminology used throughout.
- A step-by-step video tutorial is available on YouTube
- The Instructions are written for sizes 0 (newborn) to adult. Changes for the various sizes will be given throughout the pattern.
- You can use any #3 / light worsted / DK / 8 ply yarn for this project, providing you meet the gauge as detailed below.
- In this pattern, I use Colour C (purple shade) as my main colour. But you could use Colour A (yellow) or Colour D (pink) as the main colour.
- The sunburst granny square, crown and brim are all worked in rounds.
- For a neater look, you can substitute the ch2 at the start of rounds with a stacked double crochet. Please see the video tutorial for a demonstration on how to work these stitches.
- For beginners, it will be helpful to place a stitch marker in the first stitch made at the beginning of each round.
- The brim for the adult is slightly different compared with the child version. The adult hat is designed so you can easily turn up the brim. If you would like this feature for any child size, please follow the instructions for the adult brim and work into the FLOs only for round 1.
- Support for my crochet patterns is available exclusively through my Facebook Group. If you’d like help or have questions while working through a pattern, I encourage you to join the group, connect with other members, and support one another along the way!
- Please note: if you wish to modify the patterns in any way, you’ll need to make those changes on your own, as I’m unable to provide assistance for alterations.
Materials
Yarn:
DK / #3 / 8 Ply
Sirdar Stories, 153 yds / 1.8 oz (140m / 50g) in the following colours:
Yarn A – Glowsticks (yellow)
Yarn B – Chill (blue)
Yarn C – Dreamers (purple)
Yarn D – Bestie (pink)
Yarn E – Invite (off-white)
*Yarn amounts for each size can be found in the table below.
Crochet Hook:
Check the table below.

Yarn Substitutes
If using a substitute, remember to check your gauge / tension (details below) and adjust your hook size up or down.
Premier Yarns Cotton Fair 3.5oz. / 317 yds (100g / 290m)
Paintbox Yarns Cotton Mix DK 3.5oz. / 268yds (100g / 245m)
Rico Baby Cotton Soft 1.8oz. / 137 yds (50g / 125m)
Brava Sport 3.5oz. / 340 yds (100g / 310m
Other Materials
- Yarn needle (for weaving in ends)
- Scissors
- 1x stitch marker
- Measuring tape
Gauge / Tension
In order to achieve the correct size and fit for this crochet bucket hat pattern, it’s important to test your gauge (tension) with a sample sunburst square before you begin.
For sizes 0-3 months and with a 3mm crochet hook, each sunburst square measures 3″ / 7.5cm
For sizes 3-6 months and with a E / 3.5mm crochet hook, each sunburst square measures 3.5″ / 9cm
For sizes 6-12 months and with a G / 4mm crochet hook, each sunburst square measures 4″ / 10cm
For sizes 1-3 years and ADULT, and with a 4.5mm crochet hook, each sunburst square measures 4.5″ / 11cm
For sizes 3-10 years and with a 5mm crochet hook, each sunburst square measures 5″ / 12.5cm
If your tension is tight and your square is smaller (by more than ¼ inch / 1cm), try using a larger hook.
If your tension is loose and your square is larger (by more than ¼ inch / 1cm), use a smaller hook.
Finished Size

Hat Construction
This stylish crochet bucket hat is worked entirely in rounds and built in four main stages:
Sunburst Granny Squares:
- Begin by crocheting the sunburst granny squares. For child sizes (0–10 years): make 4 squares. For the adult size: make 5 squares.
Joining the Squares:
- Once the squares are complete, join them together in a circle to form the decorative band of the hat.
- Use a quick and easy joining method of single crochets and chains. This creates a flexible – yet sturdy – band to support the crown and brim.
Crown Construction:
- The crown (top of the hat) is crocheted separately.
- After completing the crown, attach it to the band of squares using the same joining method—single crochets and chains—ensuring a neat look.
Brim Formation:
- Reattach the yarn at the base of the band to work the brim in the round.
- The brim is made using groups of three double crochet stitches, which makes for a fast and easy finish.
- For the adult size, the first round of the brim is worked through the front loops only to allow you to easily turn it back.
Finishing Touches (Child Sizes):
- To complete the hat for child sizes, add a pretty border in a contrasting colour around the edge of the brim, giving it a playful look.
Stitches & Abbreviations (US Crochet Terms)
beg – beginning
ch(s) – chain(s)
dc – double crochet: Yarn over (yo), insert hook into stitch, yo, pull up a loop (3 loops on hook). Yo, pull through 2 loops (2 loops on hook). Yo, pull through remaining 2 loops. 1 double crochet completed.
FLO – front loop only. Work into the front loop only of the stitch.
hdc – half double crochet: Yarn over (yo), insert hook into stitch, yo, pull up a loop (3 loops on hook). Yo, pull through all 3 loops. 1 half double crochet completed.
sc – single crochet: Insert hook into stitch, yarn over (yo), pull up a loop (2 loops on hook). Yo, pull through both loops on hook. 1 single crochet completed.
sk – skip: Do not crochet into this stitch / space.
sl st – slip stitch: Insert hook into stitch, yarn over (yo), pull up a loop, you will have 2 loops on your hook. Pull the first loop through the second loop. 1 slip stitch completed.
sp(s) – space(es)
st(s) – stitch(es)
StDC – stacked double crochet (see video tutorial for a demo)
* to * – Repeat instructions between asterisks as many times as directed.
( ) – Sets of stitches to be worked within one stitch or space.
[ ] – The total number of stitches at the end of a row.
Special Stitches
2dcCL – 2 Double Crochet Cluster: Yarn over (yo), insert hook into stitch, yo, pull up a loop (3 loops on hook), yo, pull through 2 loops (2 loops remain on hook). Yo, insert hook into same st, yo, pull up a loop (4 loops on hook). Yo, pull through 2 loops (3 loops on hook), yo, pull through all 3 loops. One 2dcCL made.
3dcCL -3 Double Crochet Cluster: Yarn over (yo), insert hook into stitch (or space), yo, pull up a loop (3 loops on hook), yo, pull through 2 loops (2 loops remain on hook). Yo, insert hook into same st (or space), yo, pull up a loop (4 loops on hook). Yo, pull through 2 loops (3 loops remain on hook). Yo, insert hook into same st (or space), yo pull up a loop (5 loops on hook), yo, pull through 2 loops (4 loops on hook). Yo, pull through all 4 loops. One 3dcCL made.
4dcCL – 4 Double Crochet Cluster: Yarn over (yo), insert hook into chain 1 space (ch1 sp), yo, pull up a loop (3 loops on hook), yo, pull through 2 loops (2 loops remain on hook). Yo, insert hook into same ch1 sp, yo, pull up a loop (4 loops on hook), yo, pull through 2 loops (3 loops remain on hook). Yo, insert hook into same ch1 sp, yo, pull up a loop (5 loops on hook), yo, pull through 2 loops (4 loops remain on hook). Yo, insert hook into same st, yo, pull up a loop (6 loops on hook), yo, pull though 2 loops (5 loops on hook), yo, pull through all 5 loops. One 4dcCL made.
Colourways
SQUARE A
Use A for 6ch ring.
Round 1 – colour A
Round 2 – colour D
Round 3 – colour B
Round 4 – colour E
Round 5 – colour C
SQUARE B
Use A for 6ch ring.
Round 1 – colour A
Round 2 – colour B
Round 3 – colour D
Round 4 – colour E
Round 5 – colour C
SQUARE C
Use A for 6ch ring.
Round 1 – colour A
Round 2 – colour C
Round 3 – colour D
Round 4 – colour E
Round 5 – colour C
SQUARE D
Use A for 6ch ring.
Round 1 – colour A
Round 2 – colour B
Round 3 – colour C
Round 4 – colour E
Round 5 – colour C
SQUARE E
Use A for 6ch ring.
Round 1 – colour A
Round 2 – colour C
Round 3 – colour B
Round 4 – colour E
Round 5 – colour C
Instructions
Sunburst Granny Square
(Refer to hook sizes in ‘Materials’ above. Colourways of squares A-E are detailed in the ‘Colourway’ section above).
Child sizes (0-10 years): make 4 squares: 1 each of squares A – D
Adult size: make 5 granny squares: 1 each of squares A – E
With Colour A (all squares):
Make a magic ring or ch6 and sl st to 1st ch to form a ring.
Round 1. Ch2 (counts as your first st) or make a StDC (see video tutorial), 15dc into ring, sl st to top of beg ch2 or StDC to join, [16 sts].
Cut yarn, fasten off and weave in ends.
Attach next colour to any st with a sl st.
Round 2. Ch2 (does not count as your first st), 1dc in same st (ch2 & 1dc count as 1st 2dcCL), ch1, *2dcCL in next st, ch1*, repeat from * to * 15 times in total, sl st to 1st dc to join, [1dc, 15x 2dcCL sts, 16x ch1 sps].
Cut yarn, fasten off and weave in ends.
Attach next colour to any ch1 sp with a sl st.
Round 3. Ch2 (does not count as your first st), 3dcCL in same ch1 sp (ch2 & 3dcCL counts as 1st 4dcCL), ch2, *4dcCL in next ch1 sp, ch2*, repeat from * to * 15 times in total, sl st to 1st 3dcCL st to join, [1x 3dcCL, 15x 4dcCL sts, 16x ch2 sps).
Cut yarn, fasten off and weave in ends.
With Colour E (all squares), attach yarn to any ch2 sp with a sl st.
Round 4. Ch2 (counts as your first st) or make a StDC (see video tutorial), 2dc in same ch2 sp, (3hdc in next ch2 sp) 3 times, *(3dc, ch2, 3dc) in next ch2 sp, (3hdc in next ch2 sp) 3 times*, repeat from * to * 3 times in total, 3dc in 1st ch2 sp of round, ch1, sl st to top of beg ch2 or StDC to join, [12x groups of hdc sts, 8x groups of dc sts, 4x ch2 spaces].
Cut yarn, fasten off and weave in ends.
With Colour C (all squares), attach yarn to any ch2 sp in the corner with a sl st.
Round 5. Ch2 (counts as your first st) or make a StDC, 2dc in same ch2 corner sp (3hdc in sp in between each group of 3hdc) 4 times, *(3dc, ch2, 3dc) in next ch2 corner sp, (3hdc in sp in between each group of 3hdc) 4 times*, repeat from * to * 3 times in total, 3dc in 1st ch2 corner sp of round, ch1, sl st to top of beg ch2 / StDC or make an invisible join, [16x groups of hdc sts, 8x dc sts, 4x ch2 sps]. Cut yarn, fasten off, weave in ends.

💡 Tired of scrolling?
You can grab the printable, ad-free PDF version of the Sunny Stitches Hat here:
It’s much easier to follow and perfect for printing or using on your mobile or tablet.
Arrangement of Squares
Arrange your squares (for the size you are working on) as seen in the diagram below:

Joining Squares
The following method is fast, simple, and great for all skill levels—perfect when you want a no-stress way to assemble your hat. This technique creates a soft, flexible seam that stretches nicely and keeps the hat comfortable to wear.
To begin, line up the first two squares by placing them on top of each other. The wrong sides of both squares should be facing out:
- With Colour C, place a slip knot on your hook and insert it into the ch2 corner sp of the square on top. Then slide your hook through the corresponding ch2 sp of the square on the bottom. Make a single crochet.
- Then chain 3.
- Move along to the space in between the next 2 groups of 3dc stitches on the top square, insert your hook through the space and push it through to the corresponding space of the bottom square. Make a single crochet.
- Repeat steps 2 and 3 along to the next two corners.
- Work a single crochet through the last two ch2 corner spaces. Chain one, fasten off and weave in ends.
- Grab the next square, place it on top of one of the squares you just joined together and repeat the process along one side from step 1.
- Repeat for all squares until you have formed a strip. {photo 6}.
- Once you have created a strip, join the first and last square to form a band / circle, which is the main body of the hat.
Crown (Child 0-10 Years)
With Colour C:
Make a magic circle or ch6 and then sl st to 1st ch to form a ring.
Round 1. Ch2 (counts as your first st) or make a StDC, ch1, (1dc, ch1) 6 times into the centre of ring, sc to top of beg ch2 / StDC to join [7 sts and 7x ch1 sps].
Round 2. Ch2 or make a StDC in sp immediately below sc just made in last round, (ch1, 1dc, ch1) in same sp (1st V-st made), (V-st, ch1 in next ch1-sp) 6 times until end, sc to top of beg ch2 / StDC to join [7 V-sts and 7x ch1 sps].
Round 3. Ch2 or make a StDC in sp immediately below sc just made in last round, (1dc, ch1) in same sp, (2dc, ch1 in next ch1-sp) 13 times until end, sc to top of beg ch2 / StDC to join [14 groups of 2dc sts and 14x ch1 sps].
Round 4. Ch2 or make a StDC in sp immediately below sc just made in last round, (ch1, 1dc, ch1) in same sp (1st V-st made), (V-st, ch1 in next ch1-sp) 13 times until end, sc to top of beg ch2 / StDC to join [14 V-sts and 14x ch1 sps].
Round 5. Ch2 or make a StDC in sp immediately below sc just made in last round, (1dc, ch1) in same sp, (2dc, ch1 in next ch1-sp) 27 times until end, sc to top of beg ch2 / StDC to join [28 groups of 2dc sts and 28x ch1 sps].
Round 6. Repeat round 5, making sure to end with a sl st to top of beg ch2 / StDC to join [28 groups of 2dc sts & 28x ch1 sps]. DO NOT CUT YARN.
Crown (Adult)
With Colour C:
Make a magic circle or ch6 and then sl st to 1st ch to form a ring.
Round 1. Ch2 (counts as your first st) or make a StDC, ch1, (1dc, ch1) 8 times into the centre of ring, sc to top of beg ch2 / StDC to join [9 sts and 9x ch1 sps].
Round 2. Ch2 or make a StDC in sp immediately below sc just made in last round, (ch1, 1dc, ch1) in same sp (1st V-st made), (V-st, ch1 in next ch1-sp) 8 times until end, sc to top of beg ch2 / StDC to join [9 V-sts and 9x ch1 sps].
Round 3. Ch2 or make a StDC in sp immediately below sc just made in last round, (1dc, ch1) in same sp, (2dc, ch1 in next ch1-sp) 17 times until end, sc to top of beg ch2 / StDC to join [18 groups of 2dc sts and 18x ch1 sps].
Round 4. Ch2 or make a StDC in sp immediately below sc just made in last round, (ch1, 1dc, ch1) in same sp (1st V-st made), (V-st, ch1 in next ch1-sp) 17 times until end, sc to top of beg ch2 / StDC to join [18 V-sts and 18x ch1 sps].
Round 5. Ch2 or make a StDC in sp immediately below sc just made in last round, (1dc, ch1) in same sp, (2dc, ch1 in next ch1-sp) 35 times until end, sc to top of beg ch2 / StDC to join [36 groups of 2dc sts and 36x ch1 sps].
Round 6. Repeat round 5, [36 groups of 2dc sts and 36x ch1 sps].
Round 7. Repeat round 6, making sure to end with a sl st to top of beg ch2 / StDC to join [36 groups of 2dc sts and 36x ch1 sps]. DO NOT CUT YARN.
Join Crown To Hat
This joining method is quick, easy, and beginner-friendly, making it perfect for assembling your hat without any fuss. By working single crochets and chains through every space, you create a clean, stretchy, and flexible join that’s comfortable to wear and moves naturally with the fabric. Plus, with the wrong sides facing out, the seam will be neatly hidden on the inside when the hat is turned right side out.
- Position the pieces as seen in the photo below.

- Lay the crown and band with the wrong sides facing out.
- Colour C should still be on your hook – insert it into the ch2 corner sp of the square on top. Make a single crochet.
- Then chain 3.
- Go back to the crown and move along to the space in between the next 2 groups of 3dc stitches, insert your hook through this space and then push it through to the corresponding space of the square on top. Make a single crochet.
- Repeat steps 4 and 5 (move to the next space on both the crown and the band) all around the edge until you get back to the beginning of the round.
- When you reach the starting point, slip stitch to the first space to close the round.
- Fasten off and weave in ends.
REMEMBER: You can watch this joining technique in the video tutorial.
Brim (Child 0-10 Years)
With Colour C:
Go to the ch2 corner sp of any square at the back of the hat and attach yarn with a sl st into the space.
Round 1. Ch2 (counts as your first st) or make a StDC, (2dc, ch1) in same sp,
*(3dc, ch1) in sp in between each group of 3hdc*, repeat from * to * until end of round, making sure to work (3dc, ch1) in each ch2 corner sp of each square, sc to top of beg ch2 or StDC, [28 groups of 3dc sts].
Round 2. Ch2 (counts as your first st) or make a StDC, (2dc, ch1) in same sp,
*(3dc, ch1) in each ch-1 sp*, repeat from * to * until end, sl st to top of beg ch2 or StDC to join, [28 groups of 3dc sts].
Cut yarn, fasten off and weave in ends.
(OPTIONAL): Change to Colour E and attach yarn with a sl st to the top of any st:
Round 3. Ch1 (does not count as your first st), *(sl st, ch1) in next st*, repeat from * to * until end of round (do not work into the ch1-sps), sl st at bottom of beg sl st to join.
Cut yarn ,fasten off and weave in ends.
Brim (Adult)
With Colour C:
Go to the ch2 corner sp of any square at the back of the hat and attach yarn with a sl st into the FLO of any chain. {photo 12}
Round 1. Ch2 (counts as your first st) or make a StDC, (2dc, ch1) in FLO of same ch, *sk next 3 sts, (3dc, ch1) in FLO of next st, **sk next 2 sts, (3dc, ch1) in FLO of next st***, repeat from ** to *** until next square corner, work (3dc, ch1) in FLO of ch at both square corners (at each seam)****, repeat from * to **** until end of round, sc to top of beg ch2 / StDC to join [35 groups of 3dc sts]. {photo 13}
Round 2. Ch2 (counts as your first st) or make a StDC, (2dc, ch1) in same sp,
*(3dc, ch1) in each ch-1 sp*, repeat from * to * until end of round, sc to top of beg ch2 or StDC to join, [28 groups of 3dc sts].
Round 3. Repeat round 2 but end with a sl st to top of beg ch2 or StDC to join, [28 groups of 3dc sts].
Cut yarn, fasten off and weave in ends.
Your Sunny Stitches Hat is now finished! If you’d like to enjoy this pattern without the ads, you can purchase the ad-free PDF here.

Adult hat with the brim turned up (bottom left photo). This style of brim differs from the child version. If you would like this feature for any child size, please follow the instructions for the adult brim and work into the FLOs only for round 1.
PATTERN SUPPORT
Need Help with a Pattern?
We’ve got you! 😊
If you need a hand, come hang out with us in our Facebook group—it’s the best place to ask questions, share your makes, and cheer each other on.
We’ve also put together a step-by-step YouTube tutorial you can follow along with—this should answer most of your questions along the way!
Pop into the Facebook group and join our cozy little community—we’d absolutely love to see you there!💛
COPYRIGHT
Copyright © 2025 by Maisie and Ruth Limited. All rights reserved. This children’s crochet dress pattern is for personal viewing only. You may view it for free on this blog, but it is protected under applicable copyrights, trademarks, and other proprietary (including but not limited to intellectual property) rights.
You may not copy, redistribute, or sell this pattern in any form, including digital, printed or photographic formats without permission. Sharing this pattern (in whole or in part) on social media, websites, or messaging platforms is strictly prohibited. This is a theft of the author’s intellectual property, which may result in civil or criminal penalties.
Thank you for respecting my work and for your continued support — it truly means a lot!
SHARE YOUR WORK!
I really hope that you enjoyed this free crochet pattern! I would LOVE to see photos of your completed project… please tag me on Instagram using @maisieandruth and / or #maisieandruth
And remember to pin this pattern for later if you can’t make it right now!
Frequently Asked Questions (FAQ)
Can I get a printable PDF of this crochet bucket hat pattern?
Yes! While the full Sunny Stitches Bucket Hat Pattern is free in this blog post, you can purchase a printable, ad-free PDF version in my Etsy shop. It’s perfect for crocheting on the go or keeping in your project folder.
What sizes are included in this pattern?
This crochet bucket hat pattern includes instructions for baby, toddler, child, and adult sizes—so you can make matching hats for the whole family!
Is this an easy pattern for beginners?
Yes! This pattern is beginner-friendly and uses basic stitches like double crochet, single crochet, and chains, along with simple granny square construction. If you’re comfortable working in the round, you’ll do great.
What yarn is best for this pattern?
A light cotton or cotton-blend yarn works best for a breathable, structured summer hat. DK or light worsted weight yarns are recommended for this pattern.
Is this hat part of a crochet set?
Yes! The Sunny Stitches Hat is part of a coordinating crochet bundle available in my Etsy shop. The bundle includes the bucket hat, a matching baby dress, and a cozy blanket—perfect for gifts or summer photoshoots!
Can I sell items made from this pattern?
Absolutely! You’re welcome to sell finished items made from this pattern, just please credit me as the designer and link back to this post or my Etsy shop when possible (mass production or factory manufacturing of items using this pattern is not permitted).


