


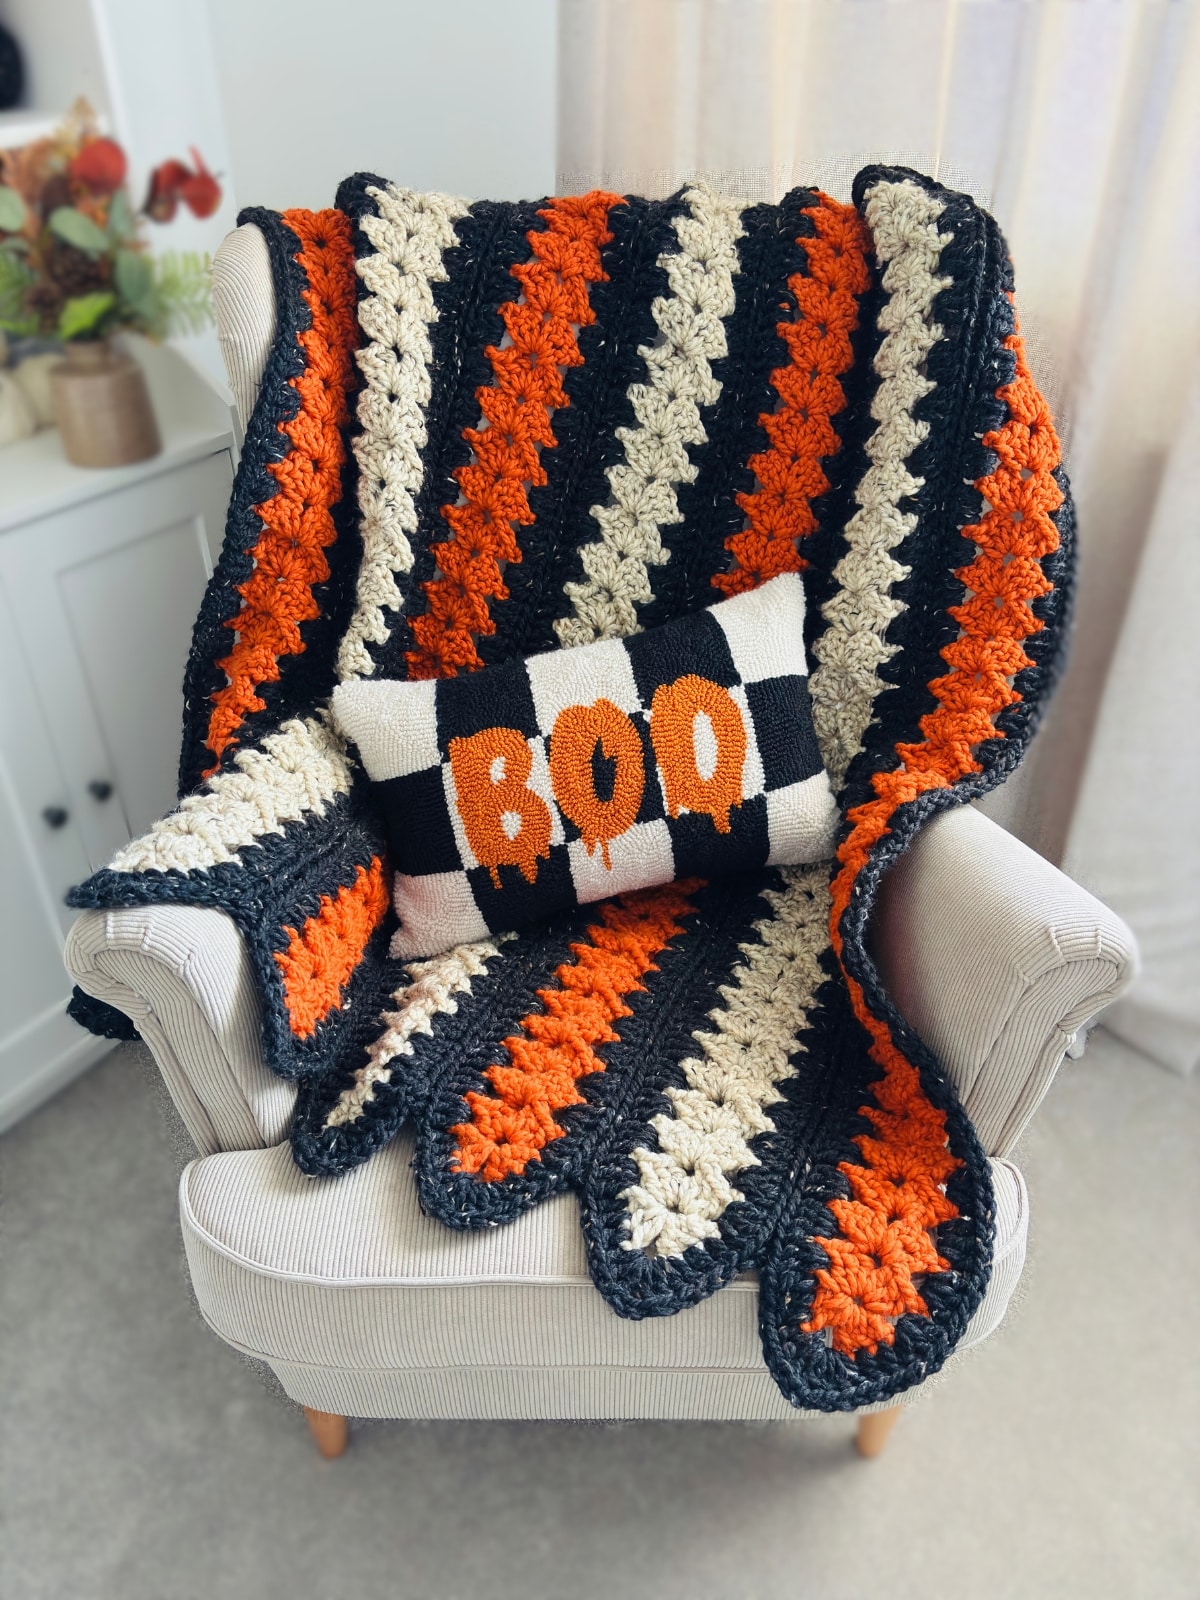
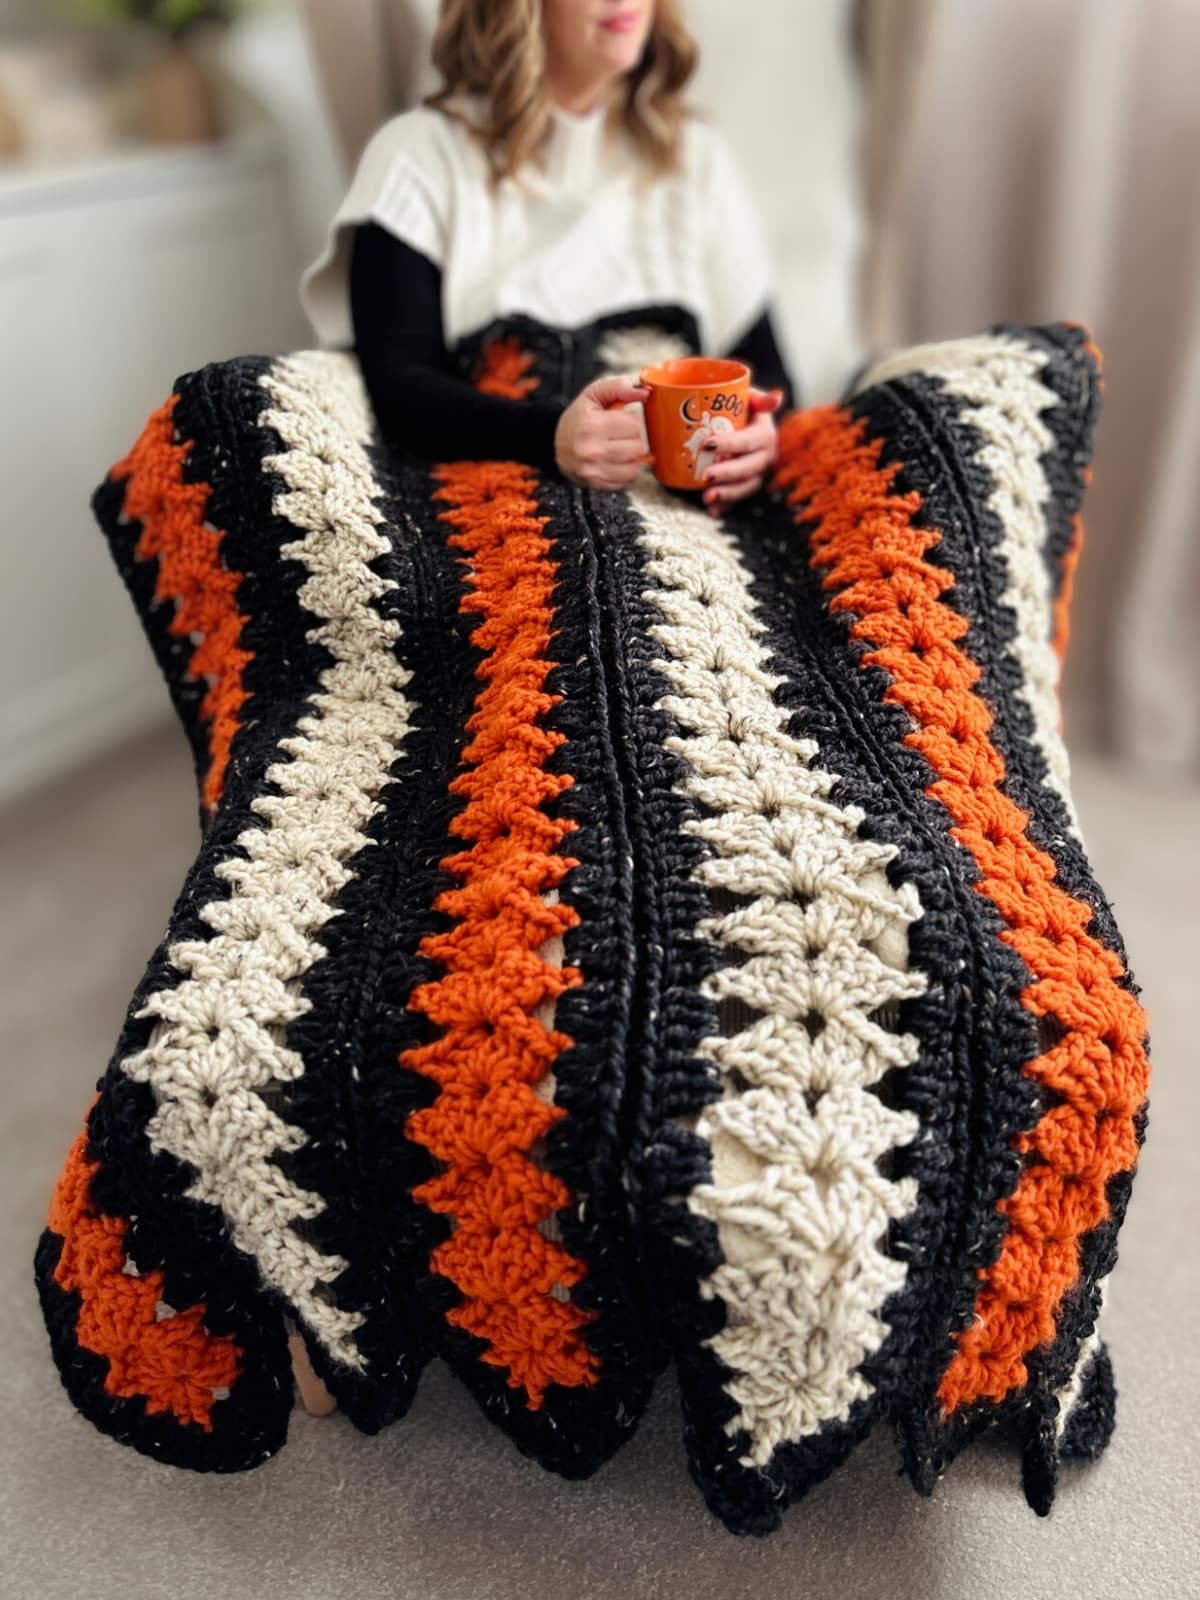
Meet the Spooky Strips Halloween Mile-a-Minute Crochet Blanket! This striking blanket is worked up in long strips of pumpkin orange, flecked oatmeal, and deep obsidian yarn – perfect colors for cozy Halloween vibes.
Best of all, this is a FREE crochet pattern and comes with a step-by-step YouTube video tutorial to help you along the way! You can also purchase the ad-free PDF pattern for easy offline access.
Key Features of the Spooky Strips Blanket
- Free pattern + video: Follow along at your own pace with written instructions (US crochet terms) and a YouTube tutorial.
- Beginner-friendly: If you can double crochet and chain, you can make this blanket!
- Mile-a-minute method: Work strips individually, then join them – easy project to take on the go.
- Super bulky yarn = quick project: Made with super chunky yarn, this blanket works up fast and feels extra plush.
- Seasonal and cozy: The colors (pumpkin, oatmeal, and obsidian) bring a touch of Halloween charm. After the spooky season, it’ll also keep you warm all winter long.
- Customizable: Adjust the number of strips — or their length — to make a baby blanket, or any other preferred size.
Why Make a Halloween Mile-a-Minute Crochet Blanket?
The mile-a-minute method is a classic crochet technique where you work up long, narrow strips and then join them together. It’s perfect if you love portable projects or want to see fast progress without tackling a giant blanket all at once.
Each strip feels like a mini project, and when joined, they create a striking, cohesive design.

How Long Does It Take to Make the Mile-a-Minute Blanket?
One of the best things about the mile-a-minute method is how fast and satisfying it is. Because you’re working in strips instead of tackling a huge blanket all at once, each piece feels quick and manageable. Plus, as it’s made with a super bulky yarn and 12mm crochet hook, it works up in record time!
On average:
- Crochet one strip: about 1 hour of crocheting time (30 minutes if you’re fast).
- Join strips together: around 45 minutes.
- Total crochet time: just under 8 hours!
Of course, your timing may vary based on your crochet experience and how much time you set aside each day. Many crocheters love that this project can be done a little at a time — the strips are portable, so you can work on them during breaks, road trips, or cozy evenings.
If you’ve been looking for a blanket you can finish in a weekend, this is a perfect choice.

Skill Level & Stitches Used
The Spooky Strips Mile-a-Minute Blanket is a beginner-friendly project that’s easy to pick up, even if you’ve never made a blanket before. If you can crochet the following stitches, you’ll be all set:
- Chain (ch)
- Double Crochet (dc)
- Slip Stitch (sl st) (for joining and finishing)
That’s it! The pattern is repetitive and soothing, making it a great “TV project” once you’ve got the rhythm down. The mile-a-minute construction also makes it less intimidating than working on one huge piece — you’re simply making strips, then joining them into a blanket.
This combination of simplicity and striking results makes Spooky Strips a great choice for confident beginners and seasoned crocheters alike.

Cozy Ways to Use Your Spooky Strips Blanket
- Snuggle under it during Halloween movie marathons
- Drape it over your couch for cozy autumn décor
- Keep warm while roasting marshmallows at the campfire
- Gift it to a Halloween-loving friend


The Yarn: Lion Brand Wool-Ease Thick & Quick
The Spooky Strips blanket was designed with Halloween in mind, so I chose the colours pumpkin (orange), oatmeal (beige), and obsidian (black) from the Lion Brand Wool Ease Thick and Quick range.
This yarn is a super bulky #6 weight, which means it works up quickly and creates a warm, cushy fabric that’s perfect for blankets. I recently discovered this yarn and I absolutely love it! It’s definitely one of the first yarns I now reach for when designing my cozy fall / winter projects.

Hugely popular with everyone else also, Wool-Ease Thick & Quick is a blend of wool and acrylic, giving you the best of both worlds: the softness and warmth of wool, plus the durability and easy care of acrylic. It glides smoothly on the hook, is easy to frog if needed, and doesn’t split – making it especially beginner-friendly.
One of the other things I love about this yarn is the beautiful range of colours. The flecked shades like Oatmeal and Obsidian add depth and interest compared to plain solid colours, while the vibrant Pumpkin ties everything together for a vibrant pop. Together, these shades give the blanket texture, warmth, and that perfect Halloween feel.

Yarn Substitutes
If you can’t get your hands on Lion Brand Wool-Ease Thick & Quick, don’t worry — there are plenty of great alternatives. Look for a super bulky (#6) yarn that’s soft, cozy, and easy to work with. A few good options include:
- Bernat Softee Chunky – soft and lightweight for a super bulky. Works up quickly.
- Stylecraft Special XL – popular yarn for blankets, accessories and garments.
- Premier Basix Super Chunky – available in many shades, great if you want to experiment with different palettes.
- Lion Brand Hometown – another excellent bulky option from Lion Brand, 100% acrylic and easy-care.
If you substitute, just make sure to check yardage per ball so you buy enough for your blanket.

How to Customize Your Spooky Strips Blanket
Want a baby blanket? Simply make shorter strips and use fewer of them. Want an even bigger-sized afghan? Work longer strips and join as many as needed until you reach the perfect size.
You can also experiment with different colour palettes: try jewel tones for a winter feel, or pastels for spring. You’ll not be short on ideas with the gorgeous Wool Ease Thick and Quick range of colours.
Whether you’re snuggling up for a scary movie night, decorating your couch for autumn, or making a handmade gift for a Halloween-loving friend, the Spooky Strips blanket is a quick, portable, and satisfying project.

Pin Me For Later!


Ready to get started? Grab your yarn and hook, and let’s dive into the Spooky Strips mile-a-minute crochet blanket pattern!

Print This Pattern
Prefer a Printable Version? You can purchase the ad-free, printable PDF of this Halloween Mile-A-Minute Crochet Blanket Pattern! It includes all the same information as the free version… it’s just in a more convenient, easy-to-read format… perfect for crocheting on-the-go (or on the couch!)

Ad-Free Download
PDF PRINTABLE PATTERN
- Easy-to-read (no ads!)
- Print-friendly & tablet-friendly
- Yours to keep and use forever
Thank you for supporting my shop!
Free Pattern: Spooky Strips Halloween Mile-A-Minute Crochet Blanket
Please carefully read all the information below in order to make the Spooky Strips Blanket – a Halloween mile-a-minute crochet blanket pattern.
Level

“Projects may include simple stitch patterns, color work, and/or shaping”.
Source: Craft Yarn Council of America’s www.YarnStandards.com
Watch The
VIDEO TUTORIAL
Crochet along with me to make the Spooky Strips Halloween mile-a-minute crochet blanket! Just click on the play button below (you can view the full tutorial on the Maisie and Ruth YouTube channel).
Pattern Notes
- US Crochet Terminology used throughout.
- A step-by-step video tutorial is available on YouTube.
- You can use any #6 / super bulky (chunky) / DK / 14 ply yarn for this project, providing you meet the gauge detailed below.
- Blanket is worked in long strips using the mile-a-minute pattern. The strips are then joined together.
- Strip length is easily adjustable – make longer or shorter depending on desired blanket size (this will affect the amount of yarn required).
- Blanket can be made with as few or as many strips as desired – simply add more strips for a larger size.
- Joining method may be customized (e.g. slip stitch, single crochet, whip stitch).
- Solid colours used for this pattern. If you opt for Wool Ease Thick & Quick yarn from the prints, stripes or metallics range, the ball weight and yardage differs.
- Great for using up leftover yarn or experimenting with seasonal colour palettes.
- Please note: if you wish to modify the patterns in any way, you’ll need to make those changes on your own, as I’m unable to provide assistance for alterations.
Materials
Yarn
#6 / super-bulky (chunky) / 14 ply yarn
Lion Brand Wool-Ease Thick & Quick, 106 yds / 6 oz (97m / 170g) in the following colours:
Yarn A – Pumpkin (orange): 4 balls (344 yds required)
Yarn B – Oatmeal (beige): 3 balls (255 yds required)
Yarn C – Obsidian (black): 5 balls (525 yds required)
Crochet Hook
12mm. I highly recommend the Clover Amour crochet hook
Extras
2x stitch marker (optional); yarn needle for weaving in ends; scissors
Yarn Substitutes
If you substitute, just make sure to check yardage / meters per ball so you buy enough for your blanket.
Bernat Softee Chunky 3.5oz. / 108yds (100g / 99m)
Stylecraft Special XL 7oz. / 149 yds (200g / 136m)
Premier Basix Super Bulky 5.29oz. / 98 yds (150g / 90m)
Lion Brand Hometown 5oz. / 81 yds (142g / 74m)
Gauge / Tension
With a Size 12mm crochet hook, follow the pattern (excluding the strip edging): width of strip = 4 inches (10 cm) and 5 shells (3dc, ch2, 3dc) = 8 inches (20 cm).
If your tension is tight and your work is smaller, try using a larger hook. If your tension is loose and your work is larger, use a smaller hook.
Finished Size
Finished width – 42 IN (107 CM)
Finished Length – 60 IN (152 CM)
Stitches & Abbreviations (US Crochet Terms)
beg – beginning
ch(s) – chain(s)
dc – double crochet: Yarn over (yo), insert hook into stitch, yo, pull up a loop (3 loops on hook). Yo, pull through 2 loops (2 loops on hook). Yo, pull through remaining 2 loops. 1 double crochet completed.
sl st – slip stitch: Insert hook into stitch, yarn over (yo), pull up a loop, you will have 2 loops on your hook. Pull the first loop through the second loop. 1 slip stitch completed.
sp(s) – space(es)
st(s) – stitch(es)
turn – I prefer to turn my work clockwise.
( ) – Sets of stitches to be worked within one stitch or space.
[ ] – The total number of stitches at the end of a row.
Instructions
Strip Pattern
Make 7 strips in total:
4 strips will be made with Main Colour A and Edging Colour C.
3 strips will be made with Main Colour B and Edging Colour C.
With Main Colour A or B:
Ch 7
Row 1. Working through both loops of the chain: (2dc, ch2, 2dc) in 4th ch from hook (skipped 3 chs count as 1st dc), sk next 2 chs, sl st in last ch (counts as last dc), [2 clusters of 3dc, separated by a ch2-sp].
At the end of row 1, flip your work. The stitches worked in row 1 should now be pointing down.
Row 2. Ch3, (3dc, ch2, 3dc) in center ch, 1dc in 3rd ch from previous row, TURN.
Row 3. Ch3, (3dc, ch2, 3dc) in ch2-sp, 1dc in 3rd ch from previous row, TURN.
Repeat row 3 until you have a total of 34 rows.
At the end of row 34, cut yarn, fasten off and weave in ends.
Edging of Strip
There is no right or wrong side with your strip, however when working the border, I like to start with the right side of the last row facing out towards me.
With Edging Colour C:
Attach yarn with a sl st to last ch2-sp at top of strip.
Top of strip. (Ch2 [counts as 1st dc], 2dc, ch2, 3dc) in same ch2-sp, 1dc in next 3 sts.
First side. Work 3dc in each ch3-sp down 1st side of strip.
Bottom of strip. When you’ve worked 3dc in the last ch3-sp near the bottom of the strip, work as follows: 1dc in next 3 sts, (3dc, ch2, 3dc) in ch2-sp at bottom of strip, 1 dc in next 3sts.
Second side. Work 3dc in each ch3-sp up 2nd side of strip.
When you’ve worked 3dc in the last ch3-sp near the top of the strip, work 1dc in next 3 sts, sl st to top of beg ch2 to join round.
Cut yarn, fasten off and weave in ends.
💡 Tired of scrolling?
You can grab the printable, ad-free PDF version of the Spooky Strips Throw here:
It’s much easier to follow and perfect for printing or using on your mobile or tablet.
Arrangement of Strips
Lay the 7 strips side by side, according to the diagram below:

Joining Strips
Using the slip stitch seam, join your work along the dotted red lines as seen in the diagram above. You will only work into the groups of 3dc sts down the sides of the strip — not into the 12 stitches around the tip of the strip (marked with a red dot in the photo below):

The sts marked with a red dot (at each end of the strip) will not be joined together.
With Colour C, place slip knot on hook:
- To begin, line up the first two strips and place them on top of each other. The wrong sides of both strips should be facing out.
- Starting in the first group of 3dc, insert hook through the outside loop of the stitch of the strip on top. Then slide hook through the outside loop of the corresponding stitch of the strip on the bottom. Make a slip stitch.
- Move along to the next stitch on the top square, insert hook through the outside loop, then insert hook through the outside loop of the stitch on the bottom strip. Work a slip stitch.
- Repeat step 2 along one side of the strip until the last groups of 3dc have been joined.
- Cut yarn, fasten off and weave in ends.
- Repeat the process from step 1 above for each strip.

I hope you enjoy making your own Spooky Strips Halloween Mile-a-Minute Blanket! Whether you keep it for yourself or gift it to someone special, it’s sure to bring cozy Halloween charm for years to come. Don’t forget — while the full pattern and video tutorial are free here on the blog, you can also purchase the ad-free PDF version for easy printing and offline access.
If you make your own version, be sure to share it on social media with the hashtag #maisieandruth so we can all admire your spooky stitches!
Happy crocheting — may your autumn be full of warmth and spooky fun! 🧡👻🖤
PATTERN SUPPORT
Need Help with a Pattern?
We’ve got you! 😊
If you need a hand, come hang out with us in our Facebook group—it’s the best place to ask questions, share your makes, and cheer each other on.
We’ve also put together a step-by-step YouTube tutorial you can follow along with—this should answer most of your questions along the way!
Pop into the Facebook group and join our cozy little community—we’d absolutely love to see you there!💛
SHARE YOUR WORK!
I really hope that you enjoyed this free crochet pattern! I would LOVE to see photos of your completed project… please tag me on Instagram using @maisieandruth and / or #maisieandruth
And remember to pin this pattern for later if you can’t make it right now!
COPYRIGHT
Copyright © 2025 by Maisie and Ruth Limited. All rights reserved. This Halloween mile-a-minute crochet blanket pattern for the Spooky Strips Blanket is for personal viewing only. You may view it for free on this blog, but it is protected under applicable copyrights, trademarks, and other proprietary (including but not limited to intellectual property) rights.
You may not copy, redistribute, or sell this pattern in any form, including digital, printed or photographic formats without permission. Sharing this pattern (in whole or in part) on social media, websites, or messaging platforms is strictly prohibited. This is a theft of the author’s intellectual property, which may result in civil or criminal penalties.
Thank you for respecting my work and for your continued support — it truly means a lot!
Frequently Asked Questions (FAQ)
Q: Is the Spooky Strips blanket beginner-friendly?
A: Yes! If you know how to chain, double crochet, and single crochet, you’ll be able to make this blanket. The mile-a-minute method is simple and repetitive, making it a great project for confident beginners.
Q: How much yarn will I need?
A: Yardage will depend on the size you make. All the yarn requirements for this blanket are listed in the ‘Materials’ section above. Be sure to check yardage on your chosen yarn and it’s always a good idea to buy a little extra just in case.
Q: Can I use a different yarn?
A: Absolutely! I used Lion Brand Wool-Ease Thick & Quick, but you can substitute with any super bulky (#6) yarn. Just keep in mind that yardage may vary between brands, so adjust accordingly.
Q: Do I have to use Halloween colours?
A: Not at all. Pumpkin, oatmeal, and obsidian give this blanket a seasonal look, but you can choose any colour palette you like — pastels for spring, jewel tones for winter, or neutrals for everyday coziness.
Q: Is there a video tutorial?
A: Yes! I’ve included a full step-by-step YouTube tutorial to walk you through the pattern. It’s linked above in the post.
Q: Can I get a printable version of the pattern?
A: Yes! While the pattern is free here on the blog, you can purchase the ad-free PDF version for easy printing and offline use.


Amanda, thank you so much for a beautiful tutorial and pattern. Your website is just the best! I love your patterns and how you teach so well. Im going to get this yarn and try this pattern. thank you for all your teaching.
Thank you for your lovely comment, Charlotte! 🥰 It means a lot that my designs are inspiring you! Enjoying curling up with your yarn and hook, and working on this blanket 🧡