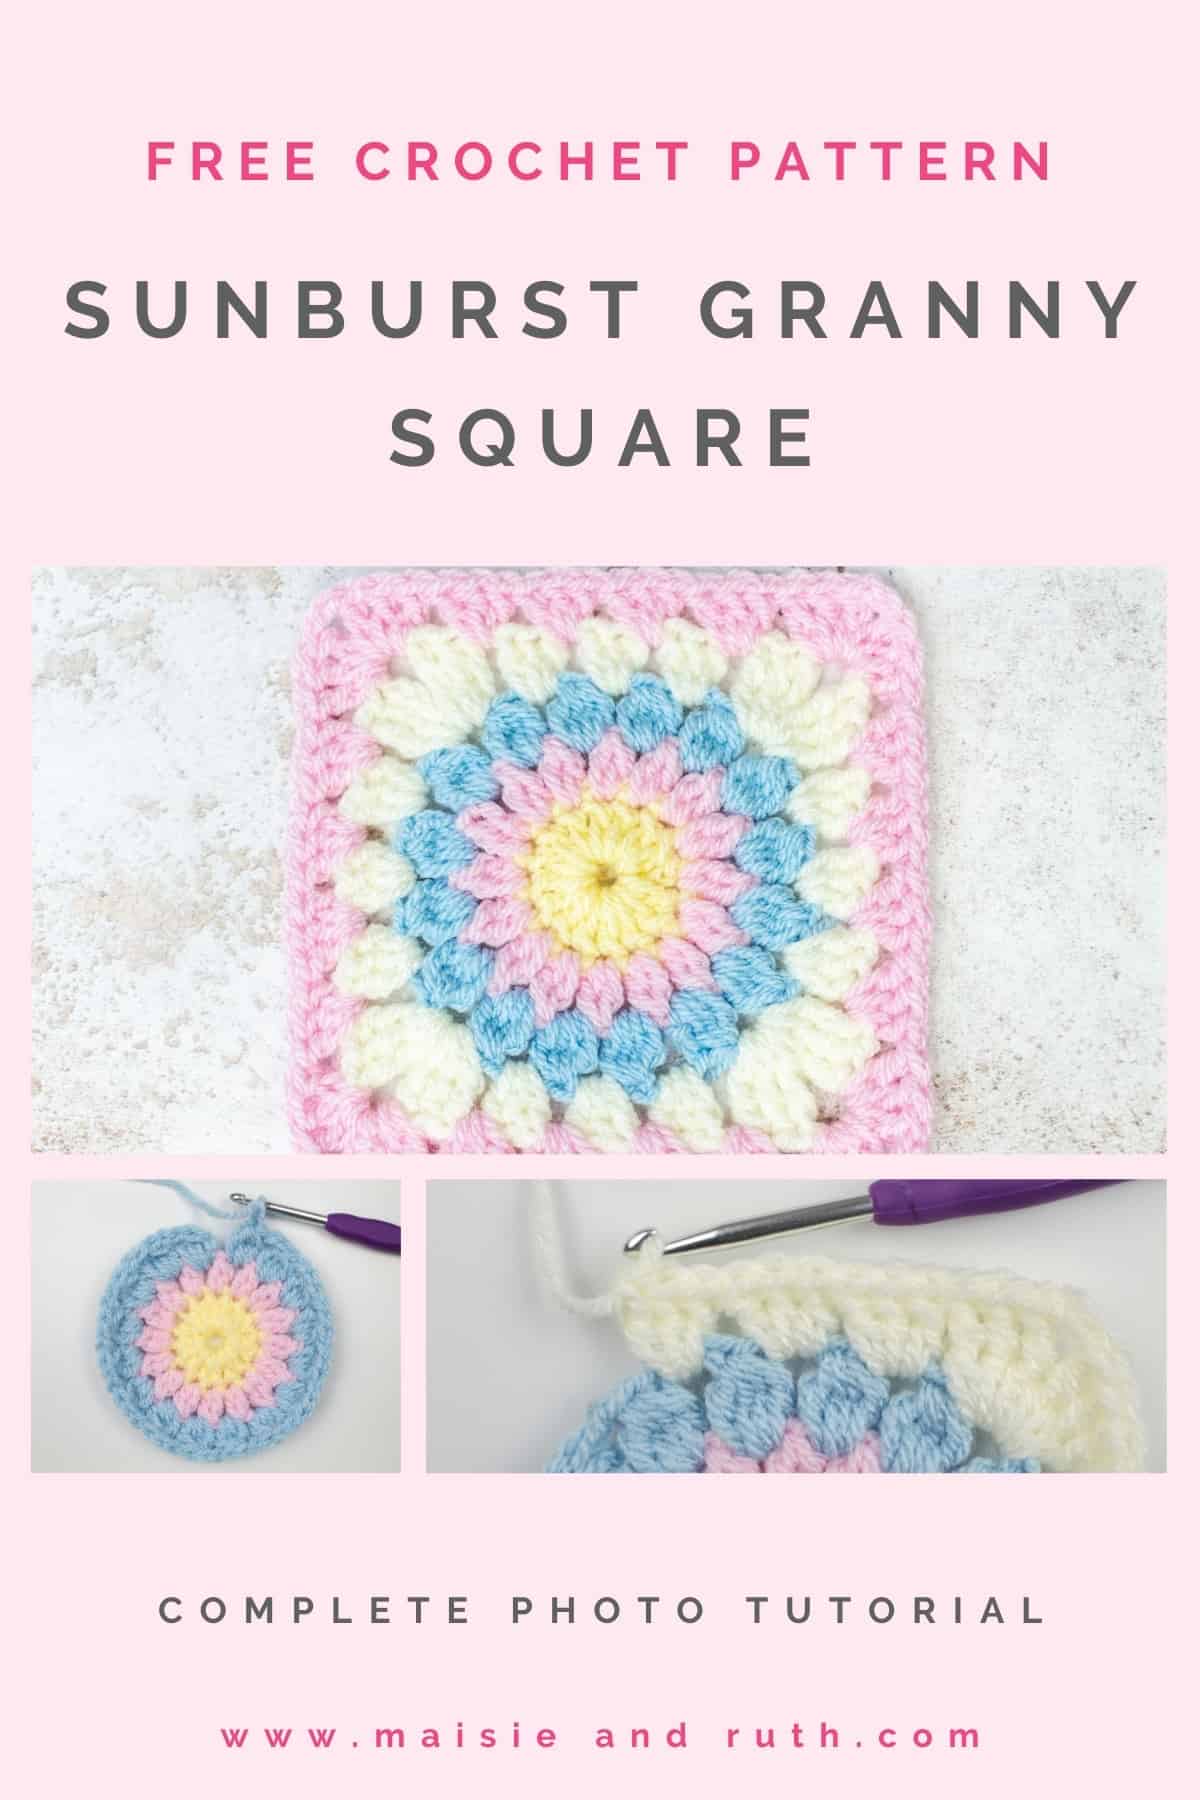
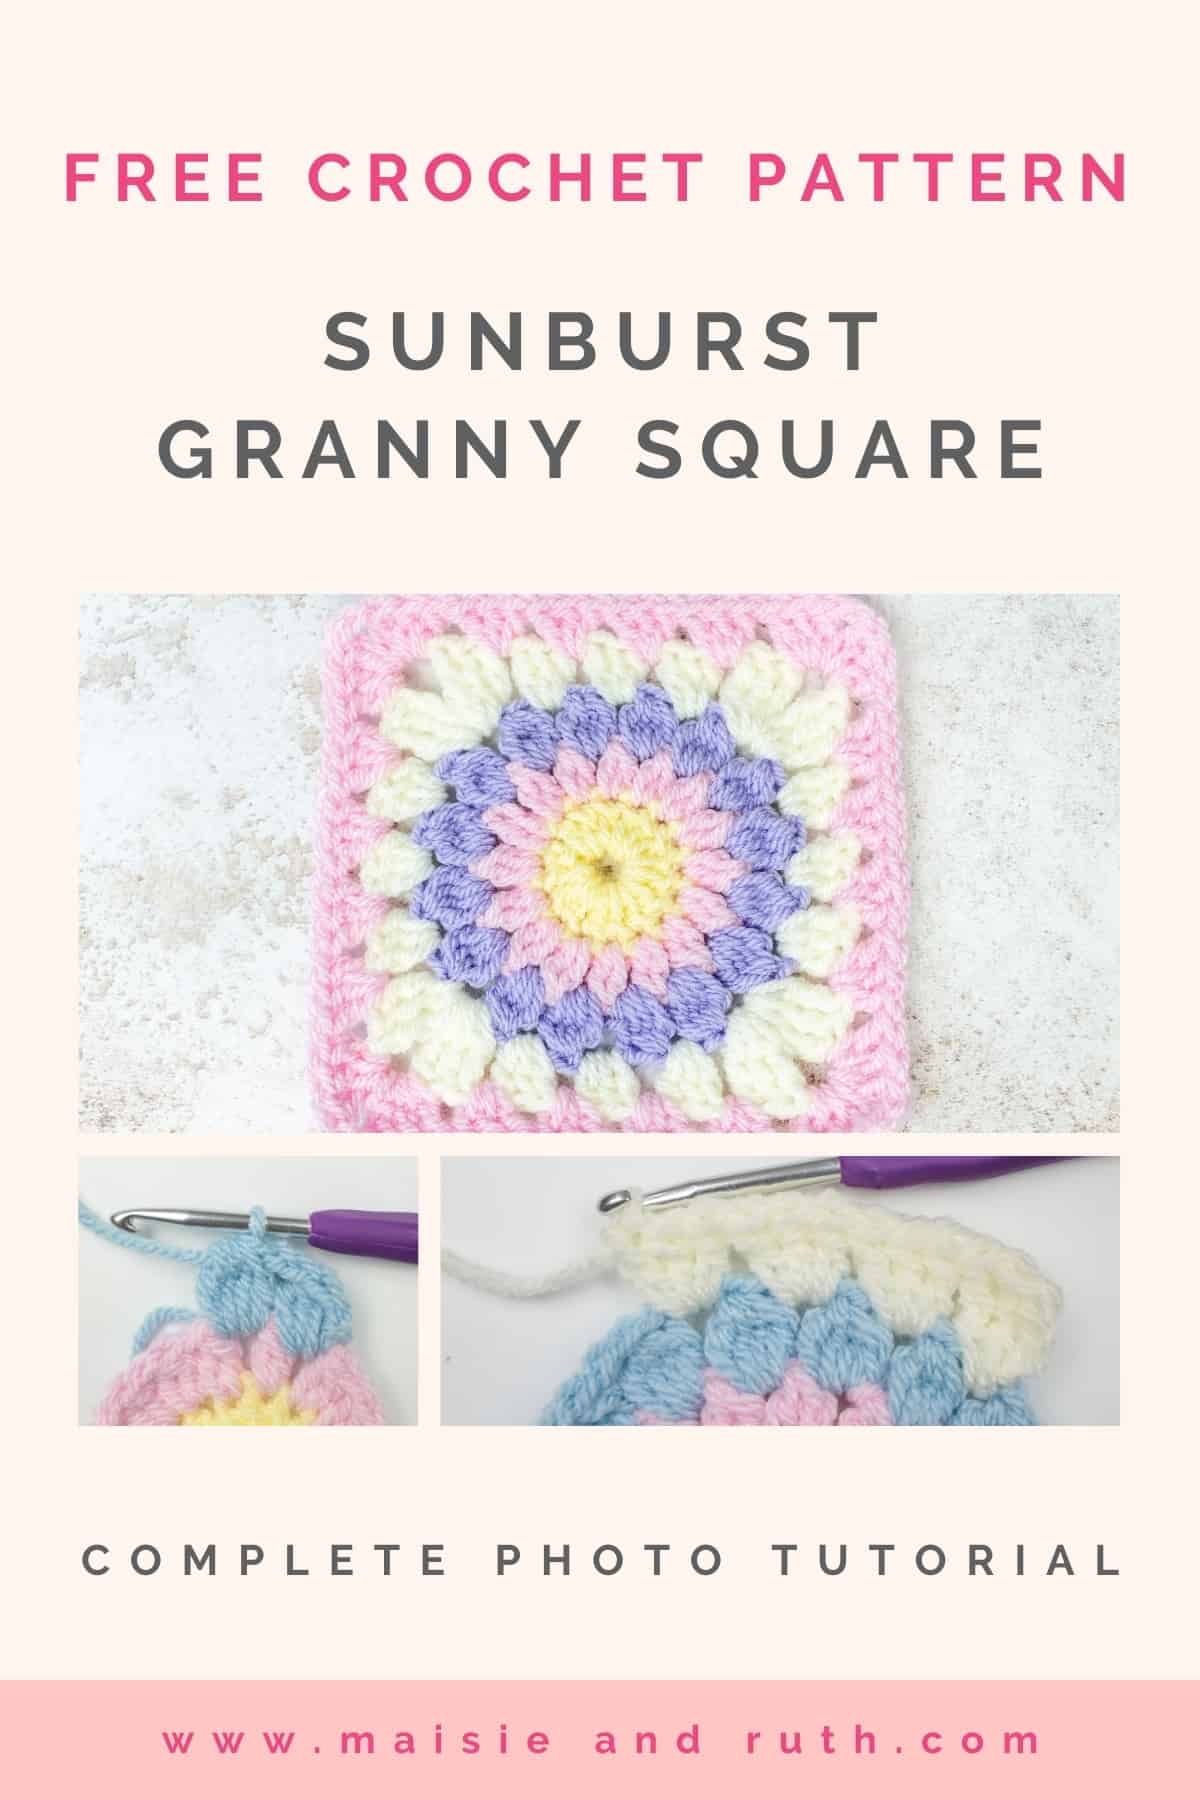
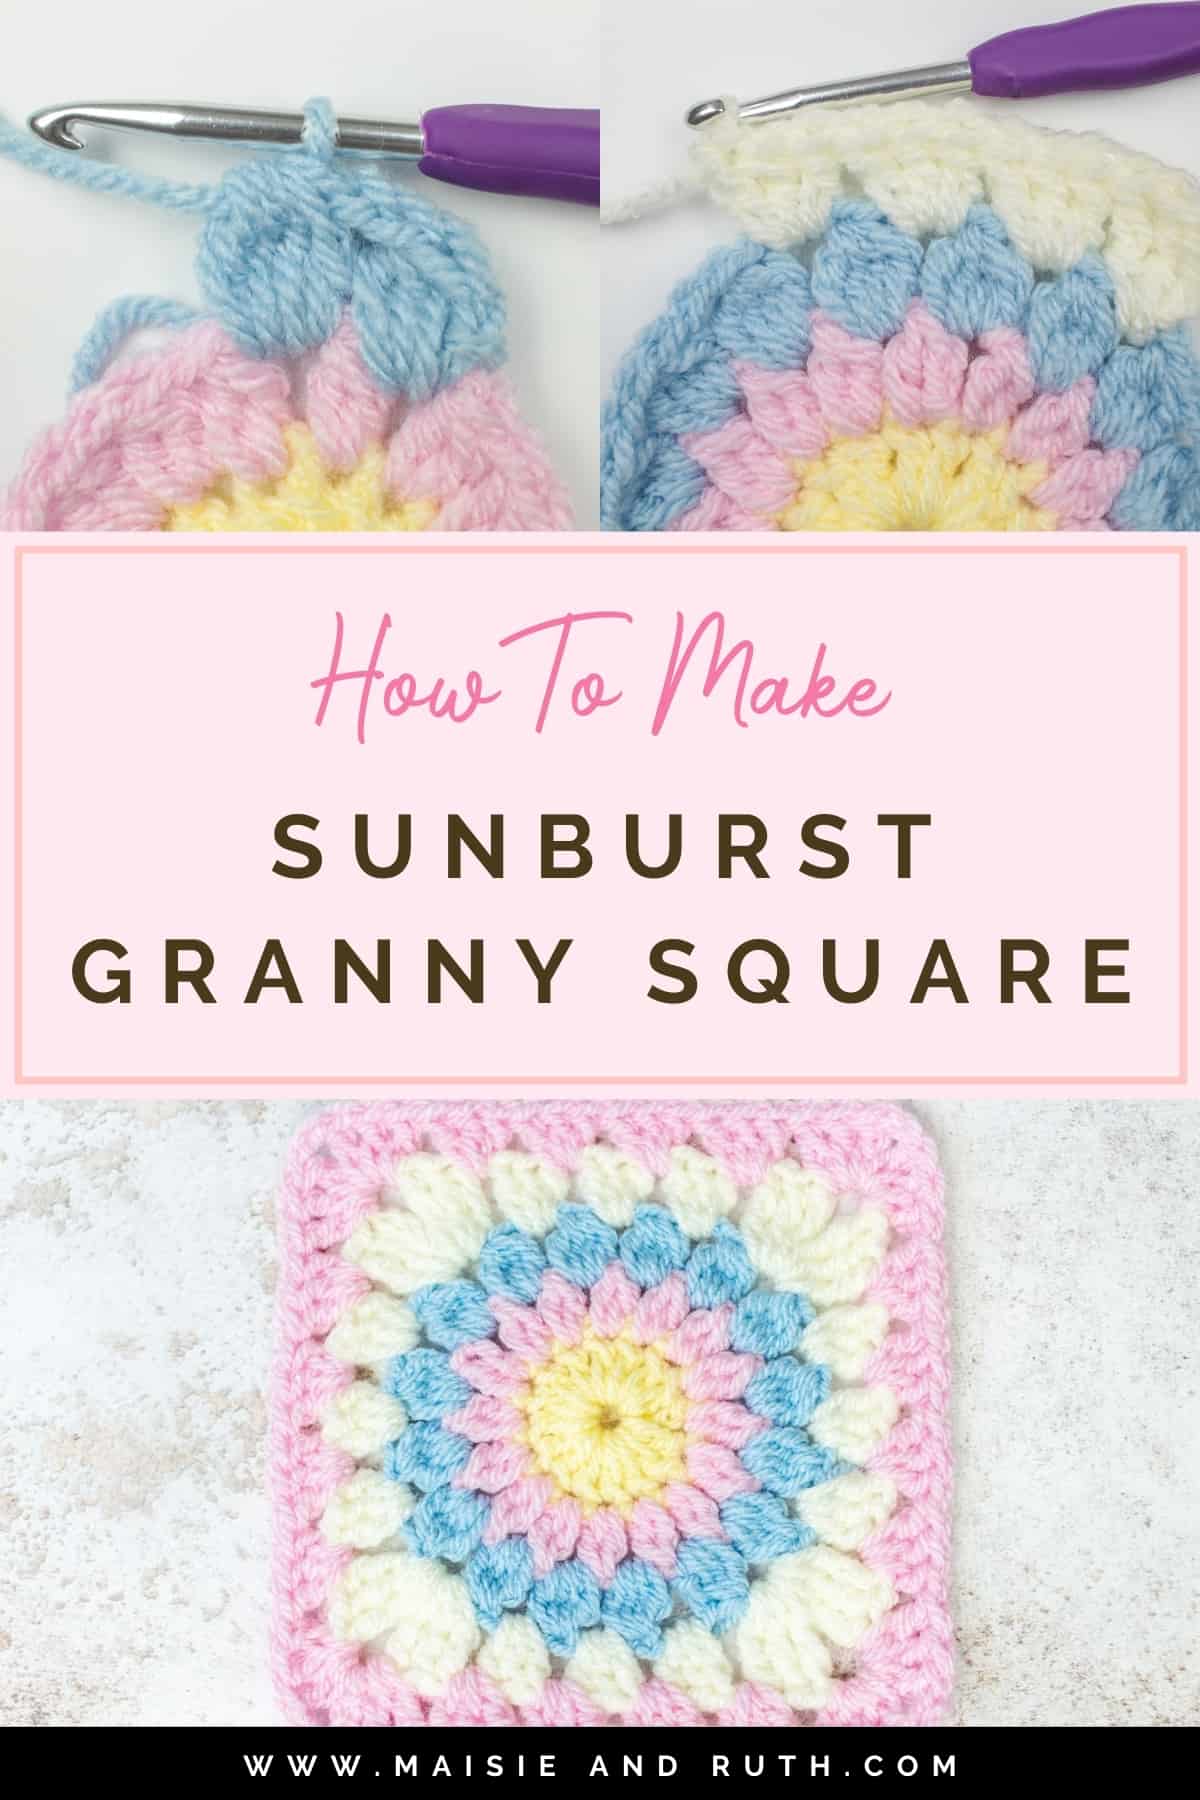
Would you like to learn how to crochet the sunburst granny square?
Follow along with the photo tutorial below and see how easy it is to work up this pretty granny square!
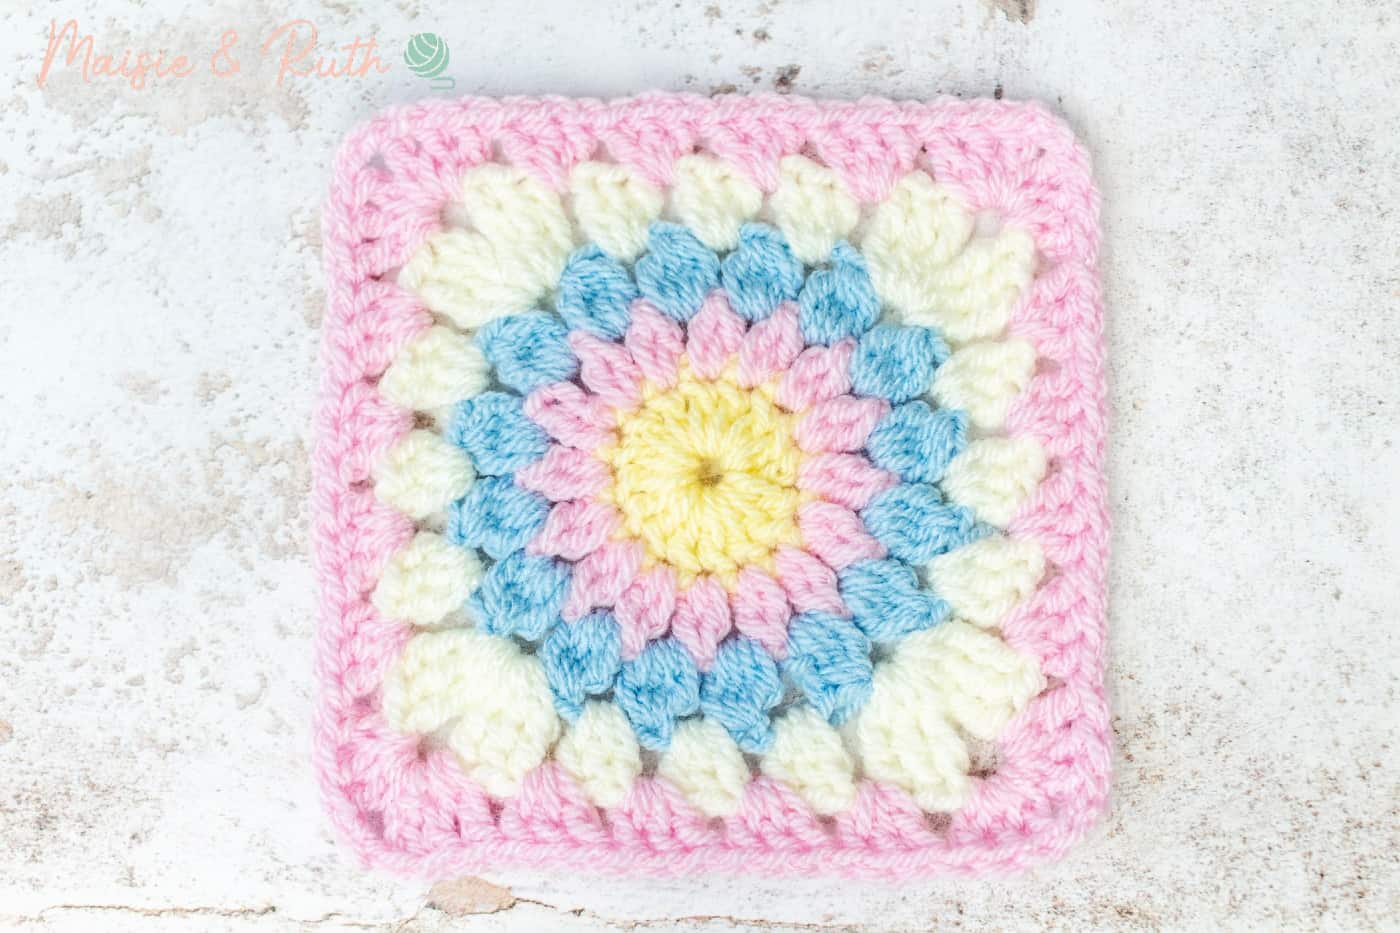
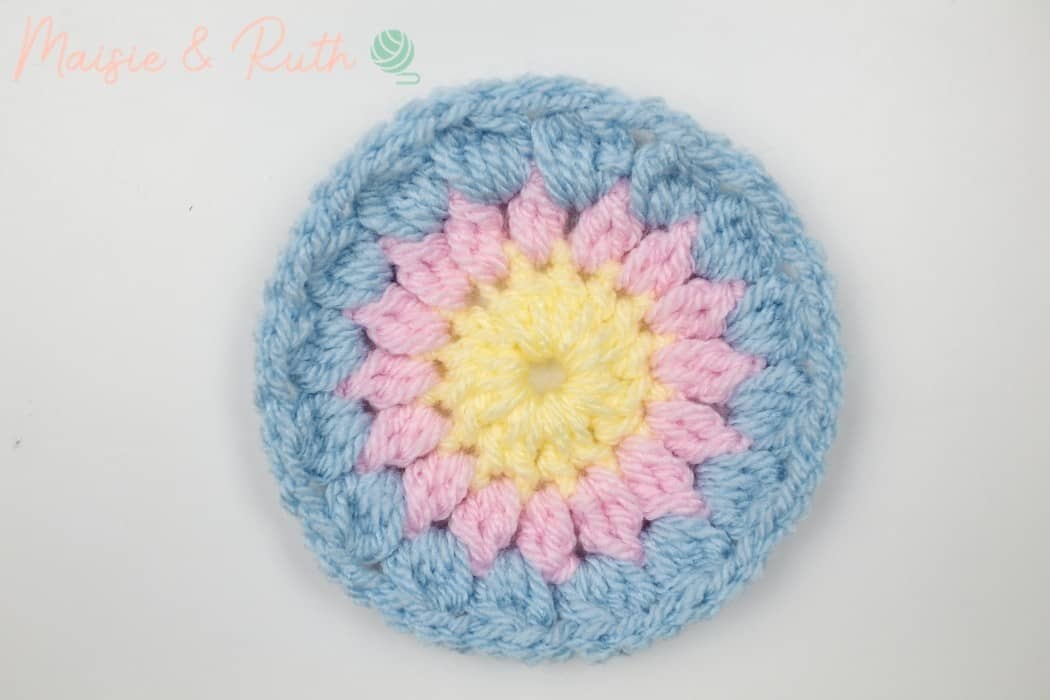
I really enjoy working up a granny square and this design in particular is one of my favourites.
In addition to being very attractive, it’s also a great project for beginner crocheters who would like to get more practise working in the round.
As you’ll be working a variety of cluster stitches, the crochet sunburst granny square is a little more challenging than the traditional granny square.
However, these stitches are not difficult to do and once you’ve mastered them you’ll be able to whip up a few of these squares in no time whatsoever!
MAKE A BABY BLANKET
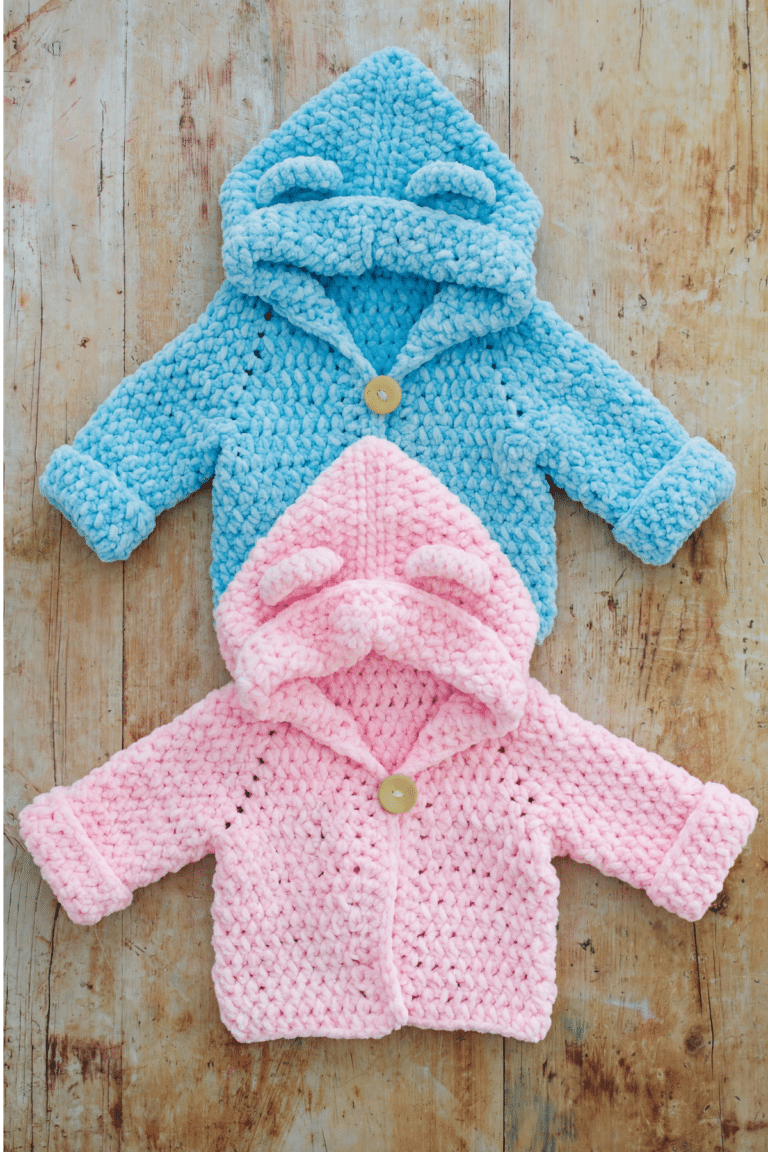
If you would like to learn how you can assemble your crochet sunburst granny squares into an adorable baby blanket, I have a tutorial for The Paisley Baby Blanket which shows you exactly how you can do this.

However, don’t feel that you have to put this square to any particular use.. it’s perfectly acceptable for you to crochet the sunburst granny square entirely just for fun if you wish!
I really hope that you enjoy this tutorial – let’s see how it’s done now…
HOW TO CROCHET THE SUNBURST GRANNY SQUARE
If you are an experienced crocheter and do not require the aid of photos, scroll down to the bottom to get the full pattern set out in one go!
LEVEL
Easy (see details of project levels at the Craft Yarn Council).
MATERIALS
- Yarn: #4, worsted / aran / 10 ply. I used Paintbox Yarns Simply Aran, 3.5oz / 201 yds (184m / 100g) in the following colours:
Colour A: Banana Cream (220)
Colour B: Duck Egg Blue (235)
Colour D: Candyfloss Pink (249)
Colour E: Champagne White (202)
- Crochet Hook: H (5mm)
- Scissors
- Yarn needle
GAUGE / TENSION
- Granny square measures 6.5″ / 16.5cm
PATTERN NOTES
- US crochet terms used throughout.
- Granny square is worked in rounds.
- Double crochet cluster stitches are used in this pattern. They are similar to working dctog stitches e.g dc2tog, dc3tog etc. The main difference is that you will work the cluster stitch into the same stitch and not across 2 or 3 stitches.
- Cluster stitches are quick and easy to do… there is no need to be intimidated by a pattern that includes this particular type of stitch!
STITCHES AND ABBREVIATIONS (US CROCHET TERMS)
beg – beginning
ch(s) – chain(s)
dc – double crochet: Yarn over (yo), insert hook into stitch, yo, pull up a loop (3 loops on hook). Yo, pull through 2 loops (2 loops on hook). Yo, pull through remaining 2 loops. 1 double crochet completed.
sk – skip: Do not crochet into these stitches.
sl st – slip stitch: Insert hook into stitch, yarn over (yo), pull up a loop, you will have 2 loops on your hook. Pull the first loop through the second loop. 1 slip stitch completed.
sp – space
st(s) – stitch(es)
tr –treble crochet: Yarn over (yo) twice, insert hook into stitch, yo, pull up a loop (4 loops on hook). Yo, pull through 2 loops (3 loops on hook). Yo, pull through 2 loops (2 loops on hook). Yo, pull through remaining 2 loops. 1 treble crochet completed.
* to * – Repeat instructions between asterisks as many times as directed.
( ) – Sets of stitches to be worked as many times as directed.
[ ] – The total number of stitches at the end of a row.
SPECIAL STITCHES
EXdc– Extended Double Crochet (almost identical to the standard dc, except you only pull through 1 loop at the beginning instead of the usual 2 loops):
Yarn over (yo), insert hook into ch2 sp, pull up a loop, 3 loops on hook, yo, pull through 1 loop (3 loops remain on hook), yo, pull through 2 loops (2 loops remain on hook), yo, pull through both loops. I EXdc made.
2dcCL – 2 Double Crochet Cluster:
Step 1. Yarn over (yo), insert hook into stitch, yo, pull up a loop (3 loops on hook), yo, pull through 2 loops (2 loops remain on hook).
Step 2. Yo, insert hook into same st, yo, pull up a loop (4 loops on hook). Yo, pull through 2 loops (3 loops on hook), yo, pull through all 3 loops. One 2dcCL made.
3dcCL -3 Double Crochet Cluster:
Step 1
Yarn over (yo), insert hook into stitch (or space), yo, pull up a loop (3 loops on hook), yo, pull through 2 loops (2 loops remain on hook).
Step 2
Yo, insert hook into same st (or space), yo, pull up a loop (4 loops on hook). Yo, pull through 2 loops (3 loops remain on hook).
Step 3.
Yo, insert hook into same st (or space), yo pull up a loop (5 loops on hook), yo, pull through 2 loops (4 loops on hook). Yo, pull through all 4 loops. One 3dcCL made.
4dcCL – 4 Double Crochet Cluster.
Step 1. Yarn over (yo), insert hook into chain 1 space (ch1 sp), yo, pull up a loop (3 loops on hook), yo, pull through 2 loops (2 loops remain on hook).
Step 2. Yo, insert hook into same ch1 sp, yo, pull up a loop (4 loops on hook), yo, pull through 2 loops (3 loops remain on hook).
Step 3. Yo, insert hook into same ch1 sp, yo, pull up a loop (5 loops on hook), yo, pull through 2 loops (4 loops remain on hook).
Step 4. Yo, insert hook into same st, yo, pull up a loop (6 loops on hook), yo, pull though 2 loops (5 loops on hook), yo, pull through all 5 loops. One 4dcCL made.
PATTERN INSTRUCTIONS
Before you begin, please carefully read all the information below… I’ve included useful points that will aid you in making this granny square.
If you are an experienced crocheter and do not require the aid of photos, scroll down to the bottom to get the full pattern set out in one go!
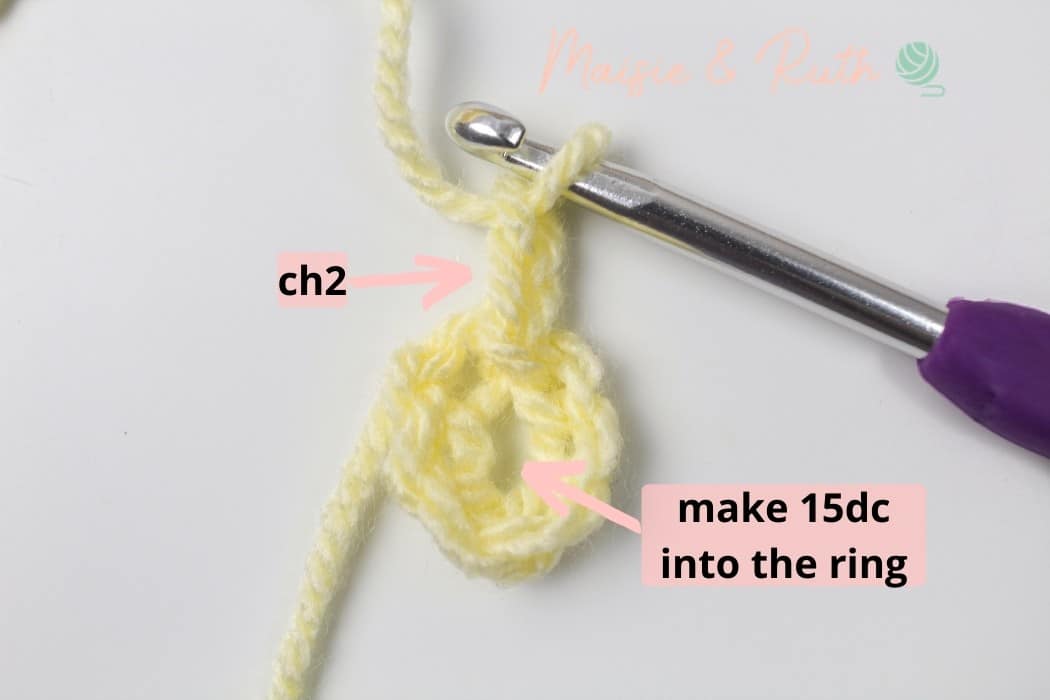
Using Colour A
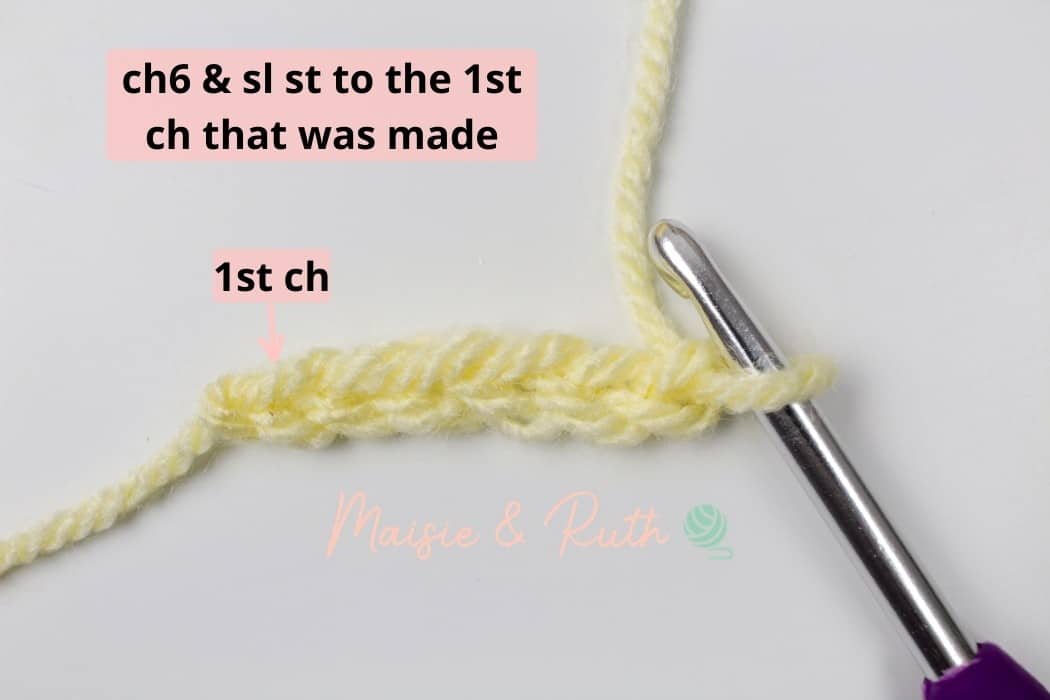
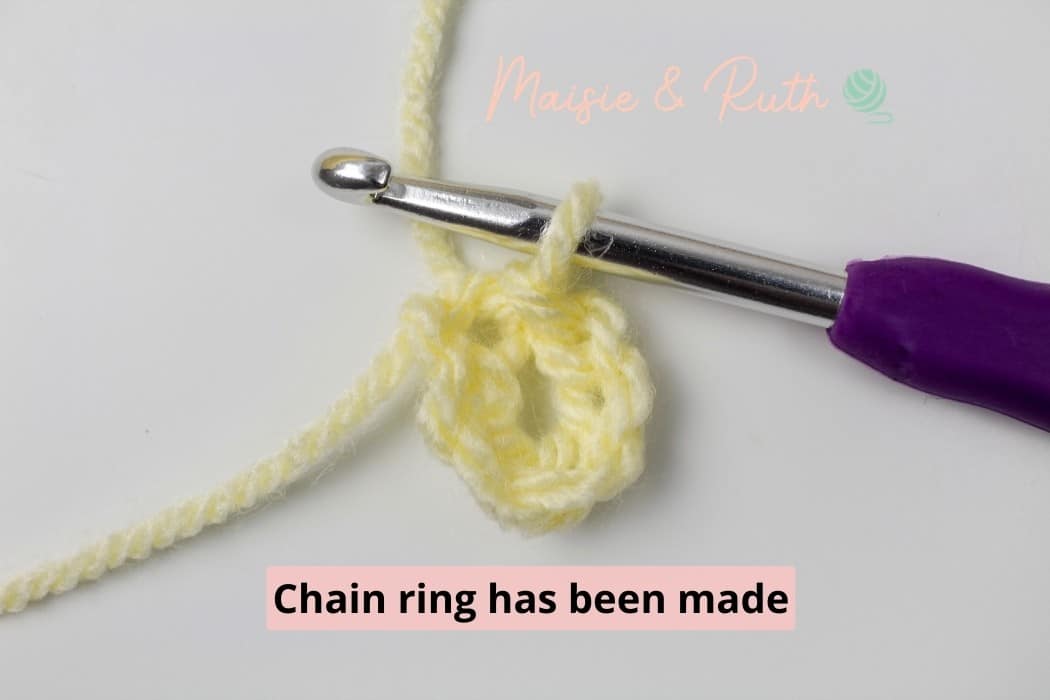
Ch6, sl st to 1st ch that was made to form a ring.
Round 1. Ch2 (counts as your first st), 15dc into ring, sl st to top of beg ch2 to join, [16 sts].
At the end of the round, sl st to the top of the ch2 made at the beginning of the round to join:
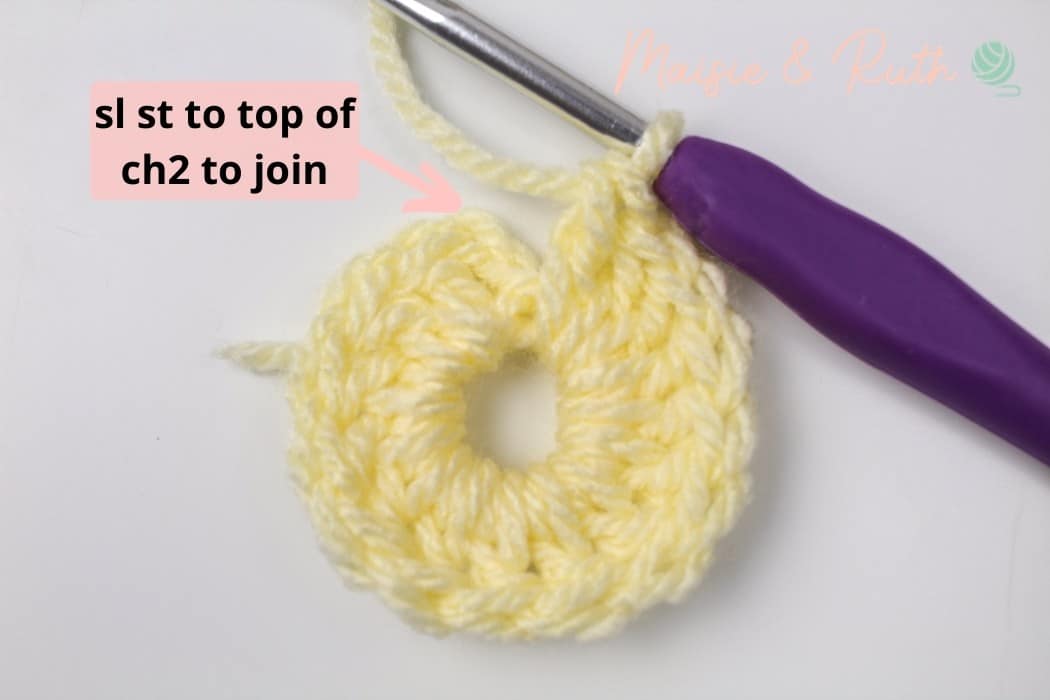
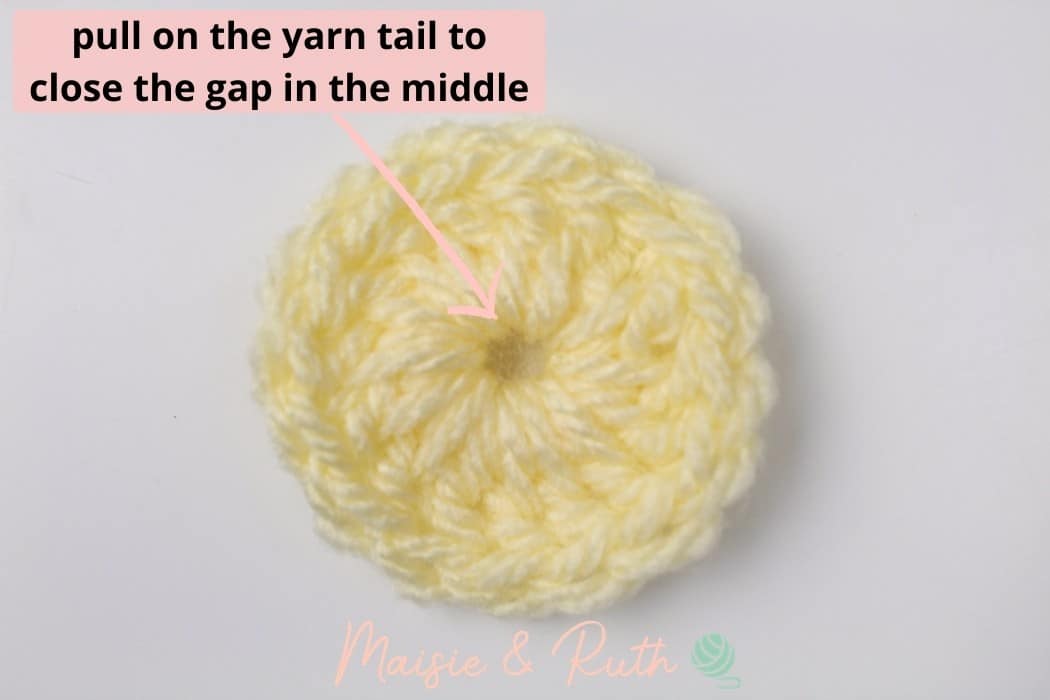
Cut yarn, fasten off and weave in ends.
At the end of round 1 you will have 16 dc stitches.
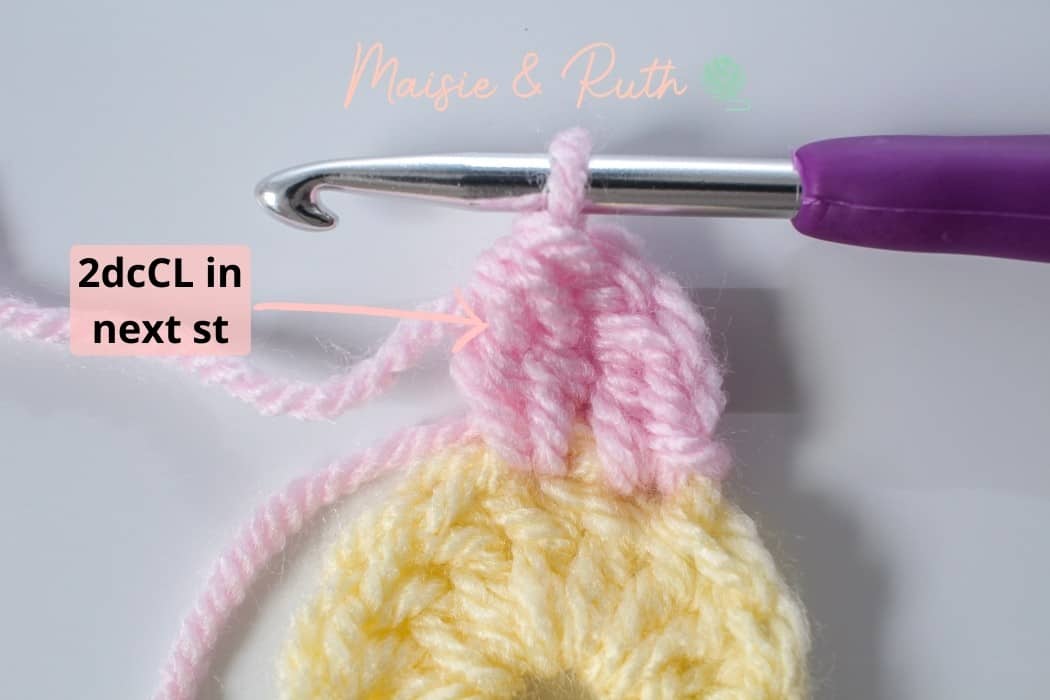
Using Colour D Attach yarn to any st with a sl st:
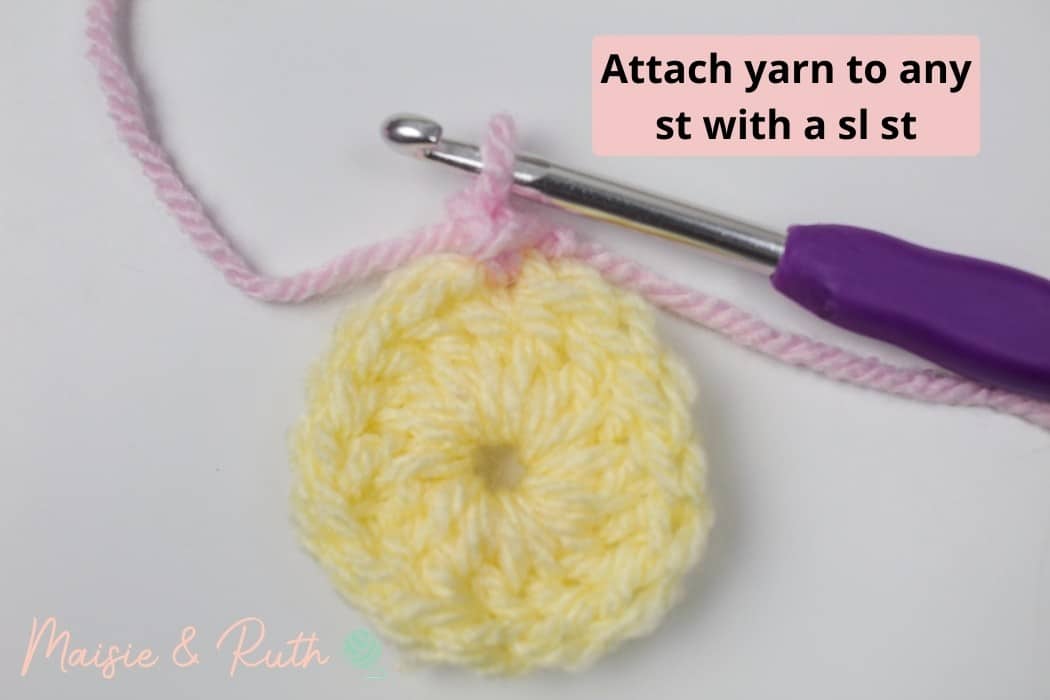
Round 2. Ch1 (does not count as your first st), 1dc in same st, ch1, *2dcCL in next st, ch1*, repeat from * to * 15 times in total, sl st to 1st dc to join, [16 2dcCL sts, 16 ch1 sp].
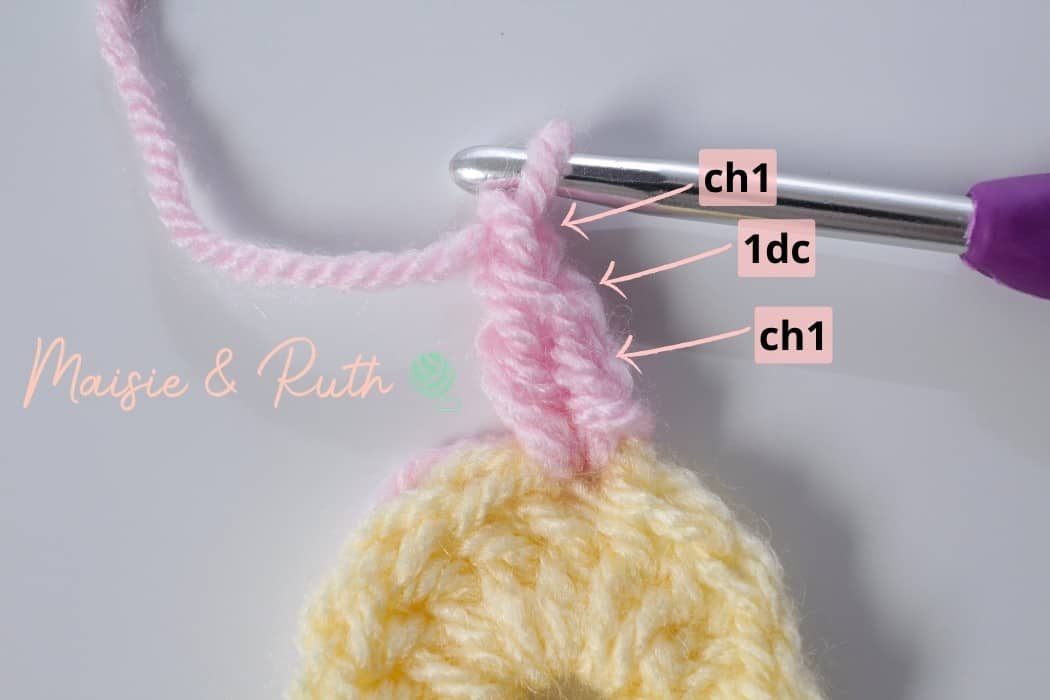
Work 2dcCL and a ch1 in the next 15 sts (the instructions between * to *):

At the end of the round, skip the ch1 made at the beginning of the round and sl st to the 1st dc to join:
Cut yarn, fasten off and weave in ends.
At the end of round 2 you will have sixteen 2dcCL stitches and sixteen ch1 sp:
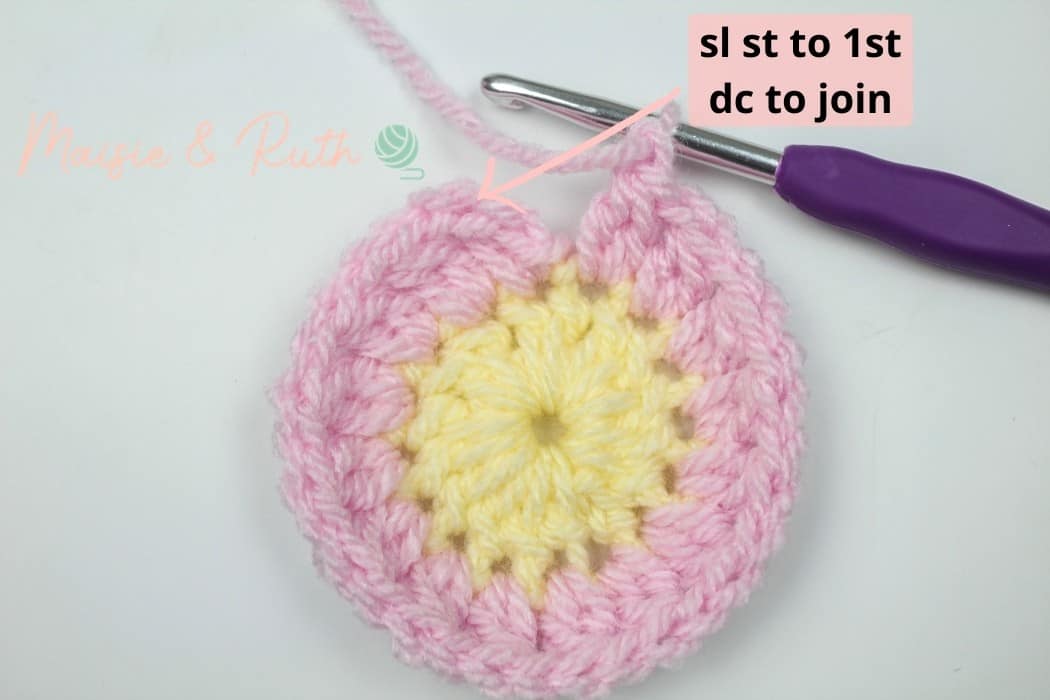
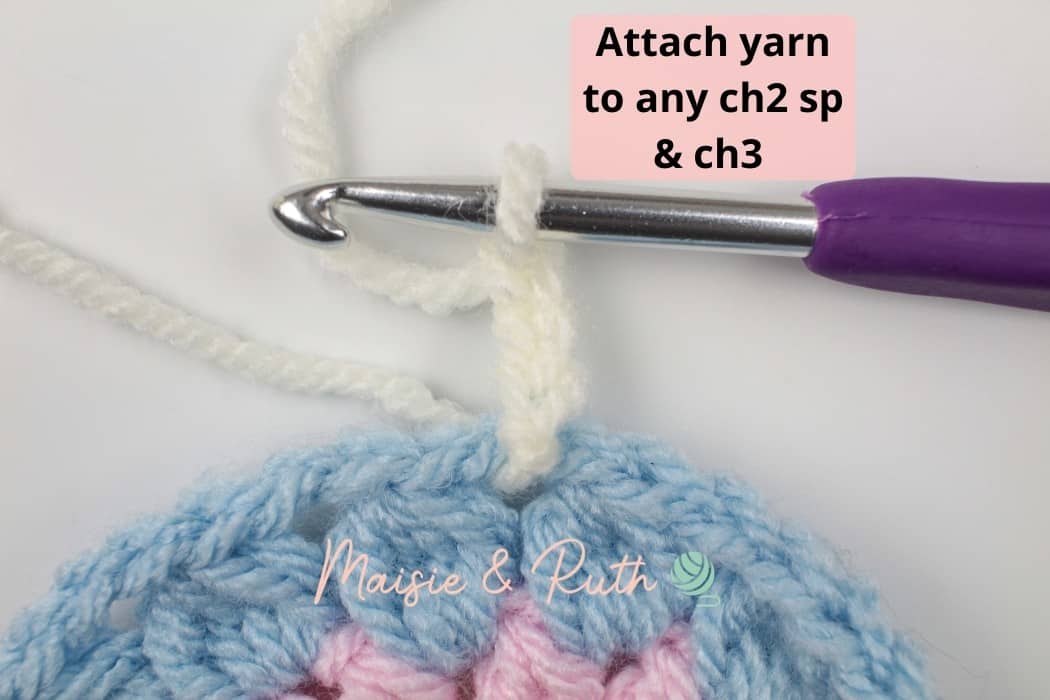
Using Colour B Attach yarn with a sl st to any ch1 sp:
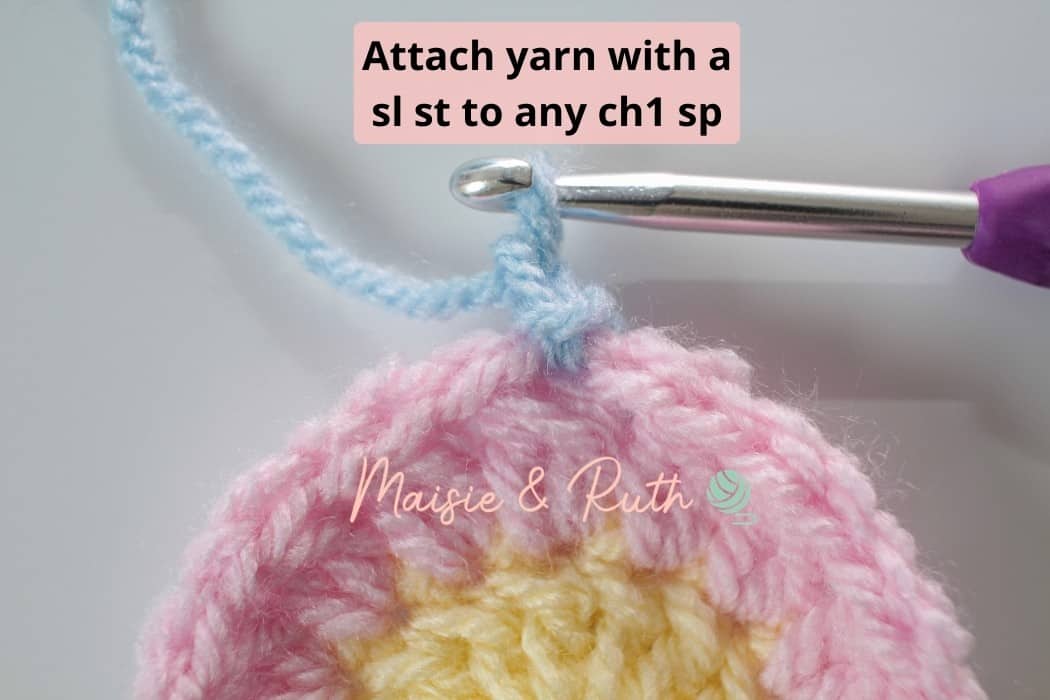
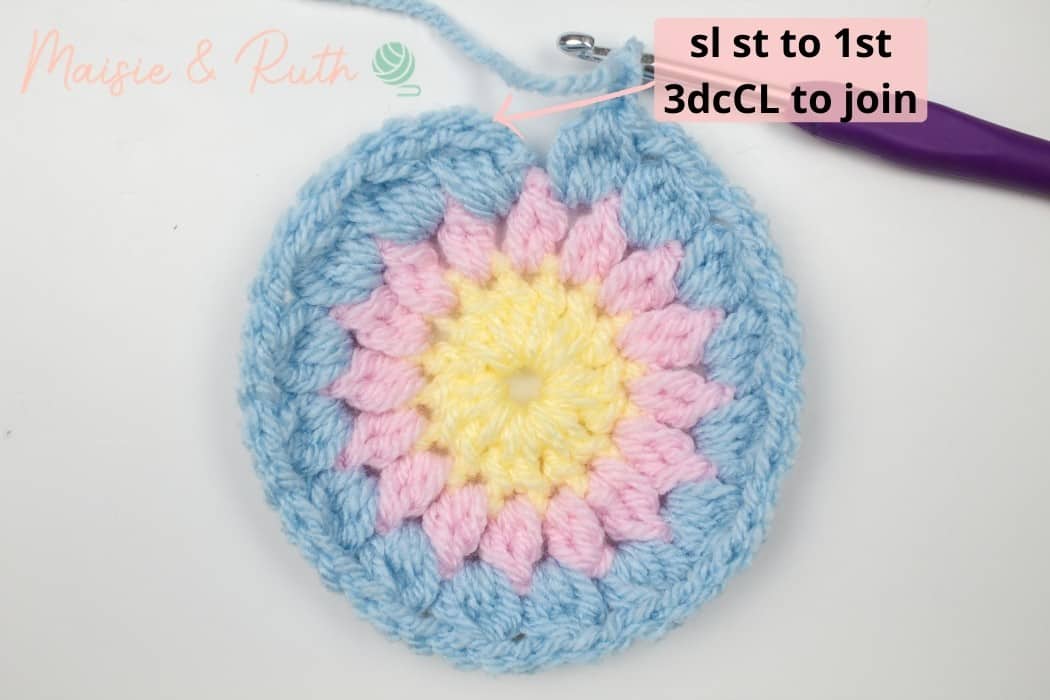
Round 3. Ch1 (does not count as your first st), 3dcCL in same ch1 sp, ch2, *4dcCL in next ch1 sp, ch2*, repeat from * to * 15 times in total, sl st to 1st 3dcCL st to join, [16 4dcCL sts, 16 ch2 sp).
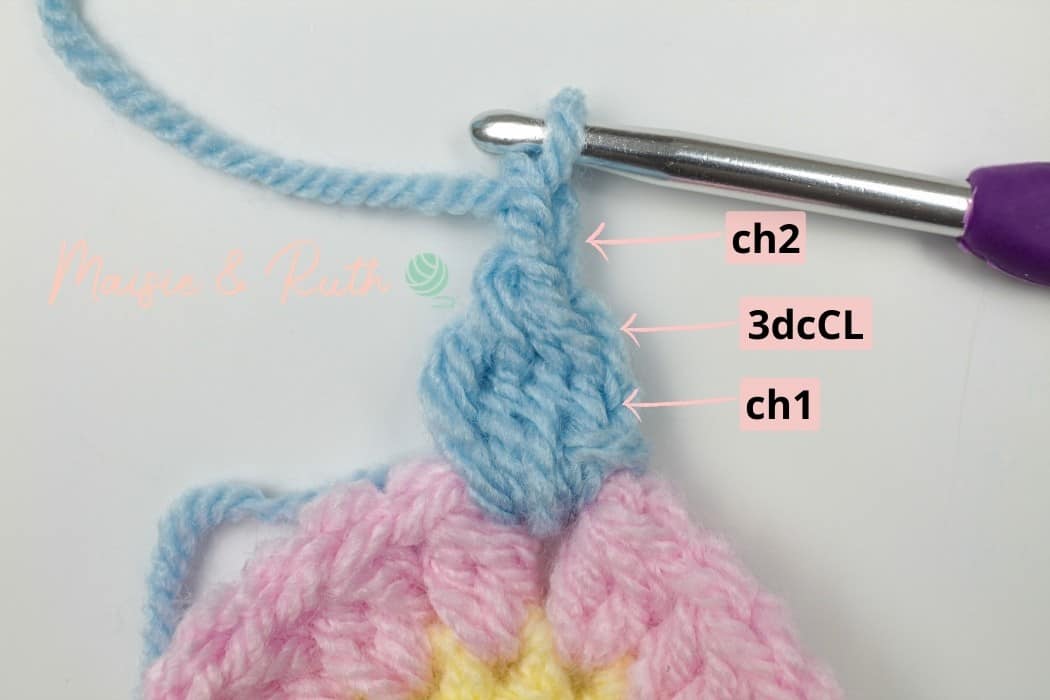
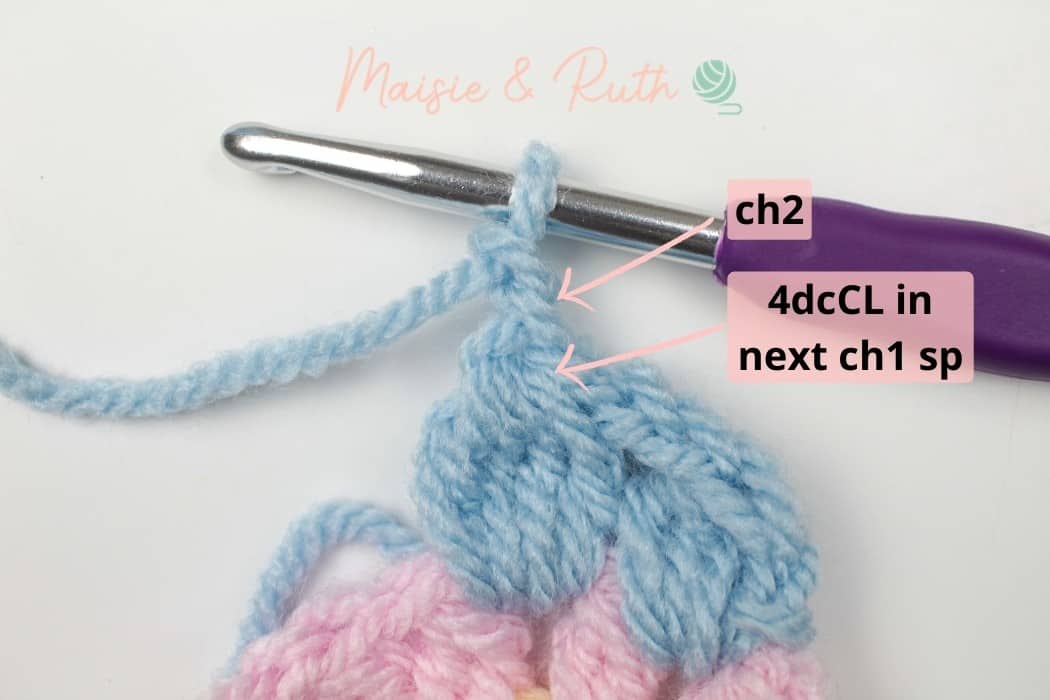
Work 4dcCL and a ch2 in the next 15 sts (the instructions between * to *):
At the end of the round, skip the ch1 made at the beginning of the round and sl st to the first 3dcCL to join:
Cut yarn, fasten off and weave in ends.
At the end of round 3 you will have sixteen 4dcCL stitches and sixteen ch2 sp:
Moving on to round 4, you will now turn your circle into a square
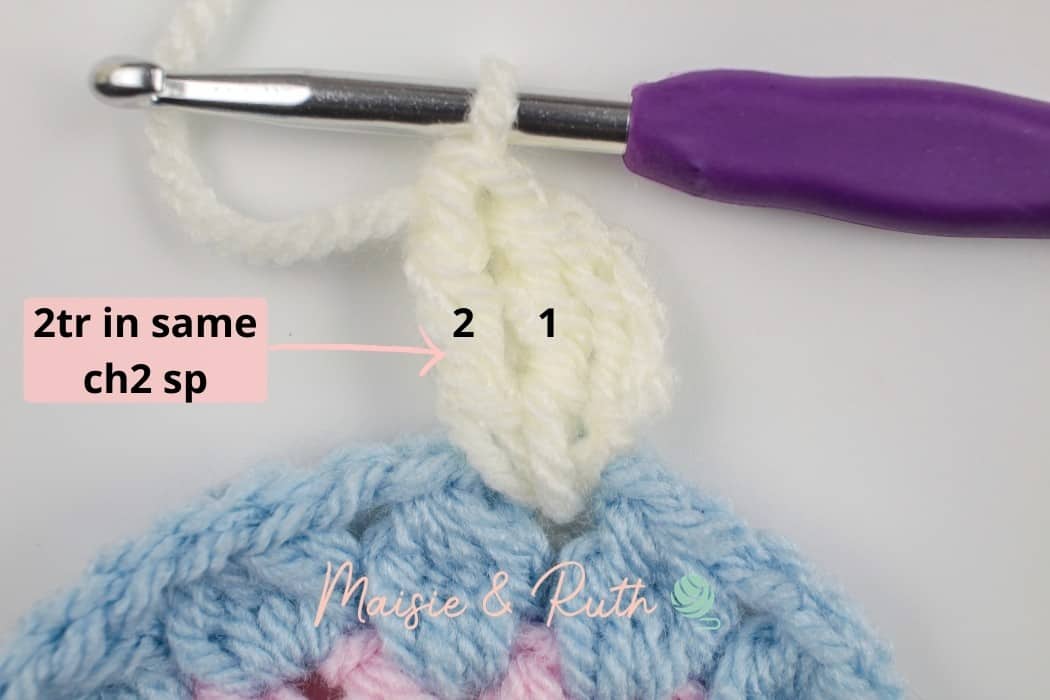
Using Colour E Attach yarn with a sl st to any ch2 sp.
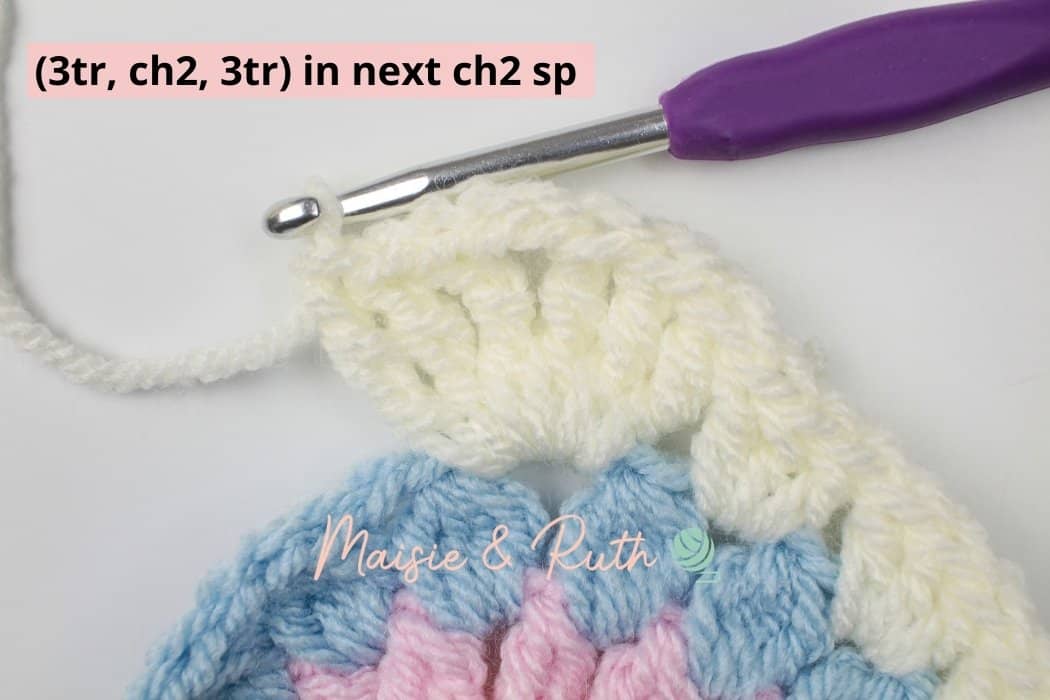
Round 4. Ch3 (counts as your first st), 2tr in same ch2 sp, (3dc in next ch1 sp) 3 times, *(3tr, ch2, 3tr) in next ch2 sp, (3dc in next ch1 sp) 3 times*, repeat from * to * 3 times in total, 3tr in 1st ch1 sp of round, ch2, sl st to top of beg ch3 to join, [12 groups of dc, 4 corners, 4 ch2 spaces].
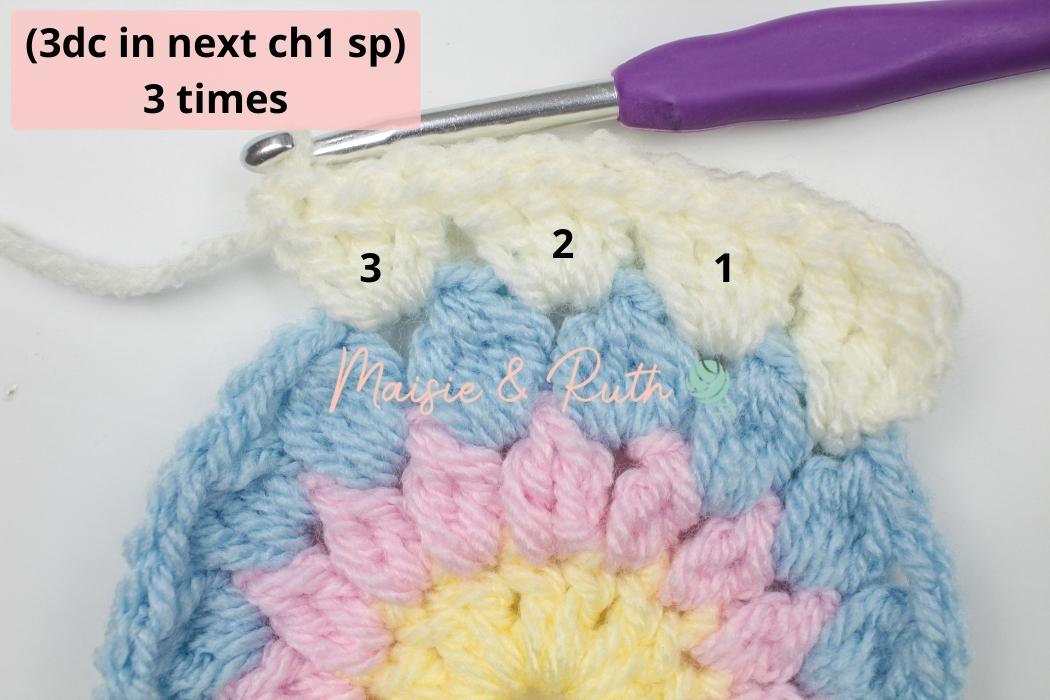
The first edge of your square has now been completed.
You will now work your first corner:
Work the second edge:
Repeat the last two steps (the instructions between * to *) for a total of 3 times.
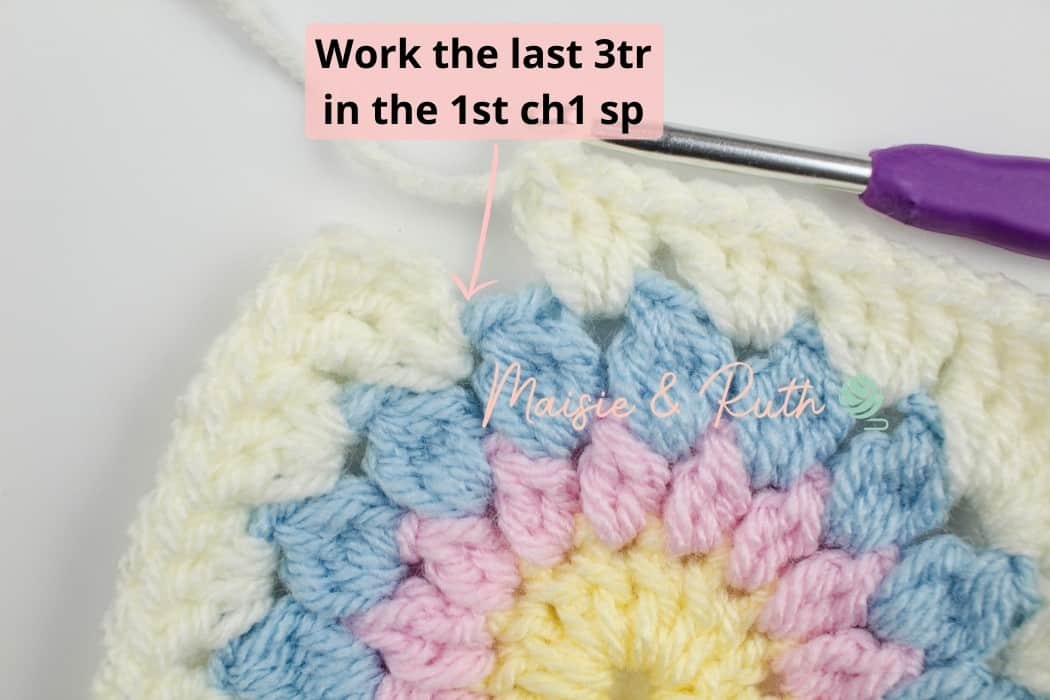
When you get back to the beginning of the round, work 3tr in to the first ch1 space:
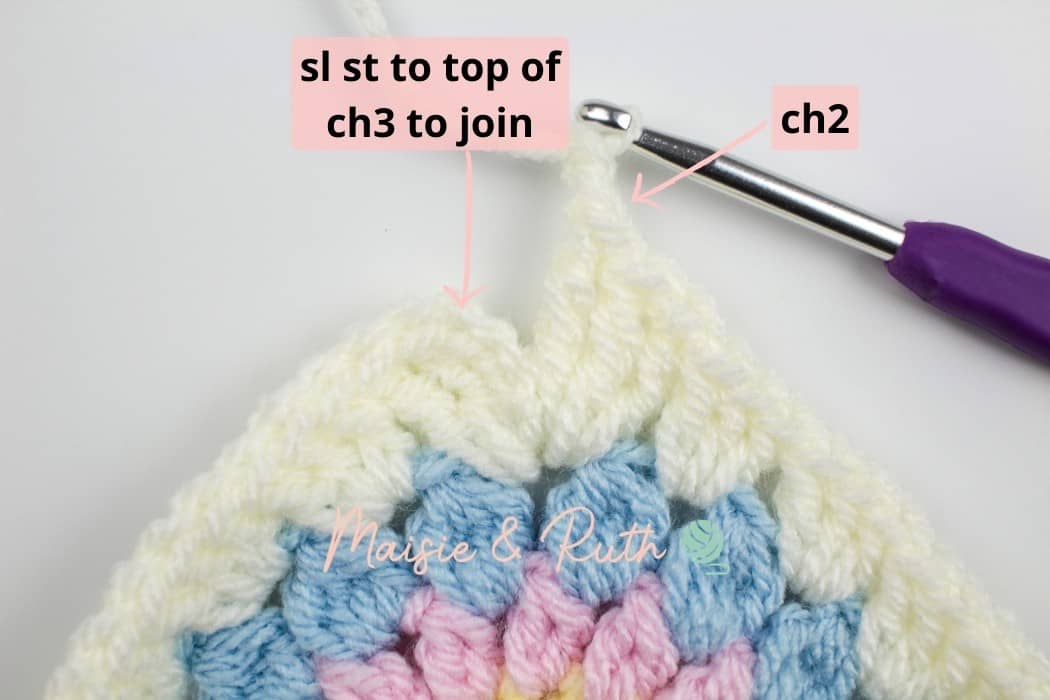
Finish the round off by making a ch2 and sl st to the top of the ch3 at the beginning of the round to join:
Cut yarn, fasten off and weave in ends.
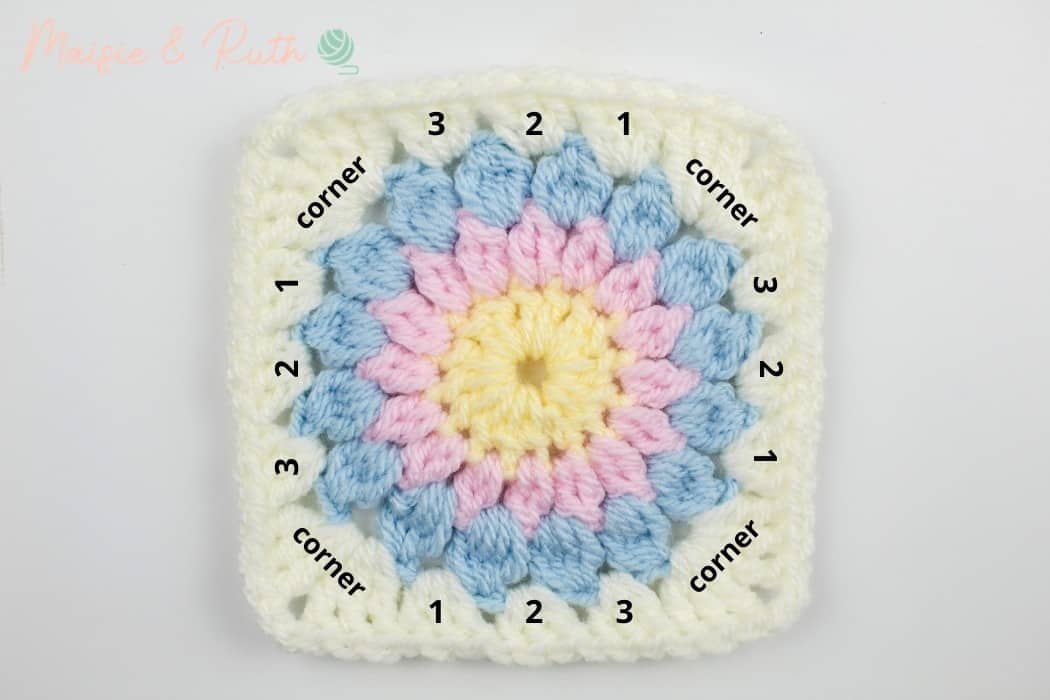
In the image below you can see that you will have four corners with 3 groups of dc in between each corner:
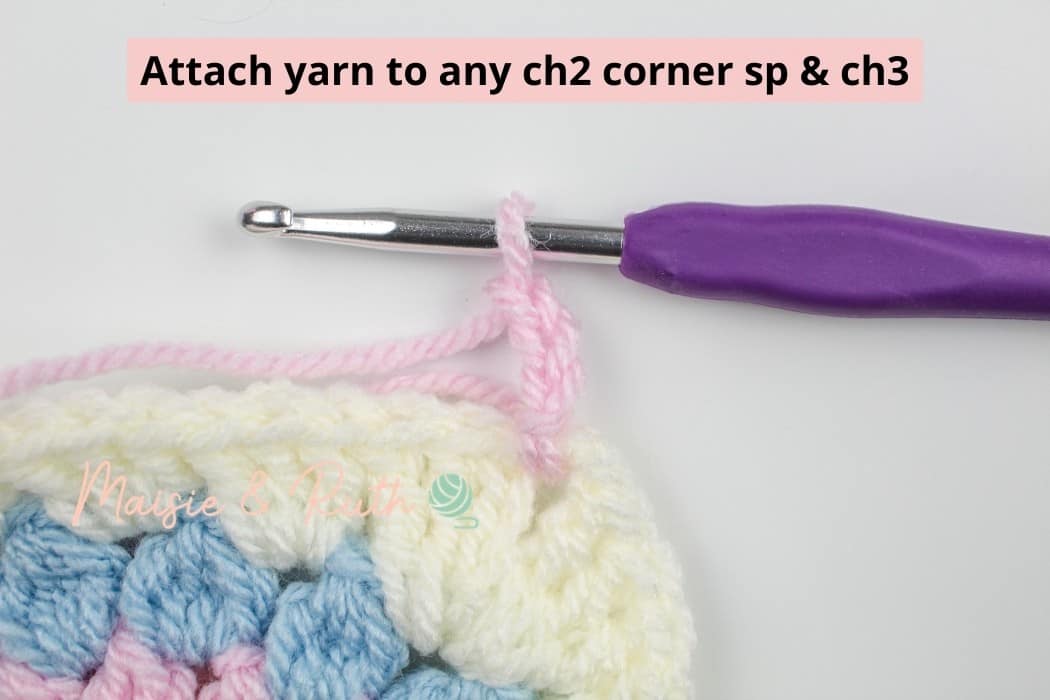
Using Colour D attach yarn with a sl st to any ch2 corner sp to join.
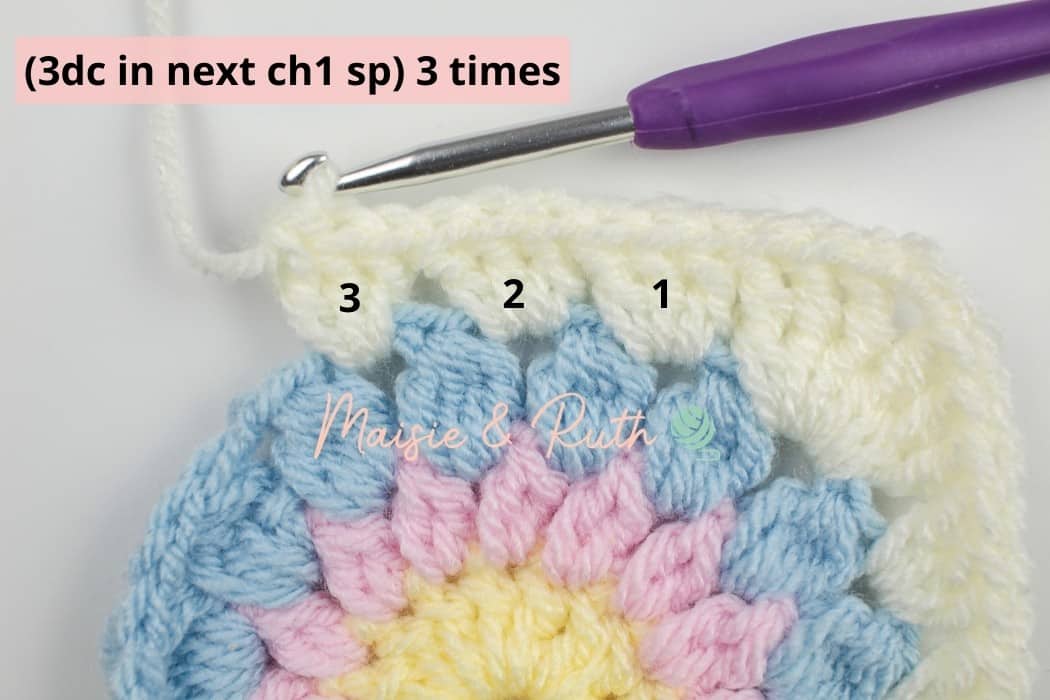
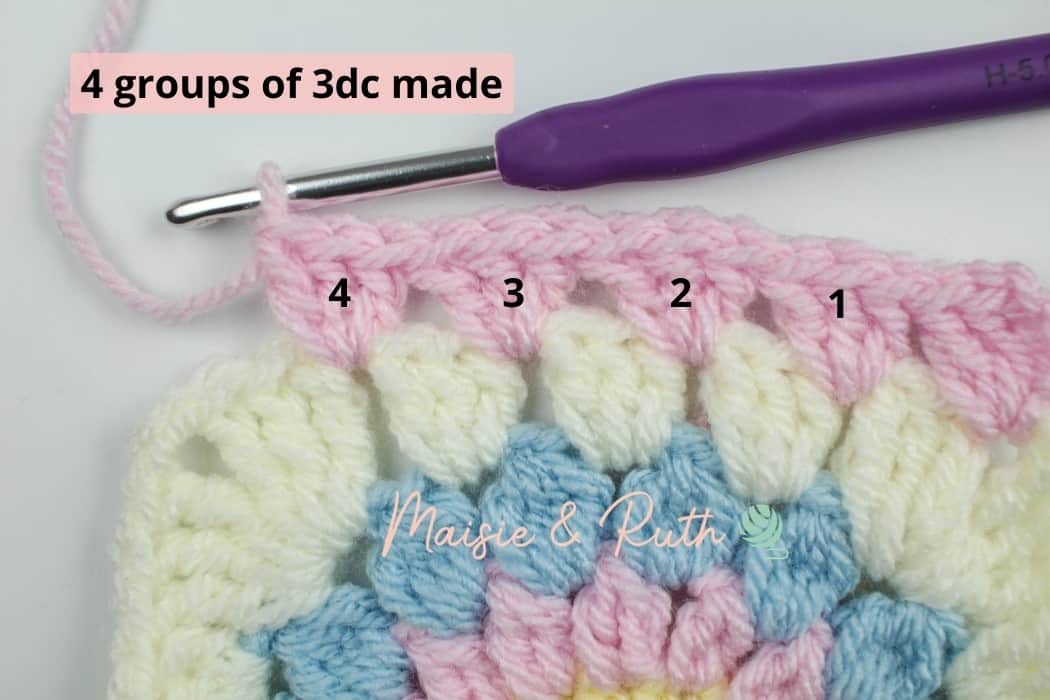
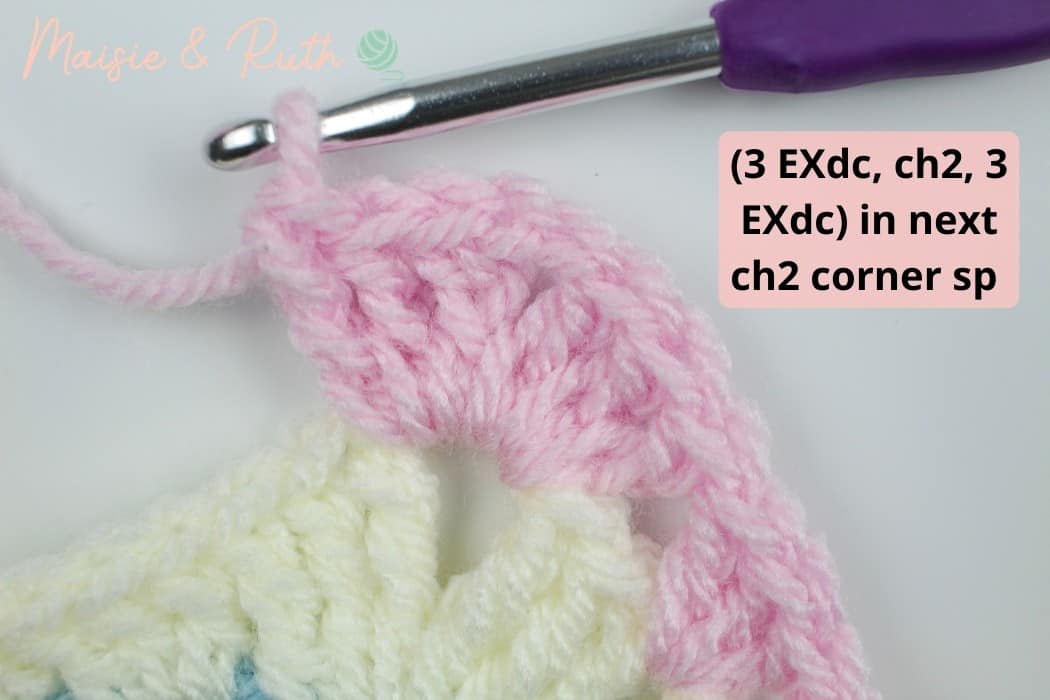
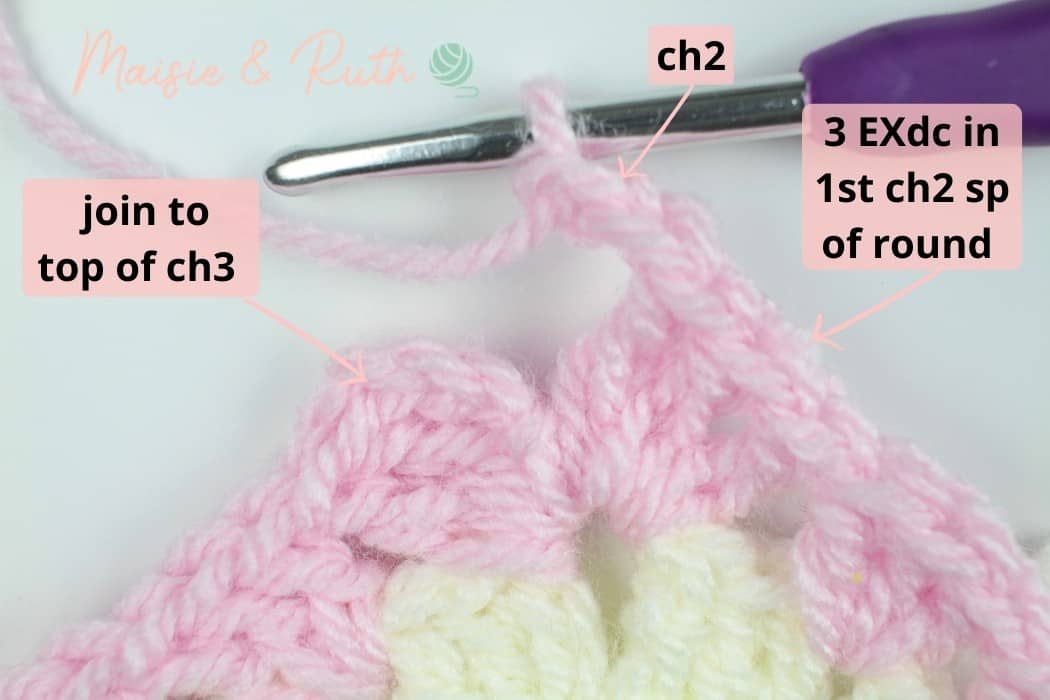
Round 5. Ch3 (counts as your first st), 2 EXdc in same ch2 corner sp (3dc in between each group of 3dc from the previous round) 4 times, *(3EXdc, ch2, 3EXdc) in next ch2 corner sp, (3dc in between each group of 3dc from the previous round) 4 times*, repeat from * to * 3 times in total, 3EXdc in 1st ch2 corner sp of round, ch2, sl st to top of beg ch3 to join, [16 groups of dc, 4 corners, 4 ch2 spaces].

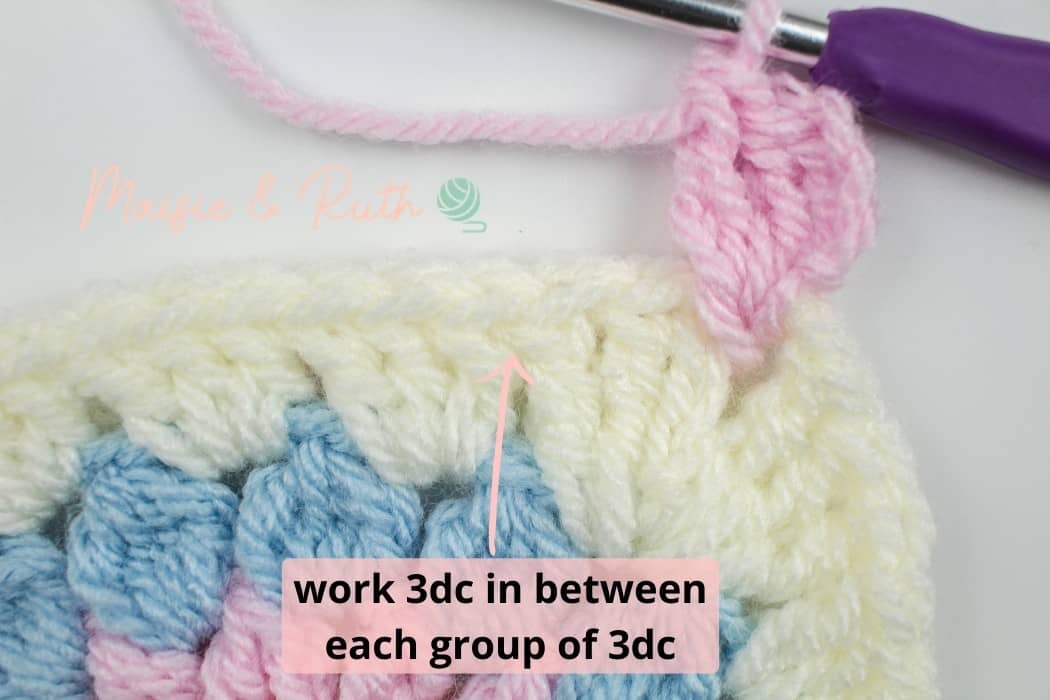
Working along the first edge of your square, you will work 4 groups of 3dc:
You will now work your first complete corner:
Continue working in this way, whereby you will work your corner stitches, with 4 groups of 3dc in between each corner, until you arrive back at the beginning of the round.
When you get back to the beginning, work 3EXtr and a ch2 in the first ch2 space at the beginning of the round.
Join to the top of the ch3 made at the beginning of the round.
For a neater finish, I prefer to make an invisible join at the end of the round (you can, of course, join with a sl st if you prefer):
Cut yarn, fasten off and weave in ends.
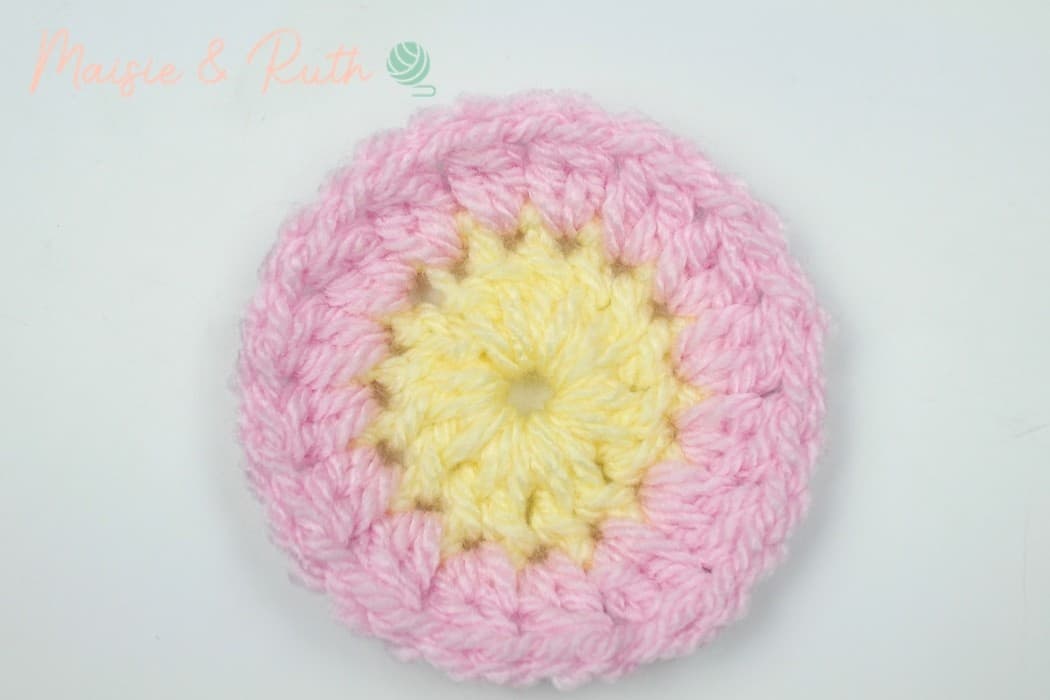
And that’s it… you’re done!

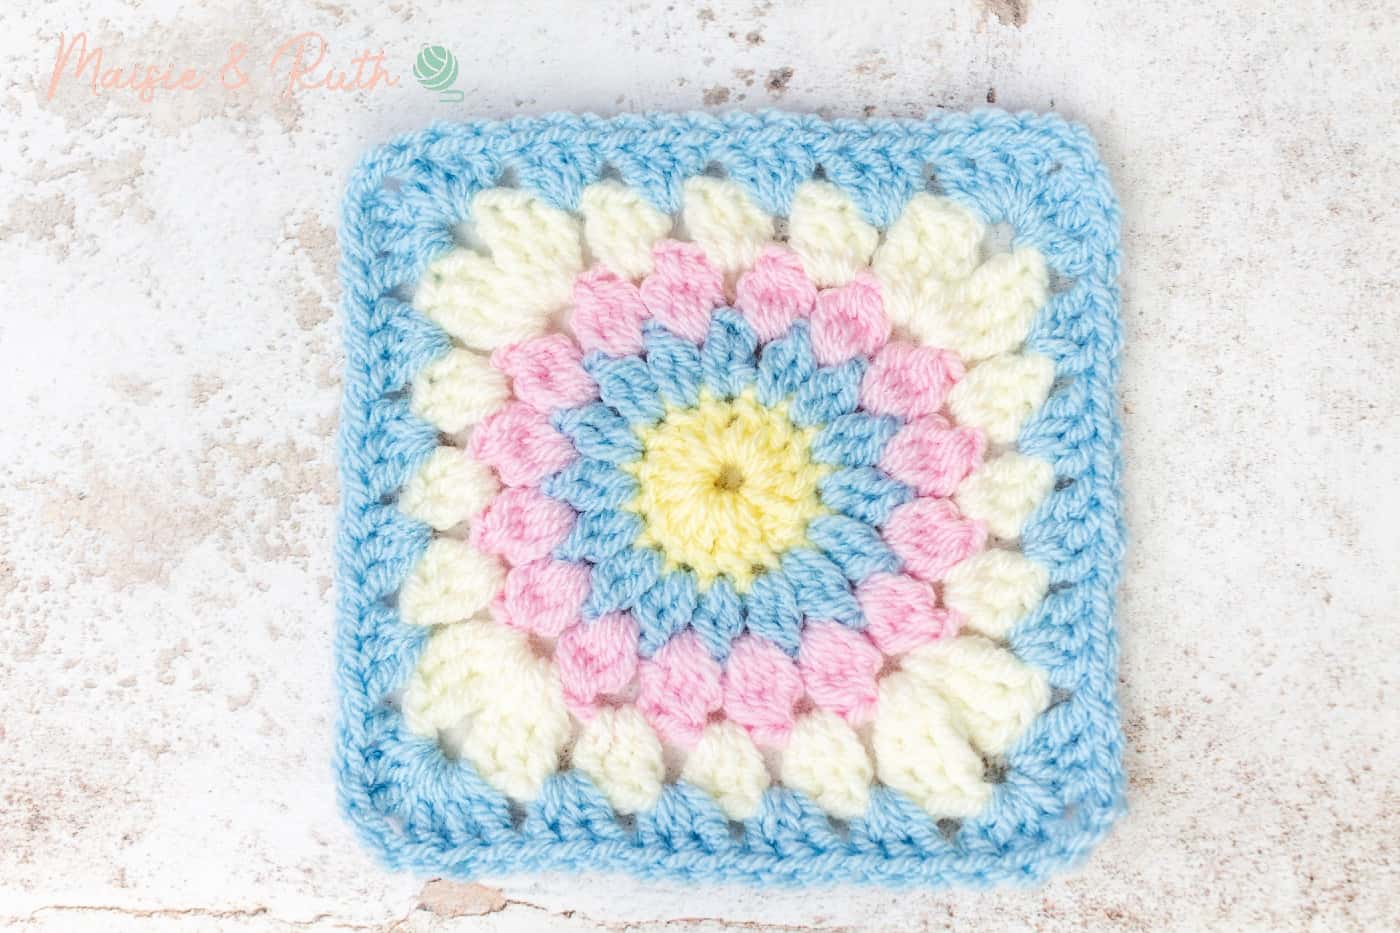
Here is the Sunburst granny square that has been made with the same colours but arranged in a slightly different order:
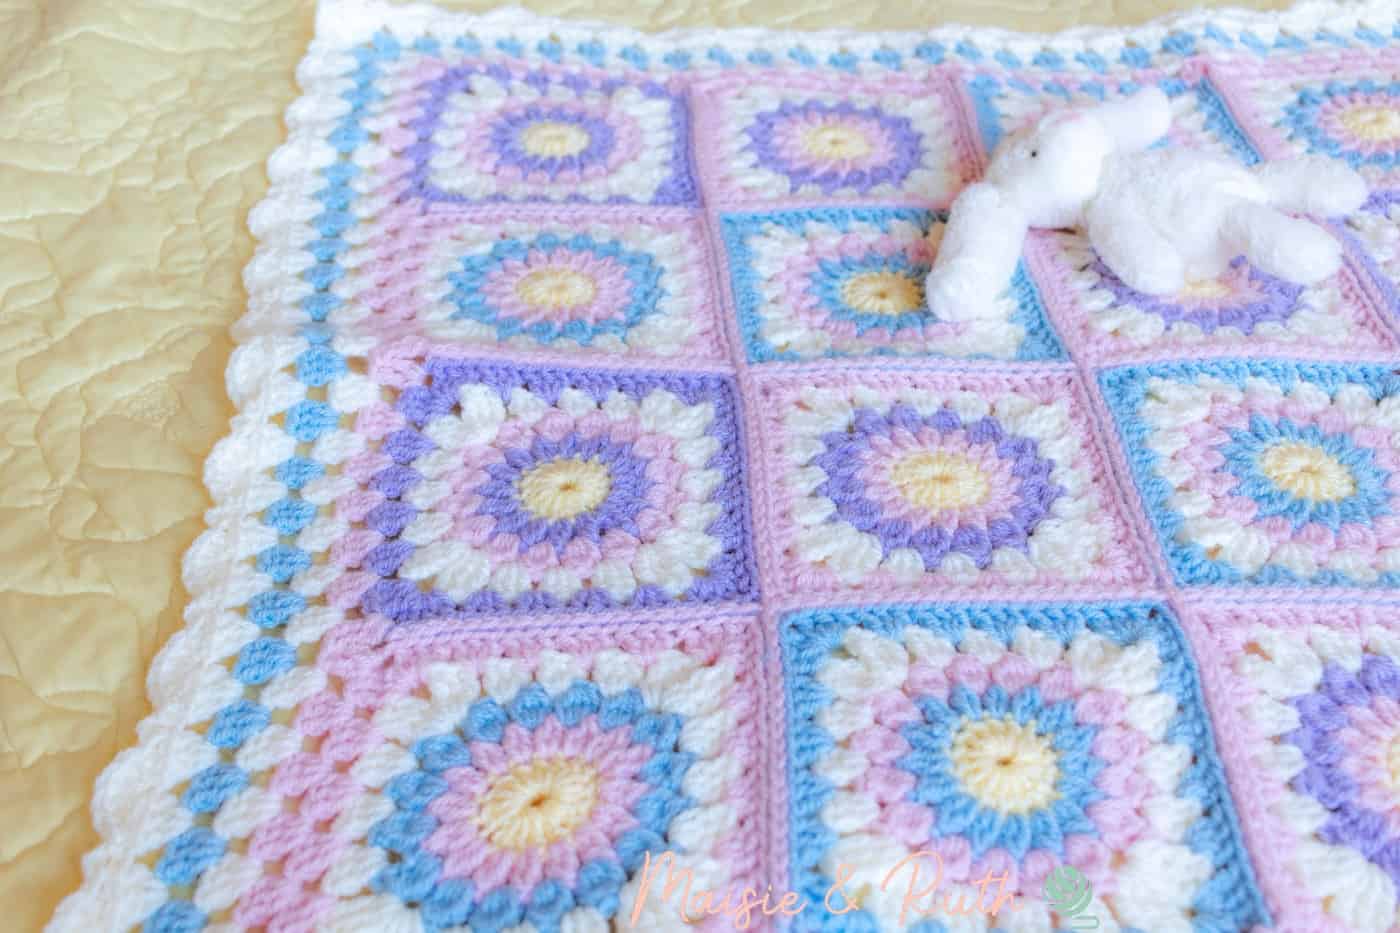
You can use your squares for lots of different projects, including the very pretty Paisley Baby Blanket below:
PATTERN IN FULL
Using Colour A
Ch6, sl st to 1st ch that was made to form a ring.
Round 1. Ch2 (counts as your first st), 15dc into ring, sl st to top of beg ch2 to join, [16 sts].
Cut yarn, fasten off and weave in ends.
Using Colour D Attach yarn to any st with a sl st.
Round 2. Ch1 (does not count as your first st), 1dc in same st, ch1, *2dcCL in next st, ch1*, repeat from * to * 15 times in total, sl st to 1st dc to join, [16 2dcCL sts, 16 ch1 sp].
Cut yarn, fasten off and weave in ends.
Using Colour B Attach yarn with a sl st to any ch1 sp.
Round 3. Ch1 (does not count as your first st), 3dcCL in same ch1 sp, ch2, *4dcCL in next ch1 sp, ch2*, repeat from * to * 15 times in total, sl st to 1st 3dcCL st to join, [16 4dcCL sts, 16 ch2 sp).
Cut yarn, fasten off and weave in ends.
Using Colour E Attach yarn with a sl st to any ch2 sp.
Round 4. Ch3 (counts as your first st), 2tr in same ch2 sp, (3dc in next ch1 sp) 3 times, *(3tr, ch2, 3tr) in next ch2 sp, (3dc in next ch2 sp) 3 times*, repeat from * to * 3 times in total, 3tr in 1st ch1 sp of round, ch2, sl st to top of beg ch3 to join, [12 groups of dc, 4 corners, 4 ch2 spaces].
Cut yarn, fasten off and weave in ends.
Using Colour D attach yarn with a sl st to any ch2 corner sp to join.
Round 5. Ch3 (counts as your first st), 2 EXdc in same ch2 corner sp (3dc in between each group of 3dc from the previous round) 4 times, *(3EXdc, ch2, 3EXdc) in next ch2 corner sp, (3dc in between each group of 3dc from the previous round) 4 times*, repeat from * to * 3 times in total, 3EXdc in 1st ch2 corner sp of round, ch2, sl st to top of beg ch3 to join, [16 groups of dc, 4 corners, 4 ch2 spaces].
For a neater finish, I prefer to make an invisible join at the end of the round (you can, of course, join with a sl st if you prefer).
If you found this tutorial on how to crochet a sunburst granny square enjoyable leave me a comment below 😊
I would also love to hear what you made using this particular granny square.
Or maybe you decided to make just one square for some de-stressing and relaxation!
Whatever use you put this pattern to, remember that you can post your photos on Instagram and tag me using @maisieandruth.
Happy crocheting!