


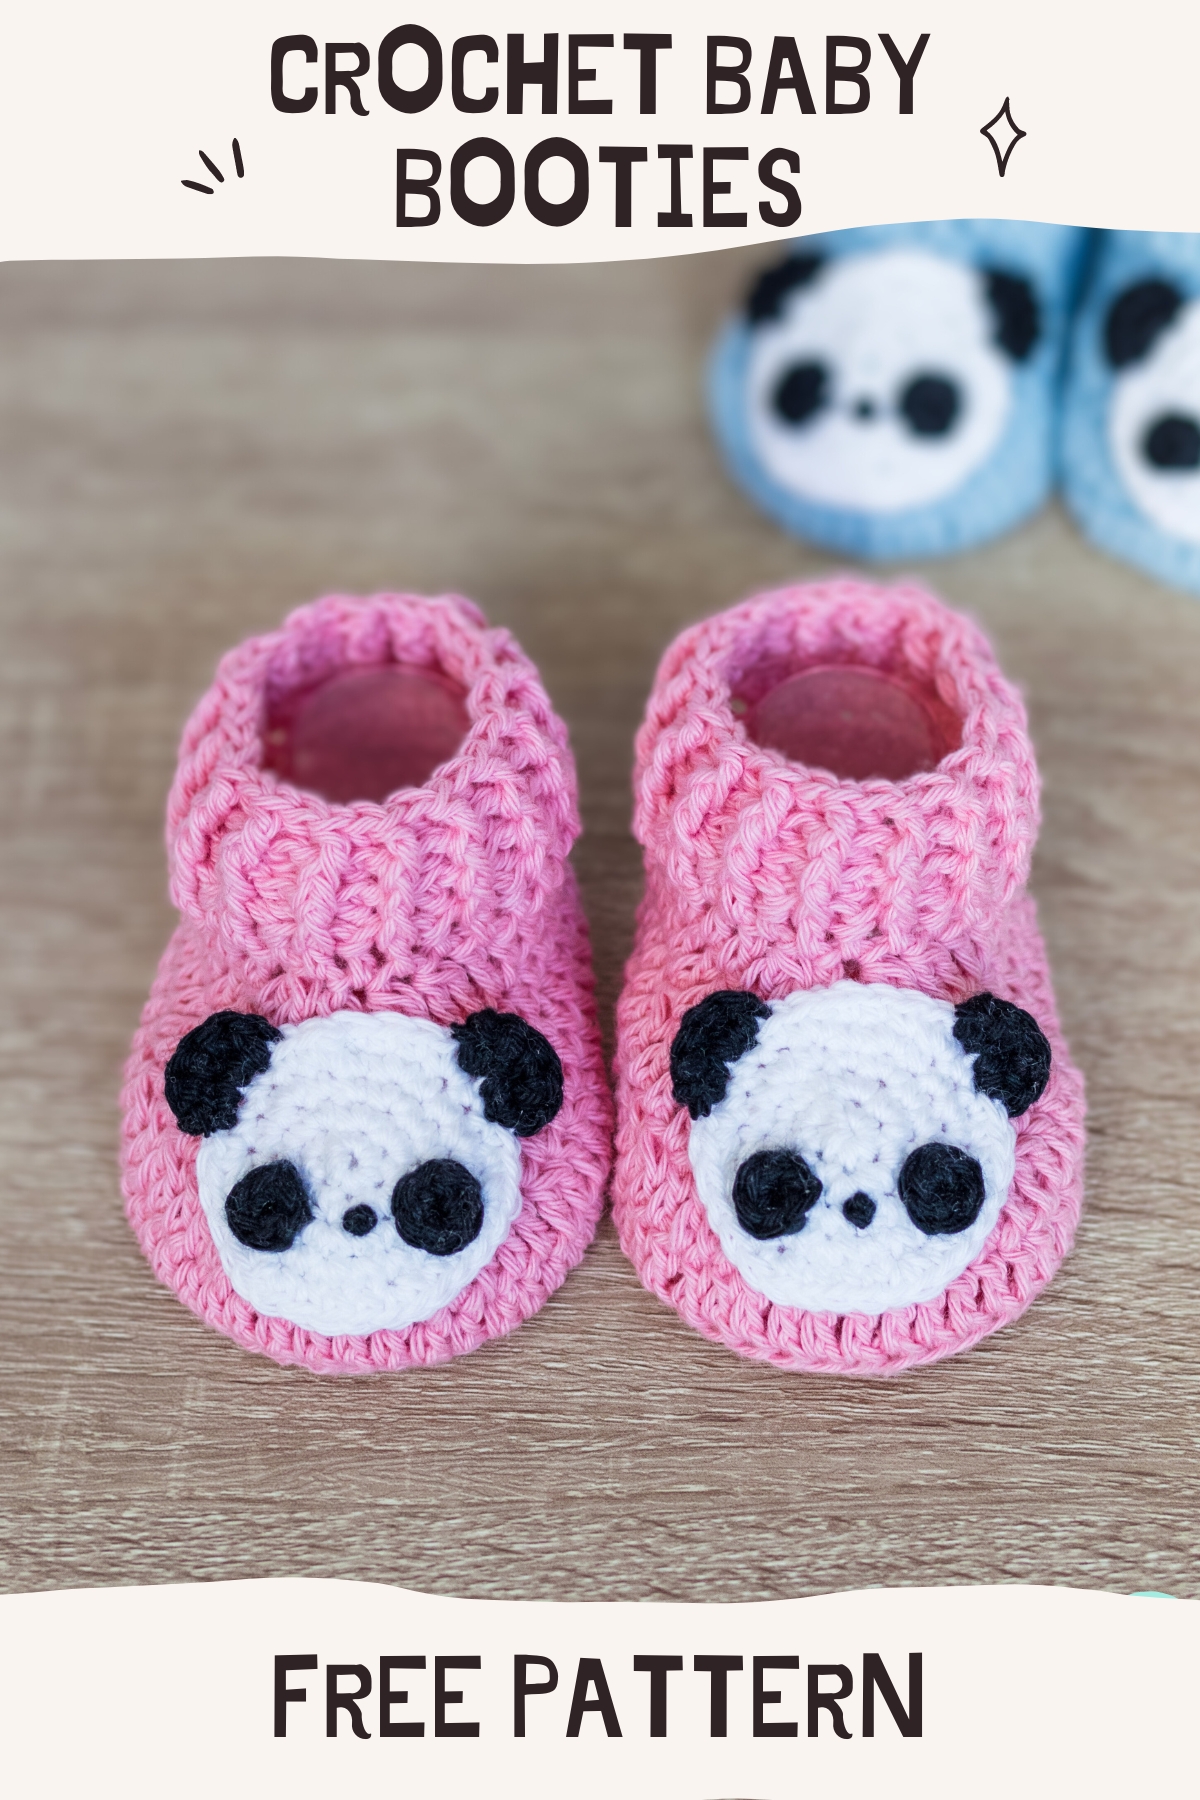
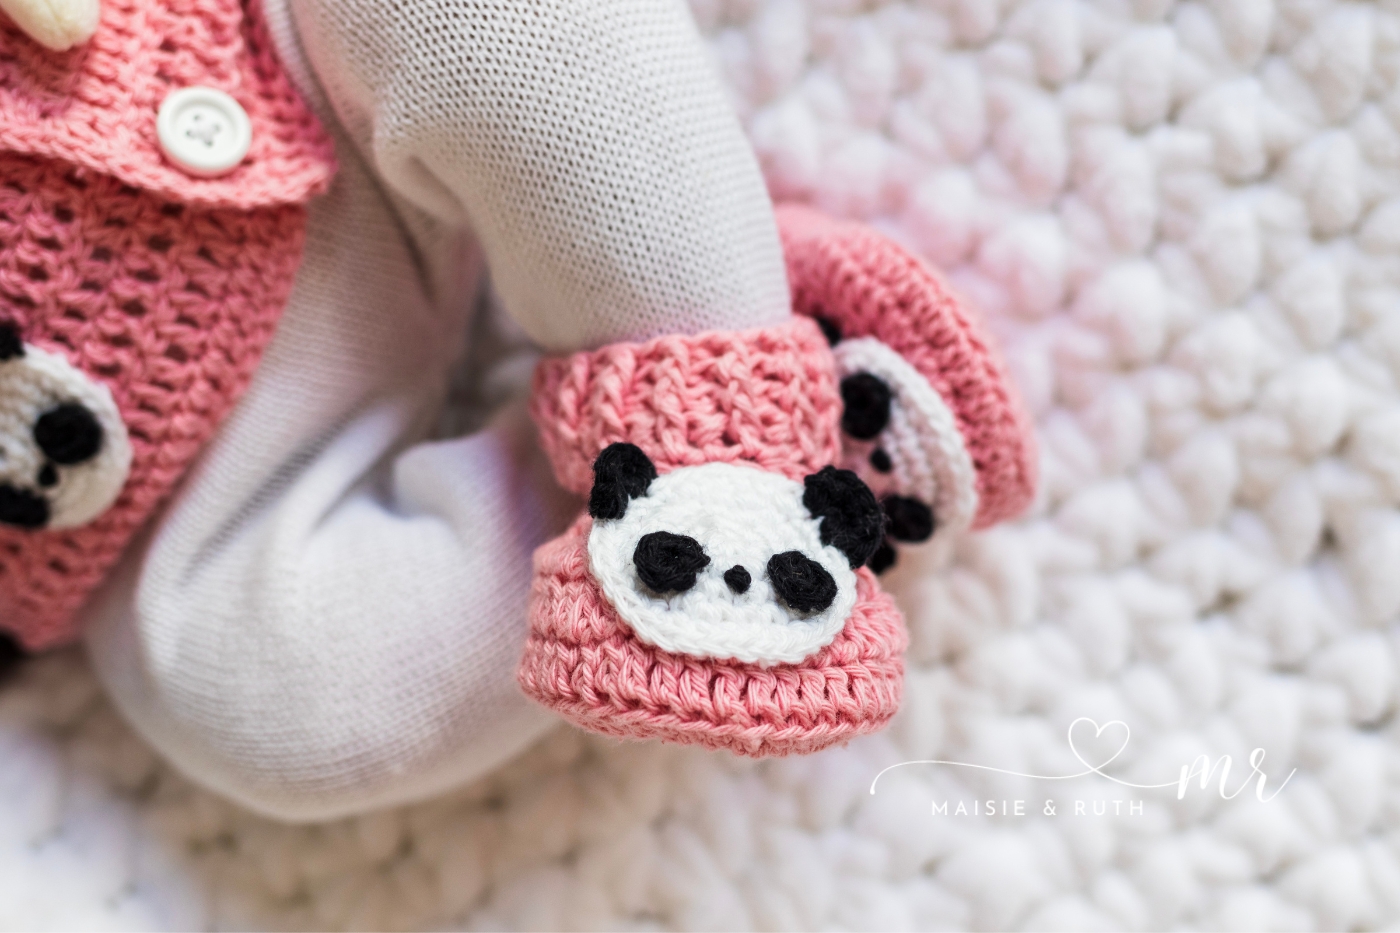
If you’re looking for a quick and easy pattern that’s both adorable and fun, look no further than this FREE pattern for Panda Crochet Baby Booties!
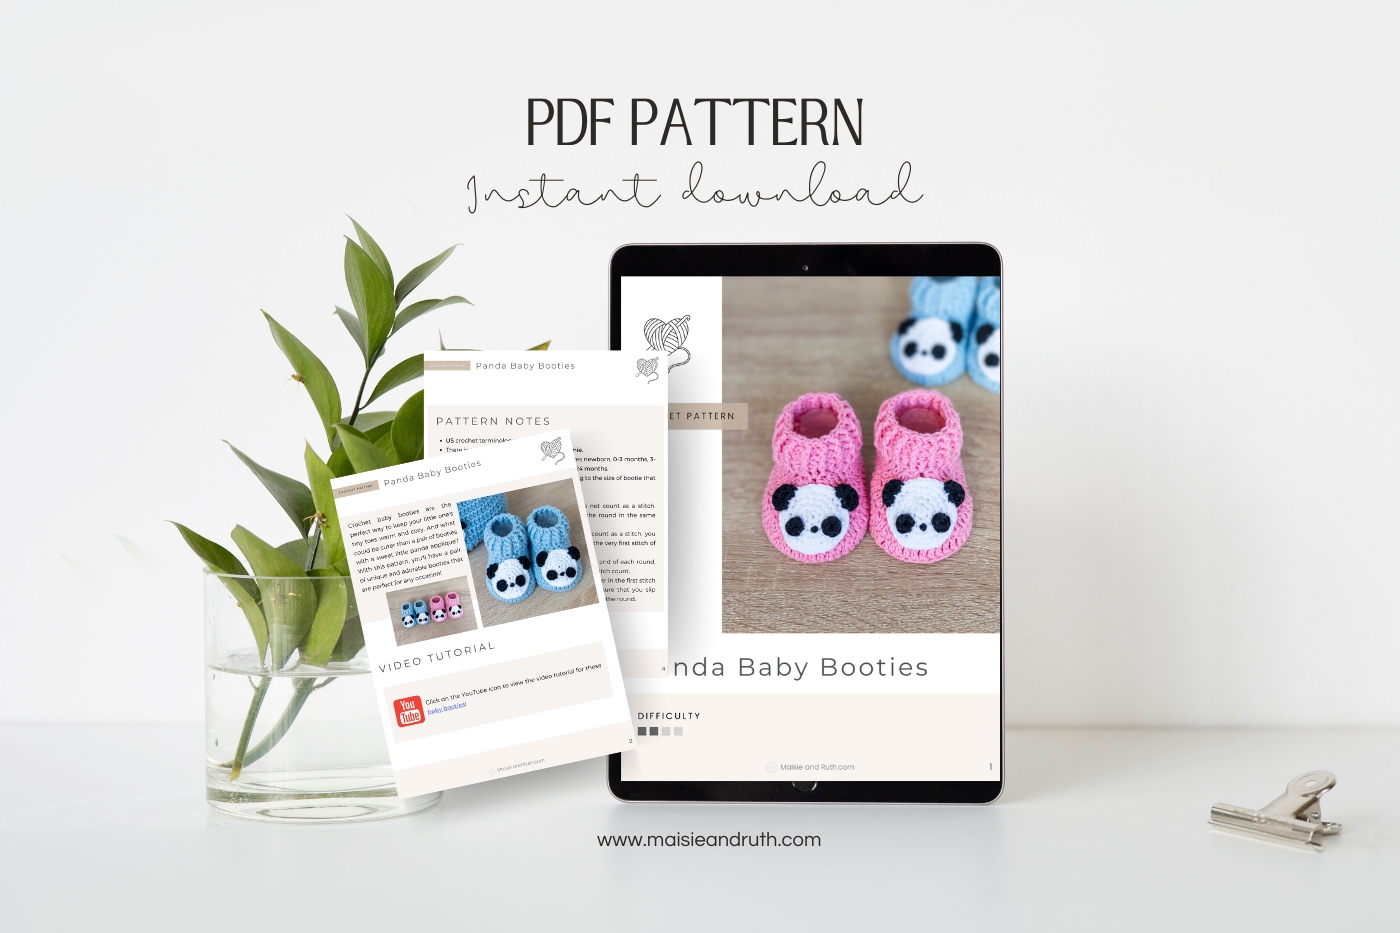
The pattern also comes with a step-by-step VIDEO tutorial (purchase the ad-free PDF pattern here).

CUTE & PRACTICAL DESIGN
Crochet baby booties are always a hit! They’re cute, practical, and perfect for keeping little feet warm.
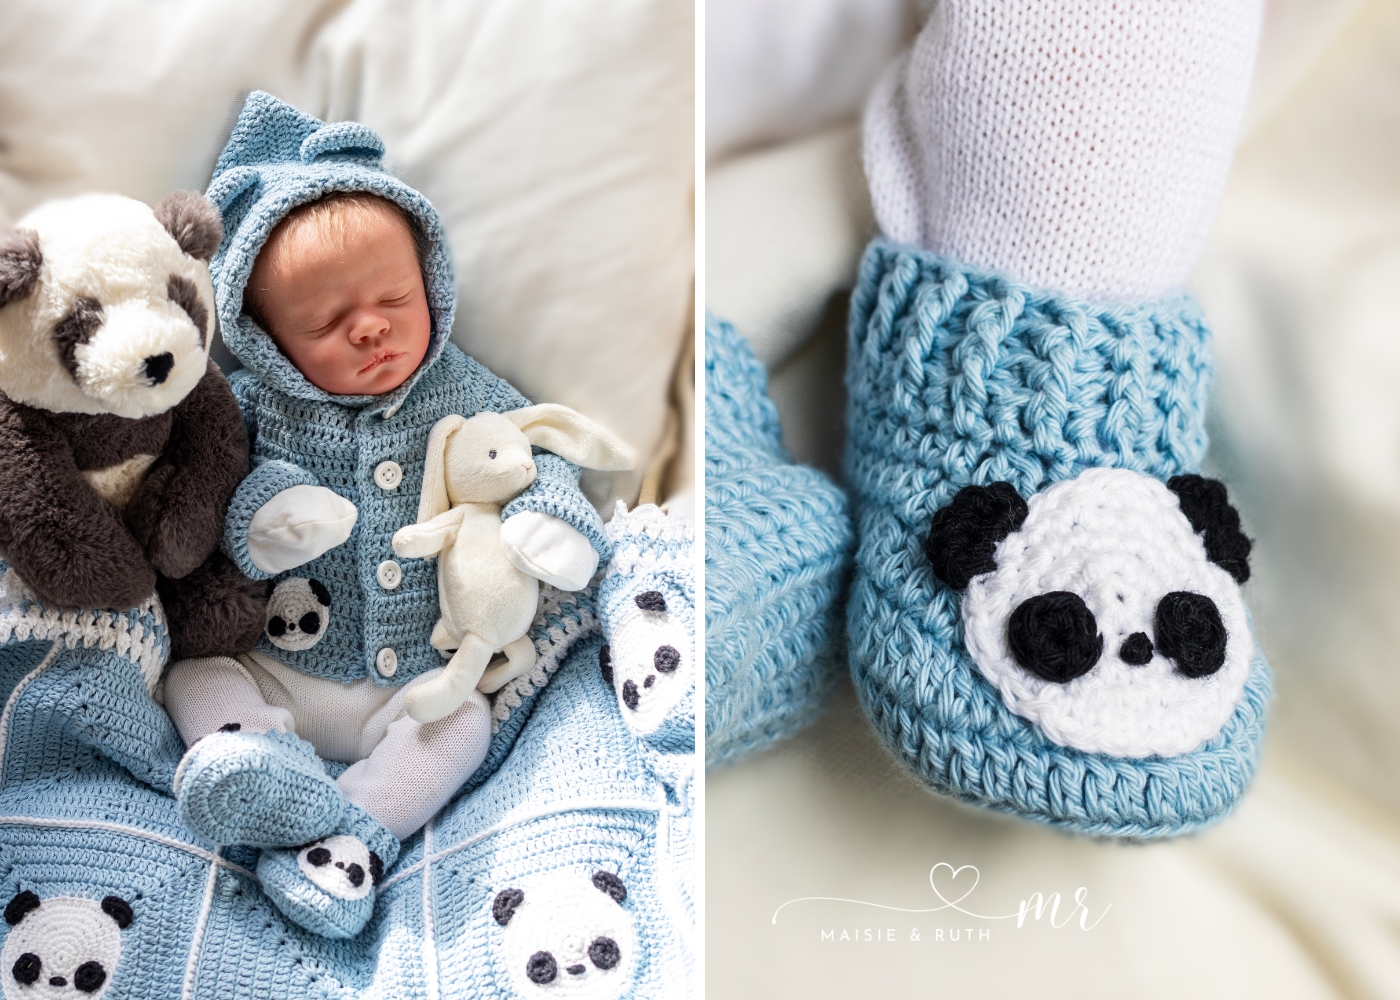
Embellish them with a sweet panda applique and you’ve got yourself the most adorable gift for a new baby.
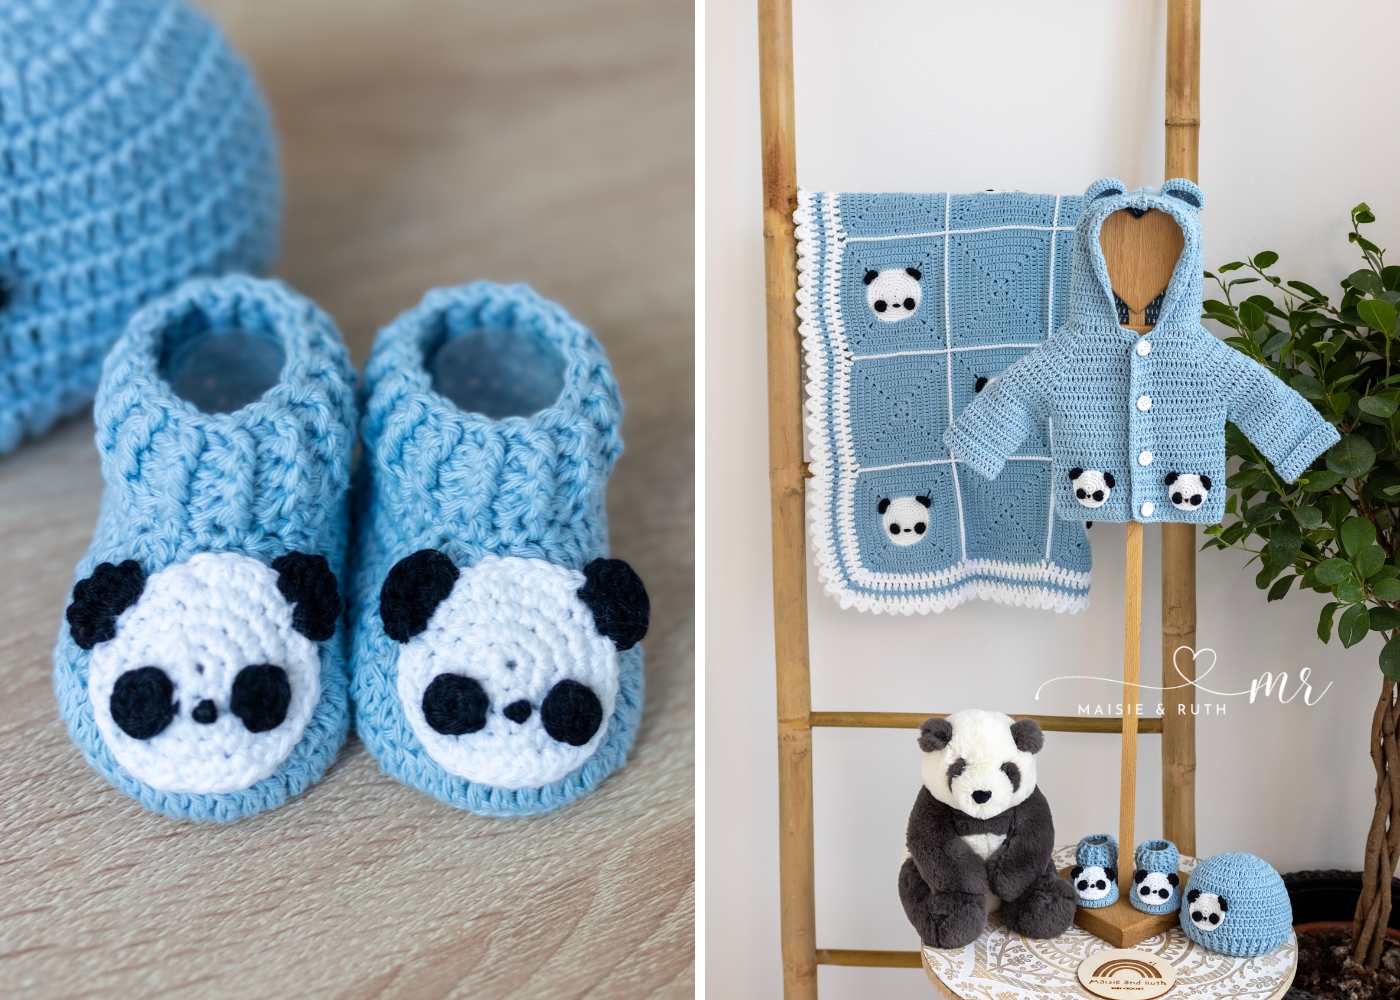
These panda crochet baby booties are part of a set. Make the matching hat, hoodie and blanket.
PDF PRINTABLE PATTERNS!
If you would prefer an ad-free, printable version of this crochet panda baby hoodie, you can purchase it from my Etsy store
These booties are also part of a Pattern Bundle! Check it out here
Thank you for supporting my shop!
VIDEO TUTORIAL
Crochet along with me to make these panda crochet baby booties.
Just click on the play button below (you can view the full tutorial on the Maisie and Ruth YouTube channel).
PIN ME FOR LATER!
Follow me on Pinterest.
Grab your yarn and hook and let’s dive into the free pattern now!

PANDA CROCHET BABY BOOTIES: A FREE PATTERN
This article for panda crochet baby booties may contain affiliate links, which means I’ll receive a commission if you purchase through my links, at no extra cost to you. Please read full disclosure for more information.
Please carefully read all the information below.
LEVEL

“Projects may include simple stitch patterns, color work, and/or shaping”.
Source: Craft Yarn Council of America’s www.YarnStandards.com
PATTERN NOTES
- US crochet terminology used throughout.
- There is one set of instructions that cover sizes newborn, 0-3 months, 3-6 months, 6-12 months, 12-18 months and 18-24 months, 2-3 years, 3-4 years and 4-5 years.
- Use the weight of yarn and hook size according to the size of bootie that you wish to make (details below in ‘Materials’).
- The bootie is made in rounds.
- The ch1 or ch2 at the beginning of each round does not count as a stitch. Therefore, you should make the first stitch of the round in the same stitch (at the base of the ch1 or ch2).
- As the ch1 or ch2 at the beginning of rounds does not count as a stitch, you should join the round by making a slip stitch into the very first stitch of the round.
- When counting the total number of stitches at the end of each round, please be careful not to include the ch1 or ch2 in the final stitch count.
- For beginners, it will be helpful to place a stitch marker in the first stitch made at the beginning of each round. This will ensure that you slip stitch into the correct stitch when joining at the end of the round.
- Panda applique: For the eyes, ears and nose you will use black coloured yarn. However, in the video and photos below I demonstrate these parts with blue coloured yarn (it is easier for you to see on camera).
SUPPLIES
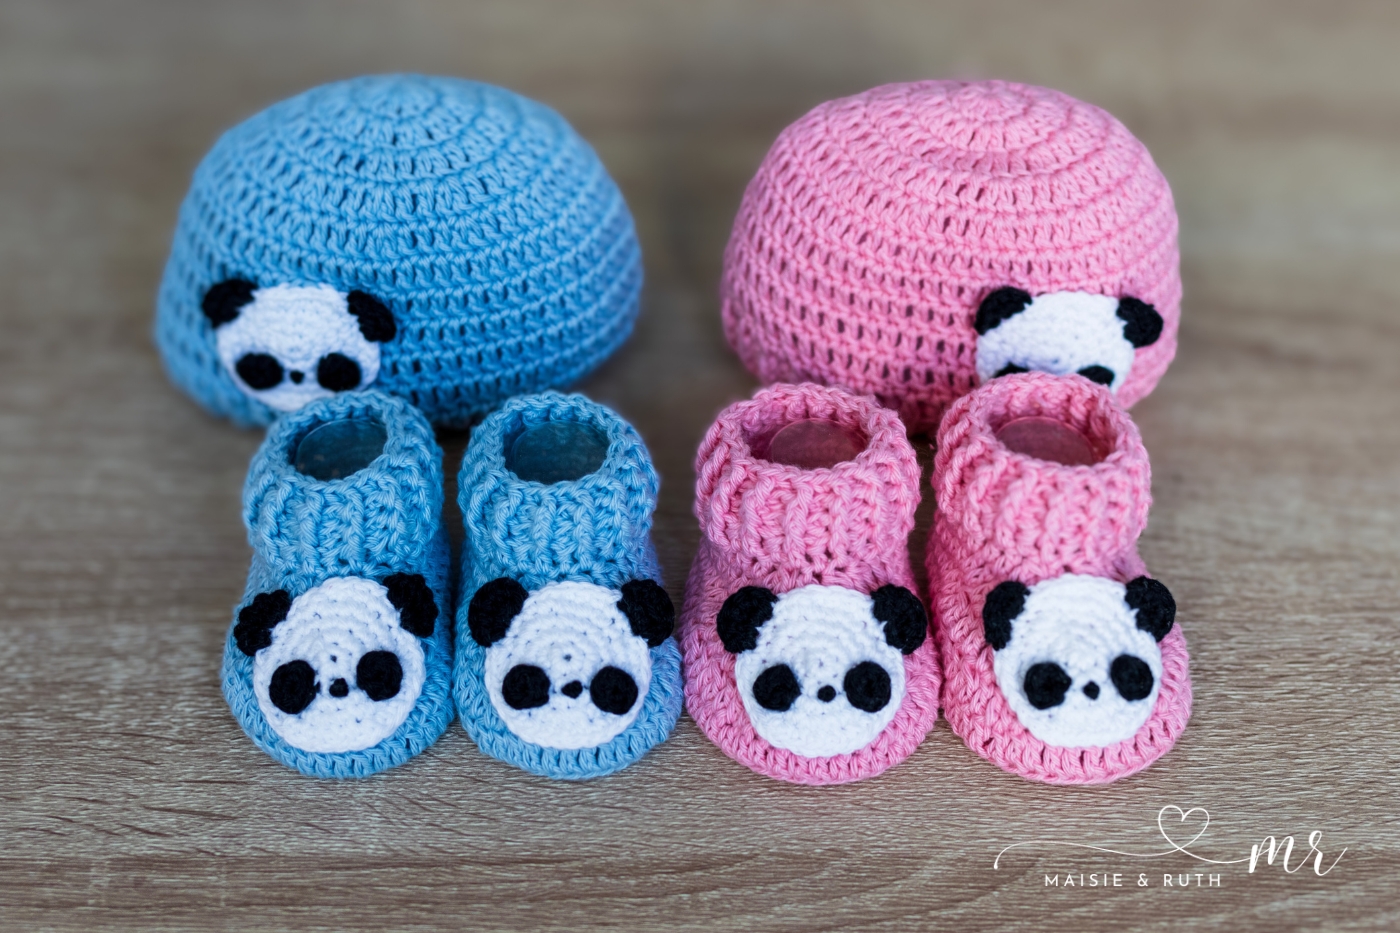
- Newborn / 0-3 months / 3-6 months:
YARN: Any category #3 / light worsted / DK / 8 ply yarn.
COLOUR A (Booties). I used less than 1 ball of Paintbox Yarns Cotton DK, 137yds / 1.8oz (125m / 50g): (colours shown: Bubblegum Pink (451) and Dolphin Blue (437)).
COLOUR B (Panda). Scrap amount of yarn from 1 ball of Paintbox Yarns Cotton DK, 137yds / 1.8oz (125m / 50g) in the colour Paper White (401).
COLOUR C (Panda). Scrap amount of yarn from 1 ball of Paintbox Yarns Cotton DK, 137yds / 1.8oz (125m / 50g) in the colour Pure Black (402).
CROCHET HOOKS:
BOOTIES: Newborn 2.5mm; 0-3 months 3mm; 3-6 months E (3.5mm)
PANDA APPLIQUE: Newborn 2.5mm; 0-3 months & 3-6 months 3mm
- 6-12 months / 12-18 months / 18-24 months:
YARN: Any category #4 / worsted / aran / 10 ply yarn.
COLOUR A (Booties). I used less than 1 ball of Stylecraft Special Aran, 214 yds / 3.5 oz (196m / 100g) (in the colour of your choice).
COLOUR B (Panda). Scrap amount of yarn from 1 ball of Stylecraft Special Aran, 214 yds / 3.5 oz (196m / 100g) in the colour White (1001).
COLOUR C (Panda). Scrap amount of yarn from 1 ball of Stylecraft Special Aran, 214 yds / 3.5 oz (196m / 100g) in the colour Black (1002).
CROCHET HOOKS:
BOOTIES: 6-12 months E (3.5mm); 12-18 months G (4mm); 18-24 months 4.5mm
PANDA APPLIQUE: 6-12 months E (3.5mm); 12-18 months & 18-24 months G (4mm)
- 2-3 years / 3-4 years/ 4-5 years:
YARN: Any category #5 / bulky / chunky / 12 ply yarn.
COLOUR A (Booties). I used less than 1 ball of Stylecraft Special Chunky, 157 yds / 3.5 oz (144m / 100g) (in the colour of your choice).
COLOUR B (Panda). Scrap amount of yarn from 1 ball of Stylecraft Special Chunky, 157 yds / 3.5 oz (144m / 100g) in the colour White (1001).
COLOUR C (Panda). Scrap amount of yarn from 1 ball of Stylecraft Special Chunky, 157 yds / 3.5 oz (144m / 100g) in the colour Black (1002).
CROCHET HOOKS:
BOOTIES: 2-3 years 4.5mm; 3-4 years H (5mm) ; 4-5 years I (5.5mm)
PANDA APPLIQUE: 2-3 years 4.5mm; 3-4 & 4-5 years H (5mm)
FOR ALL SIZES:
- Yarn needle (for weaving in ends)
- Scissors
- Stitch Marker
GAUGE / TENSION
To check your gauge / tension, work the first three rounds of the pattern below. To check that you’re okay for size, the length of your sole (which is also the completed length of your baby bootie) should measure as follows:
Newborn (2.5mm hook): 8cm
0–3 months (3mm hook): 9cm
3–6 months (E / 3.5mm hook): 10cm
6-12 months (E / 3.5mm hook): 11.5cm
12-18 months (G / 4mm hook): 12cm
18-24 months (4.5mm hook): 12.5cm
2-3 years (4.5mm hook): 15cm
3-4 years (H / 5mm hook): 16cm
4-5 years (I / 5.5mm hook): 17cm
STITCHES & ABBREVIATIONS (US CROCHET TERMS)
beg – beginning
ch(s) – chain(s)
BLOhdc – back loop only half double crochet: Yarn over (yo), insert hook into back loop only of next stitch, yo, pull up a loop (3 loops on hook). Yo, pull through all 3 loops. 1 back loop only half double crochet completed.
BLOdc – Yarn over (yo), insert hook into back loop only of next stitch, yo, pull up a loop (3 loops on hook). Yo, pull through 2 loops (2 loops on hook). Yo, pull through remaining 2 loops. 1 back loop only double crochet completed.
BPdc – back post double crochet: Yarn over (yo), insert hook from back to front to back around the post of the next stitch, yo, pull up a loop, 3 loops remaining on hook. Yo, pull up a loop and pull through 2 loops on hook, 2 loops remaining on hook. Yo, pull up a loop and pull through remaining 2 loops on hook. 1 BPdc completed.
dc – double crochet: Yarn over (yo), insert hook into stitch, yo, pull up a loop (3 loops on hook). Yo, pull through 2 loops (2 loops on hook). Yo, pull through remaining 2 loops. 1 double crochet completed.
dc2tog – double crochet two together: Yarn over (yo), insert hook into stitch, yo, pull up a loop (3 loops on hook). Yo, pull through 2 loops (2 loops on hook). Yo, insert hook into next st, yo, pull up a loop (4 loops on hook). Yo, pull through 2 loops (3 loops on hook). Yo, pull through remaining 3 loops. Dc2tog completed.
FPdc- front post double crochet: Yarn over (yo), insert hook from front to back to front around the post of the next stitch, yo, pull up a loop, 3 loops remaining on hook. Yo, pull up a loop and pull through 2 loops on hook, 2 loops remaining on hook. Yo, pull up a loop and pull through remaining 2 loops on hook. 1 FPdc completed. See my FPdc Tutorial for helpful step-by-step photos.
hdc – half double crochet: Yarn over (yo), insert hook into stitch, yo, pull up a loop (3 loops on hook). Yo, pull through all 3 loops. 1 half double crochet completed.
sc – single crochet: Insert hook into stitch, yarn over (yo), pull up a loop (2 loops on hook). Yo, pull through both loops on hook. 1 single crochet completed.
sl st – slip stitch: Insert hook into stitch, yarn over (yo), pull up a loop, you will have 2 loops on your hook. Pull the first loop through the second loop. 1 slip stitch completed.
sp(s) – space(es)
st(s) – stitch(es)
Turn: Turn your work clockwise.
* to * – Repeat instructions between asterisks as many times as directed.
( ) – Sets of stitches to be worked as many times as directed.
[ ] – The total number of stitches at the end of a row.
PATTERN INSTRUCTIONS
BOOTIES
With Colour A
Ch 11 (relaxed, not too tight). In round 1 below, I like to work through the back bumps.
Round 1. 1dc in 2nd ch from hook, 1dc in next 8 ch, 8dc in last ch, working up other side of ch, 1dc in next 8 ch, 2dc in last ch, sl st to 1st dc to join, DO NOT TURN [27 sts].
Round 2. Ch1 (does not count as your 1st st here and throughout), 2hdc in same st (at base of ch1), 1hdc in next 7 sts, 1dc in next st, 2dc in next 8 sts, 1dc in next st, 1hdc in next 7 sts, 2hdc in last 2 sts, sl st to 1st hdc to join, DO NOT TURN [38 sts].
Round 3. Ch1, 2hdc in same st (at base of ch1), 2hdc in next st, 1hdc in next 8 sts, 1dc in next st, (2dc in next st, 1dc in next st) 8 times, 1dc in next st, 1hdc in next 8 sts, 2hdc in last 2 sts, sl st to 1st hdc to join, DO NOT TURN [50 sts].
Round 4. Ch1, BLOhdc in same st (at base of ch1), BLOhdc in next 12 sts, BLOdc in next 26 sts, BLOhdc in next 11 sts, sl st to 1st BLOhdc to join, DO NOT TURN [50 sts].
Round 5. Ch1, 1hdc in same st (at base of ch1), 1hdc in next 12 sts, 1dc in next st, (dc2tog, 1dc in next st) 8 times, 1dc in next st, 1hdc in next 11 sts, sl st to 1st hdc to join, DO NOT TURN [42 sts].
Round 6. Ch1, 1hdc in same st (at base of ch1), 1hdc in next 13 sts, 1dc in next st, (1dc in next 2 sts, dc2tog) 4 times, 1dc in next st, 1hdc in next 10 sts, sl st to 1st hdc to join, DO NOT TURN [38 sts].
Round 7. Ch1, 1hdc in same st (at base of ch1), 1hdc in next 13 sts, 1dc in next st, (1dc in next st, dc2tog) 4 times, 1dc in next st, 1hdc in next 10 sts, sl st to 1st hdc to join, DO NOT TURN [34 sts].
Round 8. Ch1, 1hdc in same st (at base of ch1), 1hdc in next 13 sts, 1dc in next st, (dc2tog) 4 times, 1dc in next st, 1hdc in next 10 sts, sl st to 1st hdc to join, DO NOT TURN [30 sts].
Round 9. Ch2, 1hdc in same st (at base of ch2), 1hdc in next 29 sts, sl st to 1st hdc to join, DO NOT TURN [30 sts].
Rounds 10-12. Ch2, *FPdc in next st, BPdc in next st*, repeat from * to * to end of round, sl st to 1st FPdc to join, DO NOT TURN [15 FPdc & 15 BPdc sts].
Cut yarn, fasten off and weave in ends.
PANDA APPLIQUE
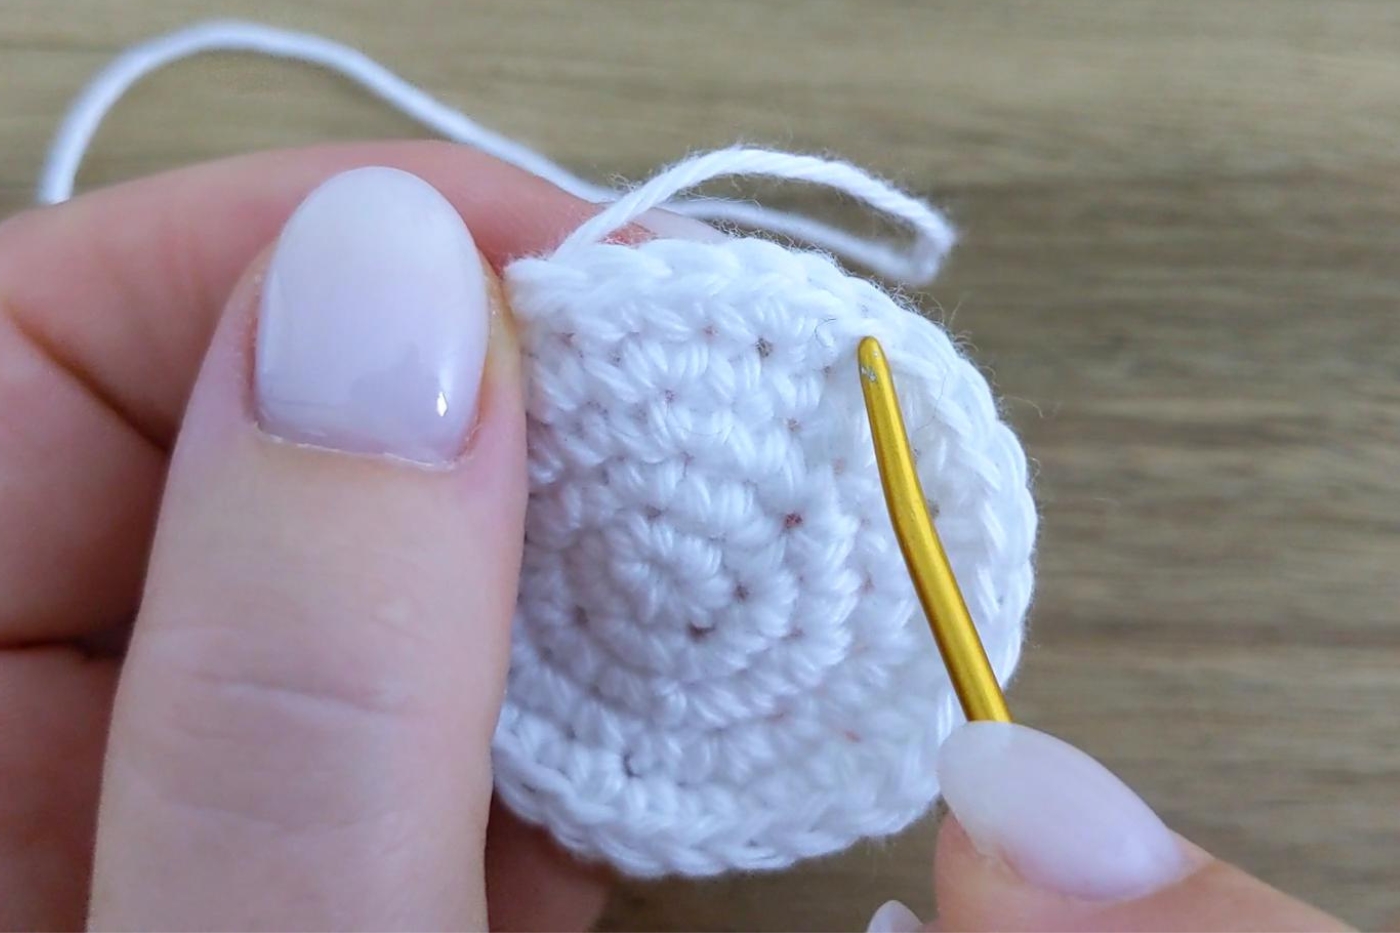
HEAD
Using Colour B
Make a magic circle (if you do not like the magic circle method, see the Alternative Round 1 below).
Round 1. Ch1, 6sc in the magic circle, do not join round, instead place a st marker in the first sc of the round [6 sts].
Alternative Round 1. Ch2, 6sc in 2nd ch from hook (work over yarn tail), do not join round, instead place a st marker in the first sc of the round [6 sts].
Round 2. 2sc in next 6 sts [12 sts].
Round 3. *2sc in next st, 1sc in next st*, repeat from * to * 6 times [18 sts].
Round 4. 1sc in next st, 2sc in next st, *1sc in next 2 sts, 2sc in next st*, repeat from * to * 5 times, ending with 1sc in last st [24 sts].
Round 5. *2sc in next st, 1sc in next 3 sts*, repeat from * to * 6 times, sl st to 1st sc or make an invisible join [30 sts].
Cut yarn (leave a long tail approx. 12” / 30cm for sewing on later).
RIGHT EAR
Note: For demonstration purposes, I’m using blue coloured yarn. When working with black yarn, make sure that you’re working in a well-lit area!
With Colour C
Attach yarn to any stitch:
Round 1. Ch1 (does not count as your first st), 2sc in same st (at base of ch1), (2sc, sl st) in next st, TURN [5 sts].
Round 2. Ch1 (does not count as your first st), 1sc in next 4 sts, sl st at base of 1st sc made in round 1 [5 sts].
Cut yarn, fasten off and weave in ends.
LEFT EAR
Attach yarn to the 8th stitch along from last stitch worked for right ear:
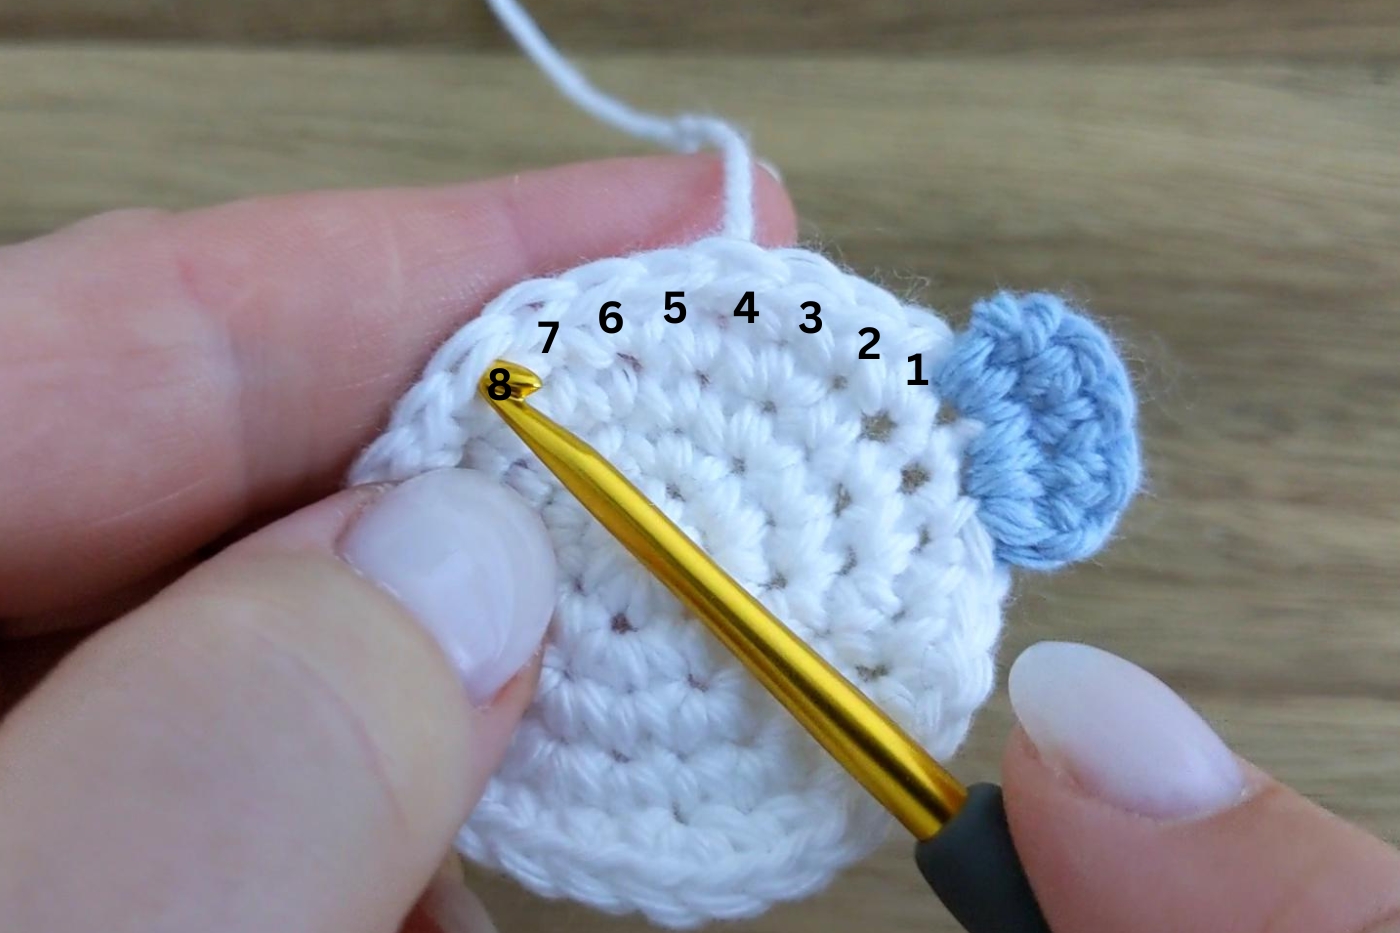
Work left ear as right ear above.
EYES
Using Colour C
Make a magic circle (if you do not like the magic circle method, see the Alternative Round 1 below).
Round 1. Ch1, 6sc in the magic circle, sl st to 1st sc or make an invisible join (when cutting yarn, leave about 10” / 25cm for sewing on later), [6 sts].
Alternative Round 1. Ch2, 6sc in 2nd ch from hook (work over yarn tail), sl st to 1st sc or make an invisible join (when cutting yarn, leave about 10” / 25cm for sewing on later), [6 sts].
NOSE
Make a slip knot (leave a yarn tail about 6” / 15cm) and place it on your hook, ch1, cut yarn (leave about 6” / 15cm) and pull yarn through. Pull on yarn tail to create a little ball.
Weave both yarn tails through the centre of the head, in between the 2nd and 3rd rounds:
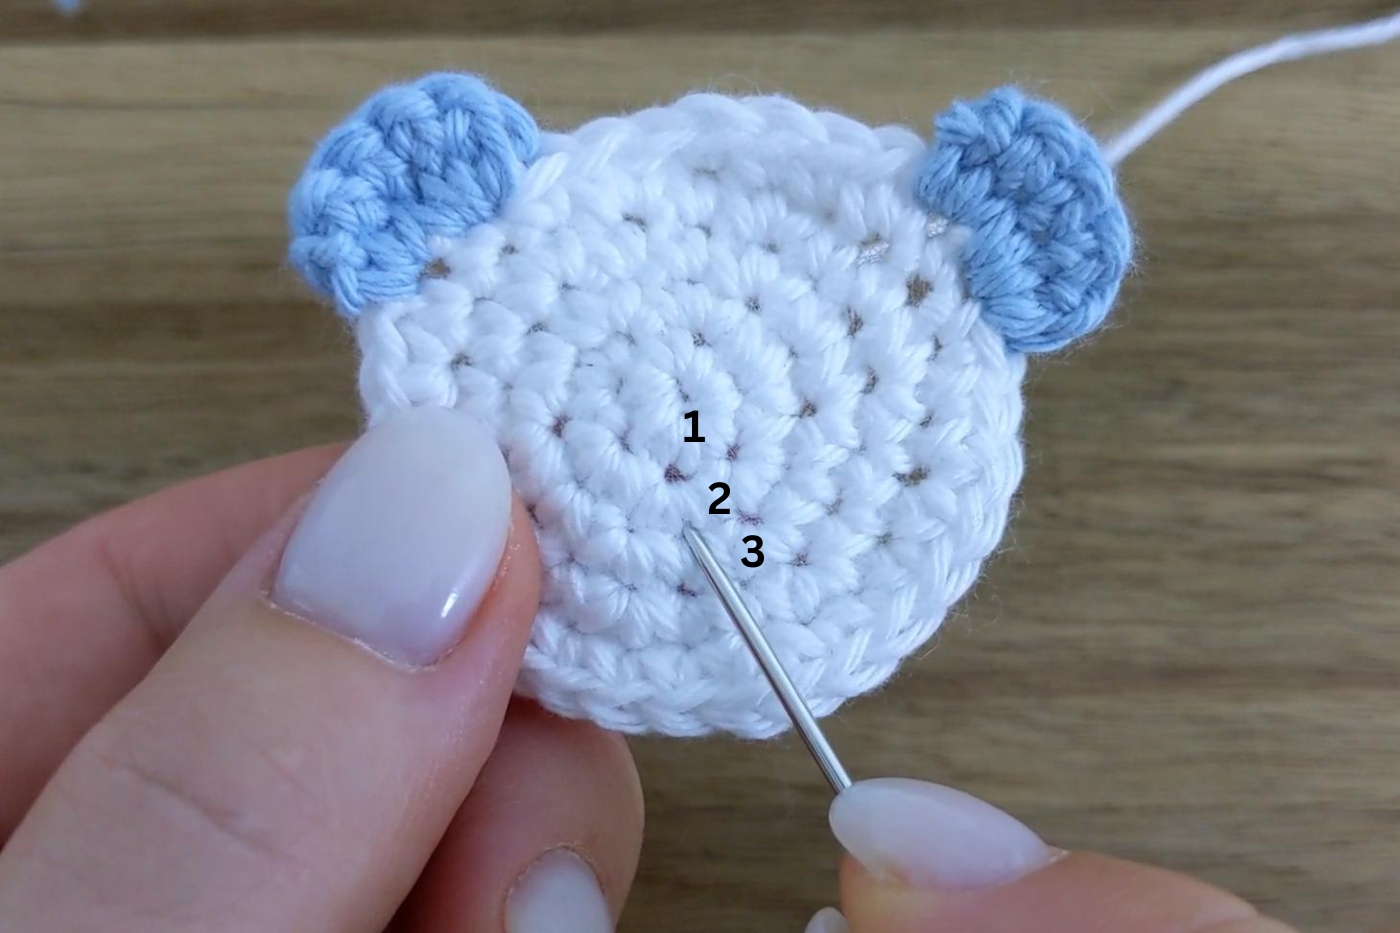
Tie a few knots at the back of your work to secure. Weave in ends.
ATTACH EYES
Sew your eyes onto either side of the nose.
SHARE YOUR WORK!
I really hope that you enjoyed the free pattern for these panda crochet baby booties!
I would LOVE to see photos of your completed booties… please tag me on Instagram using @maisieandruth and / or #maisieandruth


