

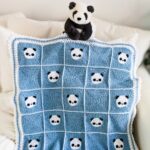
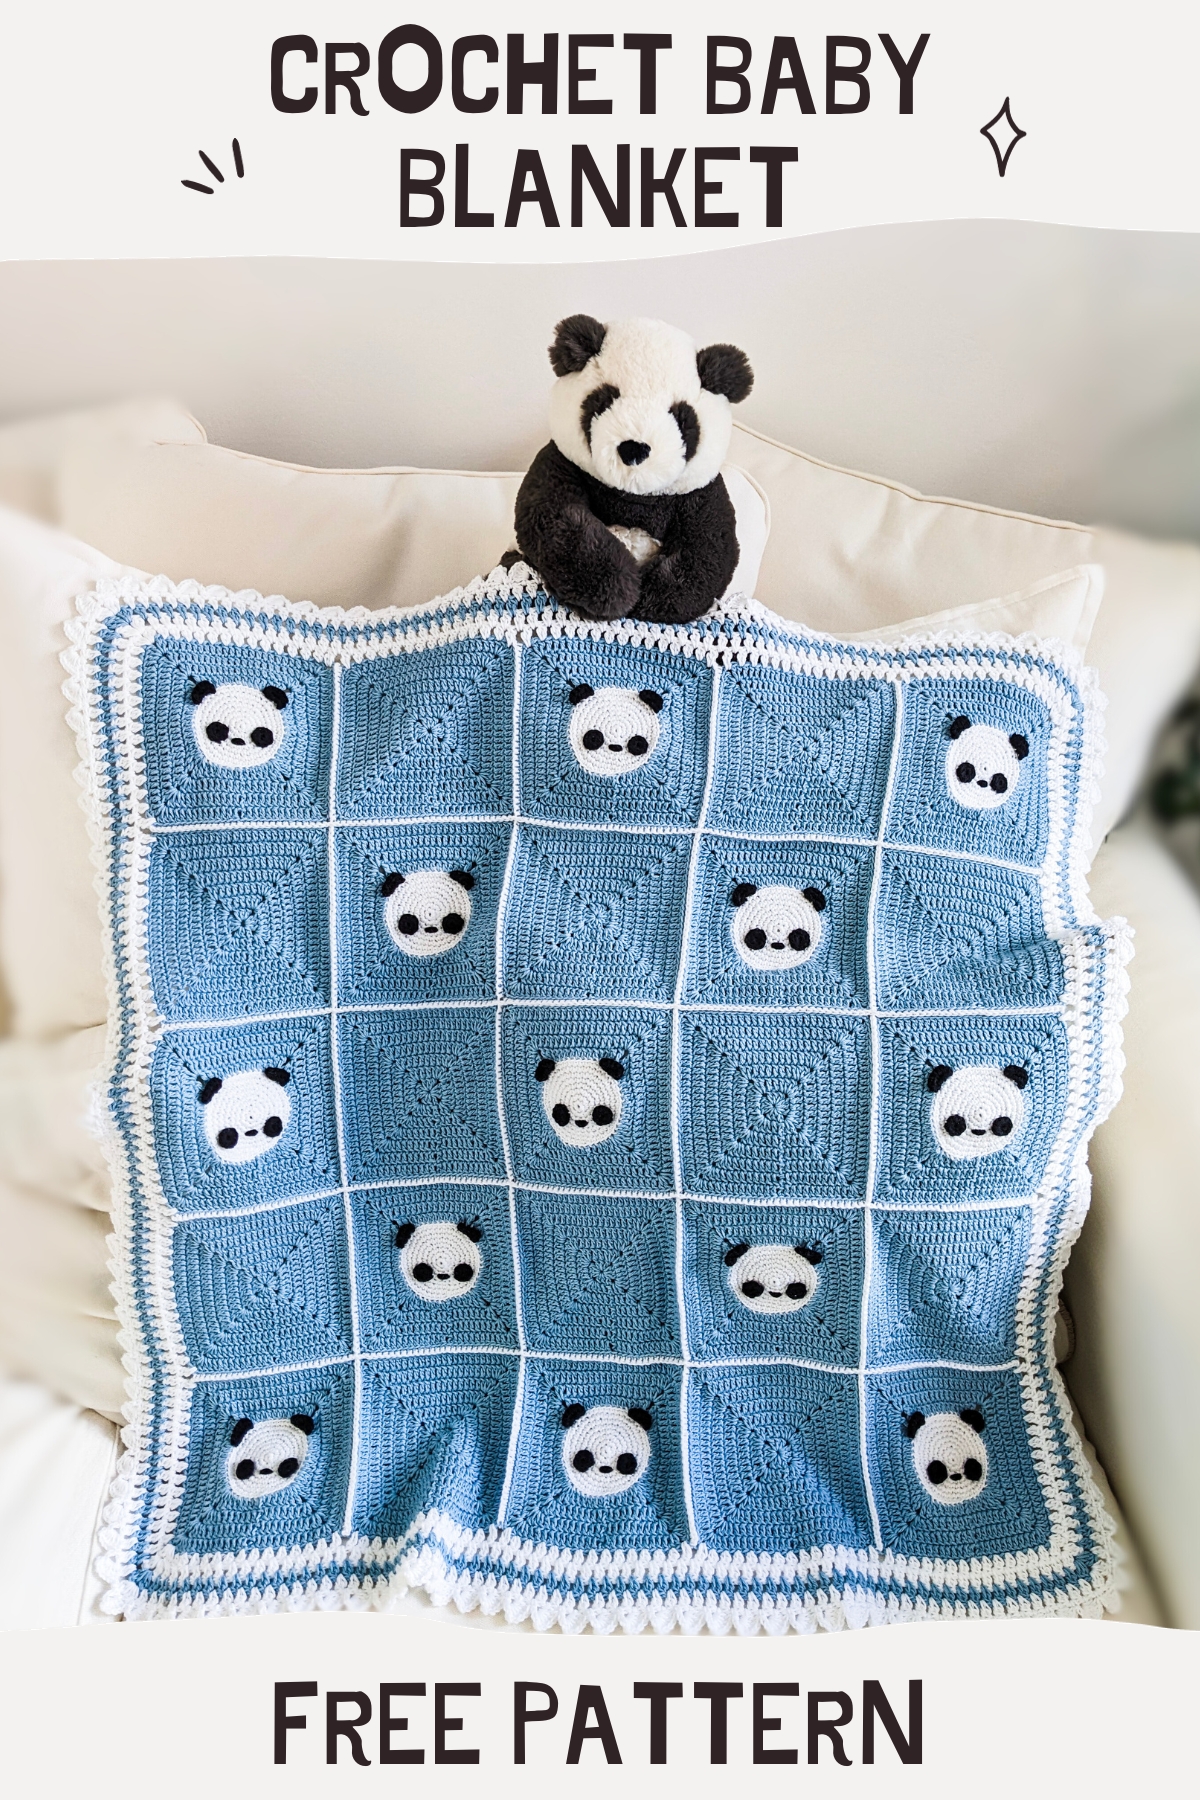
This FREE Crochet Pattern is perfect for anyone looking to make an adorable and cozy panda themed baby blanket!
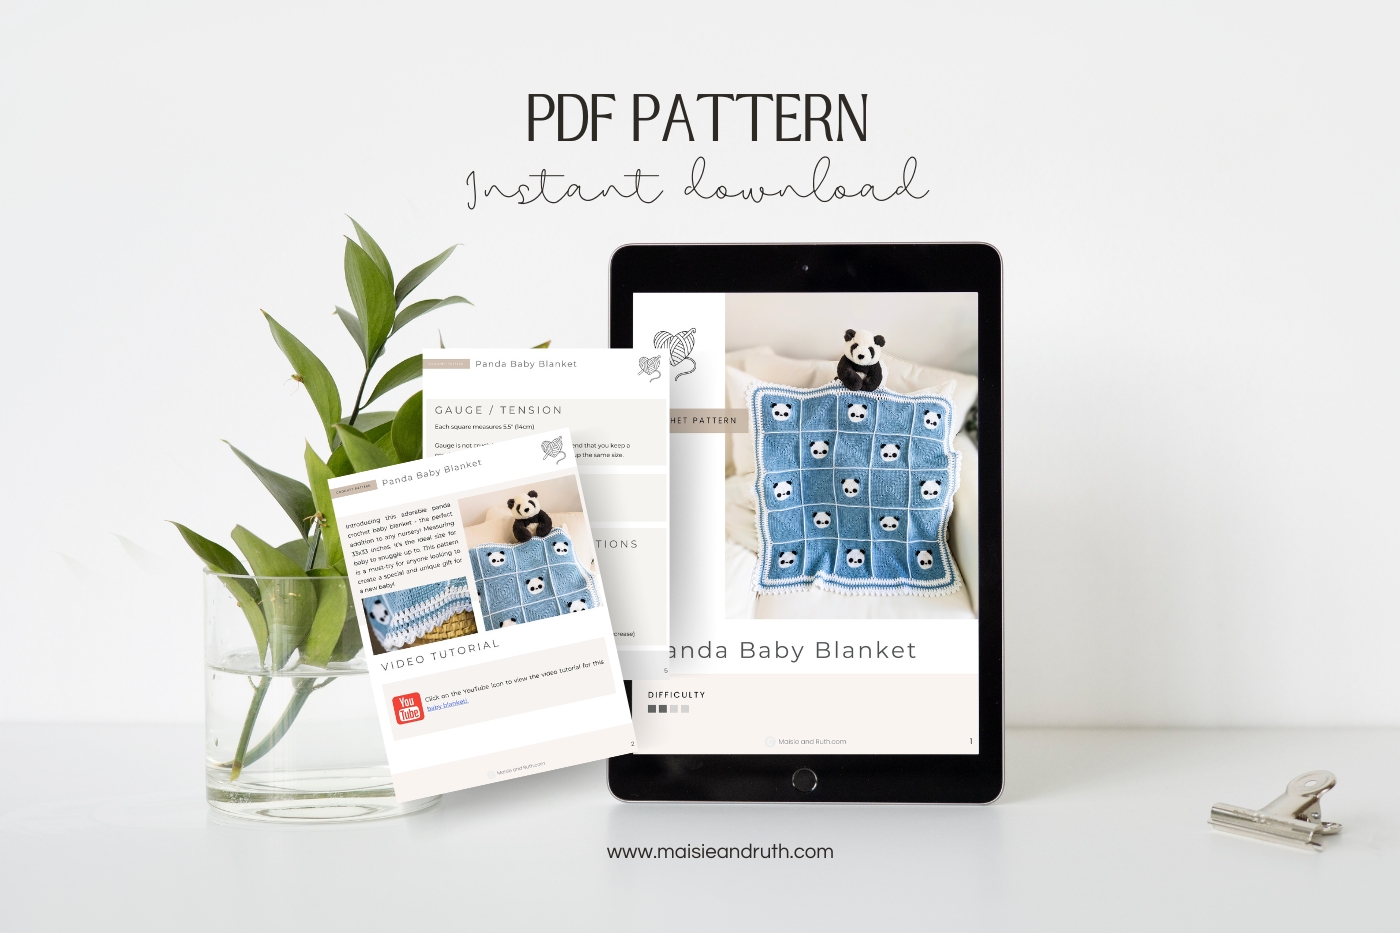
A VIDEO TUTORIAL is also included (to purchase an ad-free printable version, visit the Etsy store HERE).

CUTE PANDA DESIGN
Crocheting can be such a fun and rewarding hobby, especially when you get to create something adorable and unique for a little one in your life.
If you’re looking for a new project, why not try making a fun and easy panda crochet baby blanket? It’s a great way to practise your crochet skills, and it also makes for a cute and cozy addition to any nursery.
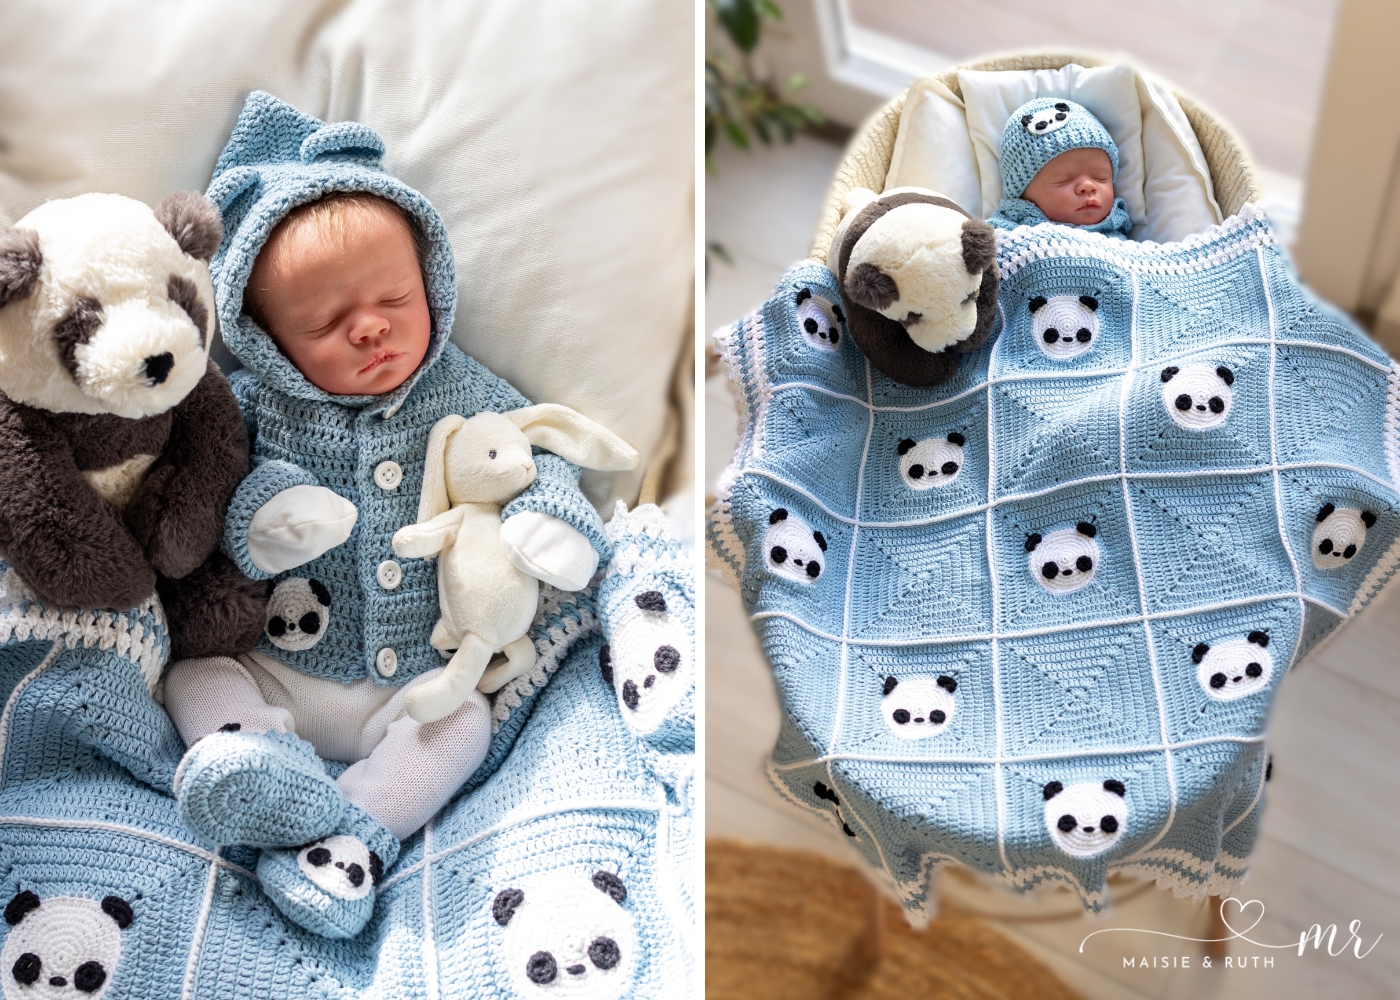
CUDDLY CREATION
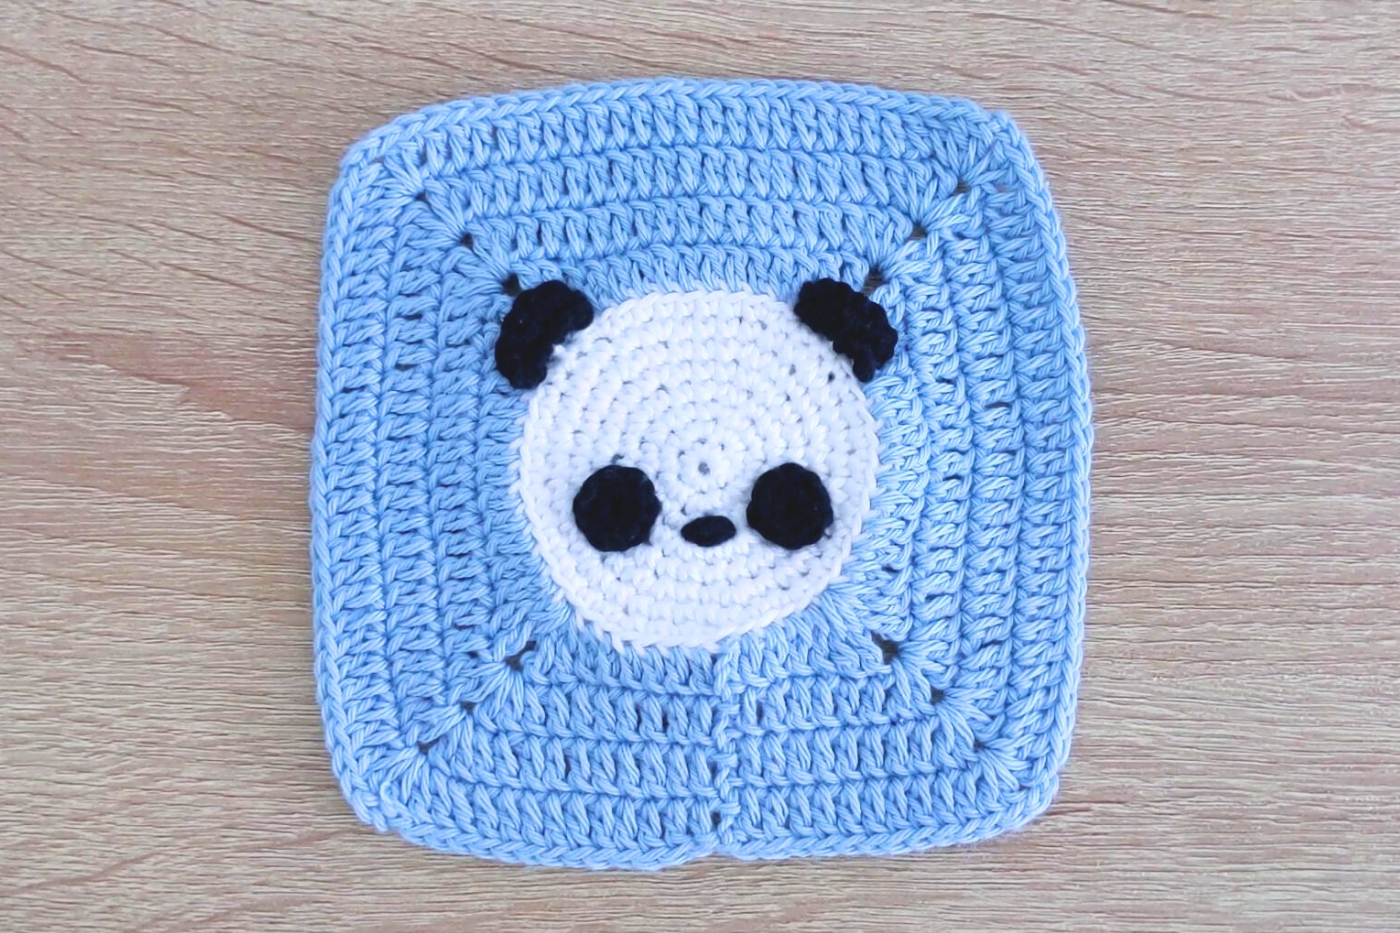
The sweet little panda face is used making black and white yarn. You will start off by crocheting a circle in the round. The ears will then be crocheted straight onto the circle.
The eyes are crocheted separately and then sewn onto the face. The nose is embroidered using a very simple technique.
While the pattern may look a little intricate at first – don’t worry! The step-by-step video tutorial will guide you every step of the way. Once you get the hang of it, I’m sure that you’ll be making more than one!

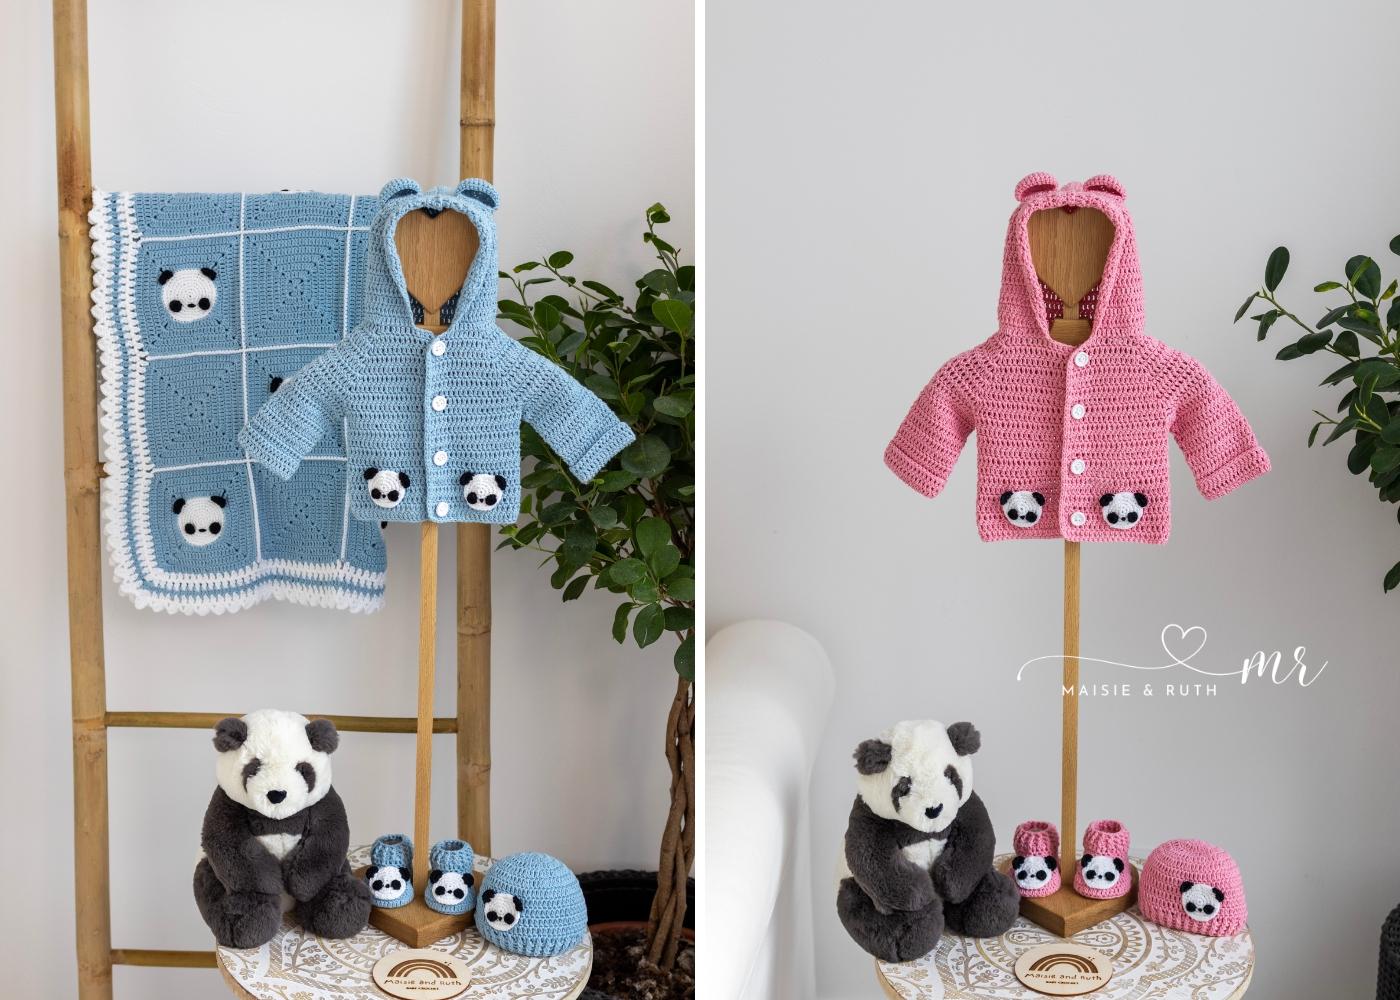
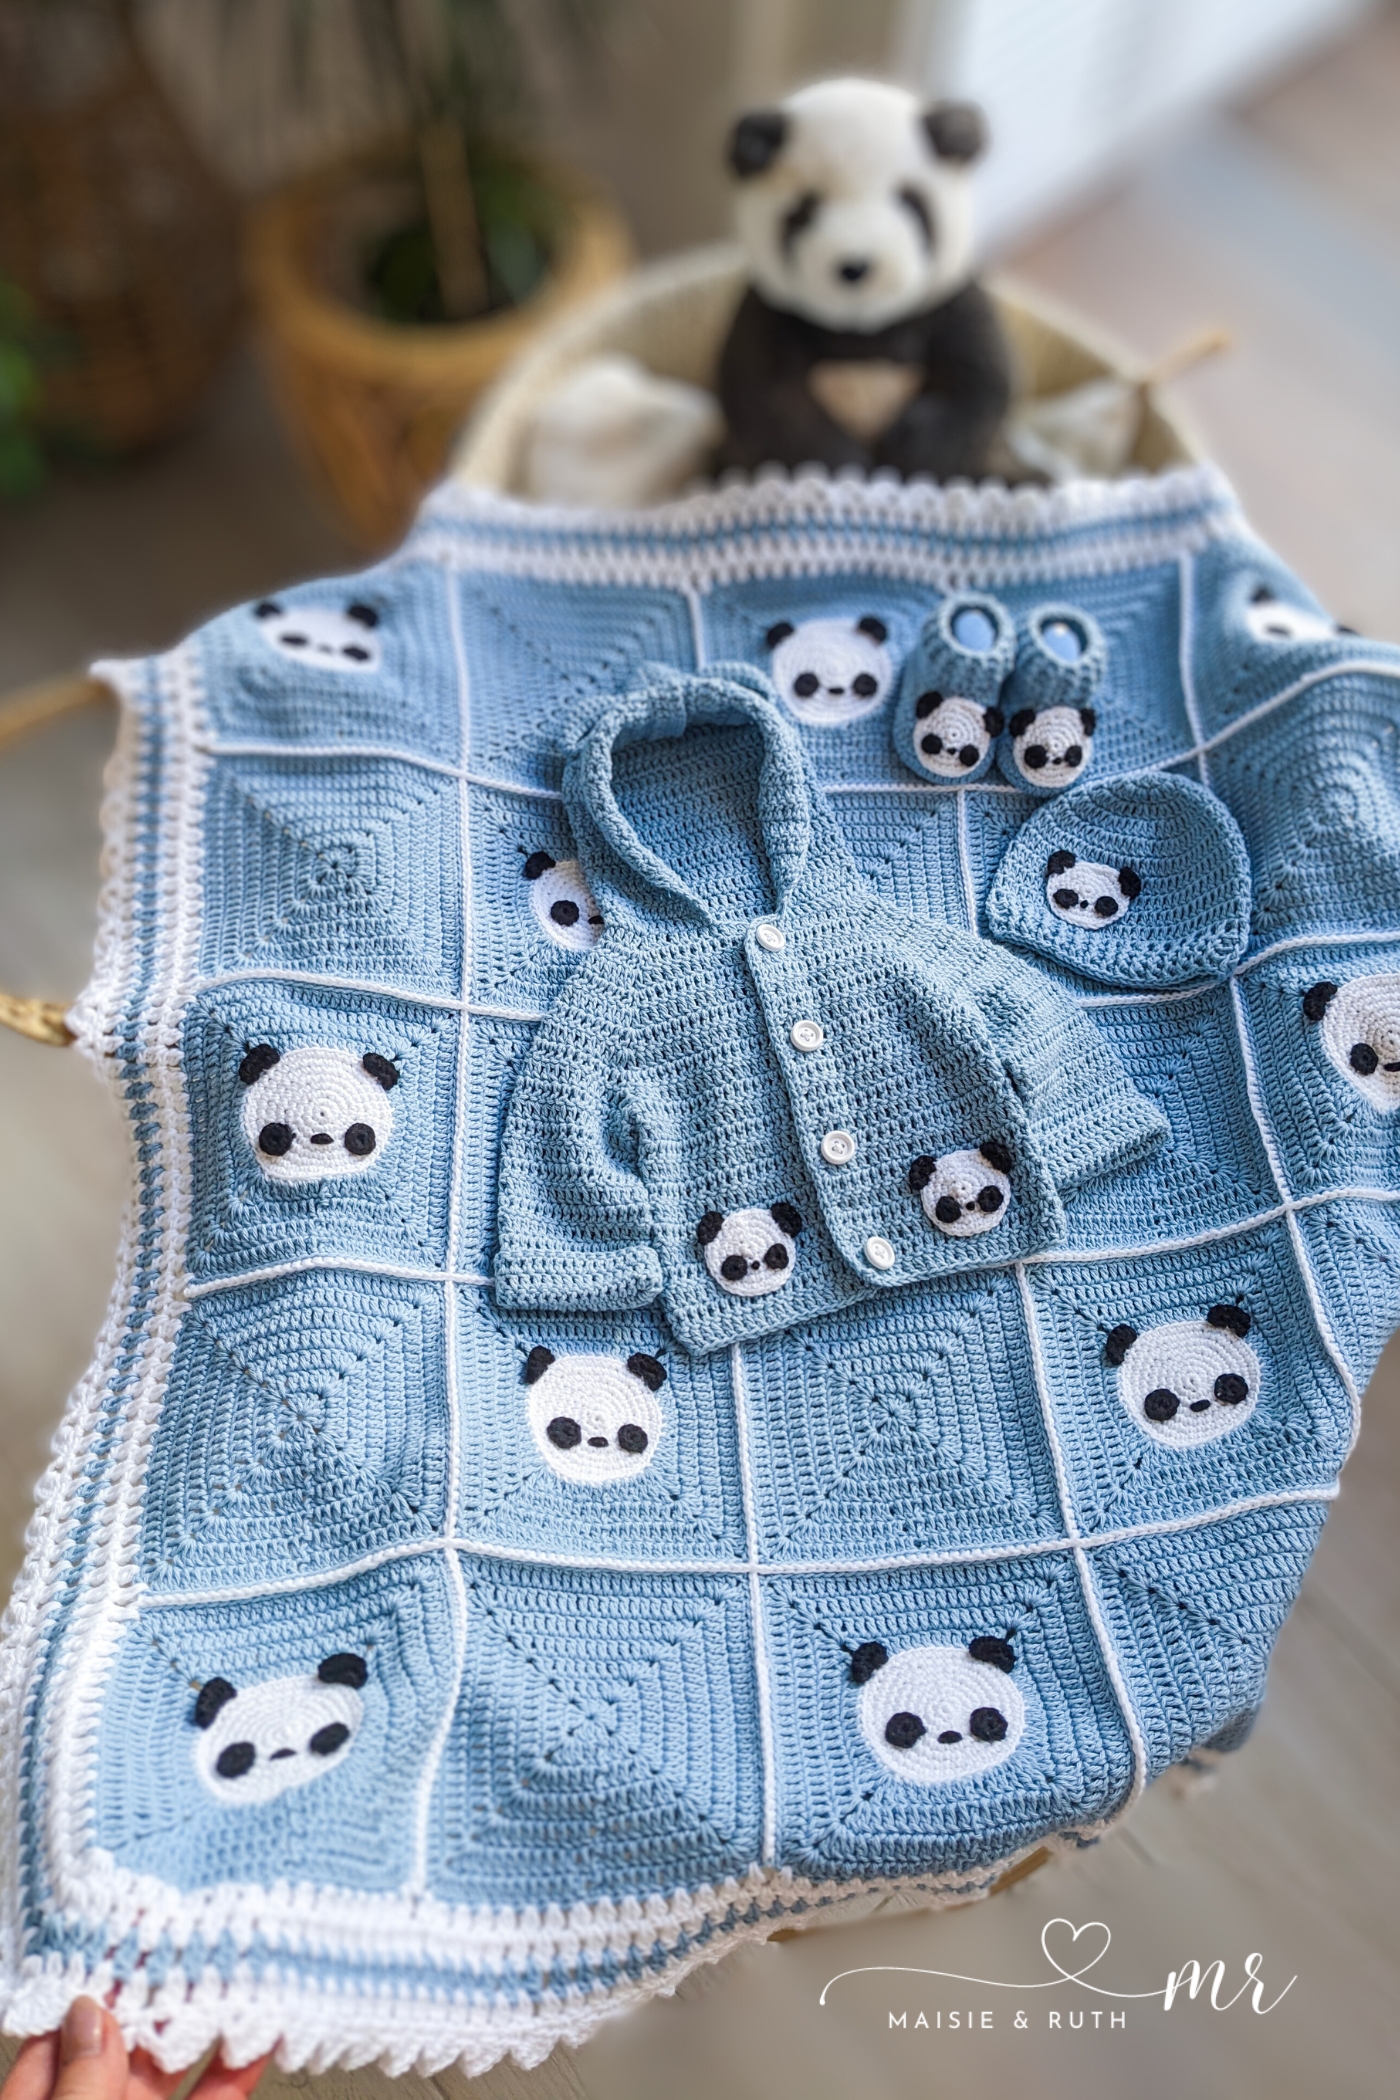
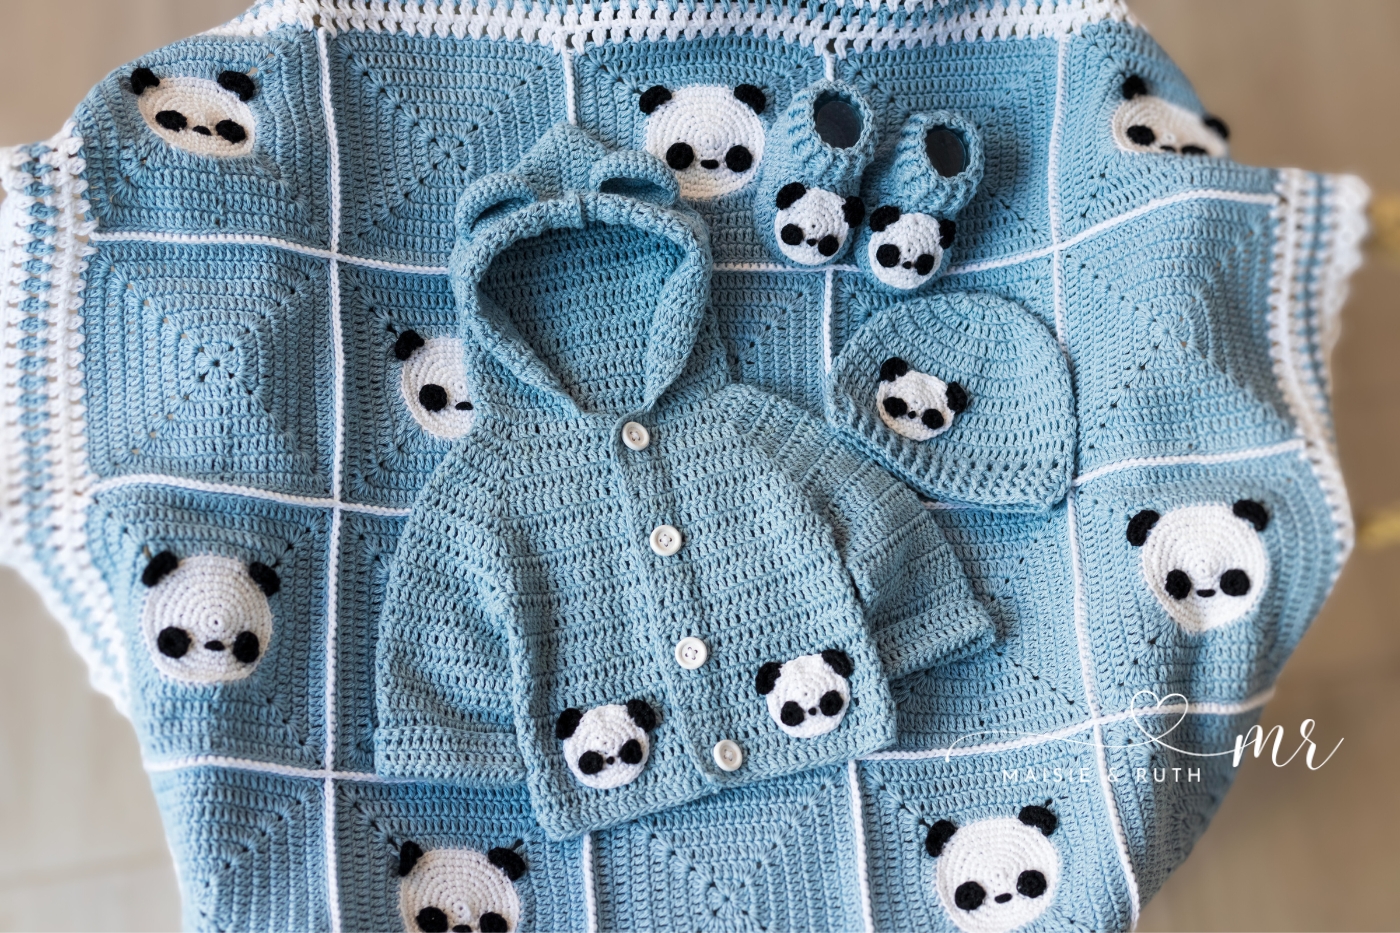
BABY SET
Not only will you love working on this fun project, but it also makes for a great gift for a new parent(s) or any special little one in your life. Make it alongside the matching booties, hat and hoodie for a truly unique gift.
It’s bound to be a hit with everyone and, more importantly, baby will love snuggling up with it!
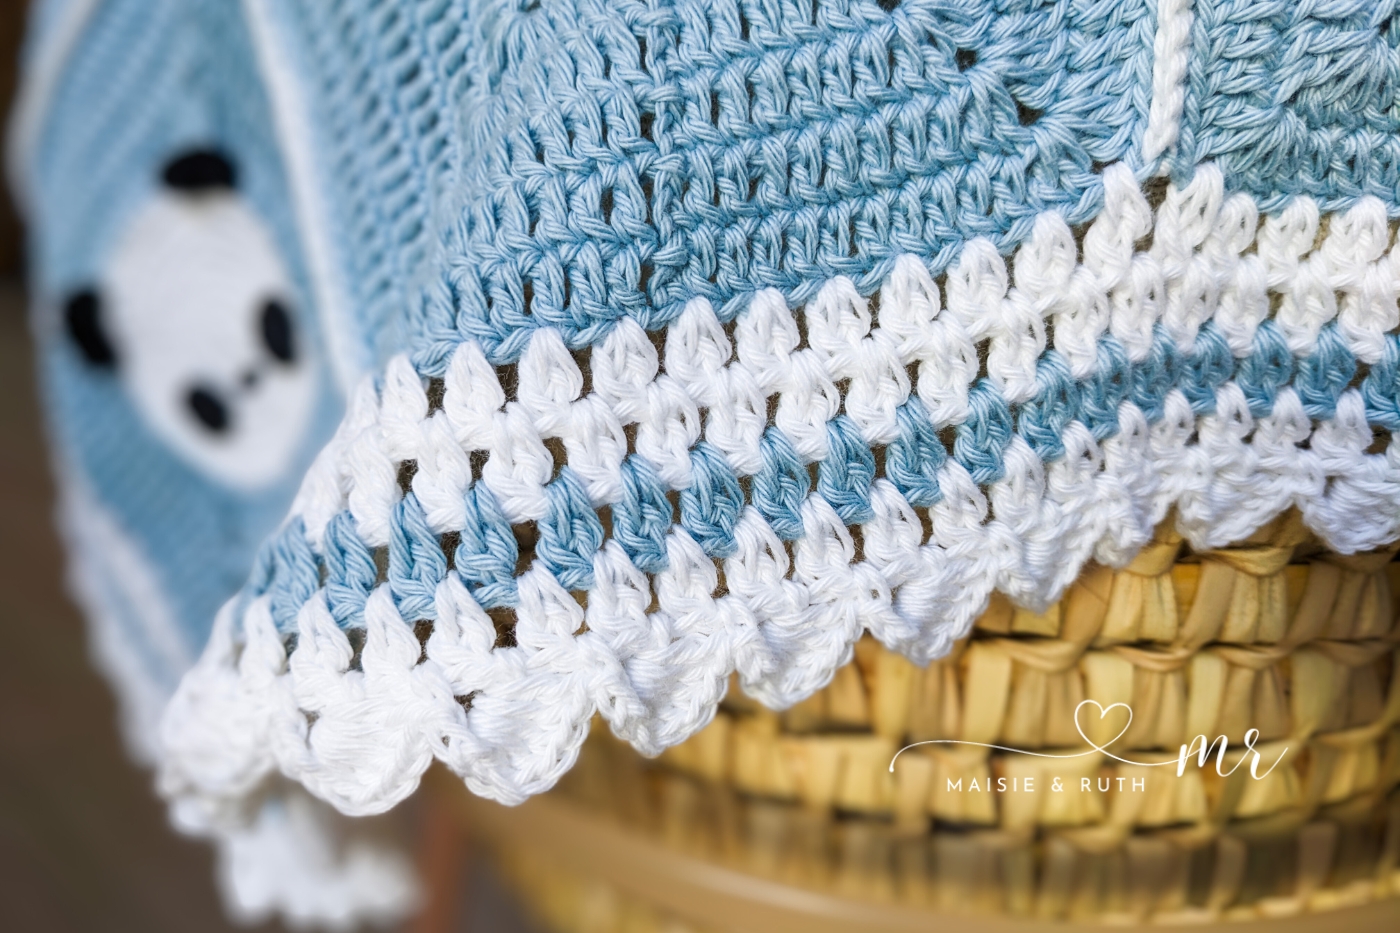
SOFT COTTON YARN
To frame my panda face, I opted for a gorgeous shade of blue, but you can choose any colour of your liking! I used Paintbox Yarns Cotton DK and they have a wonderful – and very large – selection of colours to choose from.
If you can’t get your hands on the recommended yarn, then don’t worry as this blanket can be just as easily made with any other weight 3 / DK / 8 ply yarn of your choice. Some alternative yarn suggestions are Stylecraft Naturals Bamboo & Cotton, Premier Yarns Cotton Sprout DK, Cascade Pandamonium Yarn, Premier Bamboo Fair Yarn, Universal Yarns Bamboo Pop Yarn.
PDF PRINTABLE PATTERNS!
If you would prefer an ad-free, printable version of this pattern, you can purchase it from my Etsy store
This blanket is also part of a Pattern Bundle! Check it out here
Thank you for supporting my shop!
VIDEO TUTORIAL
Crochet along with me to make this panda crochet baby blanket!
Just click on the play button below (you can view the full tutorial on the Maisie and Ruth YouTube channel).
PIN ME FOR LATER!
Follow me on Pinterest
JOIN MY FACEBOOK GROUP!
Meet and chat with others who share your love of Maisie and Ruth Crochet Patterns!

Ready? Let’s get started on this cute and cuddly creation today!
PANDA CROCHET BABY BLANKET: A FREE PATTERN
This article for a panda crochet baby blanket may contain affiliate links, which means I’ll receive a commission if you purchase through my links, at no extra cost to you. Please read full disclosure for more information.
Please carefully read all the information below.
LEVEL

PATTERN NOTES
- US crochet terms used throughout.
- The blanket is worked in rounds.
- Rounds 1-8 of the panda are worked in continuous rounds: you do not join to the first stitch at the beginning of the round. Working in this way ensures that there is no seam.
- When working in continuous rounds, it’s important to attach a stitch marker to the first stitch of each round otherwise it will be extremely hard to spot the beginning of each round.
- There is a step-by-step video to accompany this pattern. If you would like to refer to the video for further guidance, I have put the relevant minute mark beside each section of the pattern. These timestamps can be found in the description box below the video on YouTube.
SUPPLIES
- Yarn: Any category #3 / DK / 8 ply yarn. I used Paintbox Yarns Cotton DK, 137yds / 1.8oz (125m / 50g) in the following colours: 5 balls of Colour A: Paper White (401); 9 balls of Colour B: Dolphin Blue (437); 1 ball of Colour C: Pure Black (402)
- Alternative yarn suggestions are Stylecraft Naturals Bamboo & Cotton, Premier Yarns Cotton Sprout DK, Cascade Pandamonium Yarn, Premier Bamboo Fair Yarn, Universal Yarns Bamboo Pop Yarn.
- Crochet hook: 3mm (OPTIONAL: to seam the squares I sized up to an E / 3.5mm hook)
- Scissors
- Tapestry needle (for weaving in ends)
- Stitch marker
GAUGE / TENSION
Each square measures 5.5″ (14cm)
Gauge is not crucial here, but I would recommend that you keep a consistent tension so that all your squares end up the same size.
FINISHED SIZE
Width – 33 inches / 84cm
Length – 33 inches / 84cm
STITCHES & ABBREVIATIONS (US CROCHET TERMS)
beg – beginning
BLO – back loop only
ch(s) – chain(s)
dc – double crochet
FLO – front loop only
sc – single crochet
sk – skip: Do not crochet into this stitch / space.
sl st – slip stitch
sp(s) – space(es)
st(s) – stitch(es)
tr – treble crochet
SPECIAL STITCHES
EXdc– Extended double crochet: Yarn over (yo), insert hook into st or sp, pull up a loop, 3 loops on hook, yo, pull through 1 loop (3 loops remain on hook), yo, pull through 2 loops (2 loops remain on hook), yo, pull through both loops. I EXdc made.
2dcCL – Yarn over (yo), insert hook into stitch (st) or space, yo, pull up a loop (3 loops on hook), yo, pull through 2 loops (2 loops remain on hook). Yo, insert hook into same stitch (st) or space, yo, pull up a loop (4 loops on hook). Yo, pull through 2 loops (3 loops on hook), yo, pull through all 3 loops. One 2dcCL made
3dcCL – Yarn over (yo), insert hook into stitch (st) or space, yo, pull up a loop (3 loops on hook), yo, pull through 2 loops (2 loops remain on hook). Yo, insert hook into same stitch (st) or space, yo, pull up a loop (4 loops on hook). Yo, pull through 2 loops (3 loops remain on hook). Yo, insert hook into same stitch (st) or space, yo pull up a loop (5 loops on hook), yo, pull through 2 loops (4 loops on hook). Yo, pull through all 4 loops. One 3dcCL made.
PATTERN INSTRUCTIONS
PANDA SQUARE (MAKE 13)
MINUTE MARK OF VIDEO: 03:00
Using Colour A:
Make a magic circle. (if you do not like the magic circle method, see the Alternative Round 1 below).
Round 1. 6sc in the magic circle, do not join round, instead place a st marker in the first sc of the round [6 sts].
Alternative Round 1. Ch2, 6sc in 2nd ch from hook (work over yarn tail), do not join round, instead place a st marker in the first sc of the round [6 sts].
Round 2. Round 2. 2sc in next 6 sts [12 sts].
Round 3. *2sc in next st, 1sc in next st*, repeat from * to * 6 times [18 sts].
Round 4. 1sc in next st, 2sc in next st, *1sc in next 2 sts, 2sc in next st*, repeat from * to * 5 times, ending with 1sc in last st [24 sts].
Round 5. *2sc in next st, 1sc in next 3 sts*, repeat from * to * 6 times [30 sts].
Round 6. 1sc in next 2 sts, 2sc in next st, *1sc in next 4 sts, 2sc in next st*, repeat from * to * 5 times, ending with 1sc in last 2 sts [36 sts].
Round 7. *2sc in next st, 1sc in next 5 sts*, repeat from * to * 6 times [42 sts].
Round 8. 1sc in next 3 sts, 2sc in next st, *1sc in next 6 sts, 2sc in next st*, repeat from * to * 5 times, ending with 1sc in last 3 sts, to join sl st to 1st sc or make an invisible join [48 sts].
Cut yarn, fasten off and weave in ends.
Change to Colour B:
Attach yarn to BLO of last stitch worked.
Round 9. Ch3 (counts as your 1st st here and throughout), 1dc in BLO of next 2 sts, 1EXdc in BLO of next 2sts, (2tr, ch2, 2tr) in BLO of next st, *1EXdc in BLO of next 2 sts, 1dc in BLO of next 7 sts, 1EXdc in BLO of next 2 sts, (2tr, ch2, 2tr) in the BLO of the next st*, repeat from * to * twice, 1EXdc in BLO of next 2 sts, 1dc in BLO of next 7 sts, 1EXdc in BLO of next 2 sts, (2tr, ch2, 2tr) in BLO of next st, 1EXdc in BLO of next 2sts, 1dc in BLO of last 4 sts, sl st to top of beg ch3 to join, [15 sts on each side of square, 4 x ch2 sps].
Round 10. Ch3, 1dc in next 6 sts, *(2dc, ch2, 2dc) in ch2 corner sp, 1dc in next 15 sts*, repeat from * to * for a total of 3 times, (2dc, ch2, 2dc) in last ch2 corner sp, 1dc in last 8 sts, to join sl st to top of beg ch3 or make an invisible join (for easier seaming later), [19 sts on each side of square, 4x ch2 sps].
Round 11. Ch3, 1dc in next 8 sts, *(2dc, ch2, 2dc) in ch2 corner sp, 1dc in next 19 sts*, repeat from * to * for a total of 3 times, (2dc, ch2, 2dc) in last ch2 corner sp, 1dc in last 10 sts, to join sl st to top of beg ch3 or make an invisible join (for easier seaming later), [23 sts on each side of square, 4x ch2 sps].
Round 12. Ch3, 1dc in next 10 sts, *(2dc, ch2, 2dc) in ch2 corner sp, 1dc in next 23 sts*, repeat from * to * for a total of 3 times, (2dc, ch2, 2dc) in last ch2 corner sp, 1dc in last 12 sts, make an invisible join, [27 sts on each side of square, 4x ch2 sps].
IMPORTANT: If you used the magic circle method in round 1, make sure that you weave in the yarn tail securely so that the middle of your square does not unravel.
Cut yarn, fasten off and weave in ends.
LEFT EAR
MINUTE MARK: 01:19:18
With Colour C:
Attach yarn to front loop in round 9, directly in line with the left hand ch2 corner space:
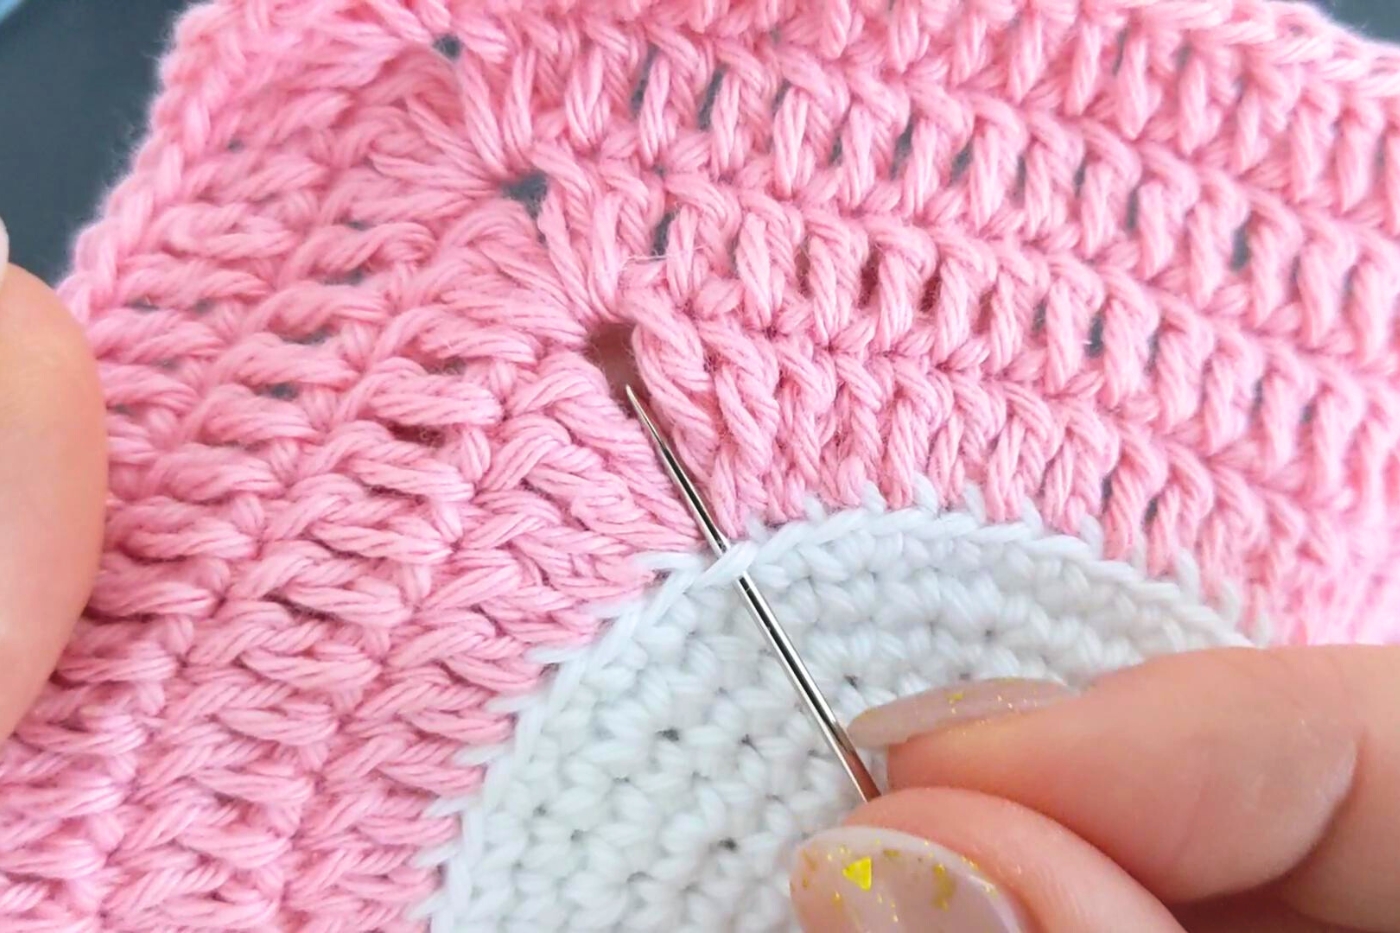
Row 1. Ch1, 3sc in same st (at base of ch1), (3sc, sl st) in next st, TURN.
Row 2. Ch1 (does not count as your 1st st), 1sc in 3rd ch from hook, 1sc in next 5 sts, sl st at base of ch1 made in row 1.
Cut yarn, leaving a long tail about 8 inches / 20 cm long.
Thread the yarn tails through your needle and pass them through a couple of stitches to the back of your work (see video tutorial for further guidance)
RIGHT EAR
Go to the right hand corner and attach yarn to the front loop made in round 9. It will be in the loop that is to the right of the loop that is in direct line with the ch2 corner space:
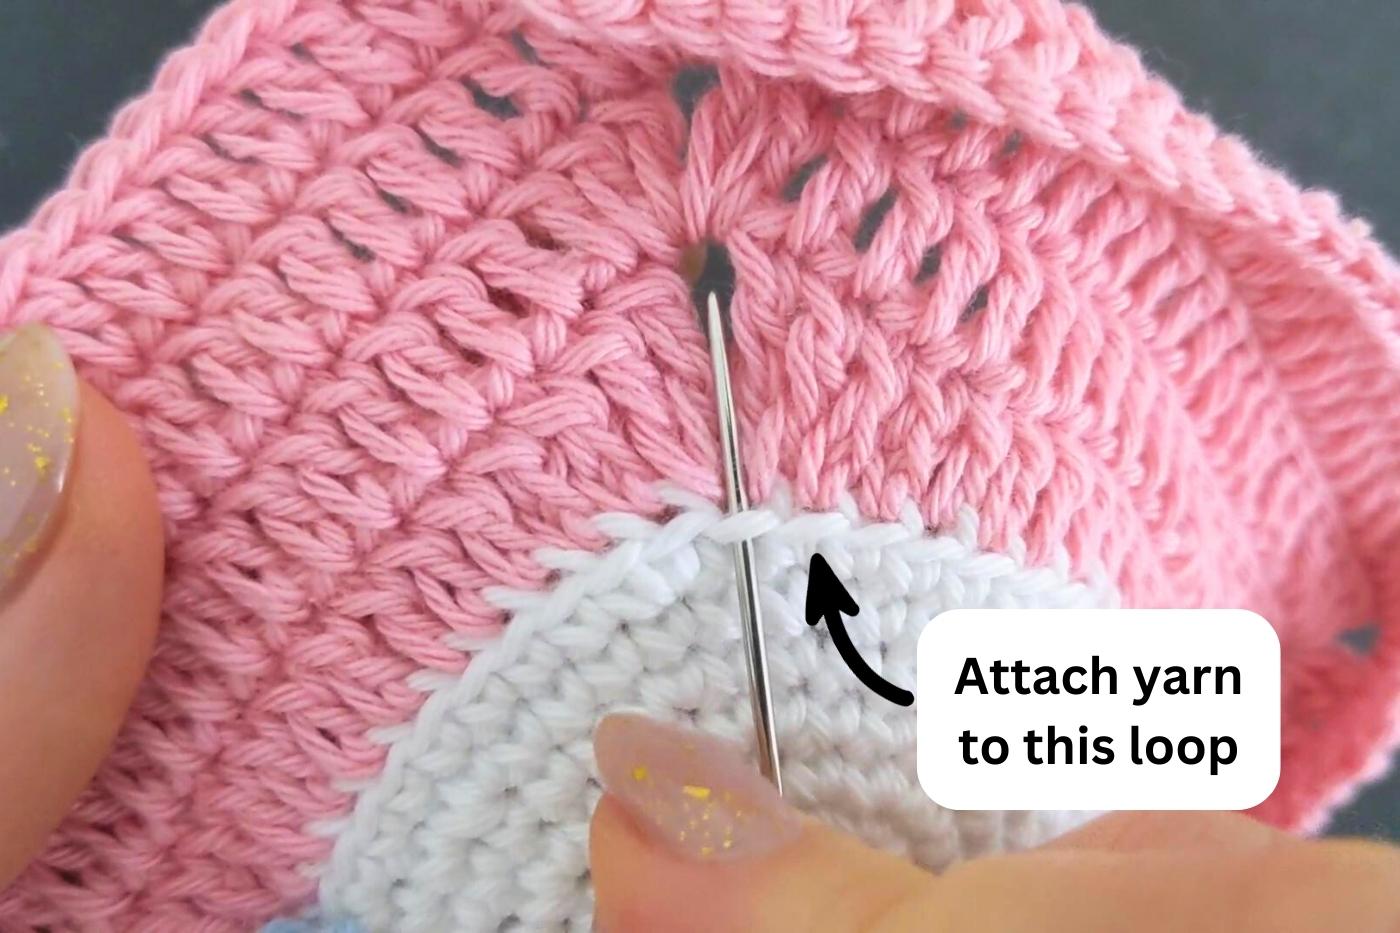
Work as left ear above.
EYES (MAKE 2)
MINUTE MARK: 01:34:15
Make a magic circle (if you do not like the magic circle method, see the Alternative Round 1 below).
Round 1. 10sc in the magic circle, sl st to 1st sc to join the round [10 sts].
Alternative Round 1 (work over yarn tail). Ch2, 10sc in 2nd ch from hook, sl st to 1st sc to join round [10 sts].
Cut yarn (leave a long tail of 8 inches /20 cm for sewing) & fasten off.
EMBROIDER THE NOSE
MINUTE MARK: 01:37:05
Before you sew on the eyes, embroider the nose first.
Cut a piece of yarn about 8 inches / 20cm long.
Embroider the nose to your liking (or watch the video tutorial) over 2 stitches between the 3rd and 4th rounds from the centre of the circle.
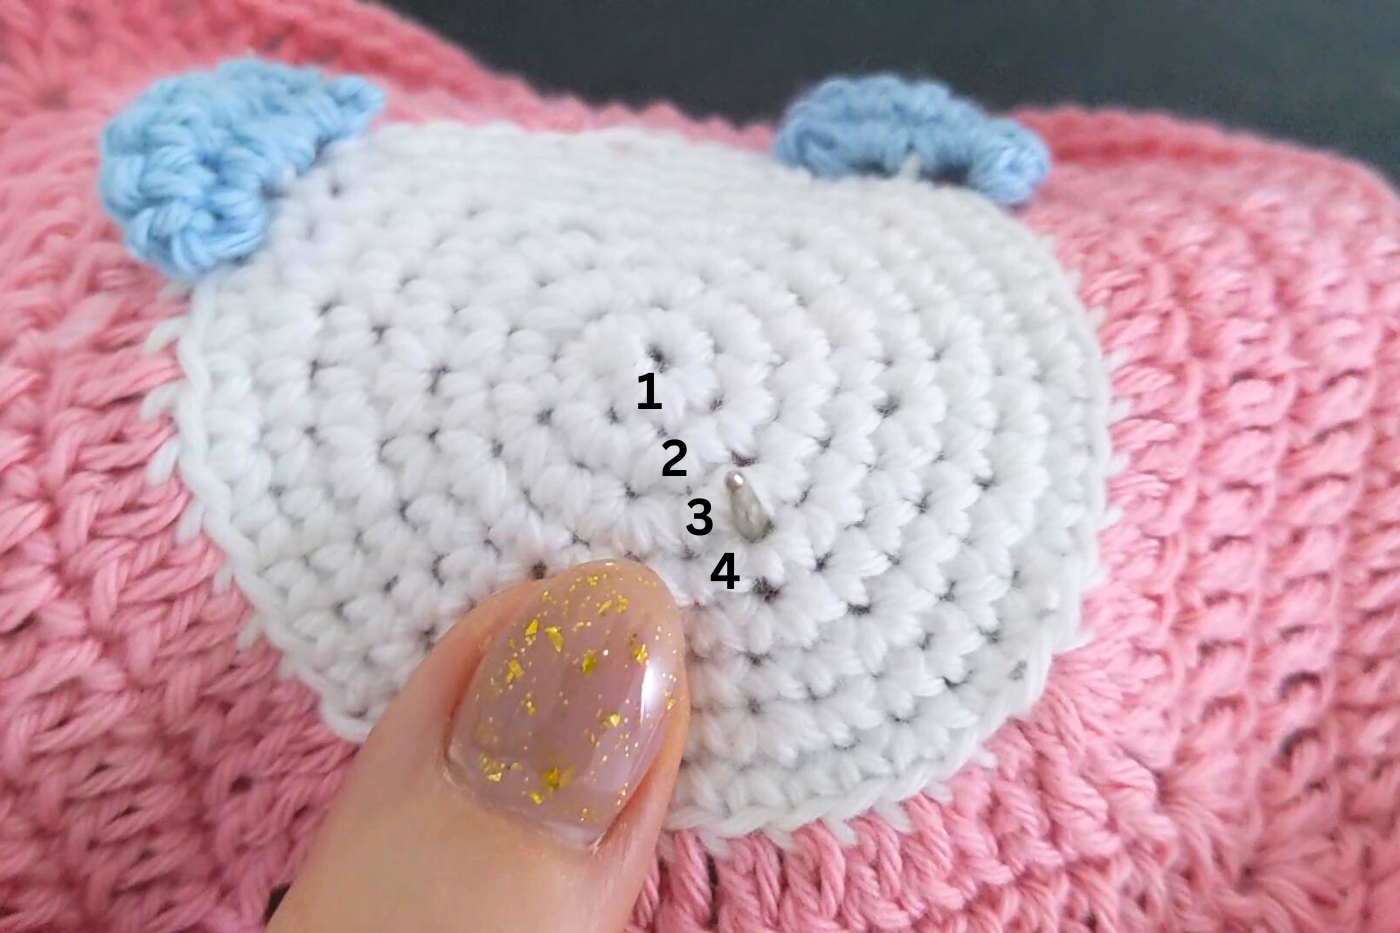
Pass the yarn tails through to back of your work. Tie a couple of knots securely.
SEW ON EYES
MINUTE MARK: 01:40:35
Sew one eye on either side of the nose.
BACKING FOR PANDA SQUARE (MAKE 13)
MINUTE MARK: 01:45:47
I like to make backings for my panda squares. This is an easy and effective way to hide all the yarn tails.
To make each backing, just follow rounds 1-8 of the panda square pattern above.
Cut a long yarn tail (about 20 inches / 50 cm) and sew the circle (with the wrong side facing you) onto the back of your panda square. I like to use the whip stitch.
SOLID GRANNY SQUARE (MAKE 12)
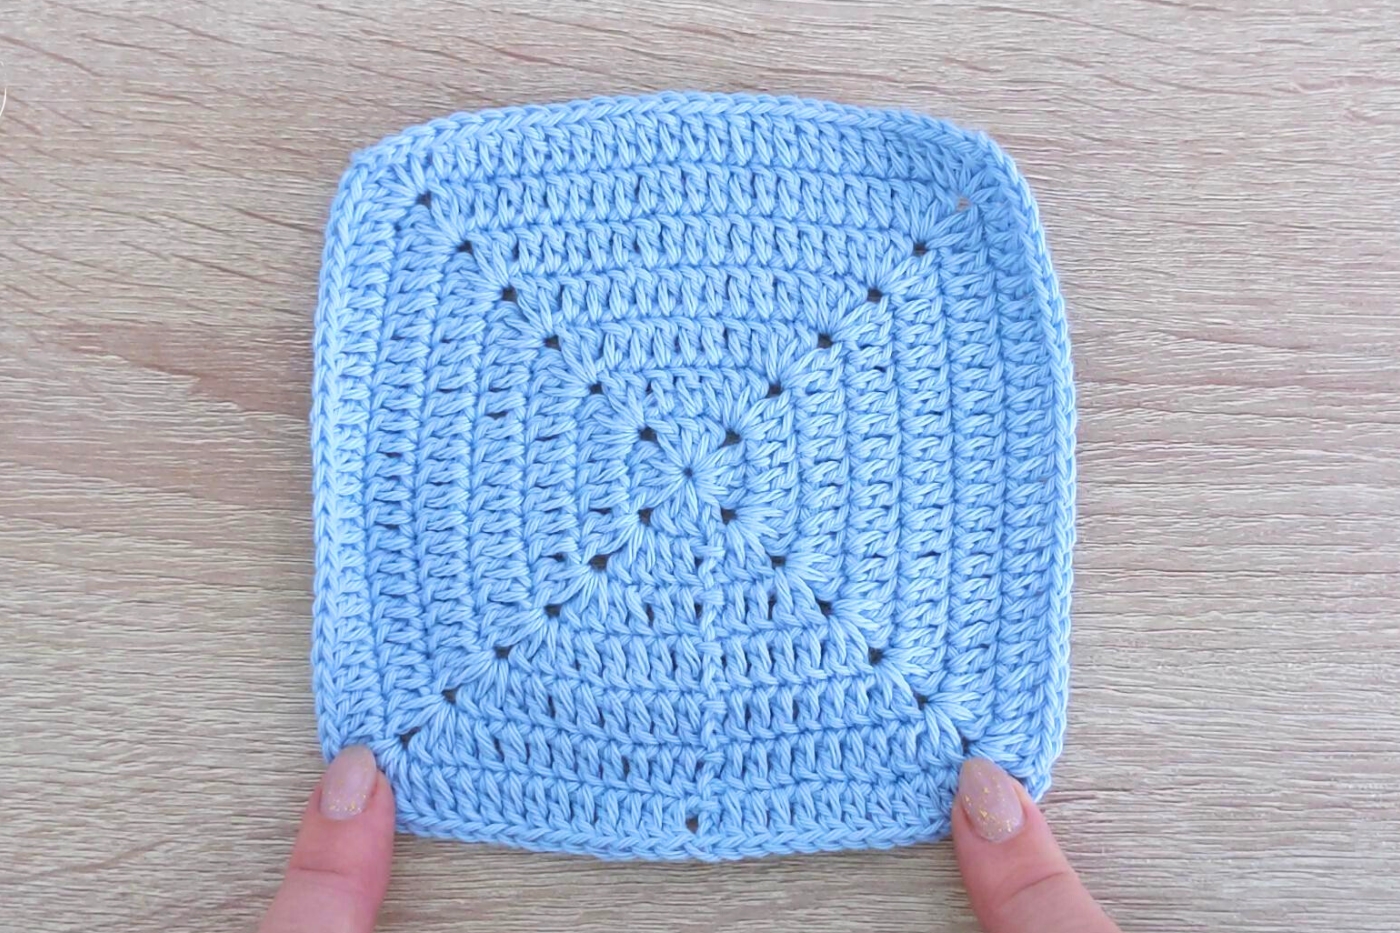
MINUTE MARK: 01:51:14
Using Colour B:
Make a magic circle. (if you do not like the magic circle method, see the Alternative Round 1 below).
Round 1. Ch5 (counts as your 1st dc and a ch2), (3dc, ch2 into the magic circle) 3 times, 2dc, sl st to 3rd ch of beg ch5 to join [3dc on each side of square].
Alternative Round 1. Ch4, sl st to 1st ch to form a ring, ch5 (counts as your 1st dc and a ch2), (3dc, ch2) into the ring 3 times, 2dc, sl st to 3rd ch of beg ch5 to join [3dc on each side of square].
Round 2. Ch3 (counts as your 1st dc here and throughout), *(2dc, ch2, 2dc) in next ch2 corner sp, 1dc in next 3 sts*, repeat from * to * for a total of 3 times, (2dc, ch2, 2dc) in last ch2 corner sp, 1dc in last 2 sts, sl st to top of beg ch3 to join, [7 dc on each side of square].
Round 3. Ch3, 1dc in next 2 sts, *(2dc, ch2, 2dc) in next ch2 corner sp, 1dc in next 7 sts*, repeat from * to * for a total of 3 times, (2dc, ch2, 2dc) in last ch2 corner sp, 1dc in last 4 sts, sl st to top of beg ch3 to join, [11 dc on each side of square].
Round 4. Ch3, 1dc in next 4 sts, *(2dc, ch2, 2dc) in next ch2 corner sp, 1dc in next 11 sts*, repeat from * to * for a total of 3 times, (2dc, ch2, 2dc) in last ch2 corner sp, 1dc in last 6 sts, sl st to top of beg ch3 to join, [15 dc on each side of square].
Round 5. Ch3, 1dc in next 6 sts, *(2dc, ch2, 2dc) in next ch2 corner sp, 1dc in next 15 sts*, repeat from * to * for a total of 3 times, (2dc, ch2, 2dc) in last ch2 corner sp, 1dc in last 8 sts, sl st to top of beg ch3 to join, [19 dc on each side of square].
Round 6. Ch3, 1dc in next 8 sts, *(2dc, ch2, 2dc) in next ch2 corner sp, 1dc in next 19 sts*, repeat from * to * for a total of 3 times, (2dc, ch2, 2dc) in last ch2 corner sp, 1dc in last 10 sts, sl st to top of beg ch3 to join, [23 dc on each side of square].
Round 7. Ch3, 1EXdc in next 10 sts, *(2EXdc, ch2, 2EXdc) in next ch2 corner sp, 1EXdc in next 23 sts*, repeat from * to * for a total of 3 times, (2EXdc, ch2, 2EXdc) in last ch2 corner sp, 1EXdc in last 12 sts, sl st to top of beg ch3 to join or make an invisible join (easier when seaming later), [27 EXdc on each side of square].
Weave in ends.
IMPORTANT: If you used the magic circle method in round 1, make sure that you weave in the yarn tail securely so that the middle of your square does not unravel.
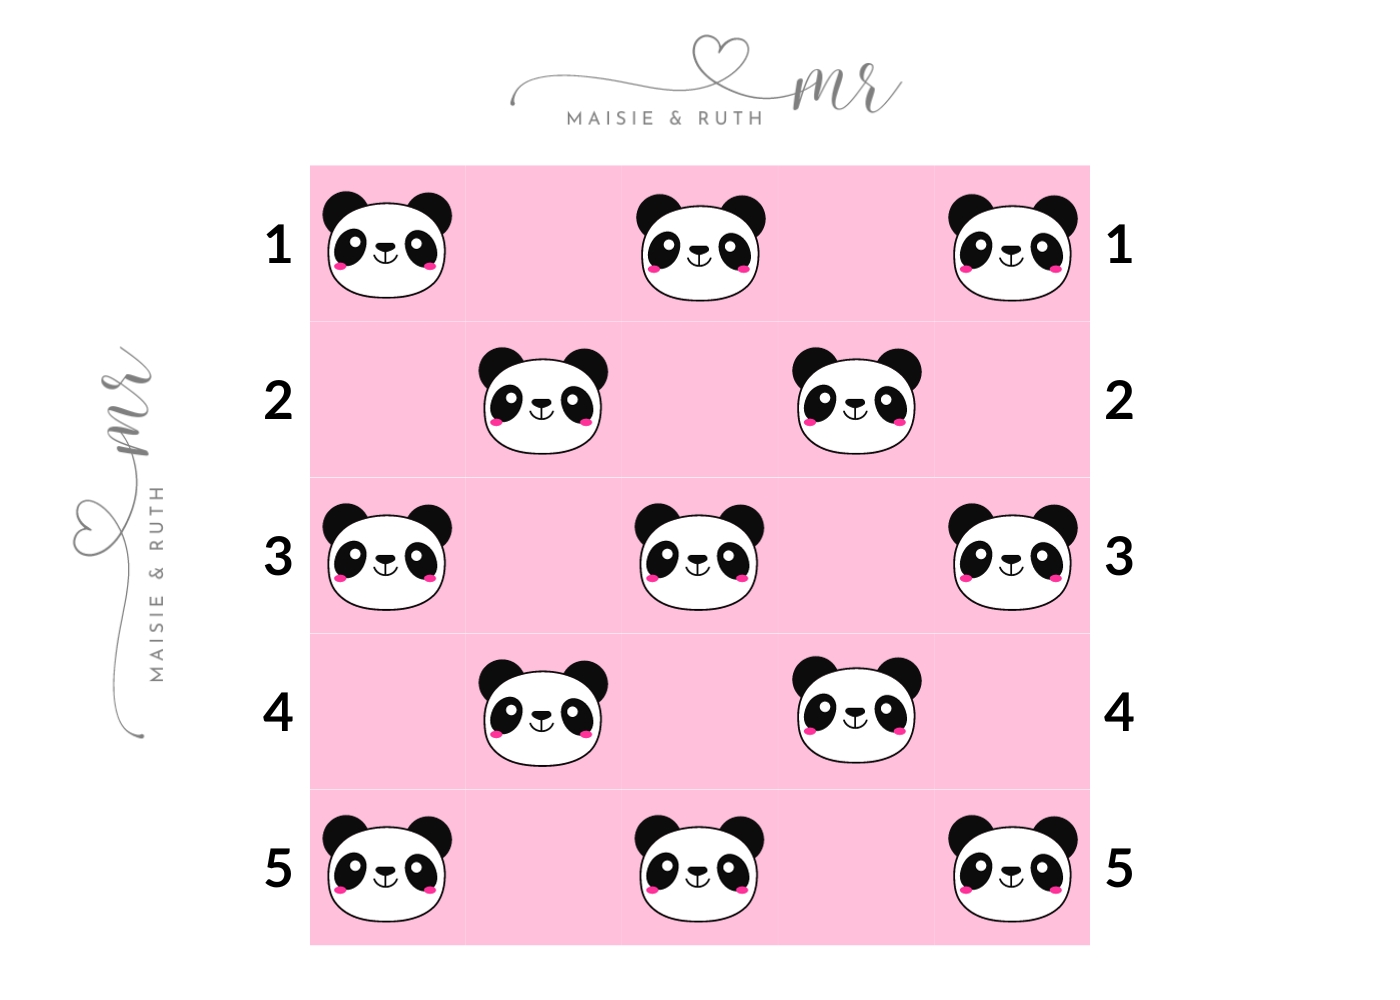
ARRANGEMENT OF PANDA CROCHET BABY BLANKET
Once you’ve made all your squares, you will arrange them before joining.
Please see the photo below, demonstrating how to arrange your squares:
JOINING YOUR SQUARES
MINUTE MARK: 02:33:09
Using Colour A and an E (3.5mm) crochet hook:
Seam your squares together. I used the single crochet seam to join my squares.
You can use any method you like to join your squares (e.g. the flat slip stitch seam).
BORDER
MINUTE MARK: 02:33:09
Once you have joined your squares, you will then finish your blanket off with a border consisting of 5 rounds.
Using Colour A:
Attach yarn to the ch2 corner sp in the top right hand corner of the blanket.{photo 7}
Round 1. (Ch2, 2dcCL, ch2, 3dcCL) in ch2 corner sp, ch1, sk next st, *(2dcCL in next st, ch1, sk next st) until next corner of blanket (at each seam work 2dcCL in next ch2 sp, ch1, 2dcCL in next ch2 sp), (3dcCL, ch2, 3dcCL) in ch2 sp in corner of blanket, ch1, sk next st* repeat from * to * around blanket, sl st to 1st 2dcCL at beg of round to join, DO NOT TURN. {photo 9}
Round 2. Sl st in next ch2-sp, (ch2, 2dcCL, ch2, 3dcCL) in ch2 corner sp, ch1, *(2dcCL in next ch-1 sp, ch1) until next corner of blanket, (3dcCL, ch2, 3dcCL) in ch2-sp in corner of blanket, ch1*, repeat from * to * around blanket, sl st to 1st 2dcCL at beg of round to join, DO NOT TURN.
Cut yarn, fasten off and weave in ends.
Change to Colour B:
Attach yarn to ch2-sp in corner of blanket.
Round 3. (Ch2, 2dcCL, ch2, 3dcCL) in ch2 corner sp, ch1, *(2dcCL in next ch-1 sp, ch1) until next corner of blanket, (3dcCL, ch2, 3dcCL) in ch2-sp in corner of blanket, ch1*, repeat from * to * around blanket, sl st to 1st 2dcCL at beg of round to join, DO NOT TURN.
Cut yarn, fasten off and weave in ends.
Change to Colour A:
Attach yarn to ch2-sp in corner of blanket.
Round 4. Repeat round 3.
Round 5. Sl st in next ch2-sp, *(1sc, ch2, 1dc, 5dc around post of dc just made) in ch2 corner sp, 1sc in next ch1-sp, (ch2, 1dc in next ch1-sp, 5dc around post of dc just made, 1sc in next ch1-sp) 38 times to next corner of blanket, work in same ch1-sp (immediately before corner) as follows: ch2, 1dc, 5dc around post of dc just made*, repeat from * to * around blanket, ending with a sl st to 1st sc at beg of round to join.
Cut yarn, fasten off and weave in ends.
SHARE YOUR WORK!
I really hope that you enjoyed the free pattern for this panda crochet baby blanket!
I would LOVE to see your work; share your photo in the Maisie & Ruth Facebook Group or tag me on Instagram using @maisieandruth.
And remember to pin the pattern to your board for later if you can’t make it now 😊
Happy crocheting!


Didn’t you make one of these blankets with sheep? I’ve looked all over and can’t seem to find it.
Hello! Thanks for you interest however we don’t currently have a sheep blanket pattern.
The other animal blankets available on the website are:
Bunny blanket – https://maisieandruth.com/bunny-crochet-baby-blanket-free-pattern/
Bear blanket – https://maisieandruth.com/bear-crochet-baby-blanket-cute-easy-tutorial/
Can you please send me the bunny one
I thought I had saved it now I can’t find it
Thank you
Love all your patterns
Hi Joanie, the free pattern for the bunny baby blanket is here: https://maisieandruth.com/bunny-crochet-baby-blanket-free-pattern/
Thank you and enjoy making it! 🐰💝