


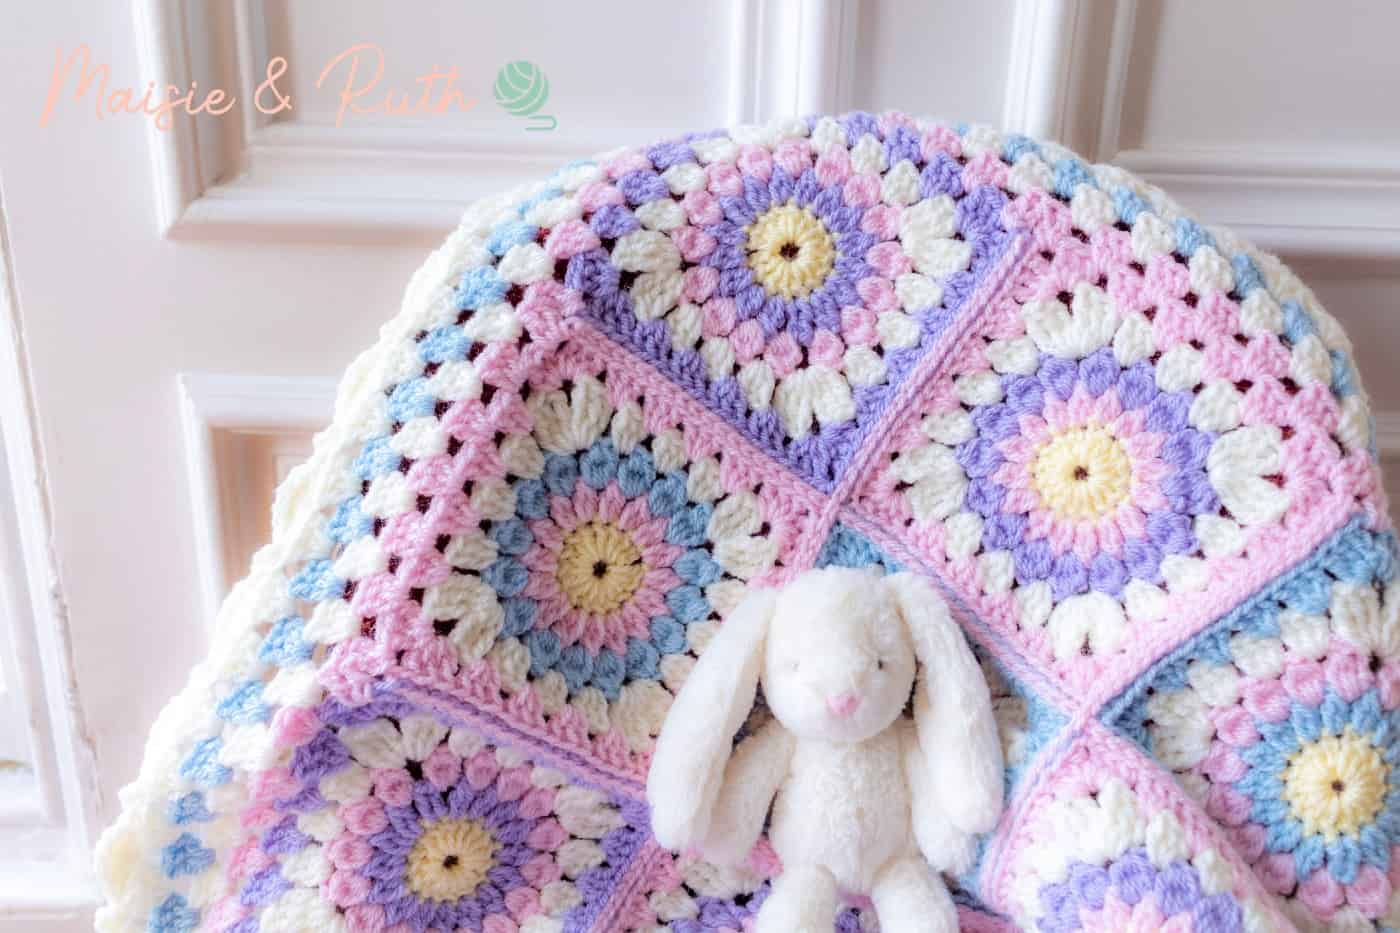
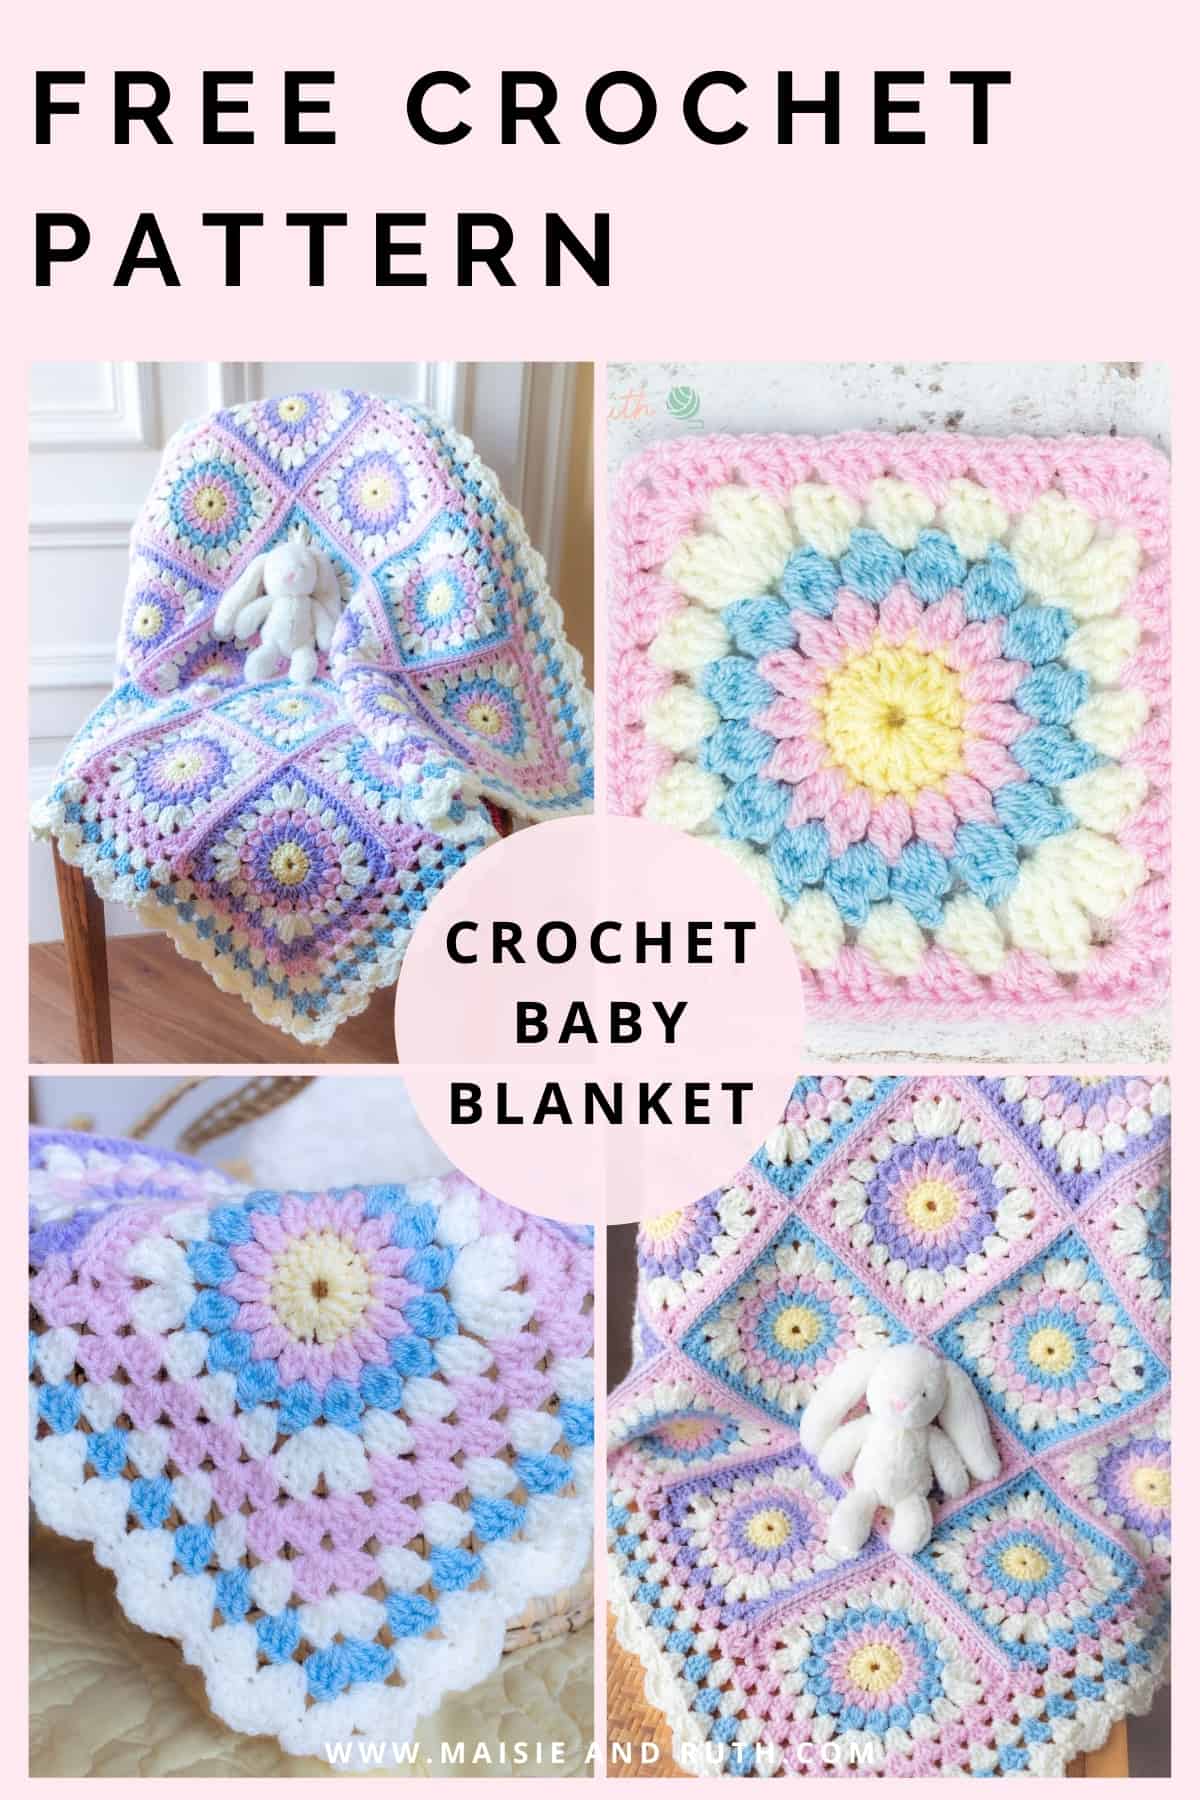
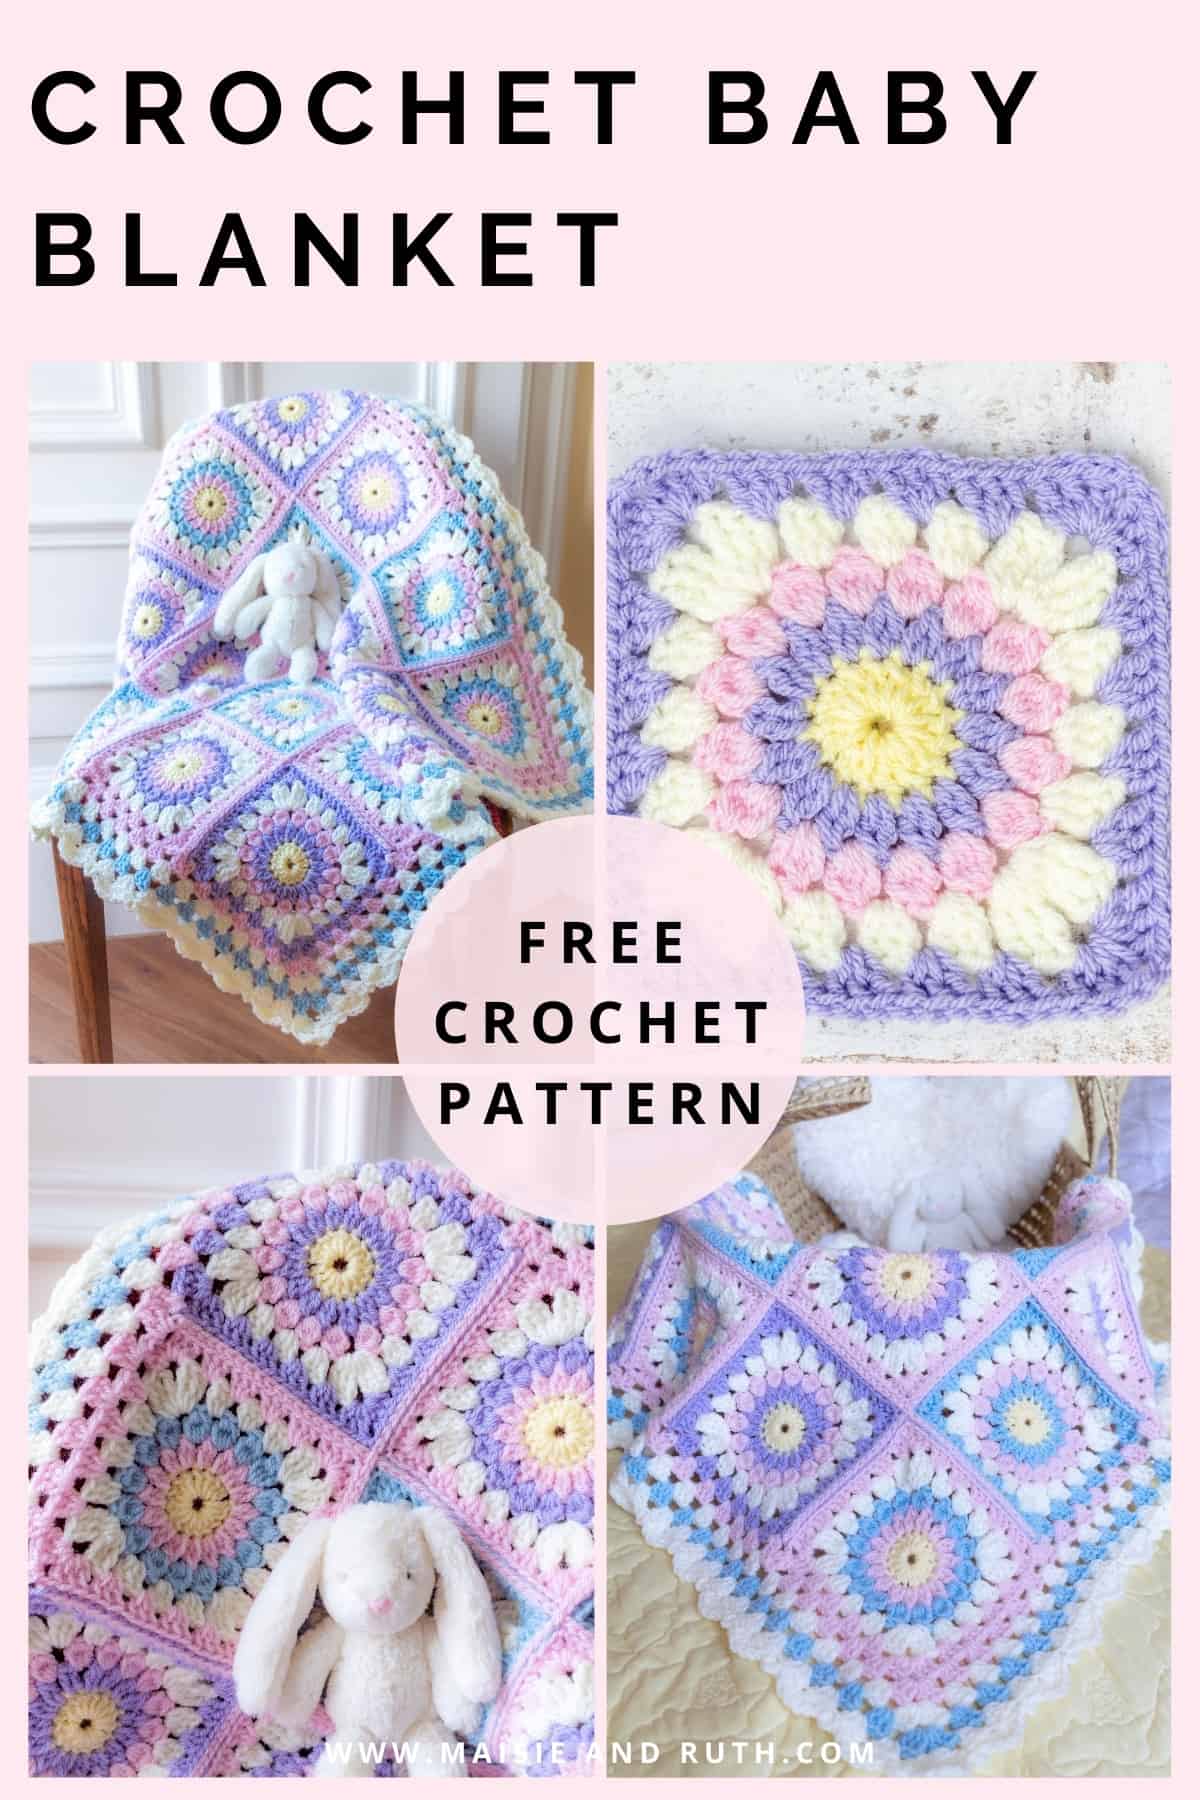
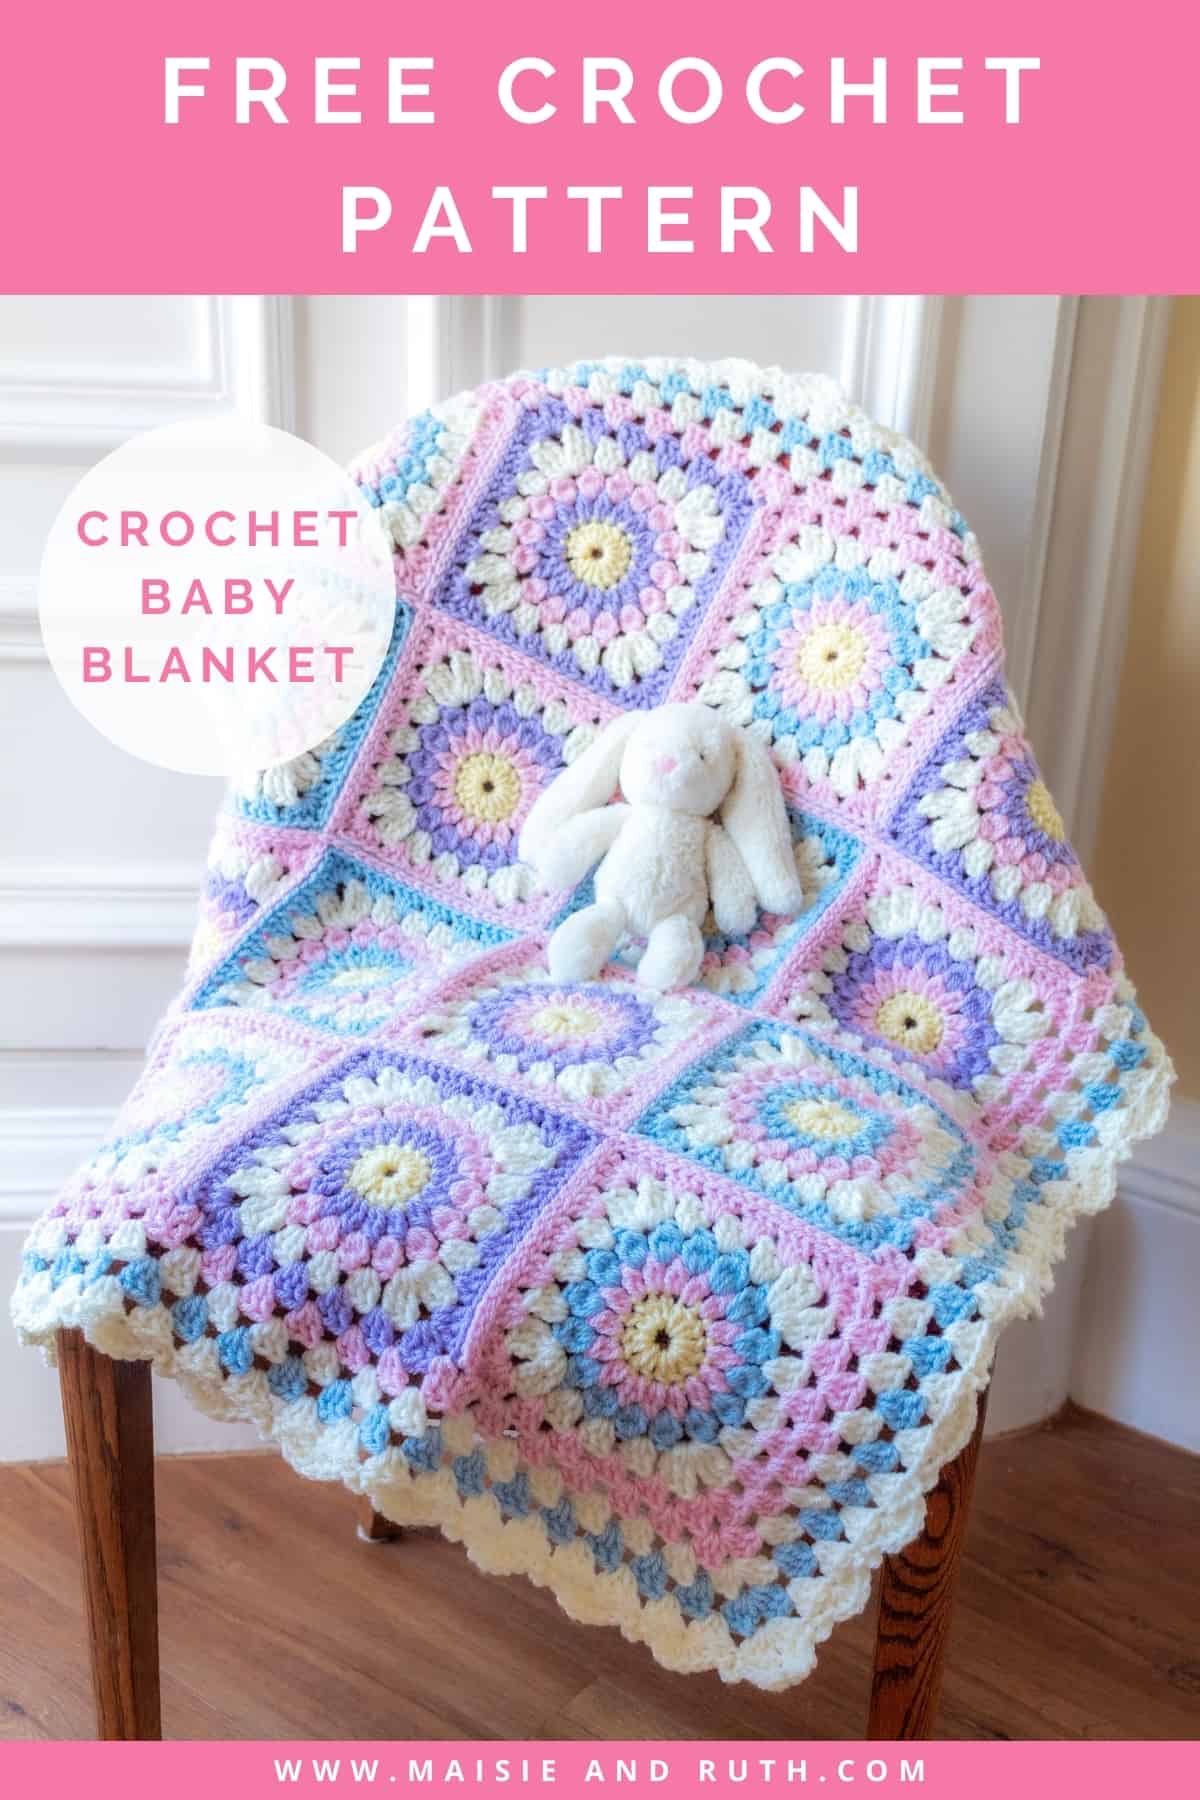
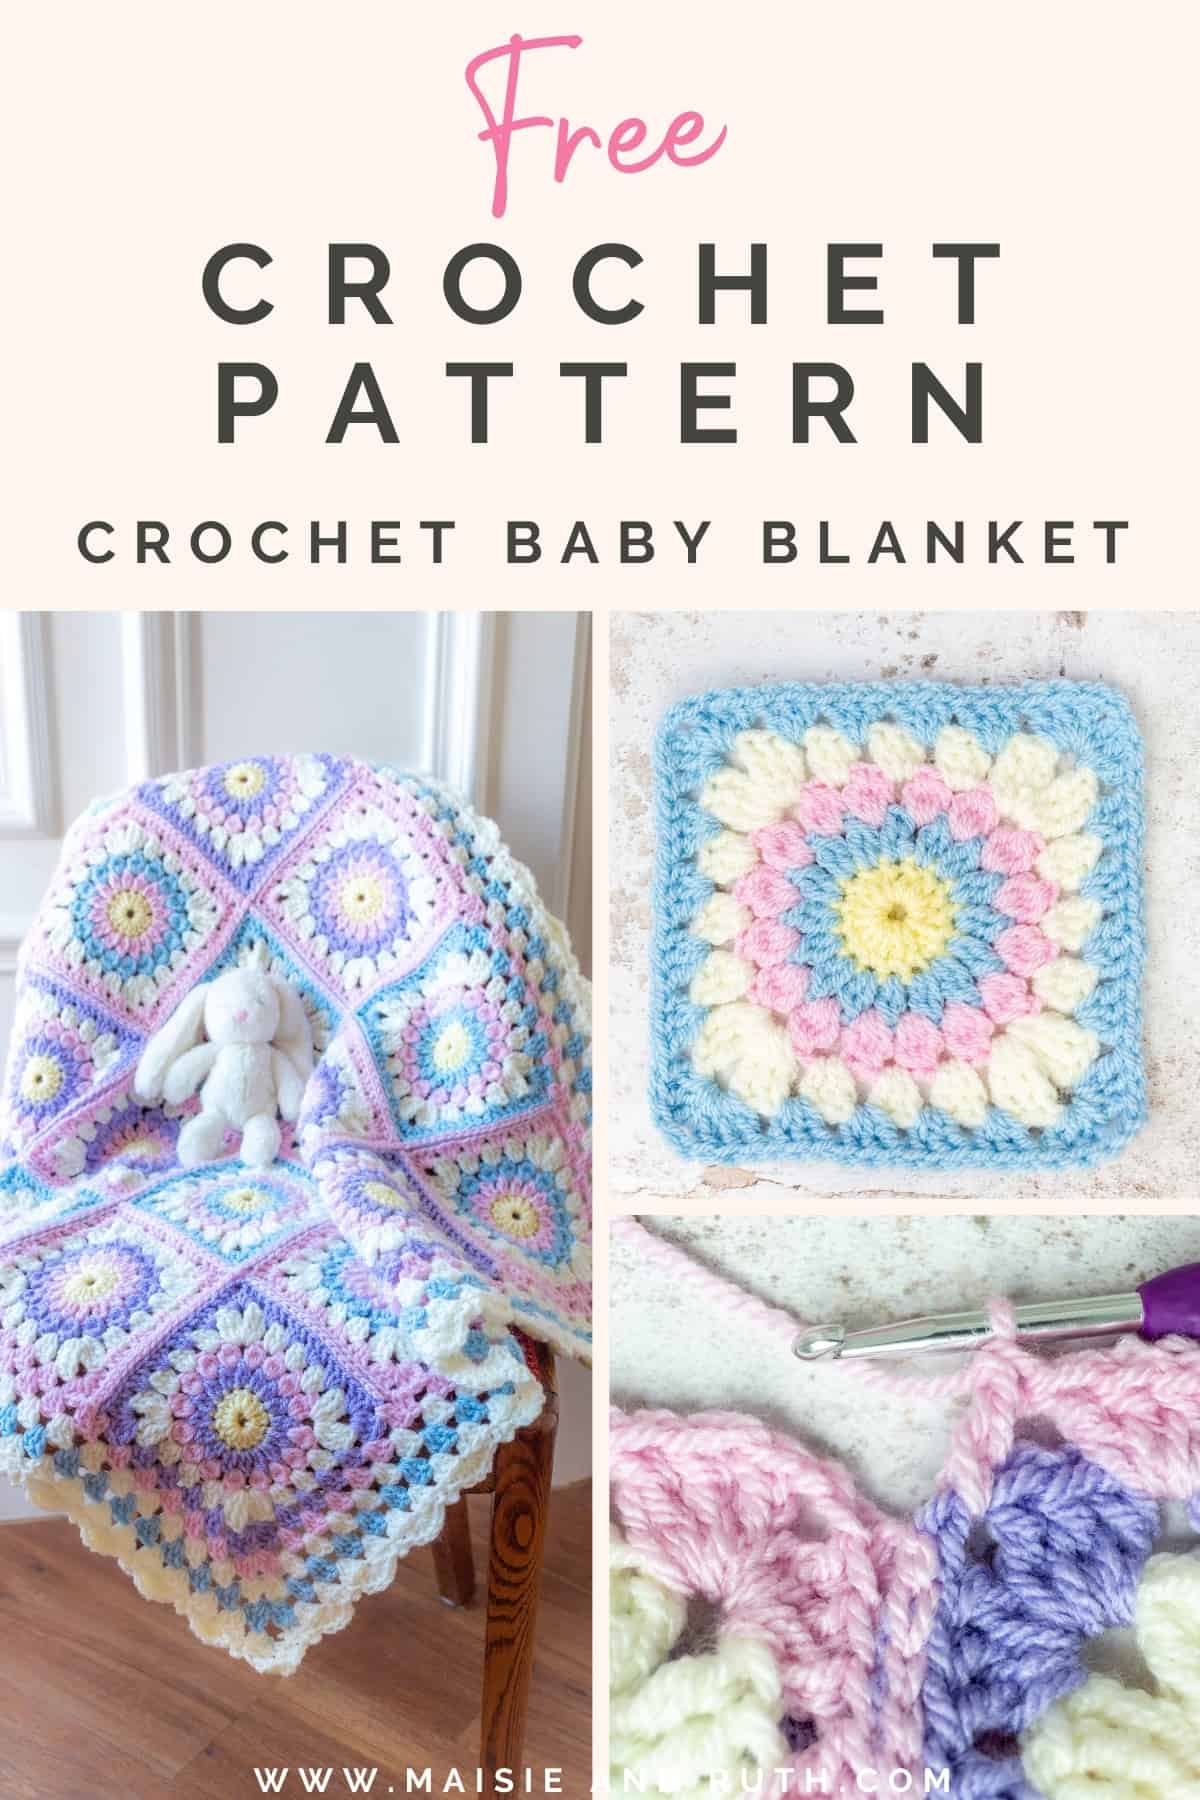
Welcome to today’s blog post where you’ll learn how to crochet a charming granny square blanket!
This FREE crochet pattern includes comprehensive written instructions and is also accompanied by a detailed step-by-step photo tutorial.
You can also purchase an ad-free printable version – please visit my Etsy store HERE

RELAXING PROJECT
I really loved designing and making this blanket!
This project uses the timeless sunburst granny square pattern. If you enjoy meditative crocheting then this project is for you!
Each square with its different colour combinations is a real joy to make and will offer complete relaxation – whether you’re a beginner or an experienced crocheter.

PATTERN OVERVIEW
For this pattern, you’ll crochet 16 sunburst granny squares, which are then joined together using the flat slip stitch seam.
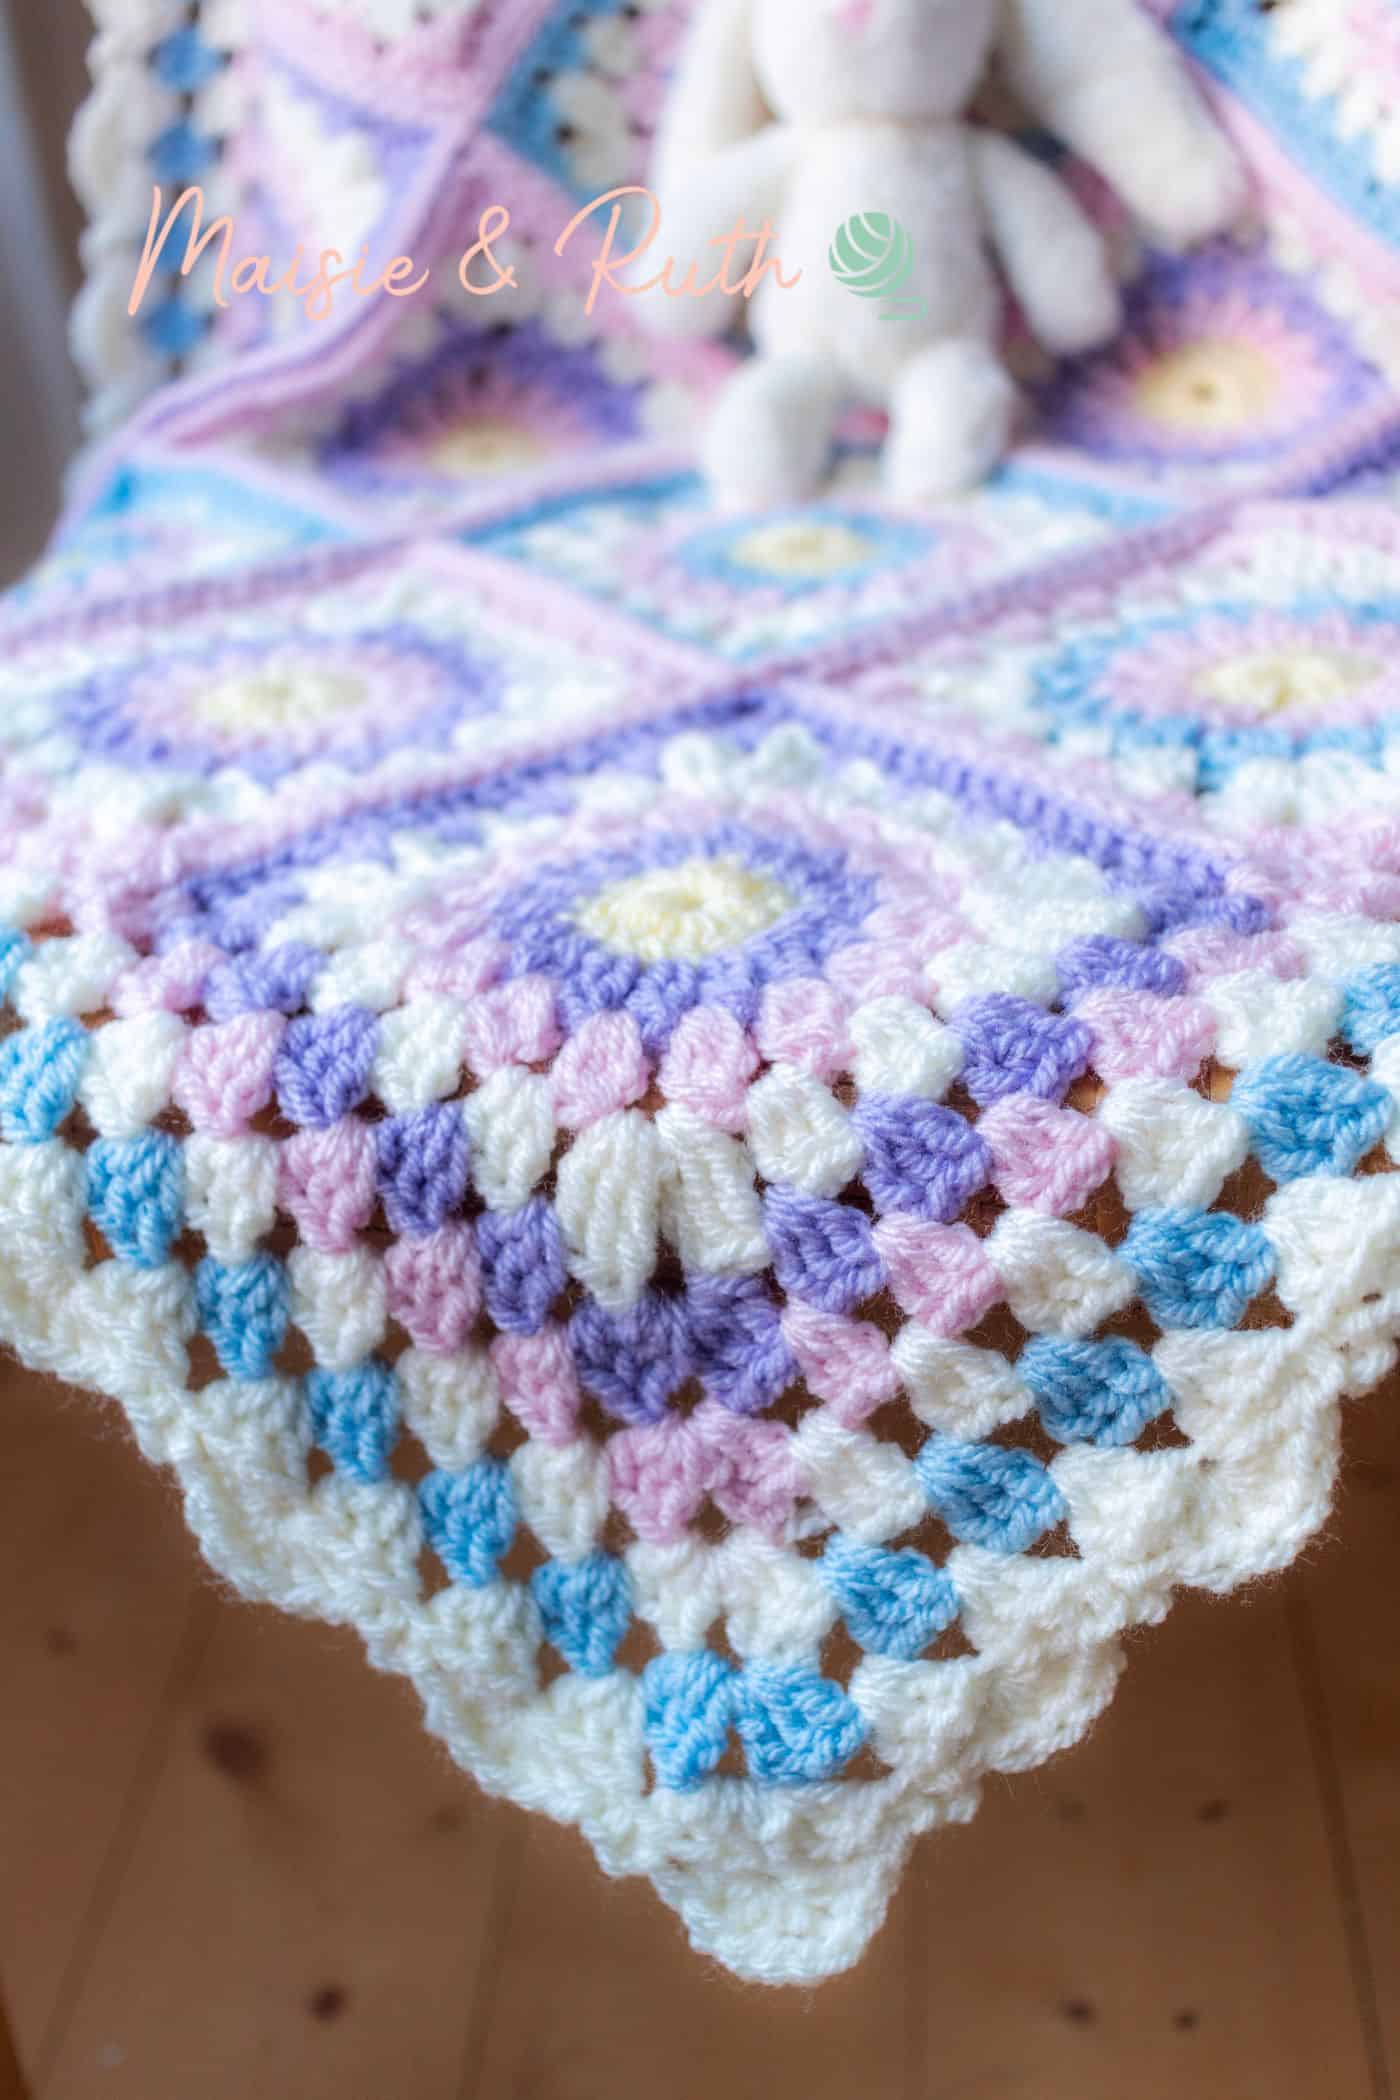
You’ll then finish off the blanket and frame the squares by working up a beautiful (yet simple) border consisting of 5 quick rounds.

OTHER CROCHET BABY ITEMS
If you’re making the Paisley baby blanket for a new arrival you might like to check out my other posts for the Ella Baby Cardigan and Fast Baby Booties.
These free patterns on the blog are quick and easy to work up, and they would make wonderful gifts also.
YARN USED
I chose to work with Paintbox Yarns Simply Aran, a worsted weight yarn that is lovely and cosy yet lightweight at the same time.
This yarn will make the transition from summer to winter, and vice-versa, with no problem whatsoever.
Paintbox Yarns Simply Aran is a great choice for a baby blanket as it’s soft and snuggly and machine washes very well.
I decided to use very soft, muted colours but if you would like to change the colourway to something more bolder then this will not be a problem… Paintbox Yarns Simply Aran has an extensive colour range so there are many shades to choose from that will suit all tastes!

PIN ME FOR LATER!
Follow me on Pinterest


PDF PRINTABLE PATTERNS!
If you would prefer an ad-free, printable version of this pattern, you can purchase it from my Etsy store
Please sign up to the Maisie and Ruth newsletter to be informed of any upcoming sales and special offers.
Thank you for supporting my shop!

Ready to learn how to crochet this delightful granny square blanket? Let’s start then!
CROCHET GRANNY SQUARE BLANKET: A FREE PATTERN
LEVEL
Easy (see details of project levels at the Craft Yarn Council).
MATERIALS
- Yarn: #4, worsted / aran / 10 ply. I used 7 balls of Paintbox Yarns Simply Aran, 3.5oz / 201 yds (184m / 100g) in the following colours:
1 ball of each colour:
Colour A: Banana Cream (220)
Colour B: Duck Egg Blue (235)
Colour C:Pale Lilac (245)
2 balls of the following colour:
Colour D: Candyfloss Pink (249)
Colour E: Champagne White (202)
- Crochet Hook: H (5mm)
- Scissors
- Yarn needle
GAUGE / TENSION
Each granny square measures 6.5″ x 6.5″ (16.5 x 16.5cm) (unblocked).
FINISHED SIZE
31.5″ x 31.5″ (80cm x 80cm) (unblocked)
PATTERN NOTES
- US crochet terms used throughout.
- Granny square blanket is worked in rounds.
STITCHES AND ABBREVIATIONS (US CROCHET TERMS)
beg – beginning
ch(s) – chain(s)
dc – double crochet: Yarn over (yo), insert hook into stitch, yo, pull up a loop (3 loops on hook). Yo, pull through 2 loops (2 loops on hook). Yo, pull through remaining 2 loops. 1 double crochet completed.
fasten off – To fasten off securely, work one chain, then cut the yarn leaving a 5 – 6” tail. Pull the tail through the loop that is on your hook. Tighten gently.
sl st – slip stitch: Insert hook into stitch, yarn over (yo), pull up a loop, you will have 2 loops on your hook. Pull the first loop through the second loop. 1 slip stitch completed
sp – space
st(s) – stitch(es)
SPECIAL STITCHES
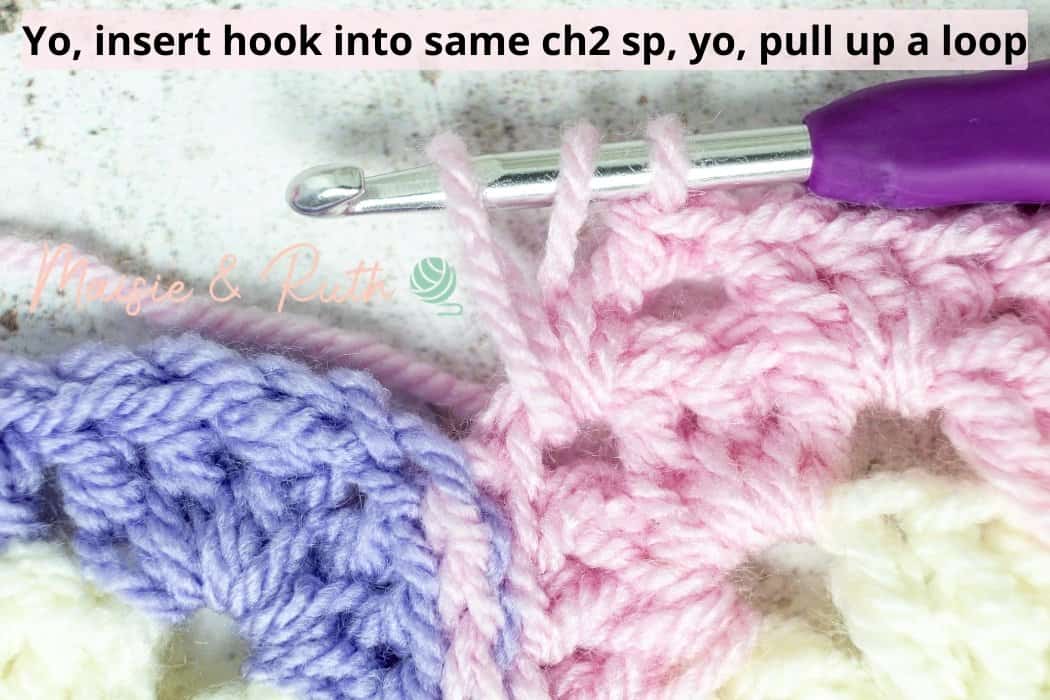
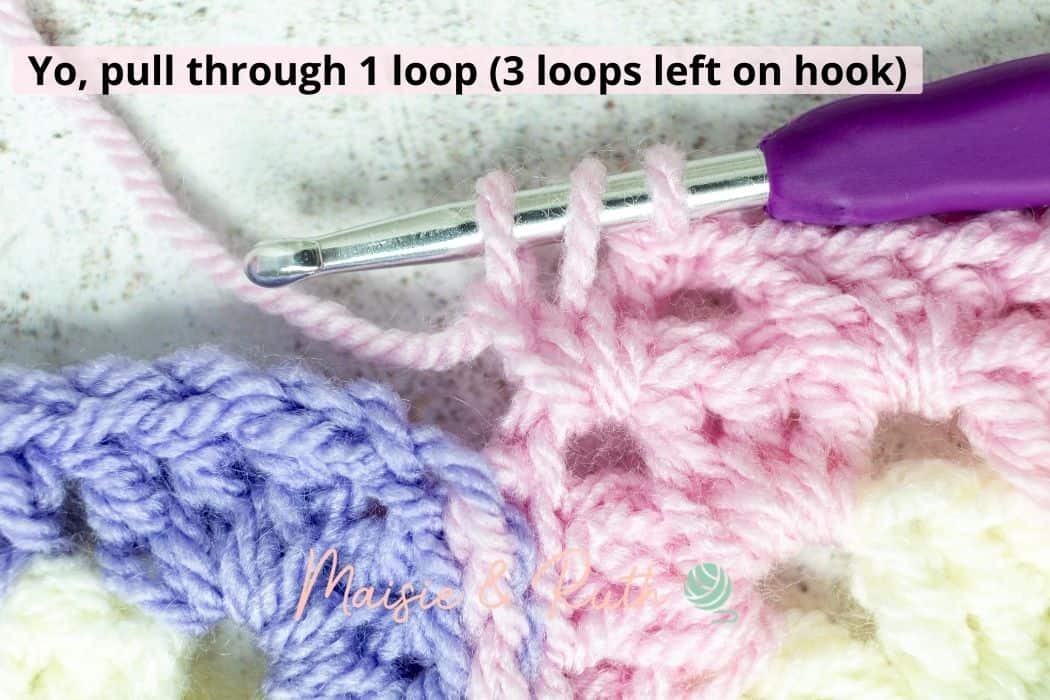
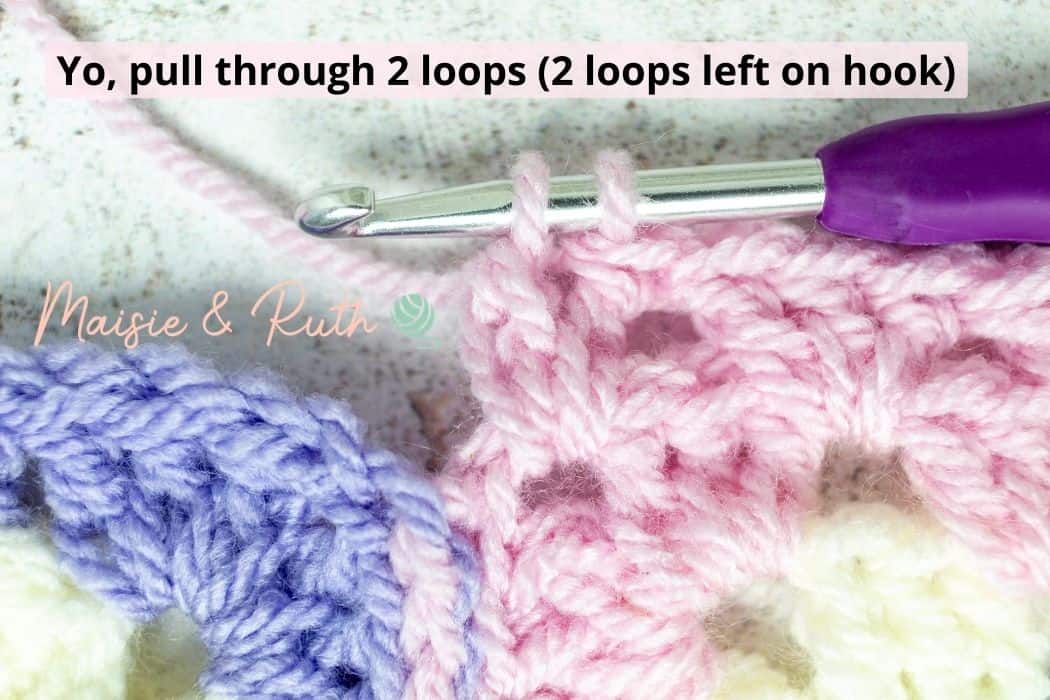
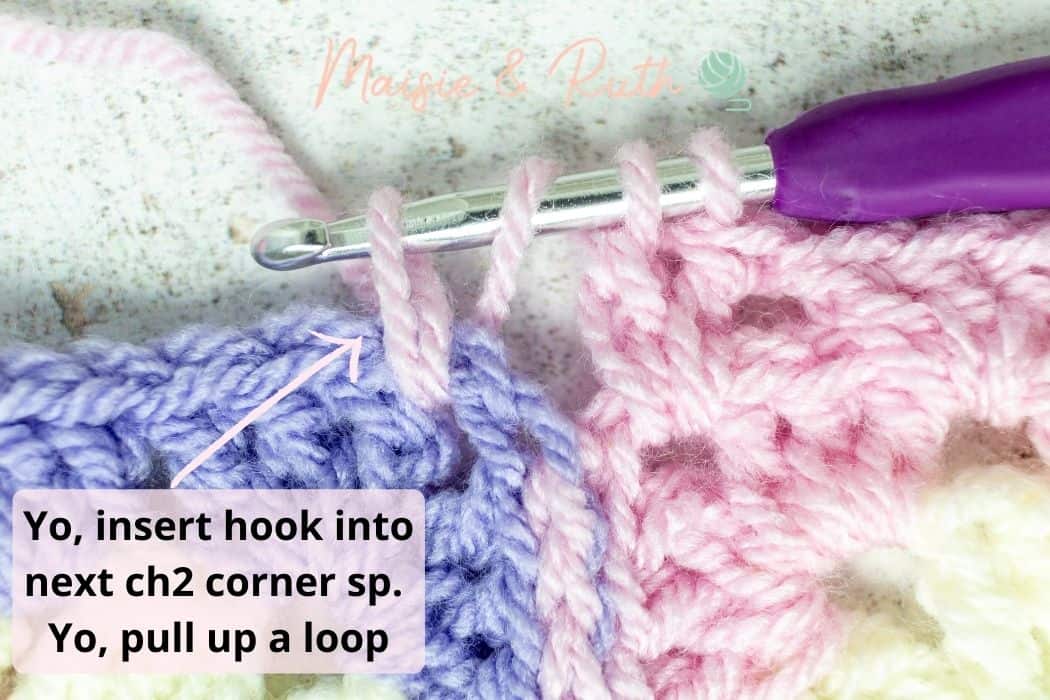
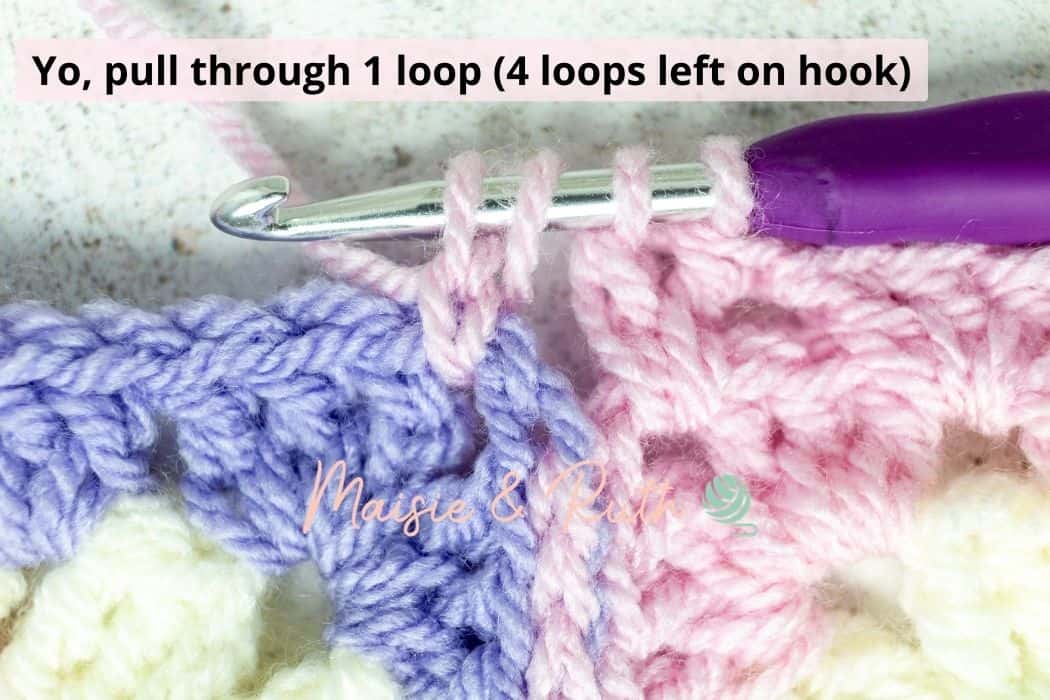
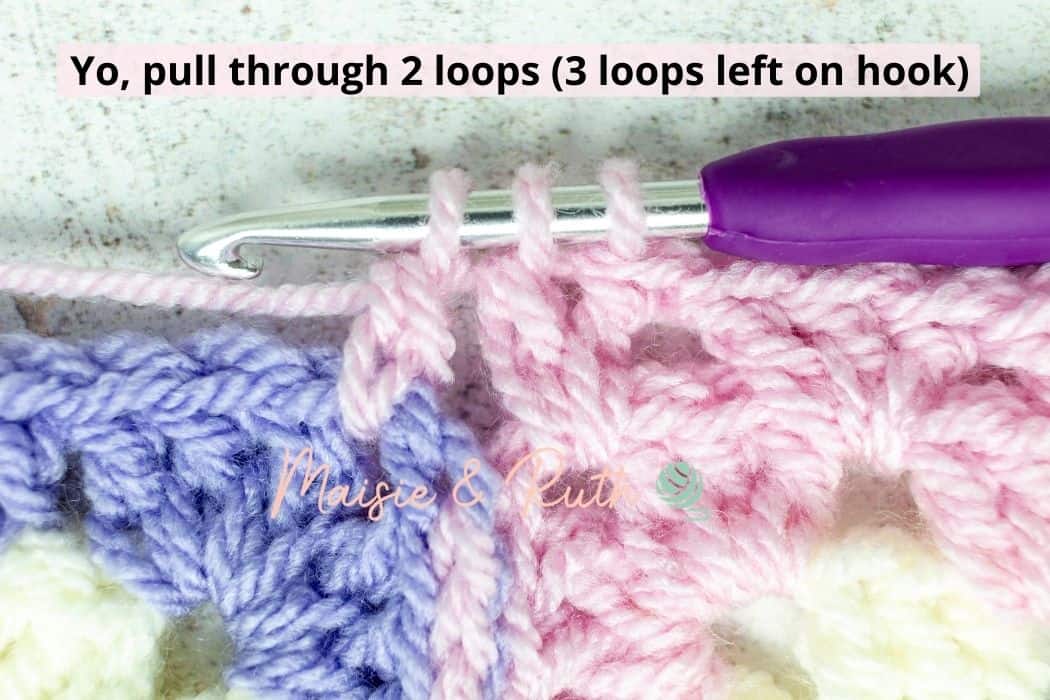
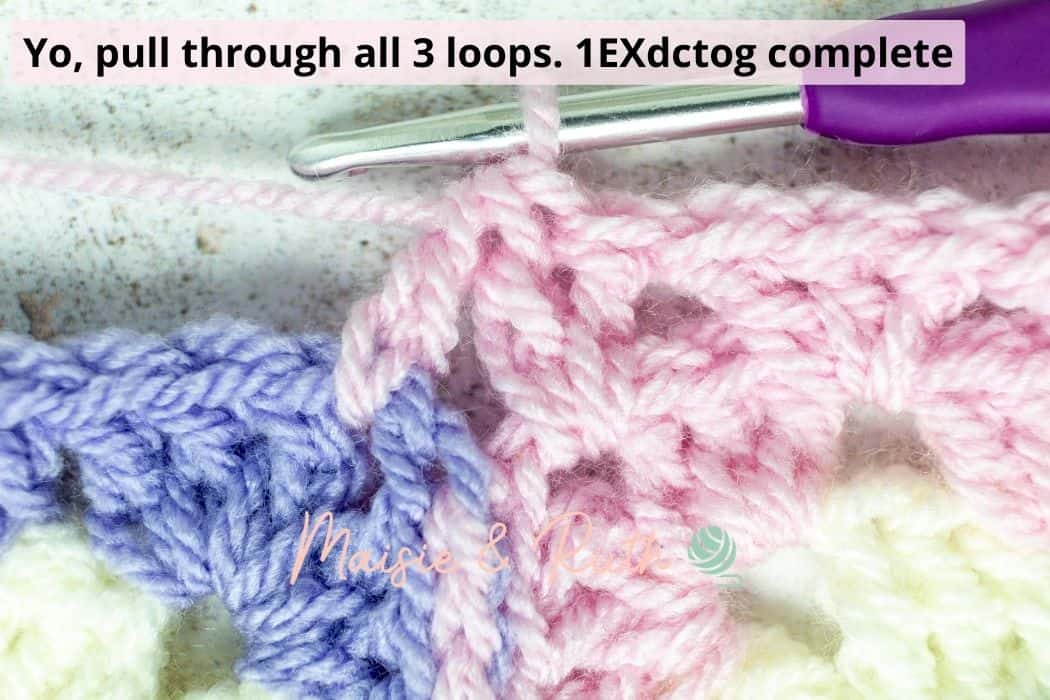
EXdc– Extended double crochet: Yarn over (yo), insert hook into st or sp, pull up a loop, 3 loops on hook, yo, pull through 1 loop (3 loops remain on hook), yo, pull through 2 loops (2 loops remain on hook), yo, pull through both loops. I EXdc made.
EXdctog – Extended double crochet together (photos below): Yarn over (yo), insert hook into st or sp, yo, pull up a loop, 3 loops on hook, yo, pull through 1 loop ( 3 loops left on hook), yo, pull through 2 loops (2 loops left on hook). Yo, insert hook into next st or sp, yo, pull up a loop, 4 loops on hook, yo, pull through 1 loop (4 loops left on hook), yo, pull through 2 loops (3 loops left on hook), yo, pull through all 3 loops. 1EXdctog made.
picot stitch – ch3 in ch1 sp, sl st into same st (at base of ch3).
shell stitch – 6dc in ch1 sp.
PATTERN INSTRUCTIONS
For the Paisley baby blanket you will need to crochet 16 squares of the Sunburst Granny Square (click on the link to be taken to the step-by-step photo tutorial).
Make the following Sunburst granny squares:
Square A: 4 squares
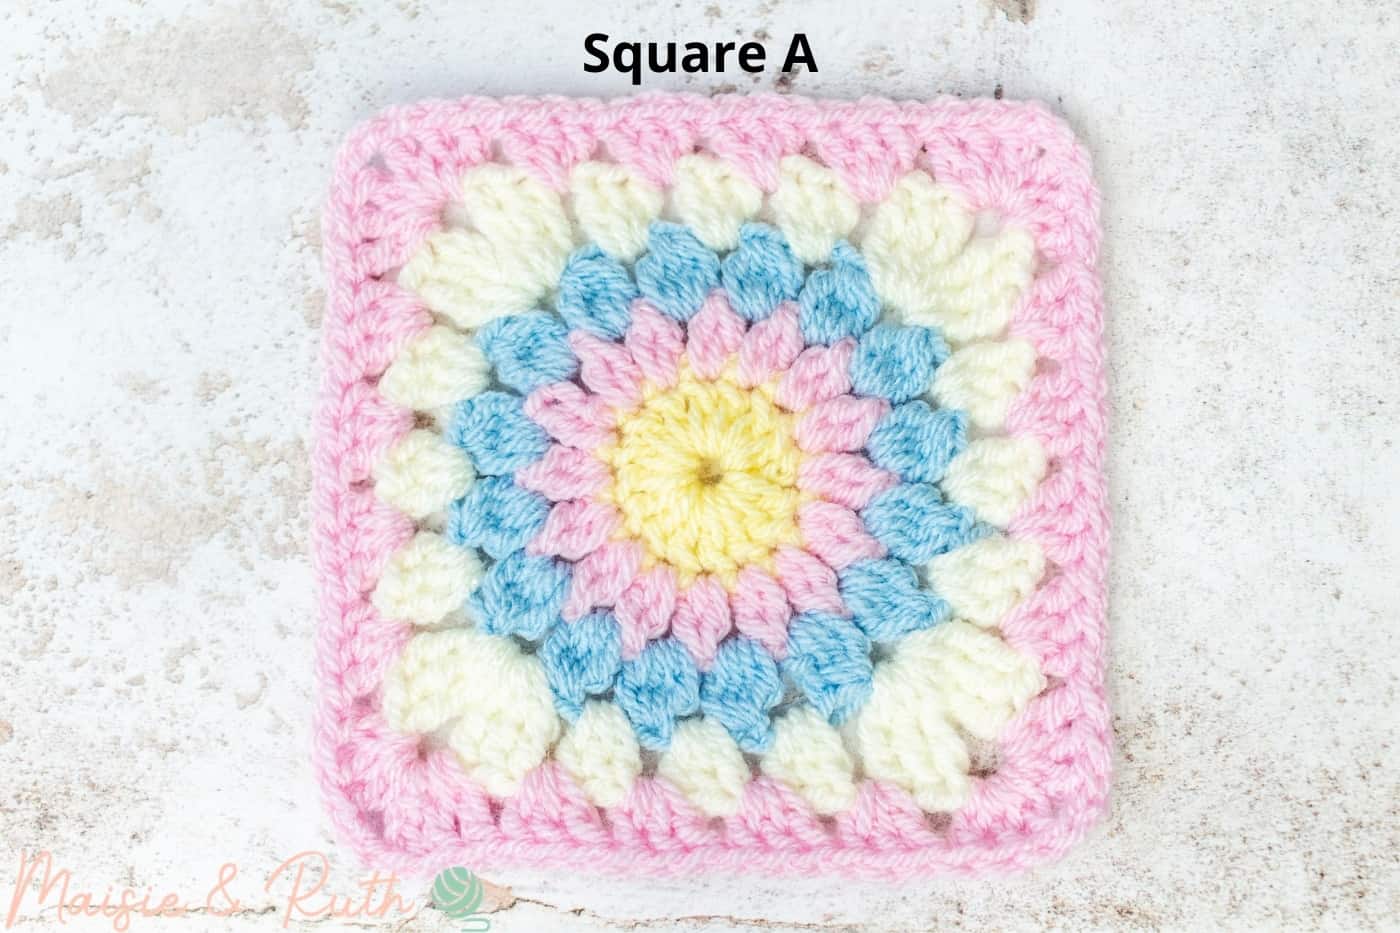
Round 1 – colour A
Round 2 – colour D
Round 3 – colour B
Round 4 – colour E
Round 5 – colour D
Square B: 4 squares
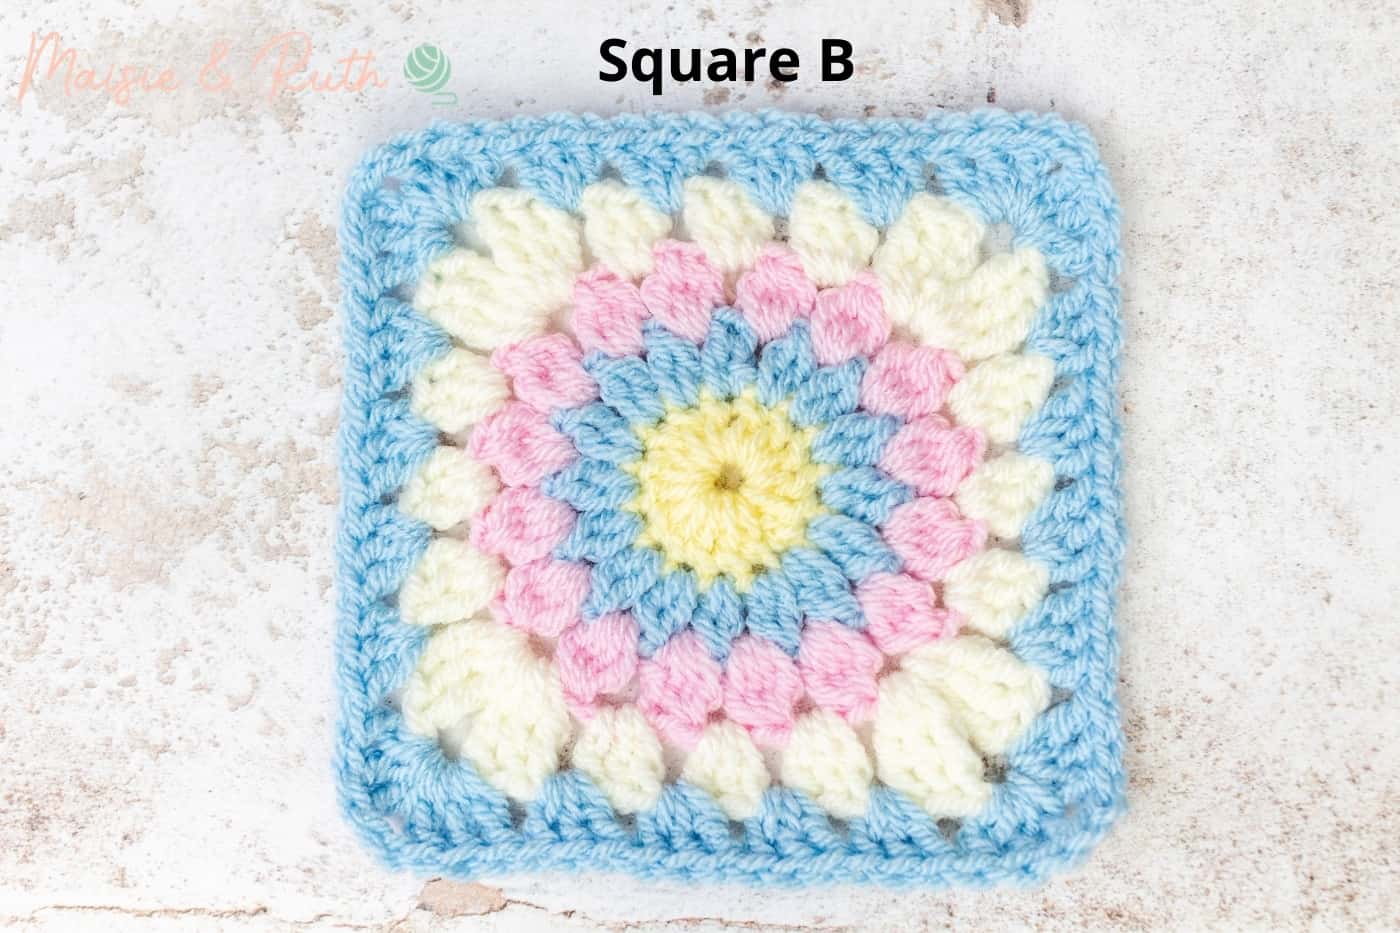
Round 1 – colour A
Round 2 – colour B
Round 3 – colour D
Round 4 – colour E
Round 5 – colour B
Square C: 4 squares

Round 1 – colour A
Round 2 – colour C
Round 3 – colour D
Round 4 – colour E
Round 5 – colour C
Square D: 4 squares
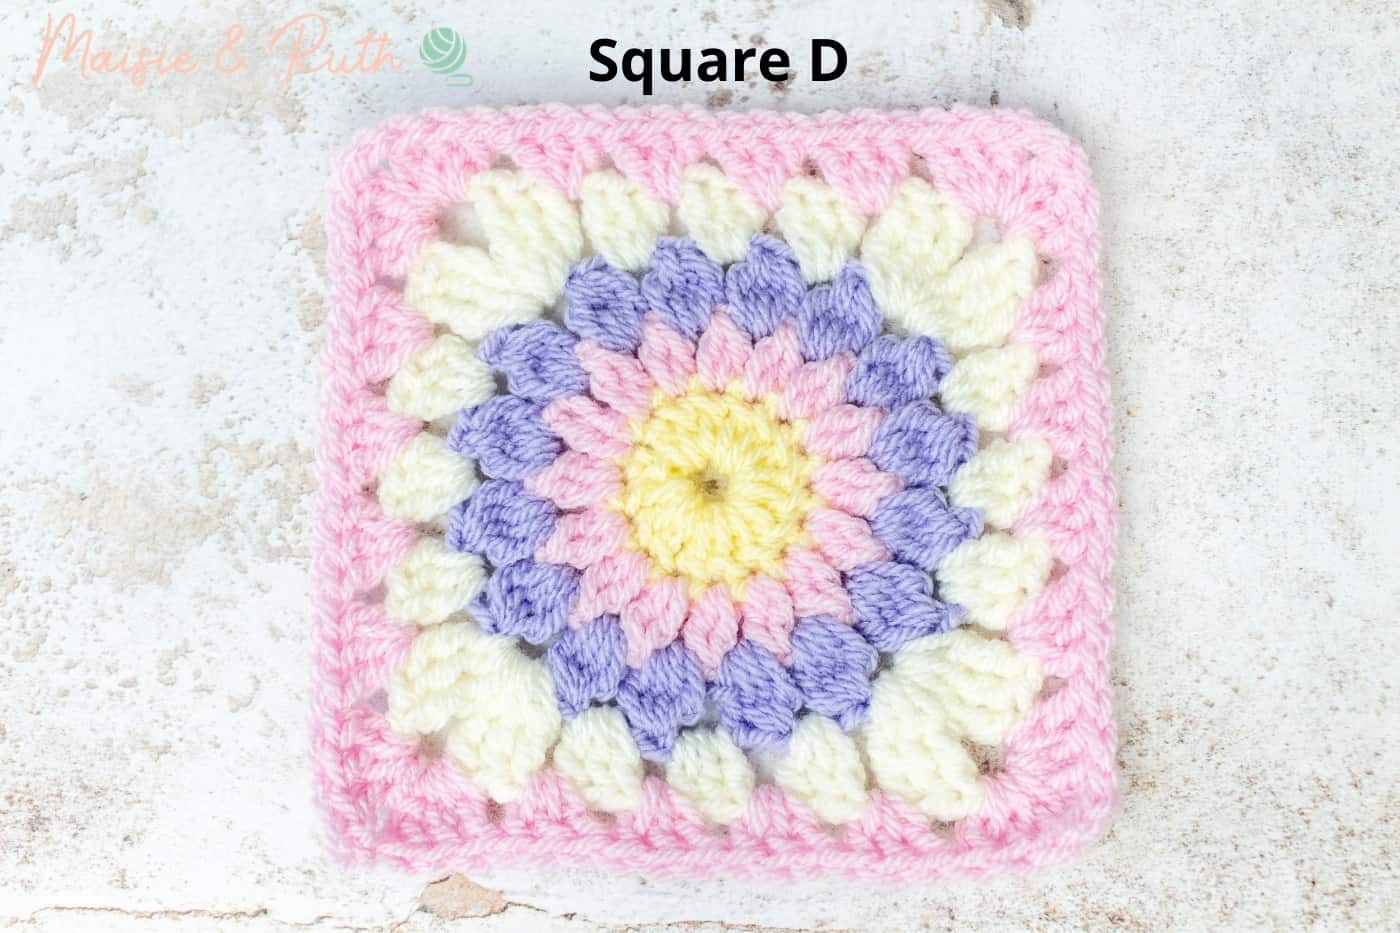
Round 1 – colour A
Round 2 – colour D
Round 3 – colour C
Round 4 – colour E
Round 5 – colour D
ARRANGEMENT OF CROCHET GRANNY SQUARE BLANKET
Once you have all 16 squares, it’s time to arrange them before seaming.
Below is a diagram showing you how I decided to arrange my granny squares.
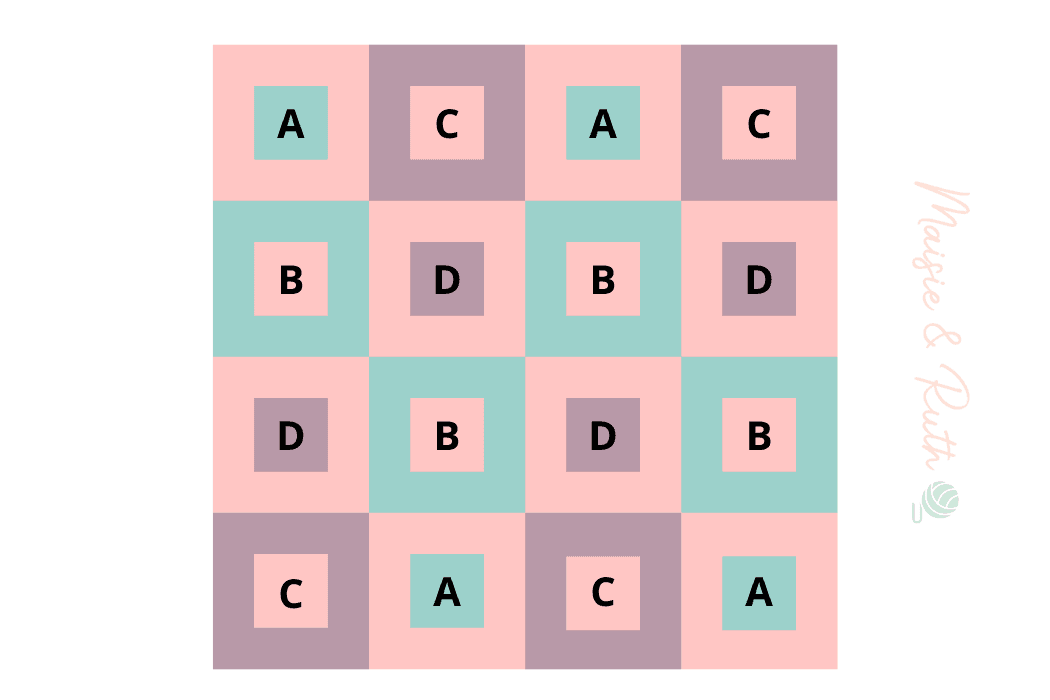
This is just a guide… feel free to arrange the squares to your liking!
JOINING CROCHET GRANNY SQUARES
It’s now time to seam your squares together.
For this crochet pattern, I used my favourite way of joining granny squares…the flat slip stitch seam.
Join the squares using your preferred method of joining. Or visit my tutorial for the flat slip stitch seam for a detailed step-by-step video (and photos too) of the process.

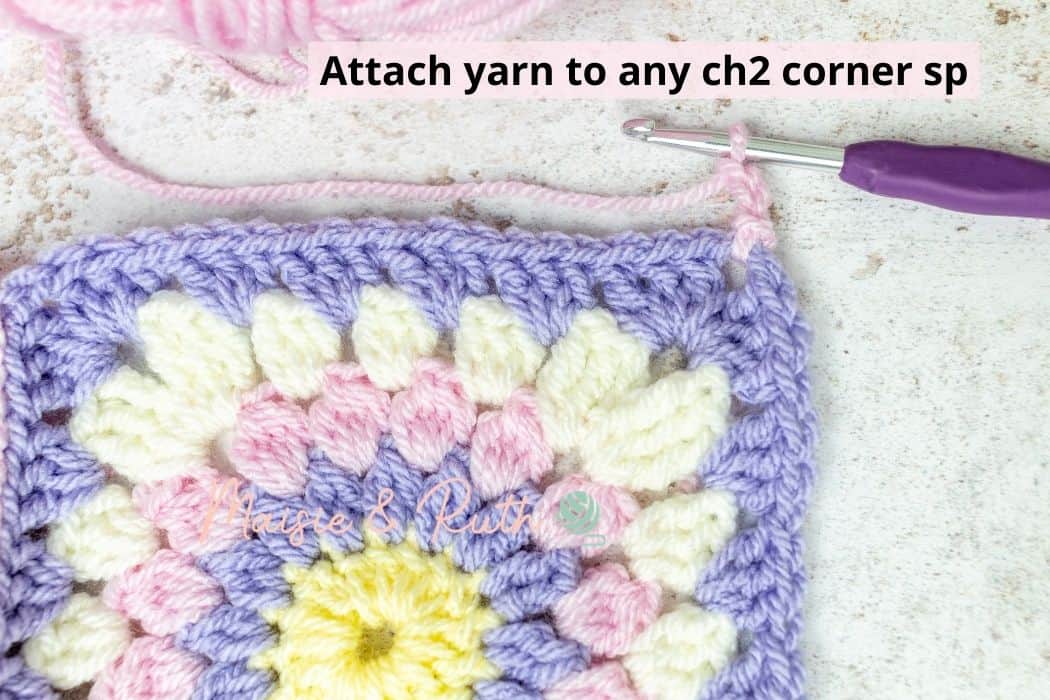
GRANNY SQUARE BORDER
You will now finish your blanket off with a border consisting of 5 simple rounds.
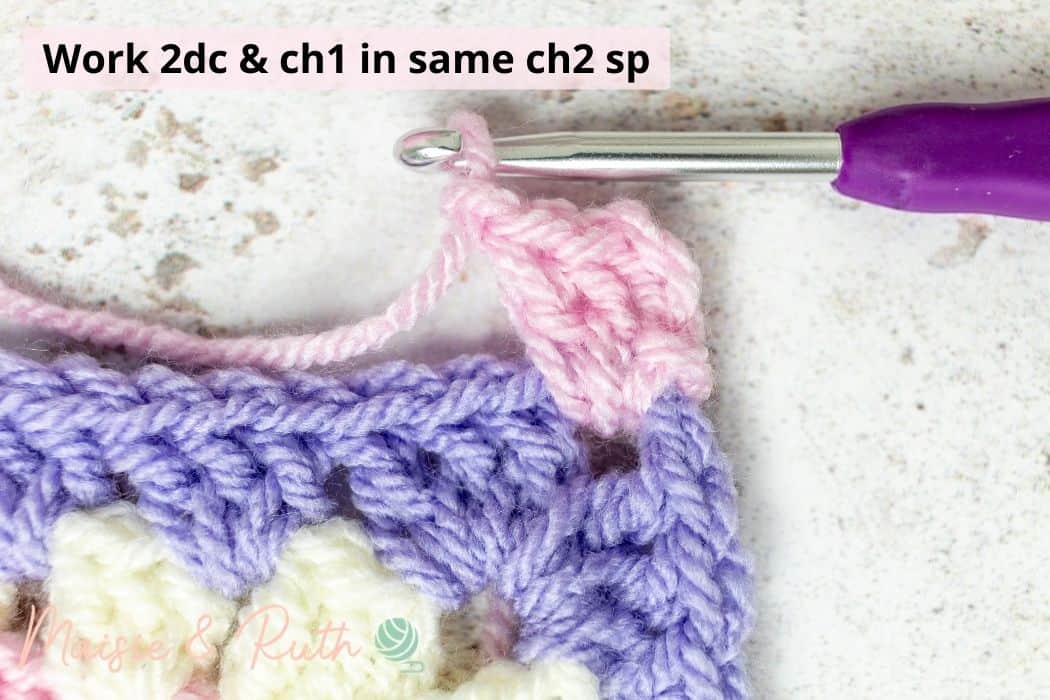
Round 1. With colour D, attach your yarn to any ch2 corner space at the edge of your blanket and ch3:
Work 2dc and a ch1 in the same ch2 sp.
Work (3dc, ch1) in between each group of 3dc from the previous round until you get to the next ch2 corner sp at the seam area:

When you arrive at the first seam of your blanket, work 1EXdc in the ch2 corner space:
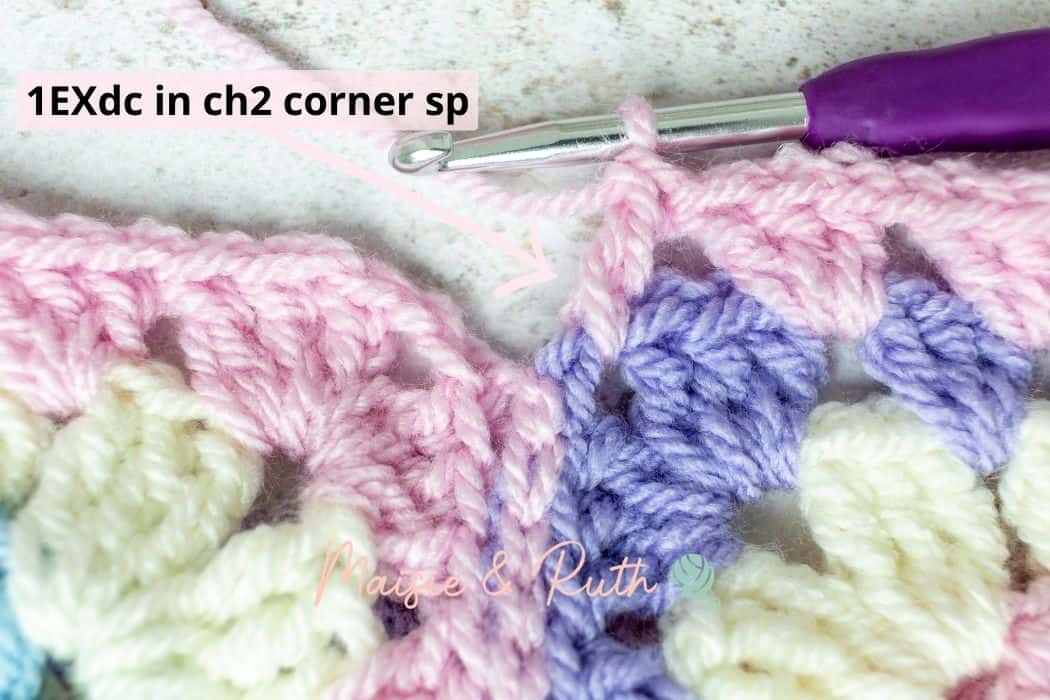
In order to ensure that your blanket lays flat, you will now work 1EXdctog over the next two ch2 corner sps, as follows:
Now work 1EXdc and a ch1 in the same ch2 corner space:
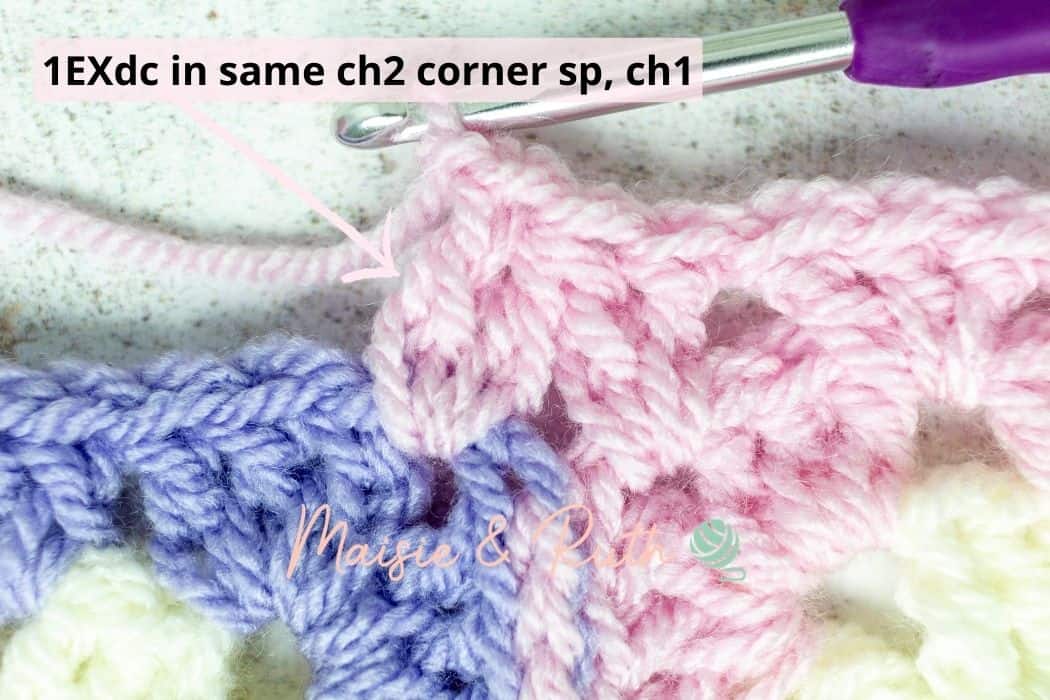
As you work around your blanket, you will work this sequence of stitches at each seam of the blanket.
Continue working (3dc, ch1) in between each group of 3dc from the previous round.
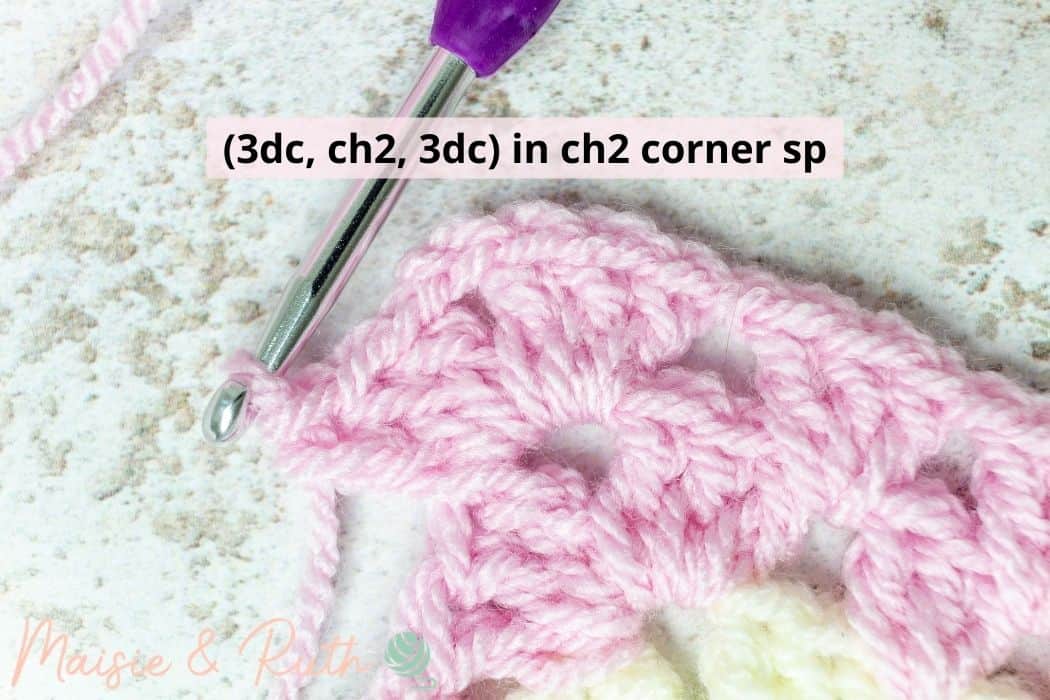
In the 4 corners of the blanket, work (3dc, ch2, 3dc) in the ch2 corner spaces:
When you get back around to the beginning of the round, work (3dc, ch2) in the first ch2 corner space. Sl st to the top of the beginning ch3 to join.
Cut yarn, fasten off and weave in ends.
Round 2. With colour E, attach your yarn to any ch2 corner space.
Repeat round 1.
Note: When you arrive at the seams with the 1EXdctog stitch, you will work 3dc in the ch1 spaces as normal:

Cut yarn, fasten off and weave in ends.
Round 3. With colour B, attach your yarn to any ch2 corner space.
Repeat round 2.
Cut yarn, fasten off and weave in ends.
Round 4. With colour E, attach your yarn to any ch2 corner space.
Repeat round 2.
Cut yarn, fasten off and weave in ends.
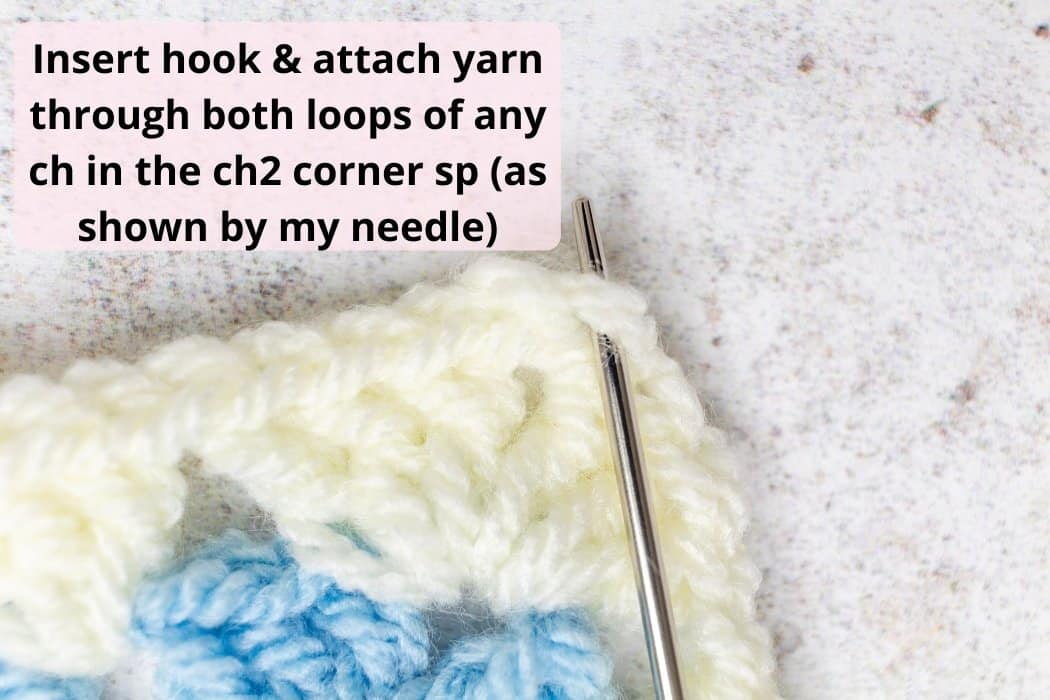
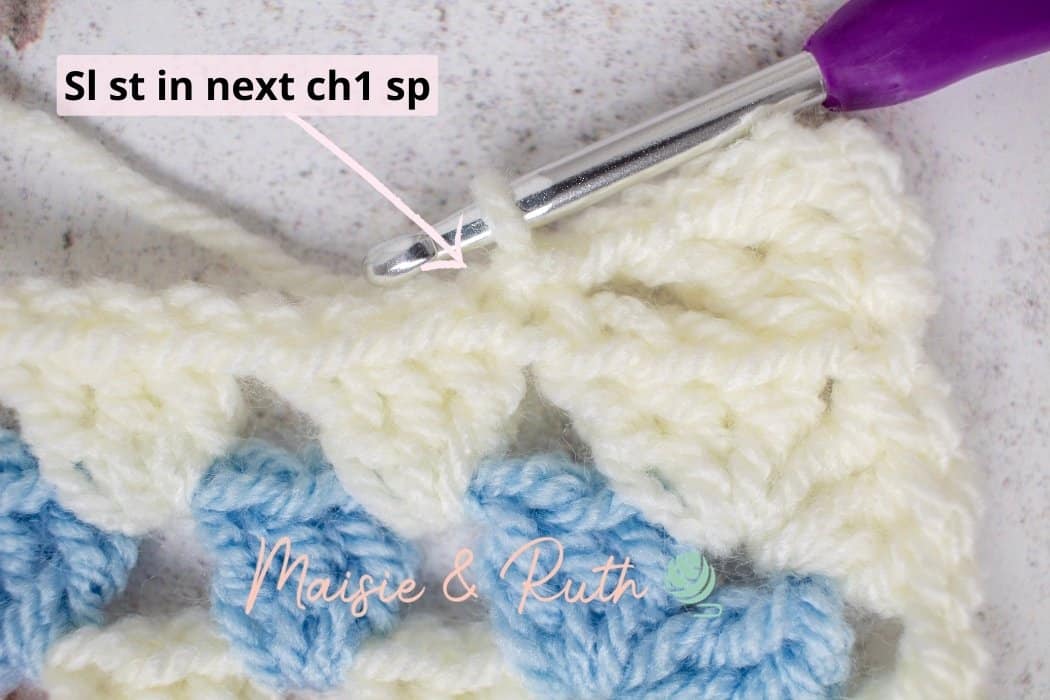
Round 5. In the final round, you will work a Shell and Picot border.
Note that instead of working around the ch1 or ch2 spaces, you will be working your stitches through both loops of the chain spaces.
With colour E attach your yarn through both loops of any ch in the ch2 corner space (it doesn’t matter which of the two chains you pick to begin the round):
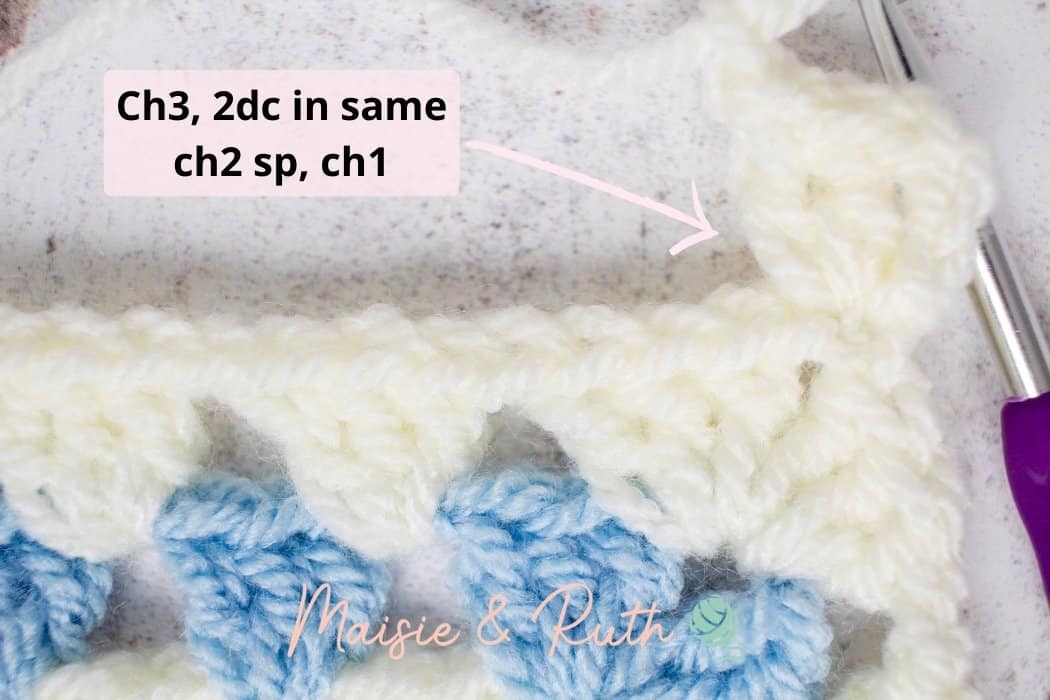
Ch3 (counts as your first stitch), 2dc in same ch2 sp, ch1:
Sl st in next ch1 sp (remember to go through both loops of the ch1 sp):
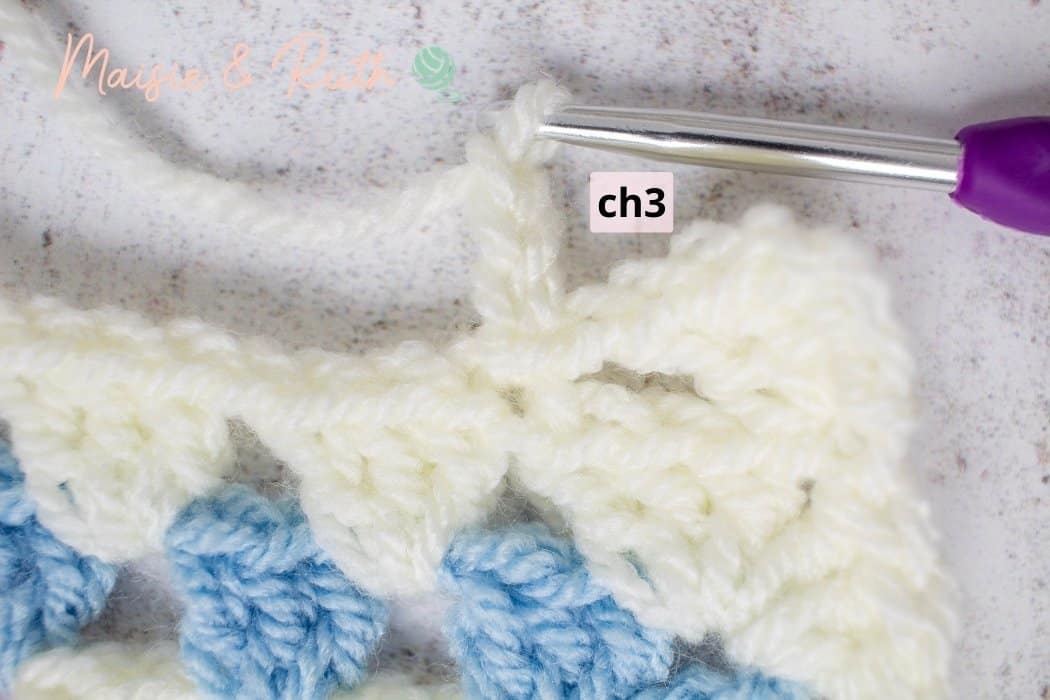
You will now work a picot stitch:
Ch3:
Sl st back in to the same ch1 sp:
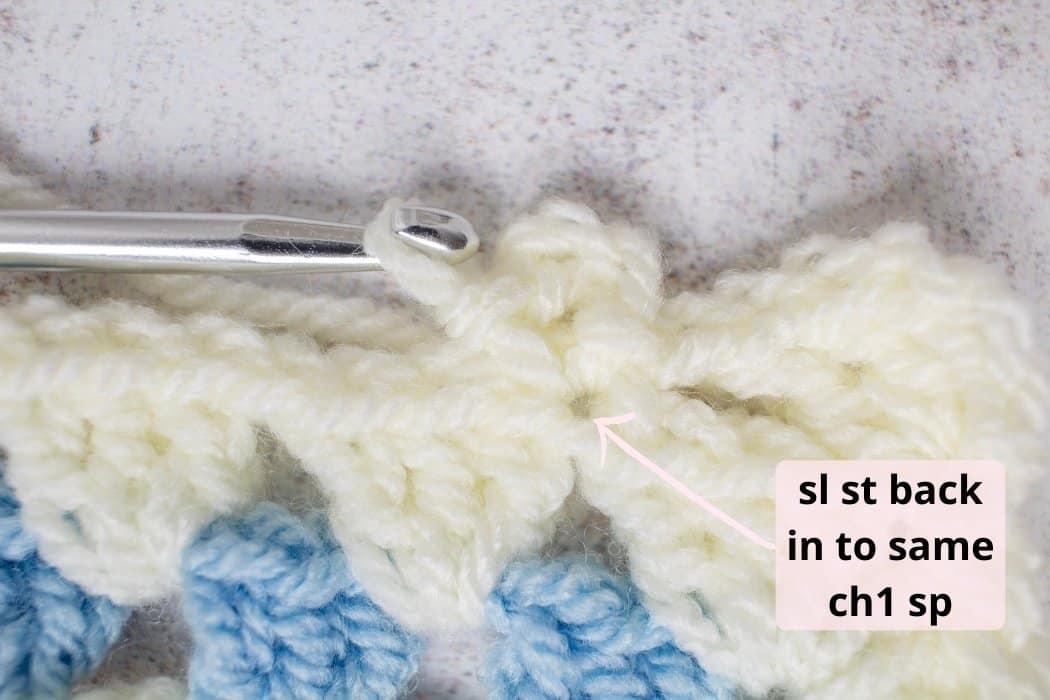
You have just made your first picot stitch.
Next up you will work a shell stitch.
Work 6dc in the next ch1 sp:
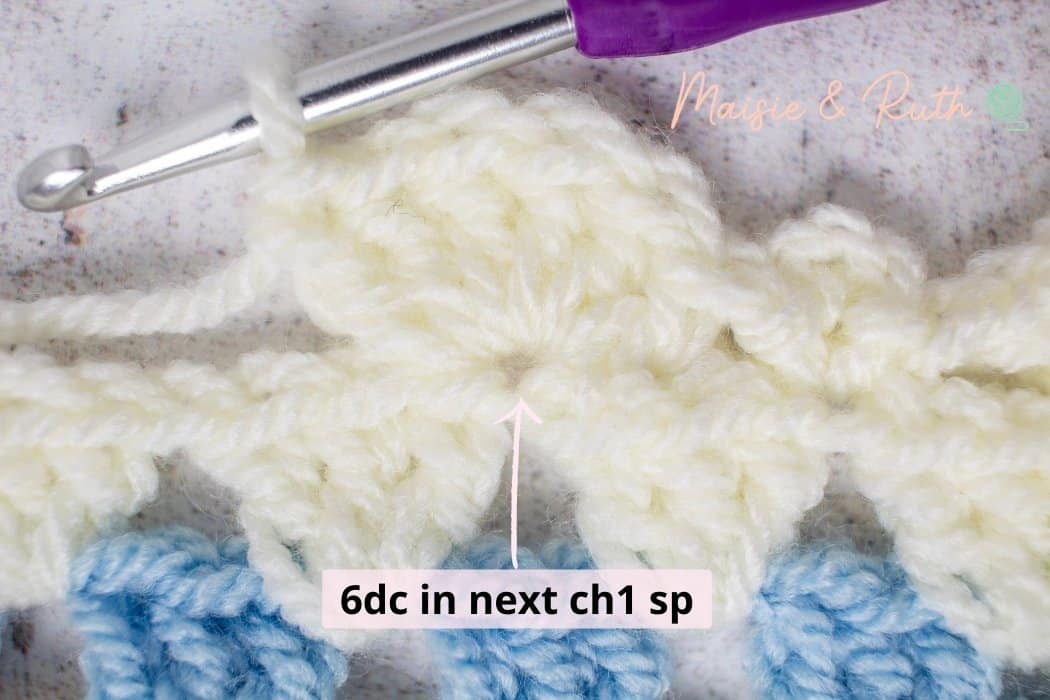
You have just made your first shell stitch.
Continue alternating a picot stitch with a shell stitch until you arrive at the corners of your blanket, work (3dc, ch2, 3dc) in the ch2 corner spaces.
When you reach the beginning of the round, work (3dc, ch2) in the first ch2 space of the round. Sl st or make an invisible join to the top of the beginning ch3 to join.
Cut yarn, fasten off and weave in ends.
And that’s it! Your crochet granny square blanket is all completed now 😍

SHARE YOUR WORK!
I hope you found the tutorial helpful… leave me a comment below!
Remember to pin this pattern to your board for later if you can’t make it now 😊
And as always, I would really like to see your photos of the Paisley baby blanket (work-in-progress or finished items) – you can tag me on Instagram using @maisieandruth or post them in my Facebook Group.
Happy crocheting!


