


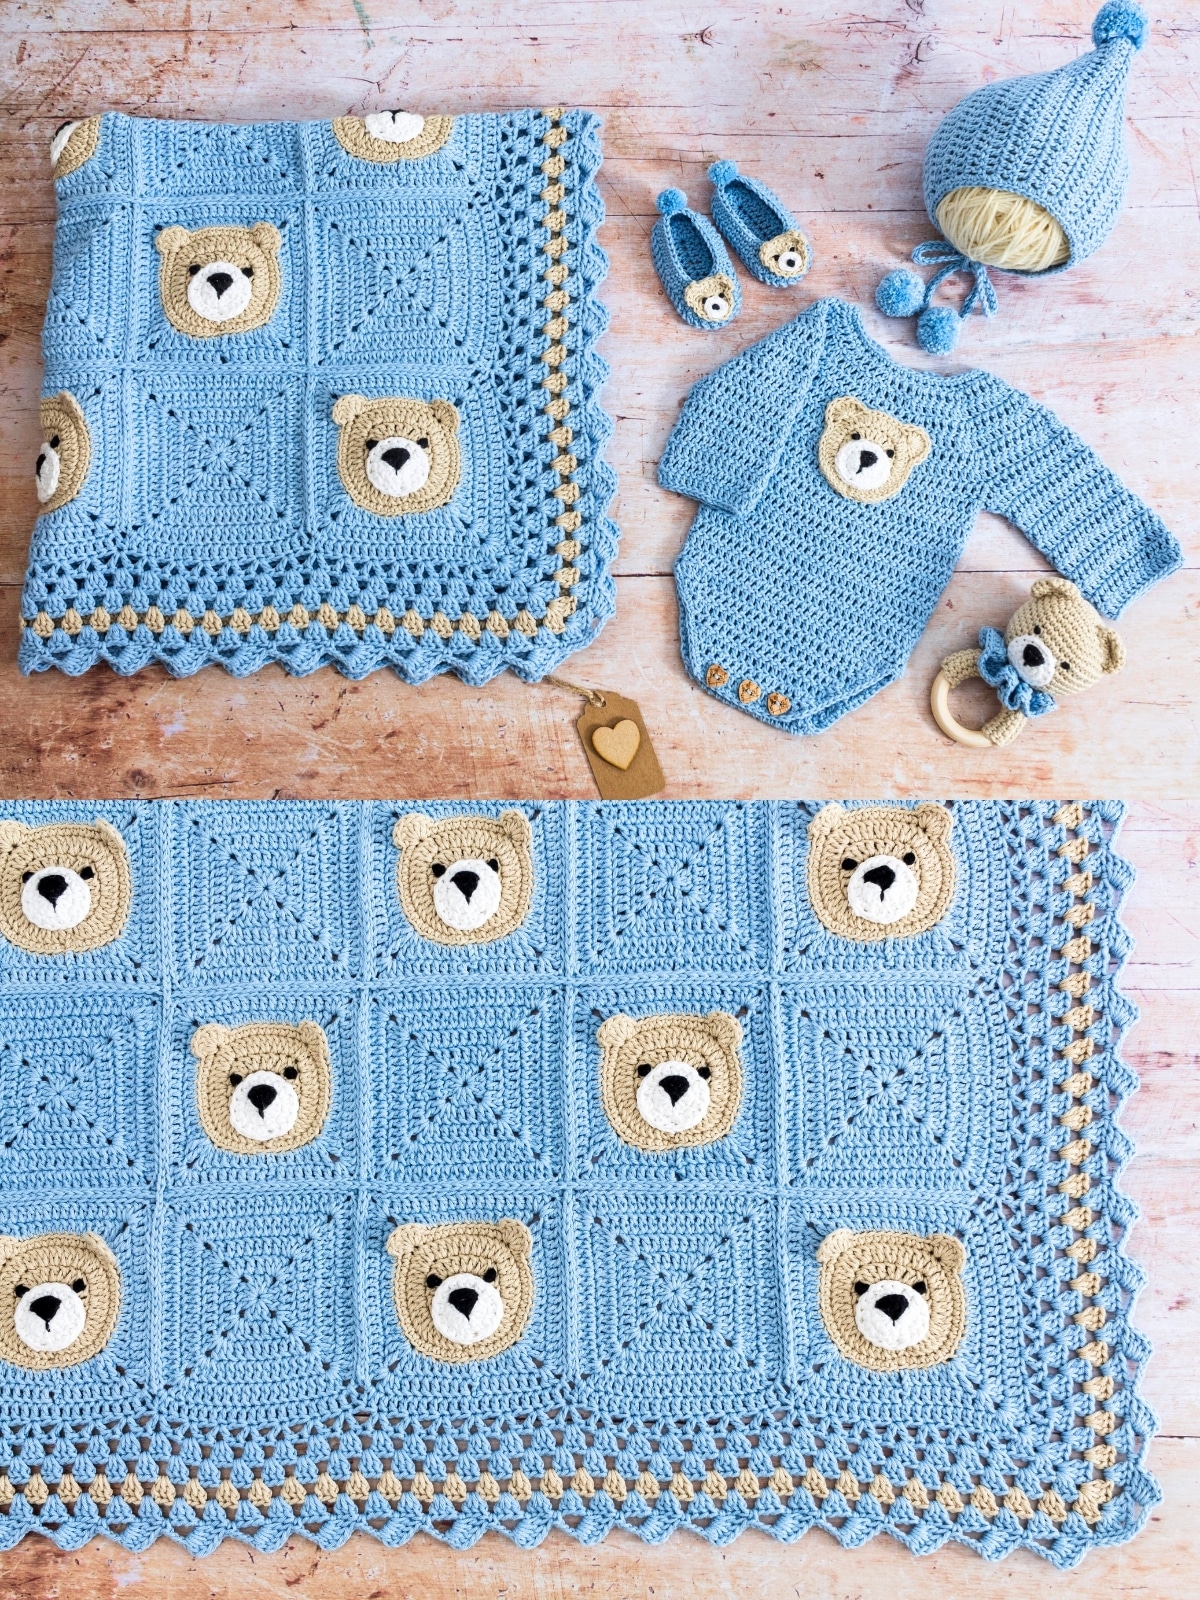
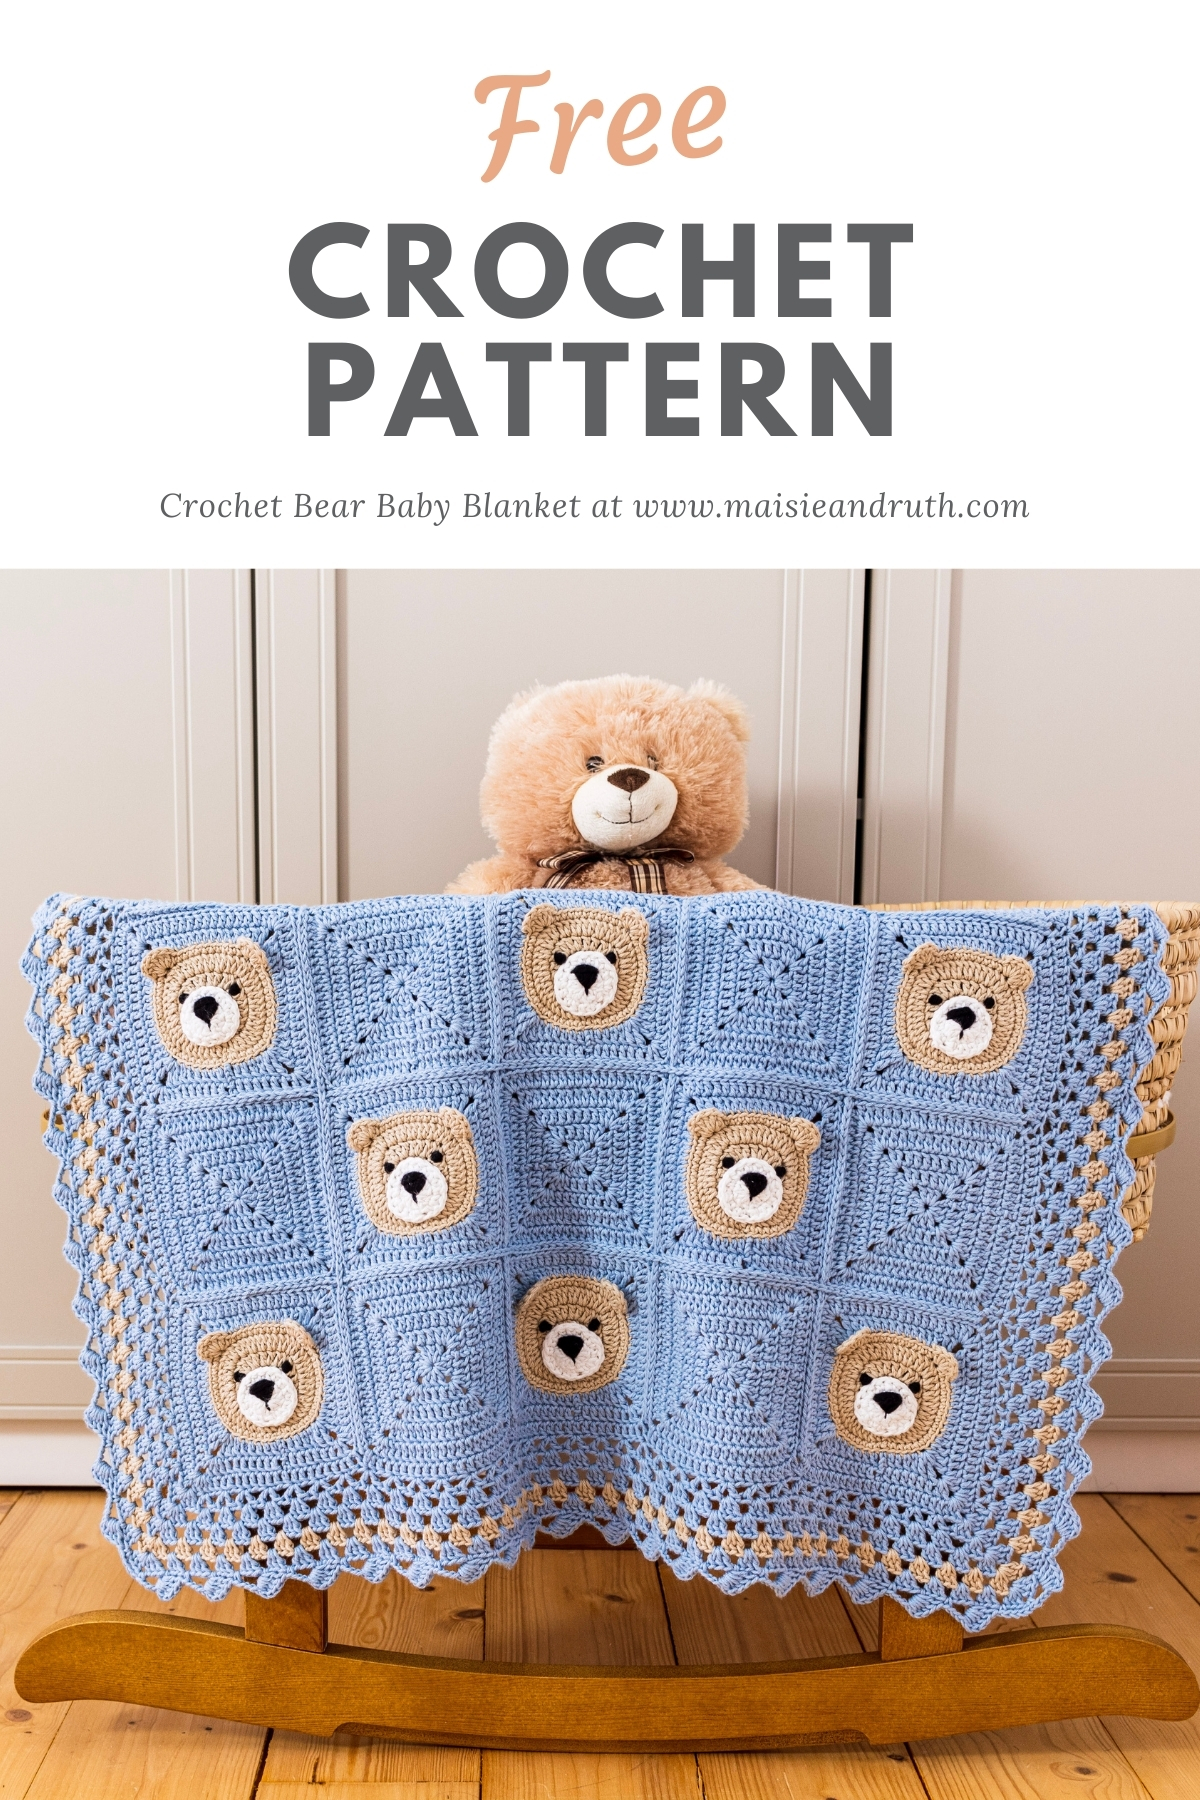
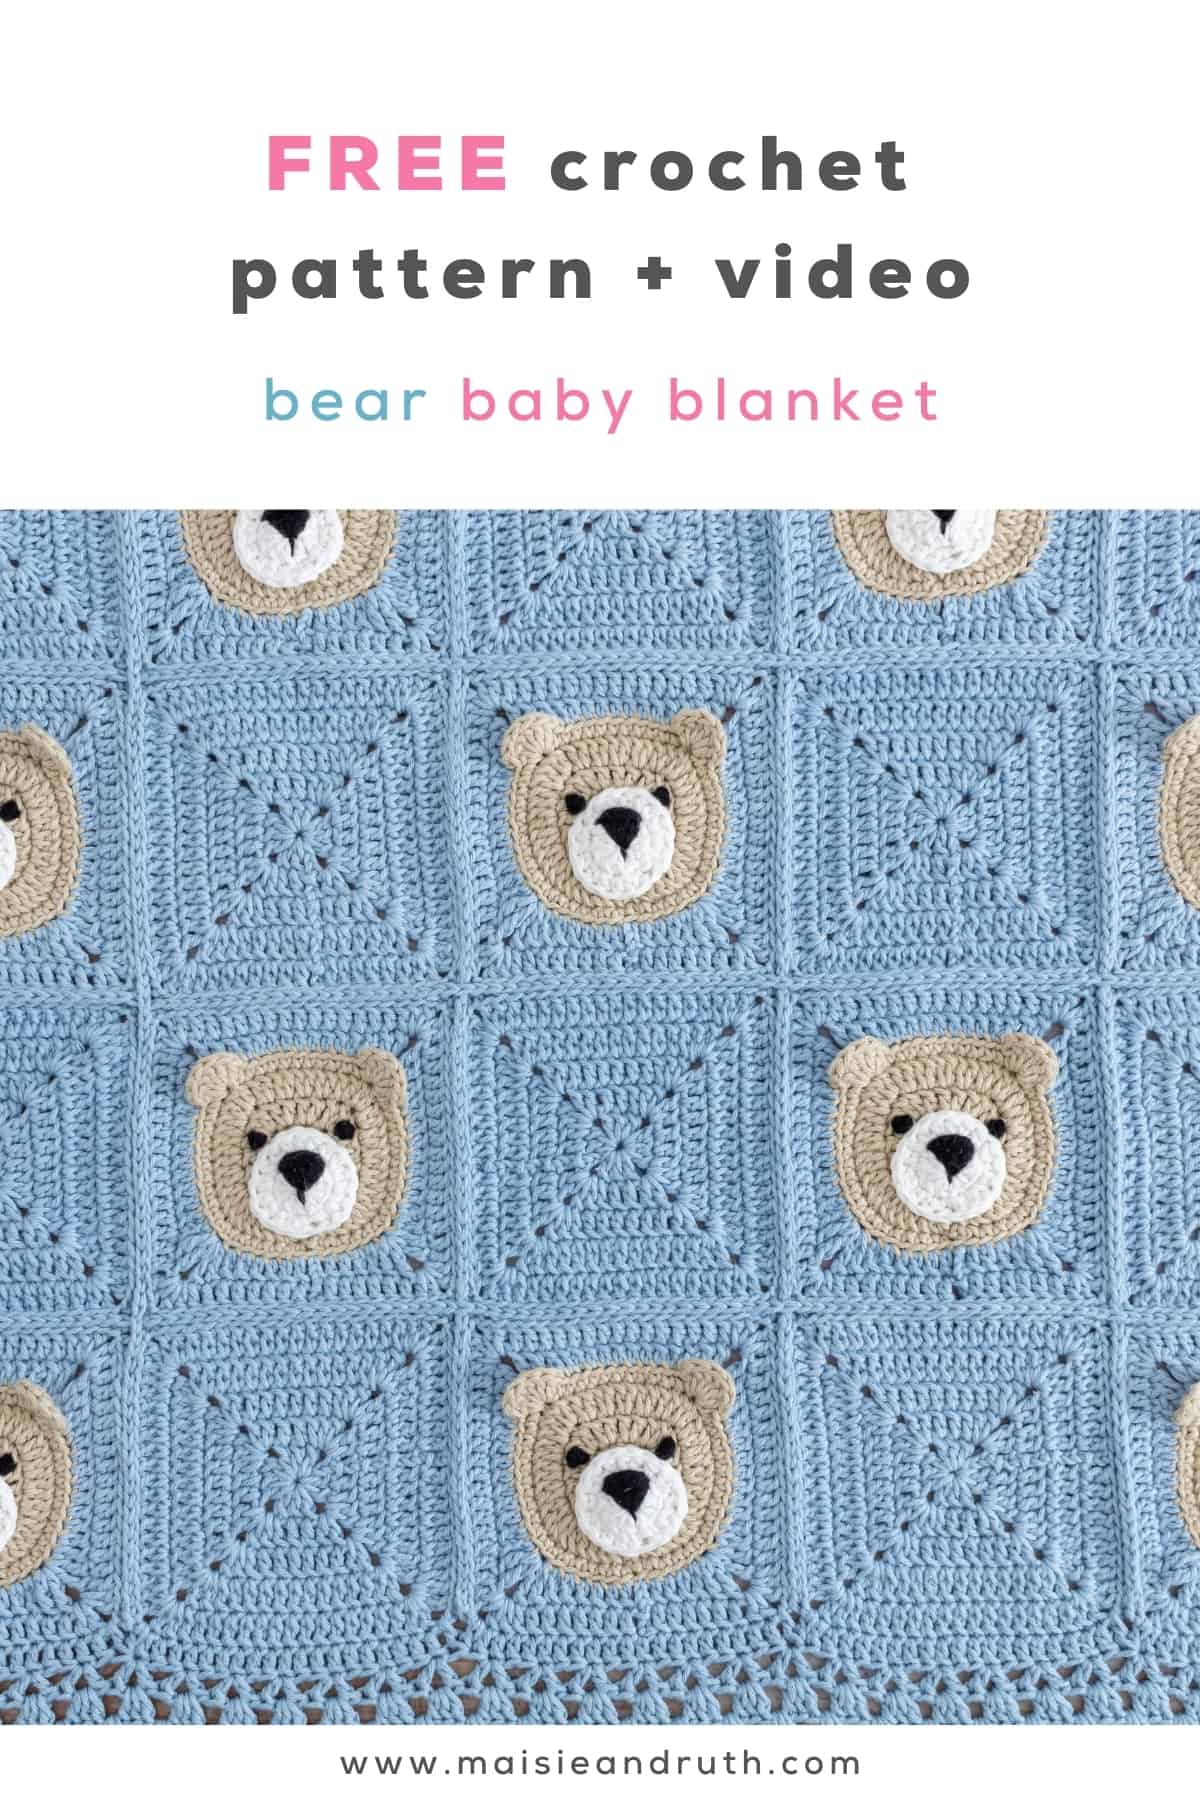
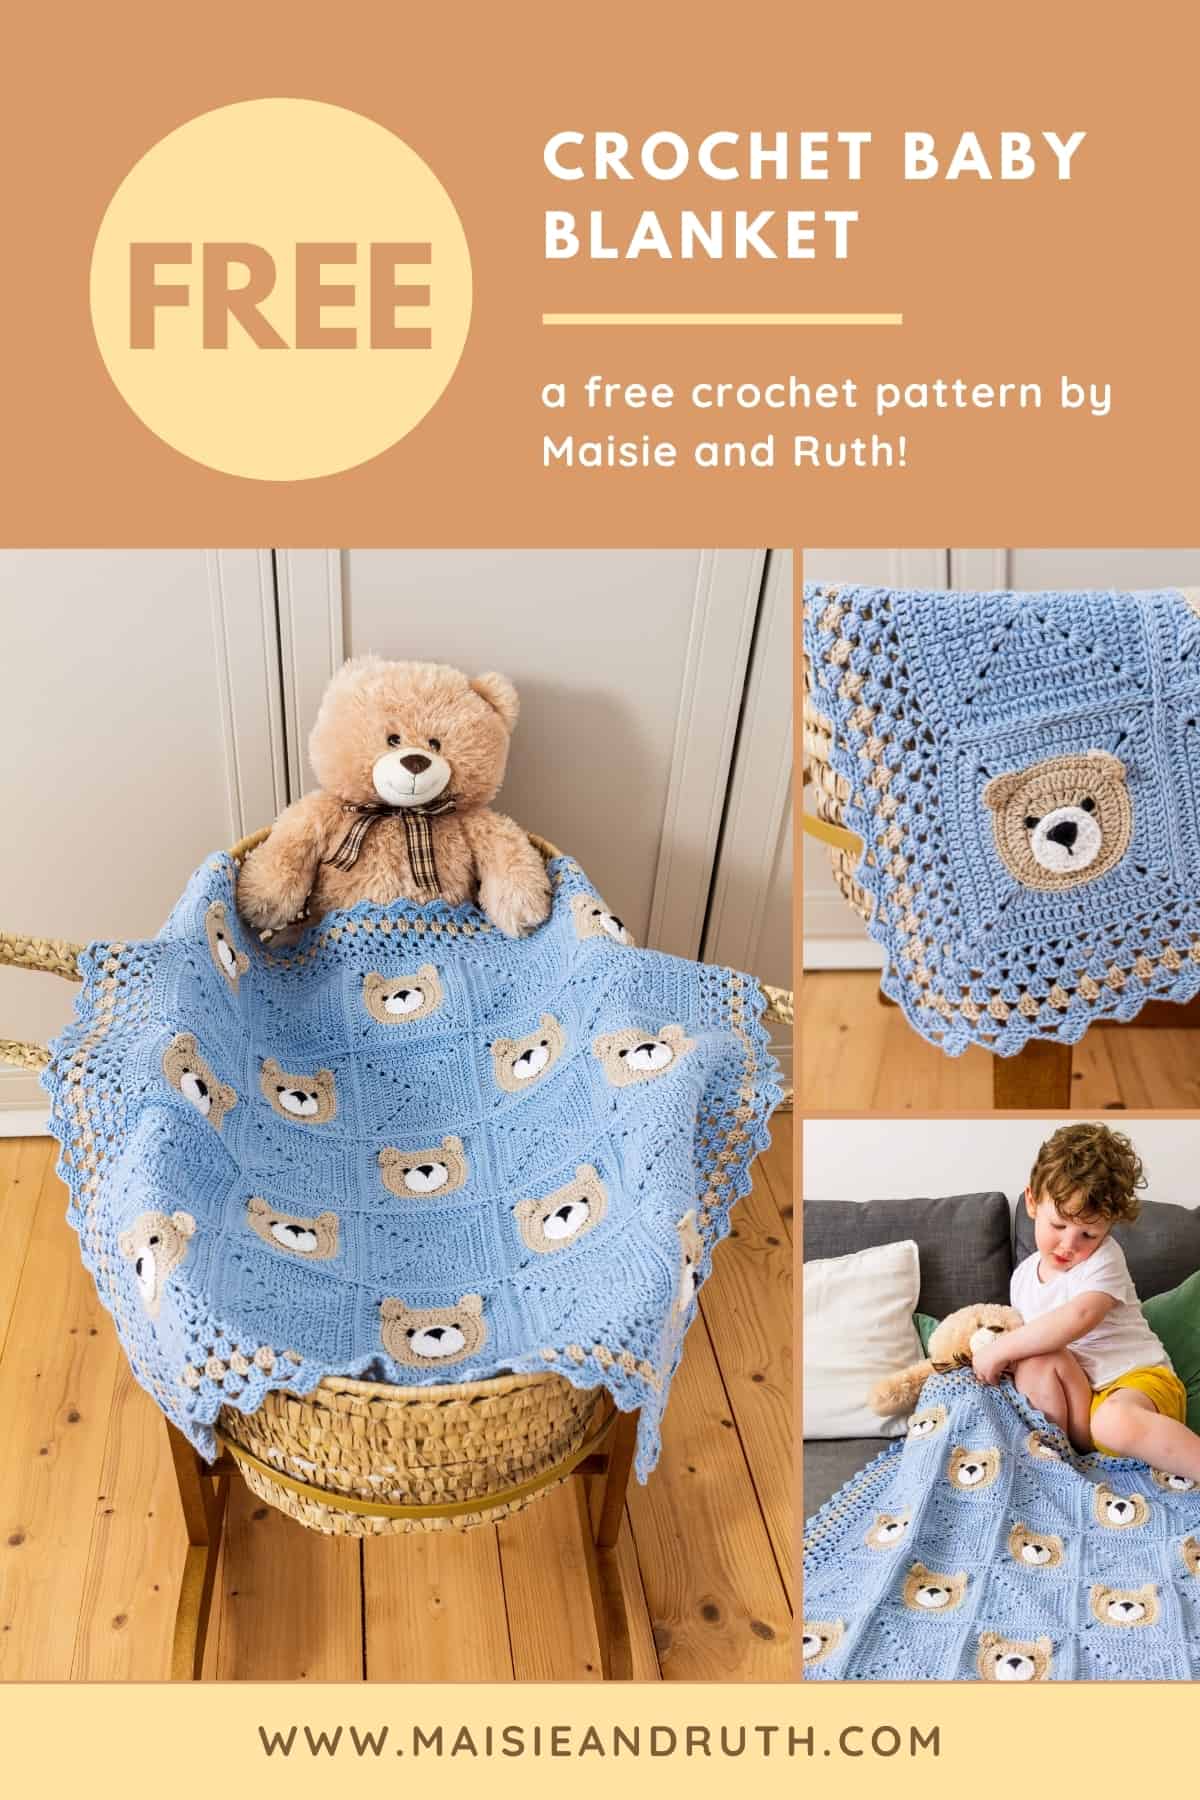
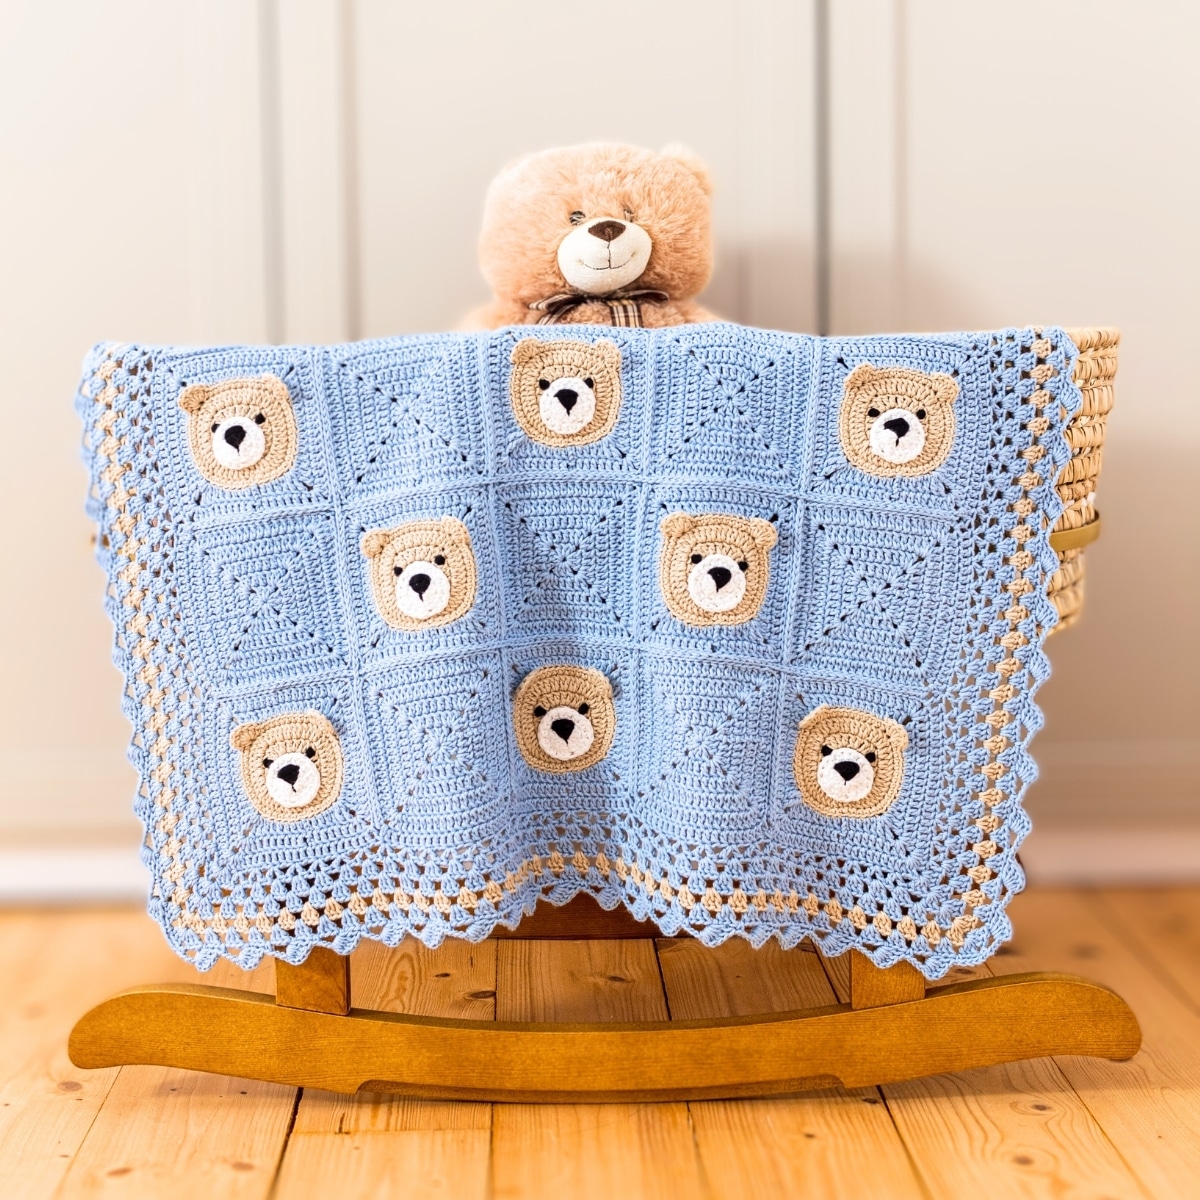
Crochet baby blanket patterns don’t get much sweeter than the Teddy Hugs Blanket. This adorable bear crochet baby blanket features charming teddy bear squares that create a cozy and playful design — perfect for newborns and little ones.
This FREE pattern is designed to give you a rewarding project from start to finish. I’ll walk you through each step so you can create a handmade piece you’ll be proud of. If you’d like a beautifully formatted, ad-free version of this pattern, you can grab the printable PDF here.

Little hands, big cuddles – my 3-year-old nephew enjoying his Teddy Hugs Blanket.
Why This One’s a Favourite
- Adorable and unique teddy bear design
- Perfect newborn baby blanket size
- Made using soft DK cotton yarn
- Uses simple beginner-friendly stitches
- Includes a step-by-step video tutorial
- Great for baby showers and handmade gifts
- Looks amazing in photos (keepsakes or social media)
- Timeless design suitable for boys or girls
- Optional printable PDF pattern available
- Coordinates with the Teddy Hugs collection
Bear-y Cute!
Formerly known as my Bear Crochet Baby Blanket, this popular pattern is now officially called the Teddy Hugs Blanket. It has become one of my most loved designs thanks to its cute teddy motif, beginner-friendly stitches, and soft, snuggly texture.
Made with DK cotton yarn and a 3mm hook, the Teddy Hugs Blanket is lightweight, breathable, and ideal for babies. It’s perfect for baby showers, nursery décor, and special handmade gifts that will be treasured for years.

Why Crochet a Teddy Bear Blanket?
If you want to express your love and creativity, crochet a baby blanket!
Not only will the Teddy Hugs Blanket provide warmth and comfort to your little one, but it will also become a cherished keepsake to be passed down through the generations.
With its adorable teddy bear design and cozy texture, it’s a blanket that little ones will truly love to cuddle for years.

Steam Blocking the Teddy Hugs Blanket
Once your blanket is finished, I recommend steam blocking it to give the project a smooth, polished finish.
Blocking helps the stitches relax, evens out the teddy bear squares, and allows the blanket to lie flat so the design really shines.
I gently steam blocked my Teddy Hugs Blanket after joining the squares and adding the border, which gave it a lovely professional look. If you’d like to see exactly how I did it, you can watch the steam blocking process in the video tutorial here.

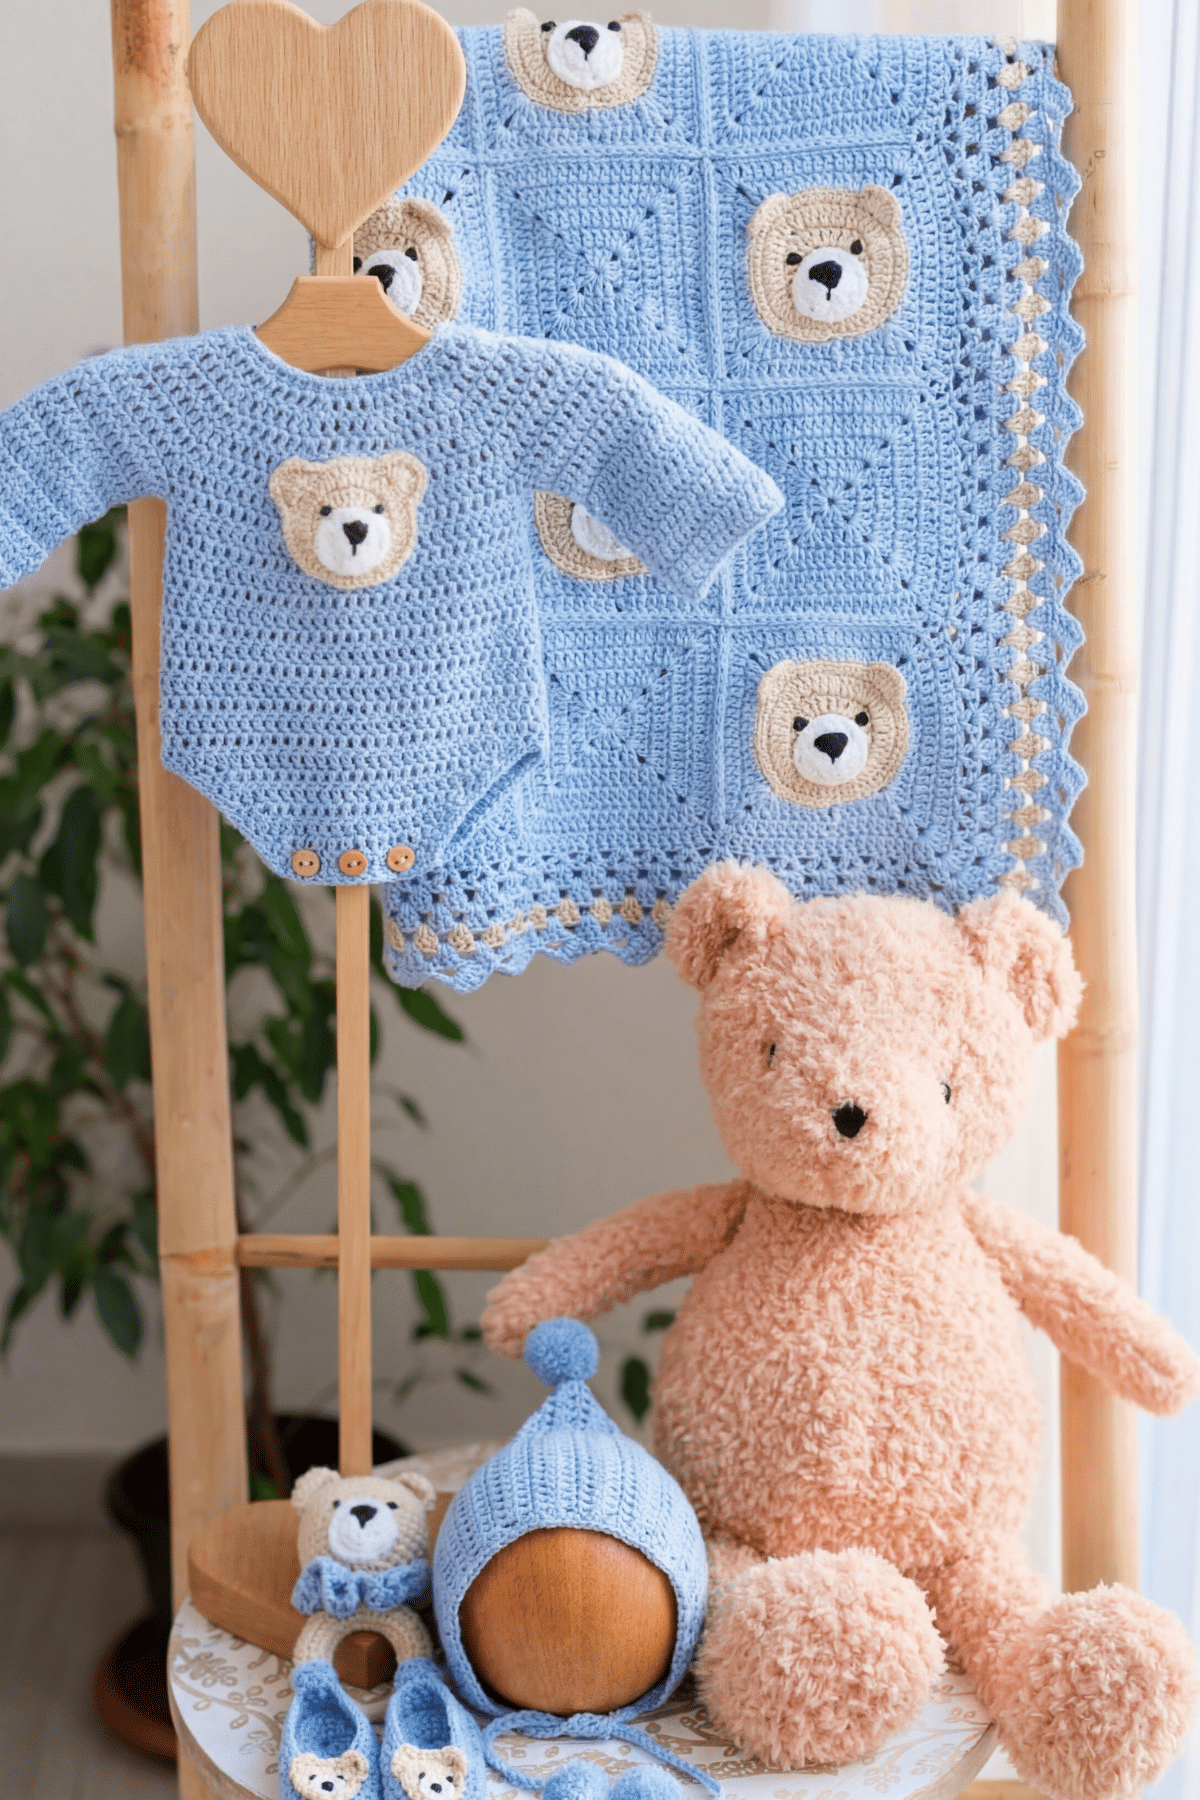
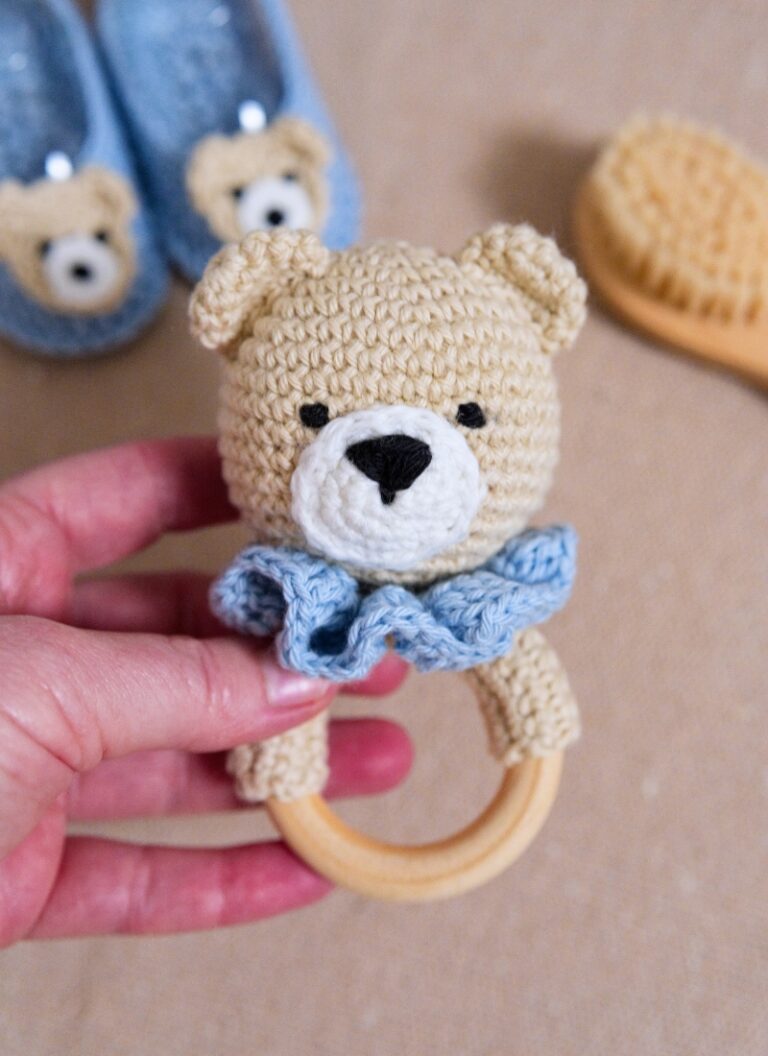
Part of the Teddy Hugs Collection
The Teddy Hugs Baby Blanket is part of a sweet coordinating newborn set designed especially for babies. If you love the teddy bear details in this blanket, you can also crochet matching pieces to create a complete handmade outfit.
The collection includes the Little Logan Romper with teddy bear appliqué, a pixie bonnet, baby shoes with a teddy appliqué, and an adorable teddy bear rattle/teether. Together they make a beautiful matching set that’s perfect for newborn photos, baby showers, or a thoughtful handmade gift.
You’ll find free crochet patterns for all of these pieces on the blog, so you can mix and match them or make the entire Teddy Hugs set for a truly special handmade keepsake.
Yarn Used for this Bear Crochet Baby Blanket
For my Teddy Hugs Blanket, I used Hobbii Rainbow Cotton 8/6, which is a soft 100% cotton DK weight yarn. Cotton yarn is a wonderful choice for baby blankets because it’s breathable, gentle on sensitive skin, and easy to care for. It also helps the teddy bear stitches hold their shape nicely, so the design stands out beautifully.
On their website, Hobbii classify this yarn as a #2 / sport / 4 ply yarn but I would say it’s more of a #3 / DK / 8 ply yarn.
Rainbow Cotton 8/6 comes in a wide range of lovely colours, making it easy to customize your blanket to match a nursery or create the perfect handmade baby gift. This yarn creates a smooth, even finish and gives the blanket a light, comfortable feel that’s perfect for little ones.
Yarn Substitutes
If you can’t find Hobbii Rainbow Cotton 8/6, you can easily substitute it with another DK (light worsted) weight cotton yarn. Cotton works particularly well for this blanket because it creates clear stitch definition for the teddy bear design and produces a soft, breathable fabric that’s ideal for babies.
When choosing a substitute yarn, look for a DK weight cotton or cotton blend that gives you a similar gauge. Always make a small swatch first to check your tension, as this can affect the finished size of the blanket.
Some good alternative yarns you could try include:
Stylecraft Naturals Bamboo and Cotton Yarn
Universal Yarns Bamboo Pop Yarn.

Get Ready!
Grab your yarn and hook — it’s time to start crocheting your Teddy Hugs Baby Blanket!

My other 5-year-old nephew loving his Teddy Hugs Blanket – proof this cozy crochet blanket is perfect for kids of all ages.
Print This Pattern!
Prefer a Printable Version? You can purchase the ad-free, printable PDF of this bear crochet baby blanket pattern! It includes all the same information as the free version. It’s just in a more convenient, easy-to-read format… perfect for crocheting on-the-go (or on the couch!).
The Teddy Bear Hugs Blanket is also part of a Crochet Pattern Bundle! Check it out here

Ad-Free Download
PDF PRINTABLE PATTERN
- Easy-to-read (no ads!)
- Print-friendly & tablet-friendly
- Yours to keep and use forever
Thank you for supporting my shop!

Teddy Hugs Blanket: A Free Bear Crochet Baby Blanket Pattern
Level

“Projects may include simple stitch patterns, color work, and/or shaping”.
Source: Craft Yarn Council of America’s www.YarnStandards.com
Enjoying the video? Join my YouTube membership to support the channel 🤍
Pattern Notes
- Quick tip: read these notes first…it’ll make everything easier!
- US crochet terminology used throughout.
- A step-by-step video tutorial is available on YouTube.
- There are two parts to the tutorial: Part one is here. Part two is here
- You can use any #3 / DK / light-worsted / 8 ply yarn for this project, providing you meet the gauge below.
- Hobbii Rainbow Cotton 8/6 was used for this design. A list of suitable yarn substitutes is listed below.
- The blanket is worked in rounds.
- For beginners, it will be helpful to place a stitch marker in the first stitch made at the beginning of each round.
- Since the video tutorial was published, I decided to add backings to the teddy bear squares (to hide the loose ends). Follow the instructions below to make the backings. I sewed the backings on and you can watch how I did it in this video here
- When joining the squares together (using the slip stitch seam), keep your tension fairly loose. Or move up a hook size to a 3.5mm crochet hook.
Materials
- Yarn: Category #3 / DK / 8 ply yarn. I used Hobbii Rainbow Cotton 8/6, 115yds / 1.75oz (105m / 50g) in the following colours: Colour A (Beige, 004): 3 balls (330 yds); Colour B (Baby Blue, 032): 7 balls (795 yds); Colour C (White, 001): 1 ball (40 yds).
- Yarn for the eyes and nose: I used Hobbii Rainbow Cotton 8/8, 82yds/ 1.8oz (75m /50g) in the following colour: Colour D (Black, 009): Scrap amount from 1 ball.
- Crochet hook: 3mm (these hooks are fabulous – the yarn just glides off them!)
- OPTIONAL: 3.5mm hook for joining squares.
- Scissors (super sharp… and pretty)
- Tapestry needle (the bent tip makes sewing and weaving in ends much easier)
- Optional: Blocking mats
Substitute Yarn
- Paintbox Yarns Cotton DK, 137yds / 1.8oz (125m / 50g) in the following colours:
- 2 balls of Colour A: Light Caramel (409); 7 balls of Colour B: Summer Sky Blue (463); 1 ball of Colour C: Paper White (401)
- Yarn for the eyes and nose: I used a scrap amount from 1 ball of Paintbox Yarns Cotton Aran, 93yds/ 1.8oz (85m /50g) in the following colour: Pure Black (602)
Gauge / Tension
Test your gauge (tension) with a sample teddy bear square before you begin.
With a size 3mm crochet hook, each blocked granny square measures 4.25 x 4.25 IN (11 x 11 CM)
If your tension is tight and your square is smaller (by more than ¼ inch / 1cm), try using a larger hook. If your tension is loose and your square is larger (by more than ¼ inch / 1cm), use a smaller hook.
Finished Size
28.5″ x 28.5″ (72.25 x 72.25 cm) approx.
Stitches & Abbreviations (US Crochet Terms)
beg – beginning
BLO – back loop only
ch(s) – chain(s)
dc – double crochet: Yarn over (yo), insert hook into stitch, yo, pull up a loop (3 loops on hook). Yo, pull through 2 loops (2 loops on hook). Yo, pull through remaining 2 loops. 1 double crochet completed.
dc2tog – double crochet two together (also known as a dc decrease): Yarn over (yo), insert hook into stitch, yo, pull up a loop (3 loops on hook). Yo, pull through 2 loops (2 loops on hook). Yo, insert hook into next st, yo, pull up a loop (4 loops on hook). Yo, pull through 2 loops (3 loops on hook). Yo, pull through remaining 3 loops. Dc2tog completed.
fasten off – To fasten off securely, work one chain, then cut the yarn leaving a 5 – 6” tail. Pull the tail through the loop that is on your hook. Tighten gently.
FLO – front loop only
hdc – half double crochet: Yarn over (yo), insert hook into stitch, yo, pull up a loop (3 loops on hook). Yo, pull through all 3 loops. 1 half double crochet completed.
sc – single crochet: Insert hook into stitch, yarn over (yo), pull up a loop (2 loops on hook). Yo, pull through both loops on hook. 1 single crochet completed.
sk – skip: Do not crochet into this stitch / space.
sl st – slip stitch: Insert hook into stitch, yarn over (yo), pull up a loop, you will have 2 loops on your hook. Pull the first loop through the second loop. 1 slip stitch completed.
sp(s) – space(es)
st(s) – stitch(es)
tr – treble crochet: Yarn over (yo) twice, insert hook into stitch, yo, pull up a loop (4 loops on hook). Yo, pull through 2 loops (3 loops on hook). Yo, pull through 2 loops (2 loops on hook). Yo, pull through remaining 2 loops. 1 treble crochet completed.
Special Stitches
EXdc- Extended double crochet: Yarn over (yo), insert hook into st or sp, pull up a loop, 3 loops on hook, yo, pull through 1 loop (3 loops remain on hook), yo, pull through 2 loops (2 loops remain on hook), yo, pull through both loops. I EXdc made.
V-st: (1dc, ch2, 1dc) worked in the same stitch
* to * – Repeat instructions between asterisks as many times as directed.
( ) – Sets of stitches to be worked within one stitch or space.
[ ] – The total number of stitches at the end of a row / round.
Useful Tutorials
Pattern Instructions
Teddy Bear Squares (Make 13)
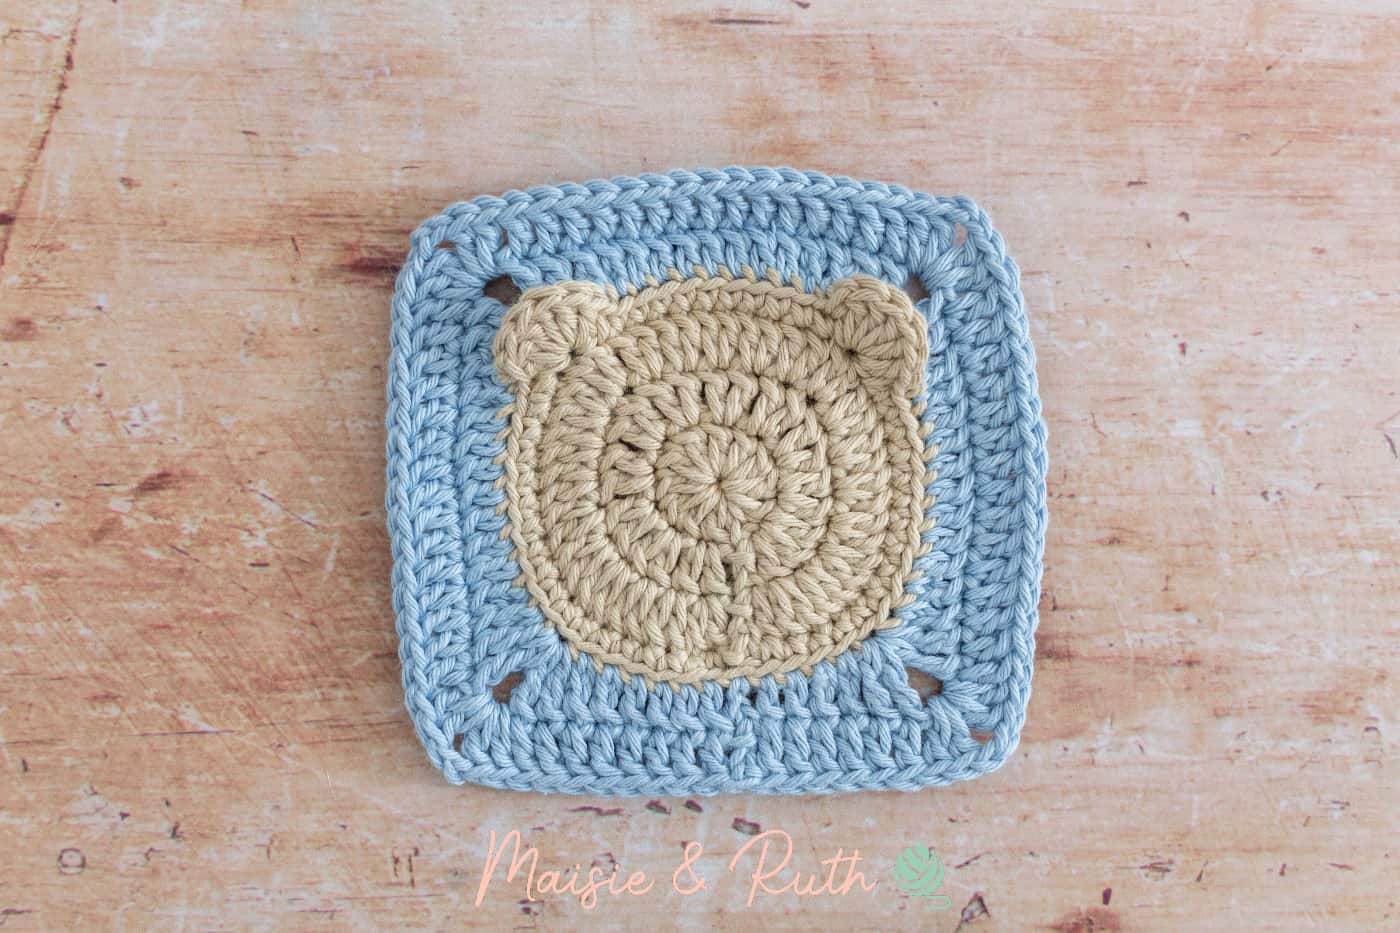
Using Colour A:
Make a magic circle. (if you do not like the magic circle method, see the Alternative Round 1 below).
Round 1. Ch2 (counts as your 1st dc here and throughout), 11dc in the magic circle, sl st to top of beg ch2 to join, [12 sts].
Alternative Round 1. Ch4, sl st to 1st ch to form a ring, ch2 (counts as your 1st dc here and throughout), 11dc into the ring, sl st to top of beg ch2 to join, [12 sts].
Round 2. Ch2, 1dc in same st, 2dc in next 11 sts, sl st to top of beg ch2 to join, [24 sts].
Round 3. Ch2, 1dc in same st, 2dc in next 23 sts, sl st to top of beg ch2 to join, [48 sts].
Round 4. Ch1 (does not count as your 1st st) 1sc in same st, 1sc in next 16 sts, 6dc in FLO of next st (1st ear made), 1sc in next 11 sts, 6dc in FLO of next st (2nd ear made), 1sc in next 18 sts, to join sl st to 1st sc or make an invisible join, [58 sts].
Cut yarn, fasten off and weave in ends.
Change to Colour B:
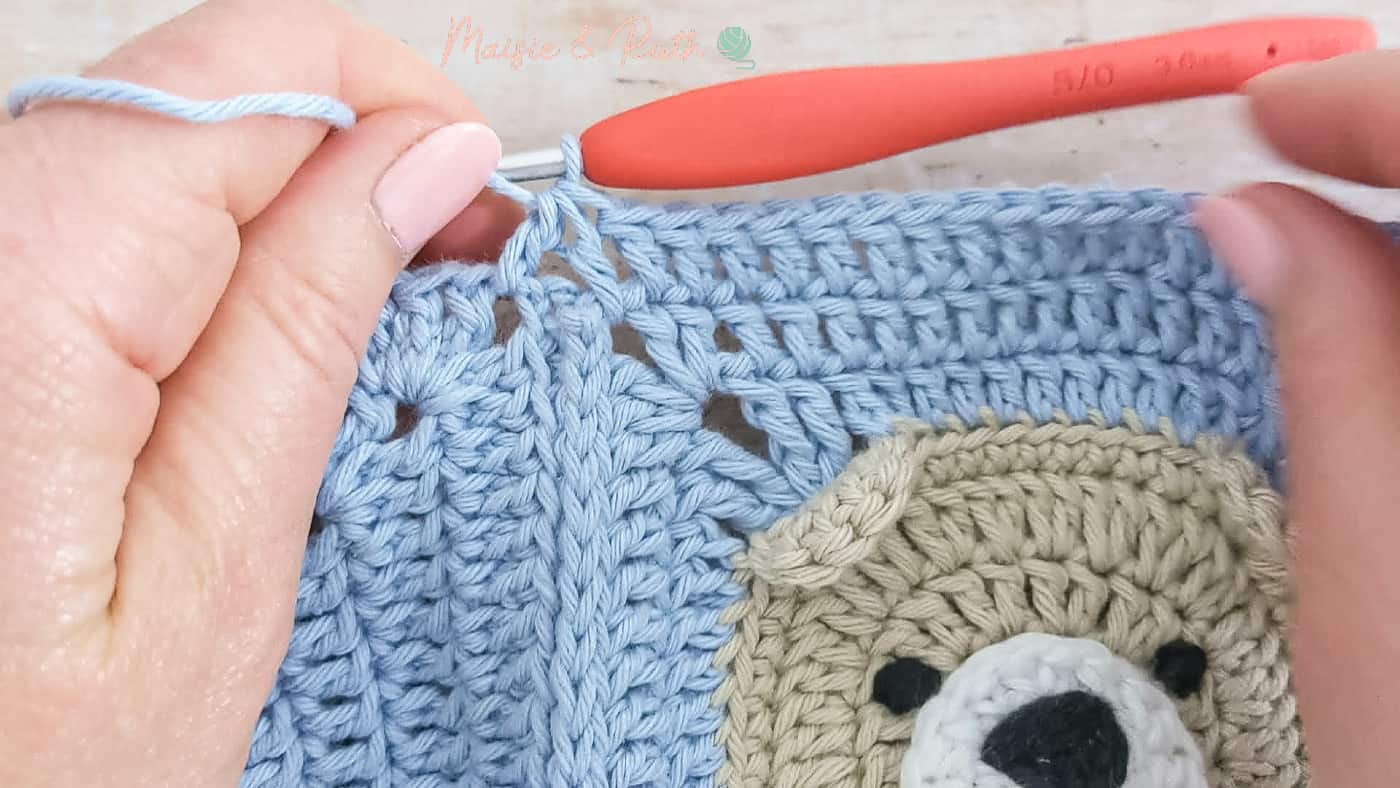
IMPORTANT: Attach your yarn to the BLO of the FIRST STITCH of the last round worked. It is important that you begin the next round in this exact stitch so that the first corner is made directly behind the ear (see photo below):
I inserted my stitch marker into the BLO of the first stitch of the last round – this is where I will attach colour B.
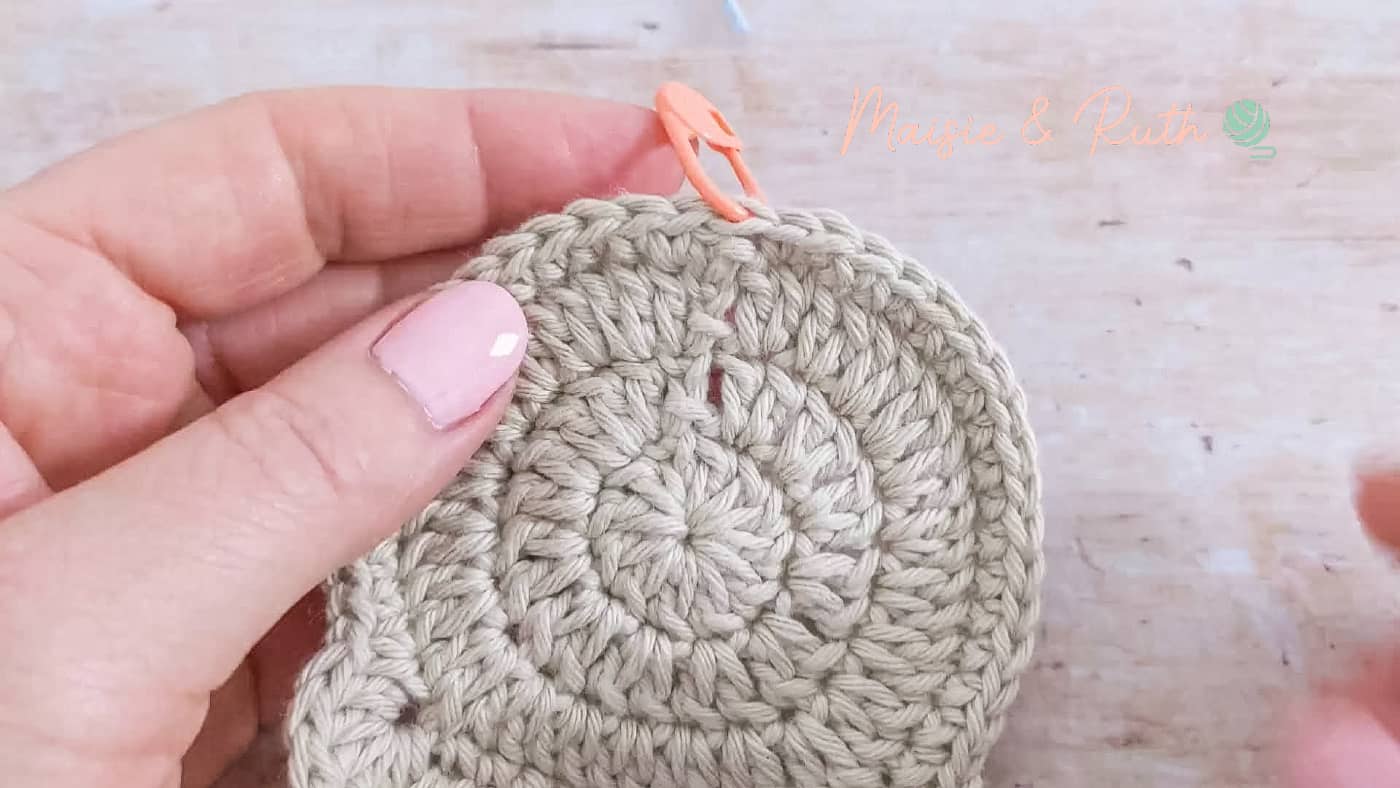
Round 5. Ch3 (counts as your 1st st here and throughout), 1dc in BLO of next 2 sts, 1EXdc in BLO of next 2sts, (2tr, ch2, 2tr) in BLO of next st, *1EXdc in BLO of next 2 sts, 1dc in BLO of next 7 sts, 1EXdc in BLO of next 2 sts, (2tr, ch2, 2tr) in the BLO of the next st (directly behind the ear made up of 6dc – do not work into these 6dc)*, repeat from * to * twice, 1EXdc in BLO of next 2 sts, 1dc in BLO of next 7 sts, 1EXdc in BLO of next 2 sts, (2tr, ch2, 2tr) in BLO of next st, 1EXdc in BLO of next 2sts, 1dc in next 4 sts, sl st to top of beg ch3 to join, [15 sts on each side of square, 4 x ch2 sps].
Round 6. Ch3, 1dc in next 6 sts, *(2dc, ch2, 2dc) in ch2 corner sp, 1dc in next 15 sts*, repeat from * to * for a total of 3 times, (2dc, ch2, 2dc) in last ch2 corner sp, 1dc in next 8 sts, to join sl st to top of beg ch3 or make an invisible join (for easier seaming later), [19 sts on each side of square, 4x ch2 sps].
Cut yarn, fasten off and weave in ends.
IMPORTANT: If you used the magic circle method in round 1, make sure that you weave in the yarn tail securely so that the middle of your square does not unravel.
Tired of scrolling?
You can grab the printable, ad-free PDF version of this teddy bear blanket here:
It’s much easier to follow and perfect for printing or using on your mobile or tablet.
Snout For Bear Head (Make 13)

Using Colour C:
Make a magic circle. (if you do not like the magic circle method, see the Alternative Round 1 below).
Round 1. Ch2 (counts as your 1st dc here and throughout), 11dc in the magic circle, sl st to top of beg ch2 to join, [12 sts].
Alternative Round 1. Ch4, sl st to 1st ch to form a ring, ch2 (counts as your 1st dc here and throughout), 11dc into the ring, sl st to top of beg ch2 to join, [12 sts].
Round 2. Ch1 (does not count as your 1st st), 1hdc in same st, 2hdc in next st, *1hdc in next st, 2hdc in next st*, repeat from * to * for a total of 5 times, to join sl st to 1st hdc or make an invisible join, [18 sts].
Cut yarn (leaving a long tail for sewing), fasten off and weave in ends.
Assembly of Teddy Bear Square
NOTE: In the video tutorial above, I show you how to do the embroidery and sew on the snout.
Step 1. Embroider the nose onto the snout (I used a piece of black yarn about 20″ long).
Step 2. Sew the snout onto the teddy bear square.
Step 3. Embroider one eye on either side of the snout (cut about 10″ of black yarn for each eye). Watch the video tutorial here
Backing for Bear Square (Make 13)
I like to make backings for the bear squares to hide all the yarn tails. To make each backing, use Colour A and follow rounds 1-3 of the bear square pattern above. Work round 4 as follows: Ch1, 1sc in same st (at base of ch1), 1sc in next 47 sts, sl st to 1st sc to join round [48 sts].
Cut a long yarn tail (about 20 inches / 50 cm) and sew the circle (with the wrong side facing you) onto the back of your bear square. You can watch how I did it in this video here
Solid Granny Square (Make 12)
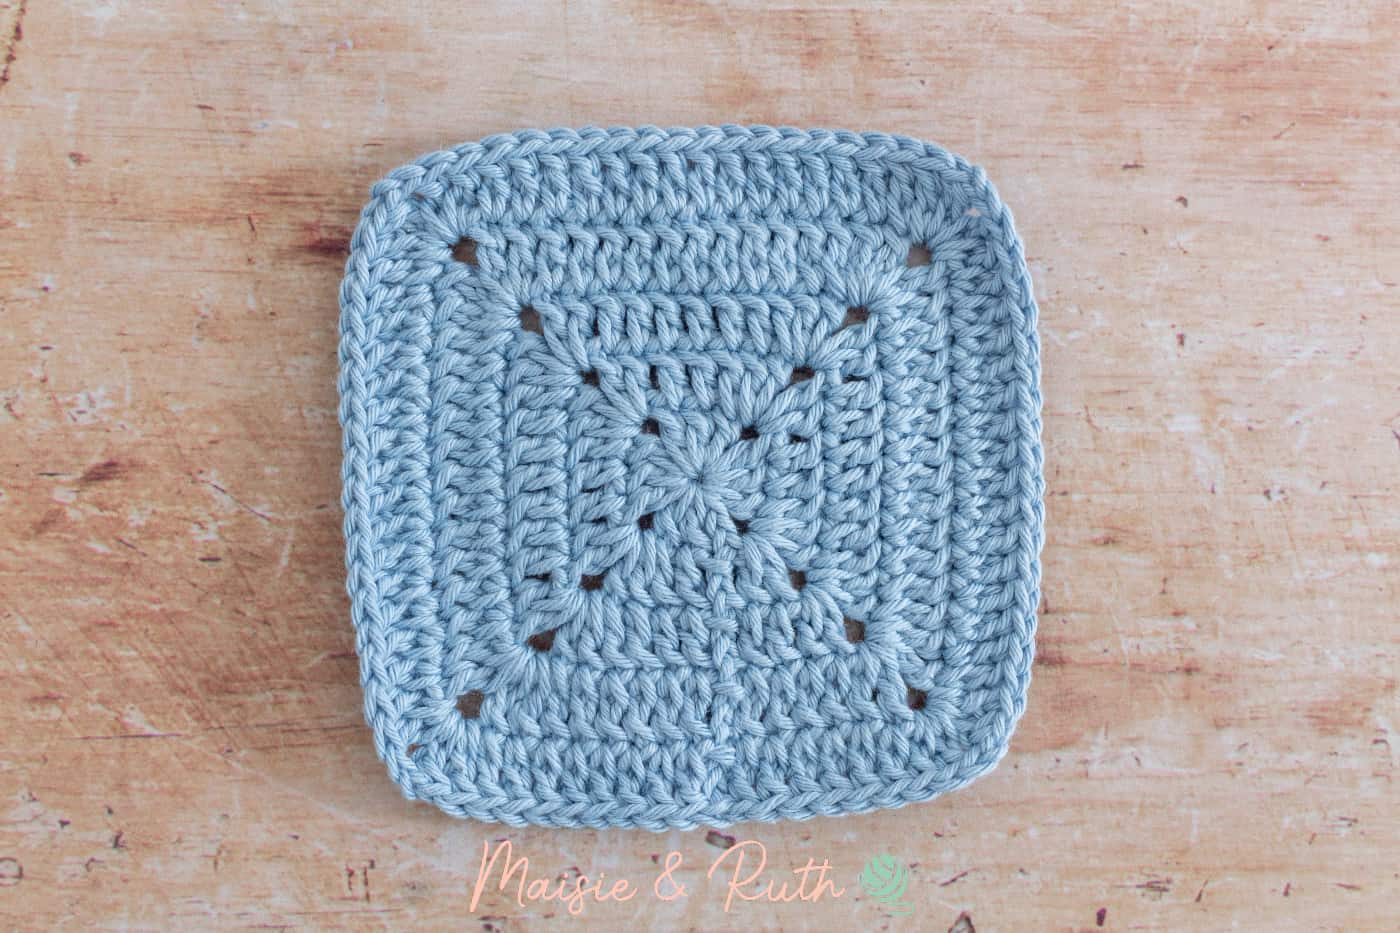
Using Colour B:
Make a magic circle. (if you do not like the magic circle method, see the Alternative Round 1 below).
Round 1. Ch5 (counts as your 1st dc and a ch2), (3dc, ch2) into the magic circle 3 times, 2dc, sl st to 3rd ch of beg ch5 to join [3dc on each side of square].
Alternative Round 1. Ch4, sl st to 1st ch to form a ring, ch5 (counts as your 1st dc and a ch2), (3dc, ch2) into the ring 3 times, 2dc, sl st to 3rd ch of beg ch5 to join [3dc on each side of square].
Round 2. Ch3 (counts as your 1st dc here and throughout), *(2dc, ch2, 2dc) in next ch2 corner sp, 1dc in next 3 sts*, repeat from * to * for a total of 3 times, (2dc, ch2, 2dc) in last ch2 corner sp, 1dc in next 2 sts, sl st to top of beg ch3 to join, [7dc on each side of square].
Round 3. Ch3, 1dc in next 2 sts, *(2dc, ch2, 2dc) in next ch2 corner sp, 1dc in next 7 sts*, repeat from * to * for a total of 3 times, (2dc, ch2, 2dc) in last ch2 corner sp, 1dc in next 4 sts, sl st to top of beg ch3 to join, [11dc on each side of square].
Round 4. Ch3, 1EXdc in next 4 sts, *(2EXdc, ch2, 2EXdc) in next ch2 corner sp, 1EXdc in next 11 sts*, repeat from * to * for a total of 3 times, (2EXdc, ch2, 2EXdc) in last ch2 corner sp, 1EXdc in next 6 sts, sl st to top of beg ch3 to join, [15EXdc on each side of square].
Round 5. Ch3, 1EXdc in next 6 sts, *(2EXdc, ch2, 2EXdc) in next ch2 corner sp, 1EXdc in next 15 sts*, repeat from * to * for a total of 3 times, (2EXdc, ch2, 2EXdc) in last ch2 corner sp, 1EXdc in next 8 sts, sl st to top of beg ch3 to join or make an invisible join (easier when seaming later), [19EXdc on each side of square].
Cut yarn, fasten off and weave in ends.
IMPORTANT: If you used the magic circle method in round 1, make sure that you weave in the yarn tail securely so that the middle of your square does not unravel.
Arrangement of Blanket
Once you’ve made all your squares, you will arrange them before joining.
Below is a diagram showing you how to arrange your squares:

Joining Squares
For this blanket, I used my favourite way of joining granny squares…the flat slip stitch seam.
You can use any method you like to join your squares, but I just love the finished look and how flat the blanket lies.
You can see the photo and video tutorial for the flat slip stitch seam here
Border
Once you have joined your squares, you will then finish your blanket off with a border consisting of 7 rounds.
Using Colour B:
Attach yarn to the ch2 corner sp in the top right hand corner of the blanket.
Round 1. *(3dc, ch2, 3dc) in ch2 corner sp, 1dc in each st to next ch2 corner sp, working 1 dc2tog over the ch2 sps at each seam*, repeat from * to * 4 times, sl st to 1st dc at beg of round to join. [105 sts on each side].
Work 1 dc2tog over both ch2 sps at the seam area.
Round 2. (Sl st) 3 times to the ch2 corner sp, *(3dc, ch2, 3dc) in ch2 corner sp, **sk next 2 sts, V-st in next st**, repeat from ** to ** to last 3 sts before next ch2 corner sp, sk next 3 sts*, repeat from * to * 4 times, sl st to 1st dc at beg of round to join. [34x v-sts, 2x 3dc groups on each side].
Round 3. (Sl st) 3 times to the ch2 corner sp, *(3dc, ch2, 3dc) in ch2 corner sp, ch1, **3dc in next V-st, ch1**, repeat from ** to ** to next ch2 corner sp*, repeat from * to * 4 times, sl st to 1st dc at beg of round to join. [36x 3dc groups on each side].
Round 4. (Sl st) 3 times to the ch2 corner sp, *(3dc, ch2, 3dc) in ch2 corner sp, ch1, **3dc in next ch1 sp, ch1**, repeat from ** to ** to next ch2 corner sp*, repeat from * to * 4 times, sl st to 1st dc at beg of round to join. [37x 3dc groups on each side].
Cut yarn, fasten off and weave in ends.
Change to Colour A:
Attach yarn to ch2 corner sp.
Round 5. Repeat round 4. Cut yarn, fasten off and weave in ends. [38x 3dc groups on each side].
Change back to Colour B:
Round 6. Repeat round 4. [39x 3dc groups on each side].
Round 7. (Sl st) 3 times to the ch2 corner sp, *(ch3, 1dc in next ch1 sp, 5dc around the post of last dc made, 1sc in next ch1 sp) 19 times to next ch2 corner sp, ch4, 1sc in ch2 corner sp*, repeat from * to * 4 times, sl st to 1st ch of beg ch3 to join. [19x 5dc groups on each side].
Finishing
Gently steam block the blanket. Watch the process here
And that’s your Teddy Hugs bear crochet baby blanket all finished! I loved sharing this pattern with you, and I hope it brings you as much joy to make as it did for me. If you’d like a keepsake version to crochet from your favourite chair, you can purchase and download the pretty, ad-free PDF here.
Helpful Links
- 🧶 Watch the full video tutorial – Follow along step by step on YouTube.
- 💛 Join the Maisie and Ruth Community – Share your finished projects, chat with fellow crocheters, and be inspired.
- 🛍️ Shop printable PDF patterns – Browse the complete collection of ad-free PDF patterns on Etsy.
- 📺 Join YouTube Membership – Get early access to new patterns and exclusive perks.
PATTERN SUPPORT
Need Help with a Pattern?
We’ve got you! 😊
If you need a hand, come hang out with us in our Facebook group—it’s the best place to ask questions, share your makes, and cheer each other on.
We’ve also put together a step-by-step YouTube tutorial you can follow along with—this should answer most of your questions along the way!
Pop into the Facebook group and join our cozy little community—we’d absolutely love to see you there! 💛
SHARE YOUR WORK!
I really hope that you enjoyed this free crochet pattern! I would LOVE to see photos of your completed project… please tag me on Instagram using @maisieandruth and / or #maisieandruth
And remember to pin this pattern for later if you can’t make it right now!
COPYRIGHT
Copyright © 2021 by Maisie and Ruth Limited. All rights reserved. This bear crochet baby blanket pattern is for personal viewing only. You may view it for free on this blog, but it is protected under applicable copyrights, trademarks, and other proprietary (including but not limited to intellectual property) rights.
You may not copy, redistribute, or sell this pattern in any form, including digital, printed or photographic formats without permission. Sharing this pattern (in whole or in part) on social media, websites, or messaging platforms is strictly prohibited. This is a theft of the author’s intellectual property, which may result in civil or criminal penalties.
Thank you for respecting my work and for your continued support — it truly means a lot!
Frequently Asked Questions
Can I sell blankets made from this pattern?
Yes! You may sell finished items made using this pattern in small quantities. Please do not copy, redistribute, or sell the pattern itself.
Is this crochet baby blanket pattern beginner friendly?
Yes. The Teddy Hugs Blanket uses basic crochet stitches and simple construction, making it suitable for confident beginners.
What yarn works best for this blanket?
DK cotton / cotton-blend yarn works beautifully because it creates a soft, breathable blanket that is perfect for babies.
Is there a printable PDF version?
Yes! A convenient ad-free PDF pattern is available for purchase here if you prefer to print the pattern.
What size is the finished blanket?
The Teddy Hugs Blanket is 28.5″ x 28.5″ (72.25 x 72.25 cm) approx. You can easily make it larger by adding additional squares (more yarn will be required).
Is there a video tutorial for the Teddy Hugs Blanket?
Yes! A step-by-step video tutorial is available to help guide you through the pattern. In the video, you can see how the teddy bear and solid granny squares are worked, how the squares are joined, how to work the easy border, and how the blanket is finished, including steam blocking.


I’d like to purchase the yarns to make the teddy bear blanket and accessories. How do I order?
You can find Hobbii’s selection of Rainbow Cotton yarn here 💕
Thank you so much for your time and sharing your talent. What an adorable baby blanket, and I cannot wait to make it for a special little someone.
You’re very welcome! I’m so glad that you like the design 🥰
I’m sure the blanket will be a great source of delight when they eventually receive it! 🐻
Do you have a pattern for the rose blanket? It was shown on your tutorial for joining squares.
Than you,
Denise
Hi Denise,
I’m in the middle of designing a border for the rose blanket, so I hope to film the tutorial and publish the free pattern soon.
Thanks… I’m glad you like it! 😊
I am amazed by your abilities. Thank you for sharing. I am new at crocheting and hope to try this when I get more experience.
You’re most welcome! I’m so happy that you like my design 😀 And welcome also to the crochet community! There are so many amazing designers out there and lots of fantastic tutorials on YouTube also, so I’m sure you’ll have a lot of fun as you start building your crochet skills 💗
Absolutely beautiful, what a lovely pattern.
Thank you very much, I’m so pleased you like the blanket! 😀🐻
So adorable 🥰❣️❣️❣️
Thank you, I’m so glad you like it! 😊🧡🧡