


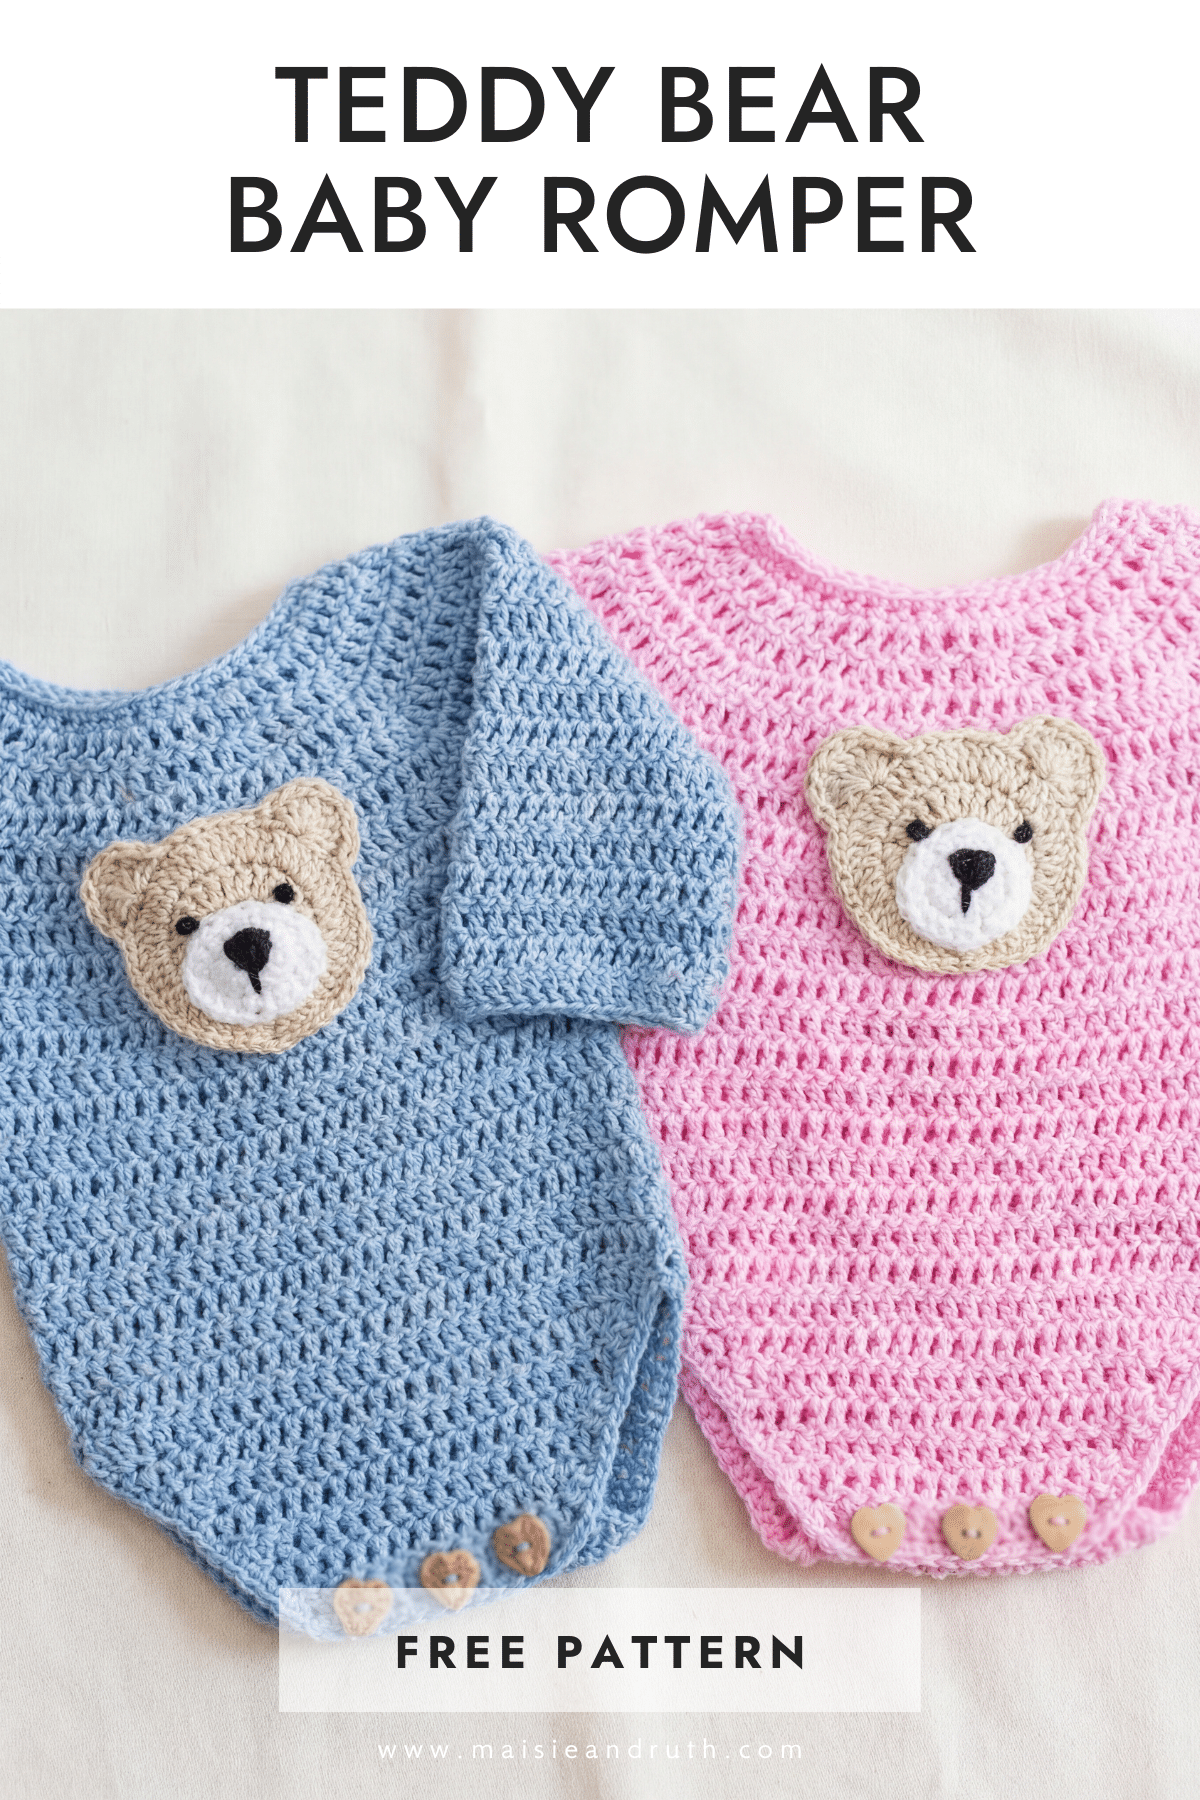
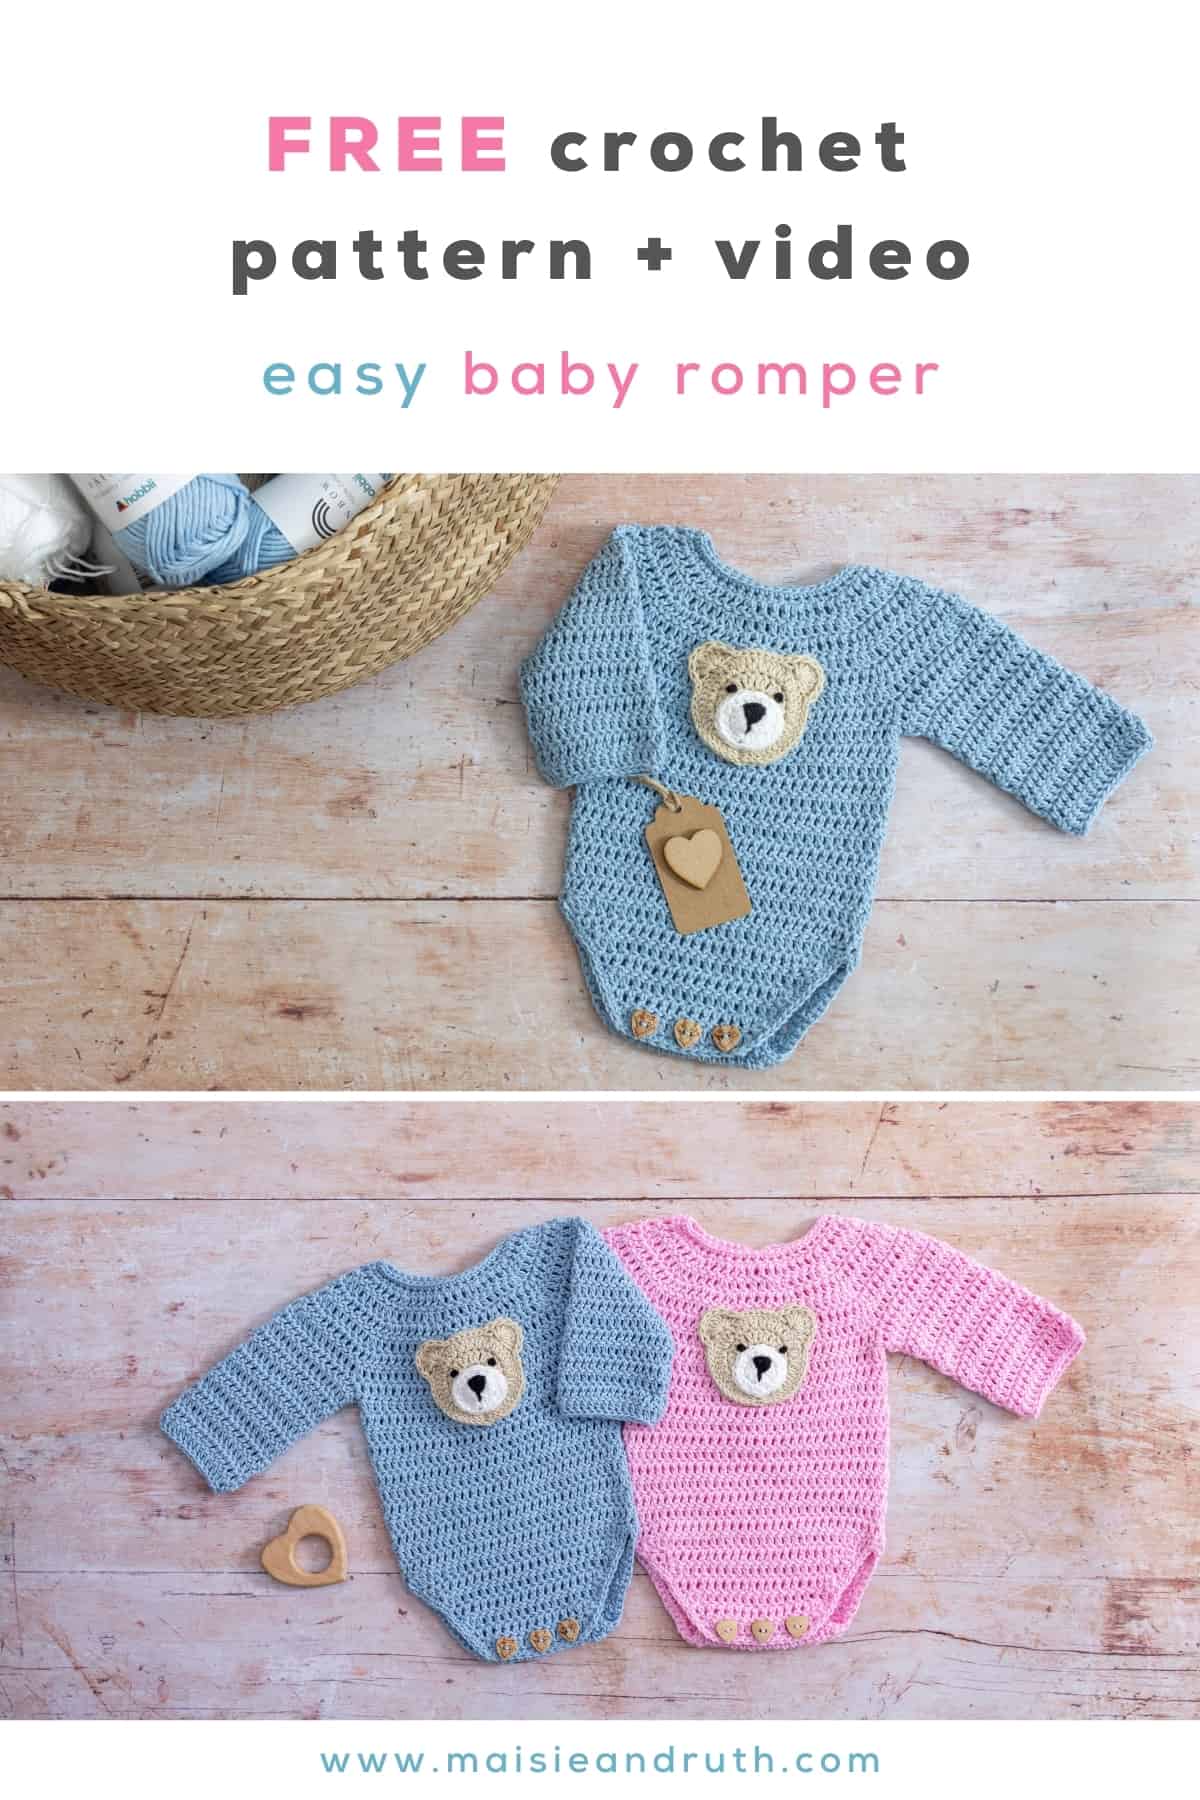
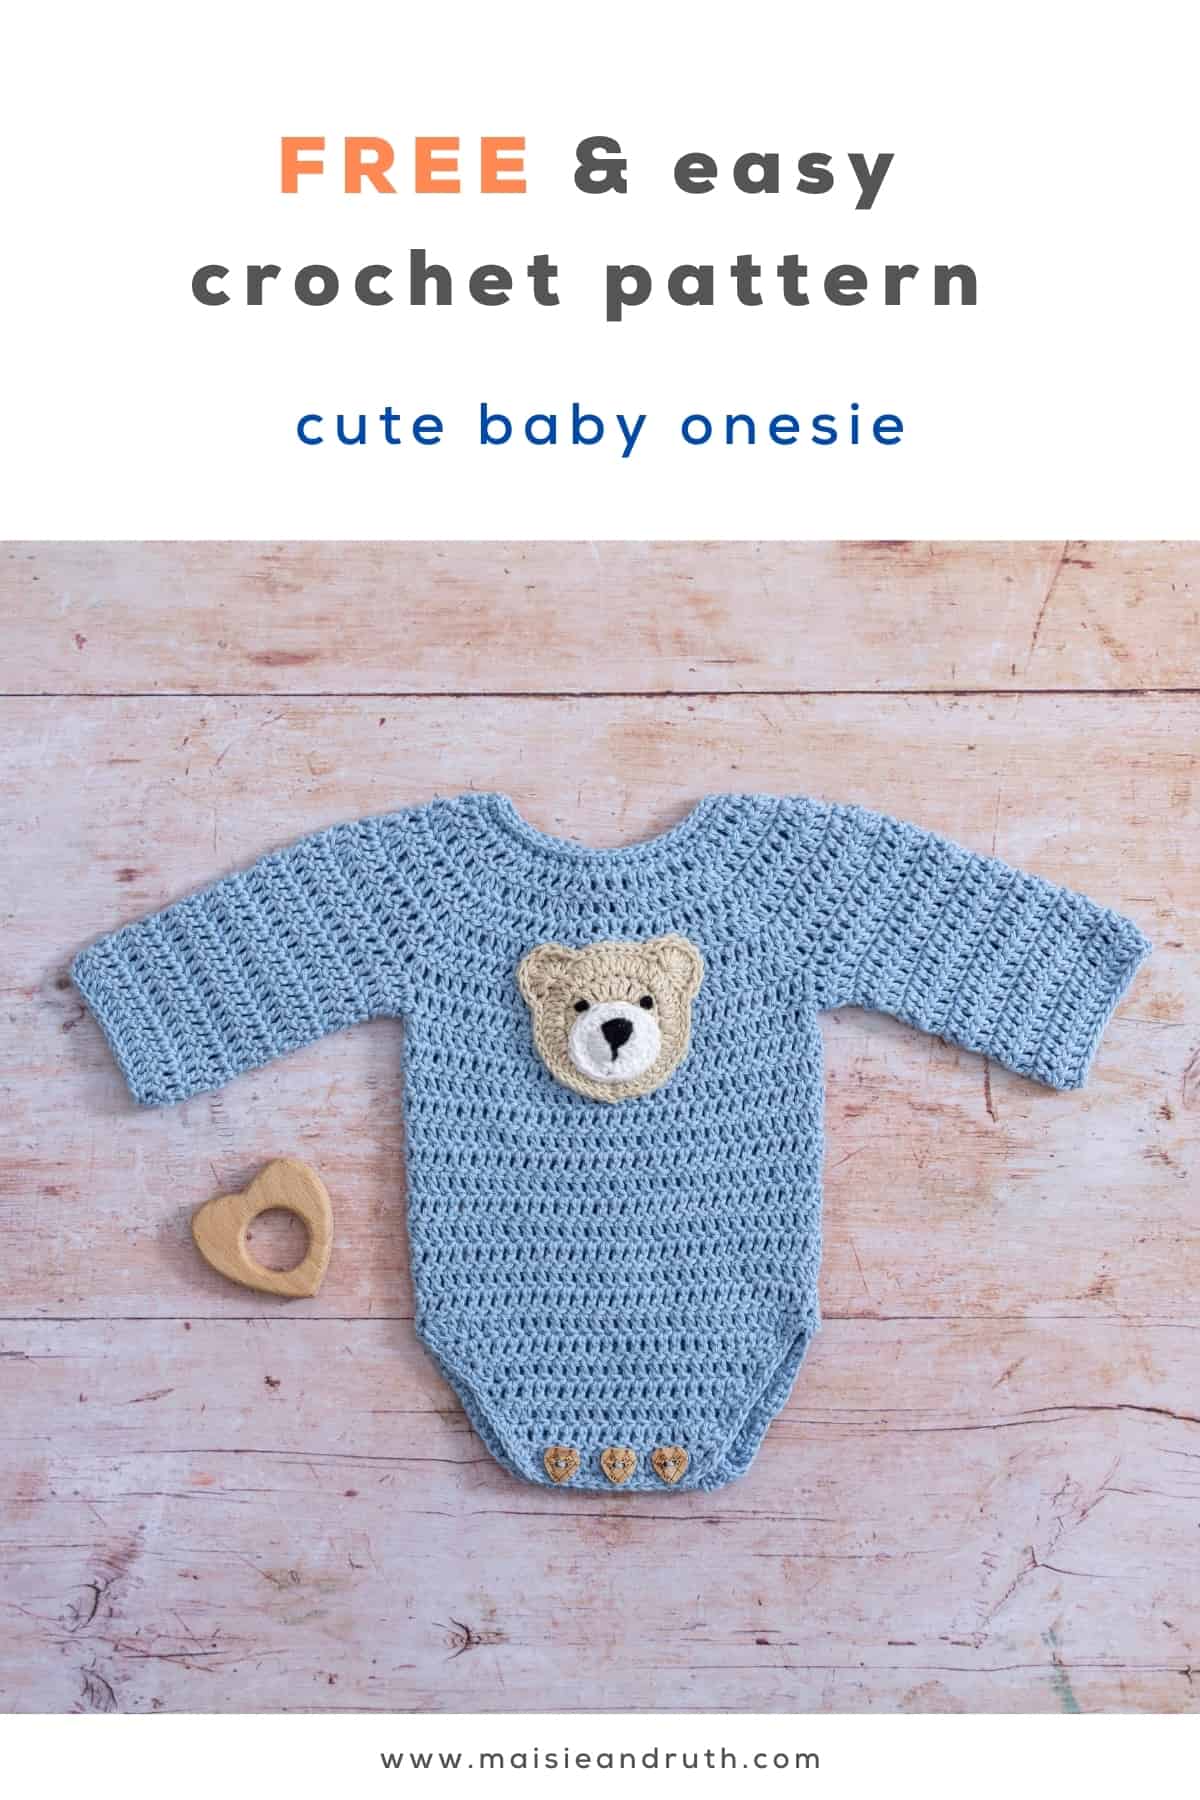
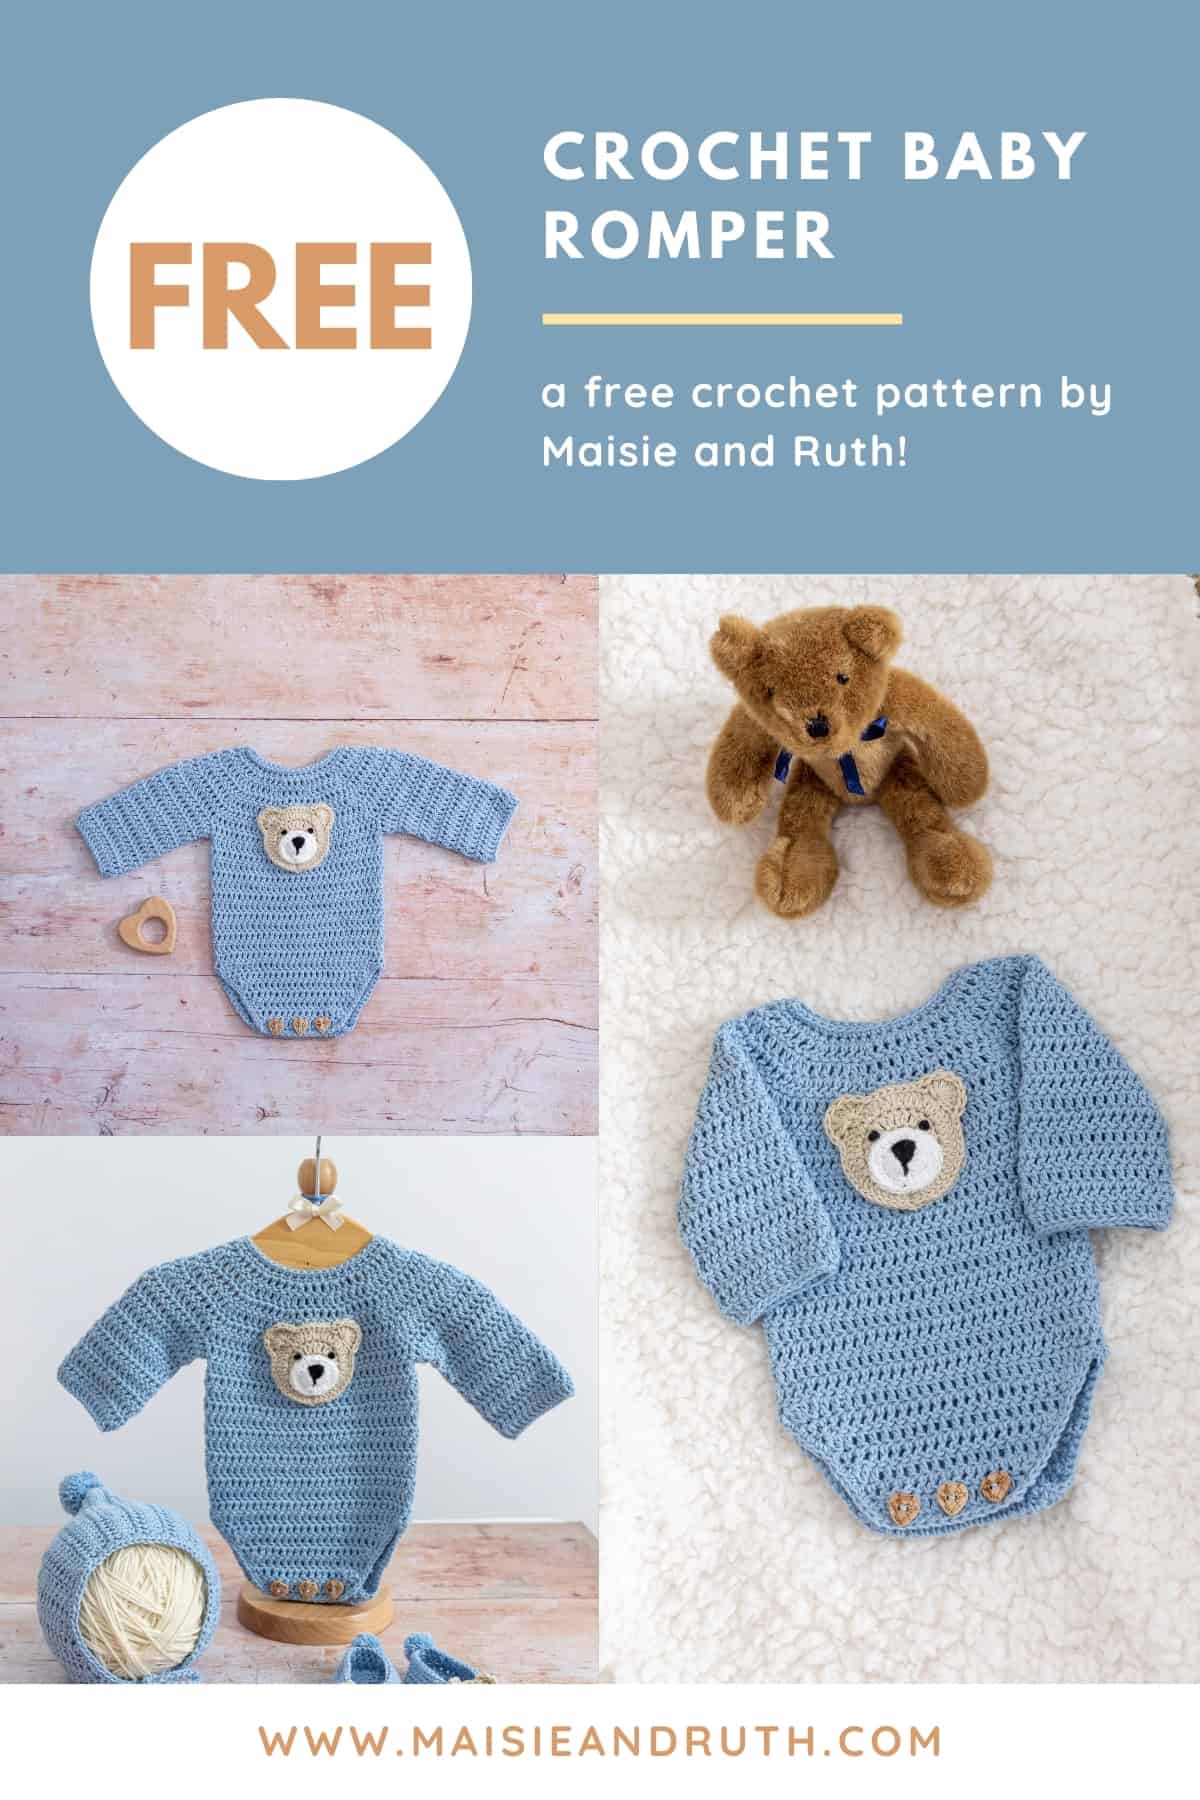
Crochet baby onesie pattern lovers, you’re going to adore the Little Logan Romper!
You’ll find the full free pattern below, and if you’d prefer an ad-free, printable version, there’s also a convenient PDF pattern available to purchase here.

Why You’ll Love This Crochet Baby Onesie Pattern
- Adorable newborn romper design with sweet teddy bear appliqué
- Made using soft DK cotton yarn for a lightweight, breathable finish
- Uses basic beginner-friendly crochet stitches
- Easy construction with simple shaping and clear instructions
- Includes a step-by-step video tutorial to guide you through the process
- Perfect for newborn photos, baby showers, and handmade gifts
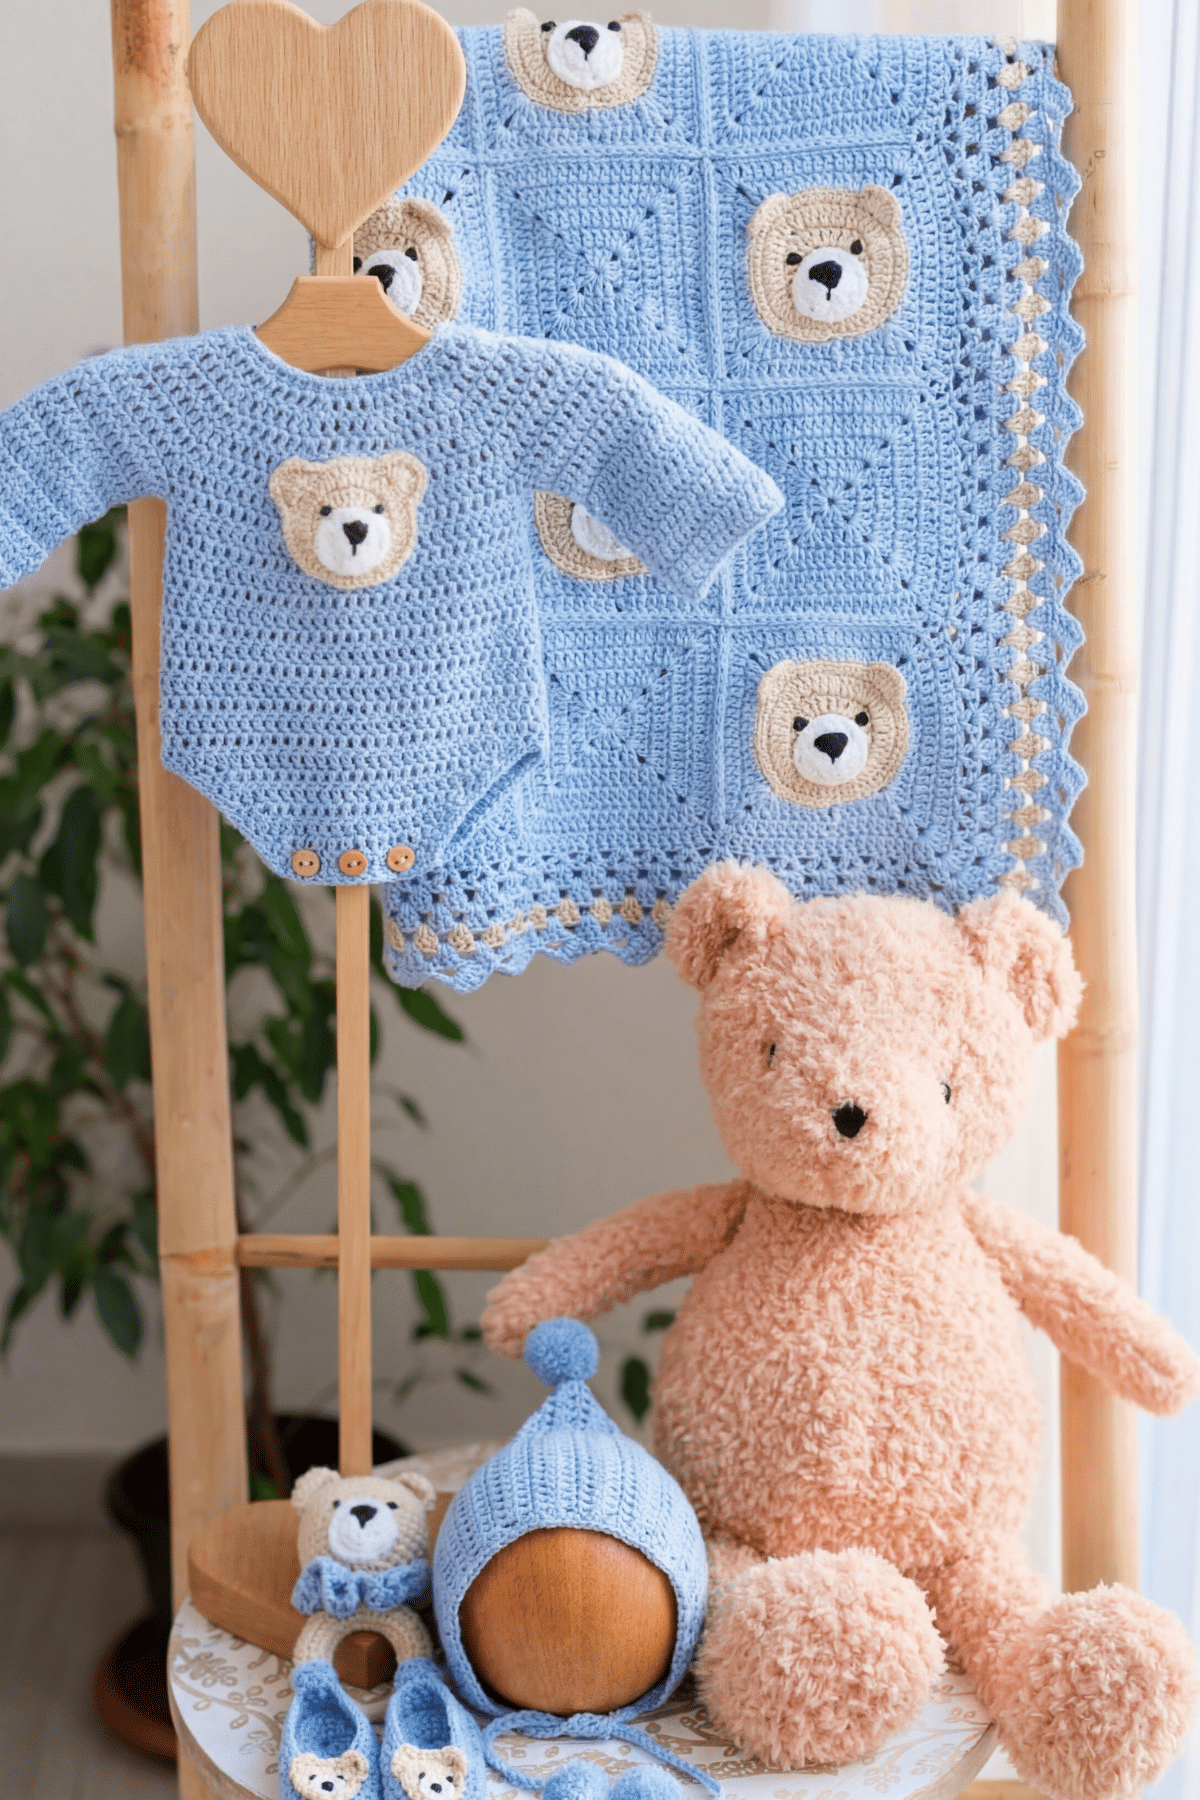
- Designed to coordinate with the Teddy Hugs Blanket and matching accessories
- Quick and satisfying project that works up fast
- Classic, timeless style suitable for boys or girls

BEGINNER FRIENDLY
This sweet newborn romper features a charming teddy bear appliqué and is made using soft DK cotton yarn for a lightweight, breathable finish that’s perfect for tiny babies.
Designed with simple stitches and easy construction, it’s a beginner-friendly project that works up beautifully for baby showers, coming home outfits, and special keepsakes.

TEDDY HUGS COLLECTION
This Little Logan Romper is part of my growing Teddy Hugs collection and coordinates perfectly with the Teddy Hugs Blanket, matching pixie bonnet, slippers, and teddy bear teether for a complete newborn set.
Whether you’re crocheting a thoughtful handmade gift or creating a special outfit for a new arrival, this cozy romper is designed to be timeless, practical, and irresistibly cute.
Follow along with the step-by-step video tutorial below and see how simple (and quick) it is to make this newborn-sized onesie!

YARN USED
For this design I used 2 balls of Hobbii Rainbow Cotton 8/4, which is made from 100% soft and natural cotton.
This yarn is a real joy to work with as it’s so soft and has the most wonderful drape to it. It’s very easy to work with also, with no splitting.
The Rainbow Cotton 8/4 is machine washable, comes in over 100 beautiful colours, and is OEKO-TEX® certified. It really is a great option for baby and children’s clothing!

SUBSTITUTE YARN
Hobbii advertise this yarn as a superfine, fingering yarn but I consider it to be more a of sport / 4 ply yarn.
Feel free to substitute this crochet baby onesie pattern with any category #2 (fine) / sport / 4 ply yarn.
Some alternative yarn suggestions would be: Paintbox Yarns Cotton 4 Ply, Brava Sport, MillaMia Naturally Soft Cotton, Valley Yarns Superwash Sport, Rowan Summerlite 4 Ply.

PIN ME FOR LATER!
PRINT THIS PATTERN
Prefer a Printable Version? You can purchase the ad-free, printable PDF of the Little Logan Romper! It includes all the same information as the free version — it’s just in a more convenient, easy-to-read format… perfect for crocheting on-the-go (or on the couch!).

Ad-Free Download
PDF PRINTABLE PATTERN
- Enlarged print (easy to read)
- Instant download (start now!)
- Work from phone or print it
- Keep and re-use it forever
Thank you for supporting my shop!
Grab your yarn and hook — it’s time to start crocheting your Little Logan Romper!

CROCHET BABY ONESIE PATTERN: INSTRUCTIONS
Please carefully read all the information below 😊
LEVEL

“Projects may include simple stitch patterns, color work, and/or shaping”.
Source: Craft Yarn Council of America’s www.YarnStandards.com
PATTERN NOTES
- US crochet terms used.
- The ch1 turning chain does not count as the first stitch of the next row. Therefore, you should make the first stitch of the row in the same stitch (at the base of the ch1). At the end of rows, do not crochet into the top of the ch1.
- The ch3 turning chain does count as the first stitch of the next row; please do not crochet into the same stitch. Instead, make one double crochet into the next stitch. At the end of rows, it’s important that you crochet into the top of the beginning ch3.
- The romper is worked top-down.
- The first 8 rows are worked flat for the button opening. The yoke will be gradually increased by working 2 double crochet stitches in the same stitch.
- In row 8 you will create two armholes.
- At the end of row 8, you will join your onesie to start working in rounds and form the middle part of the romper. Make sure that you TURN your work at the end of every round (to match the texture of the stitch that was created in the yoke).
- Once the middle part is complete, you will attach the yarn to the back of the romper to create the back lower part.
- Once the back lower part is completed, the yarn will then be attached to the front in order to work on the front lower part.
- The yarn will then be attached to the centre of both underarms, one at a time, and the right and left sleeve will be worked in rounds.
- Lastly, edging will be applied to the leg opening and back fastening of the yoke (2 button loops will be formed).
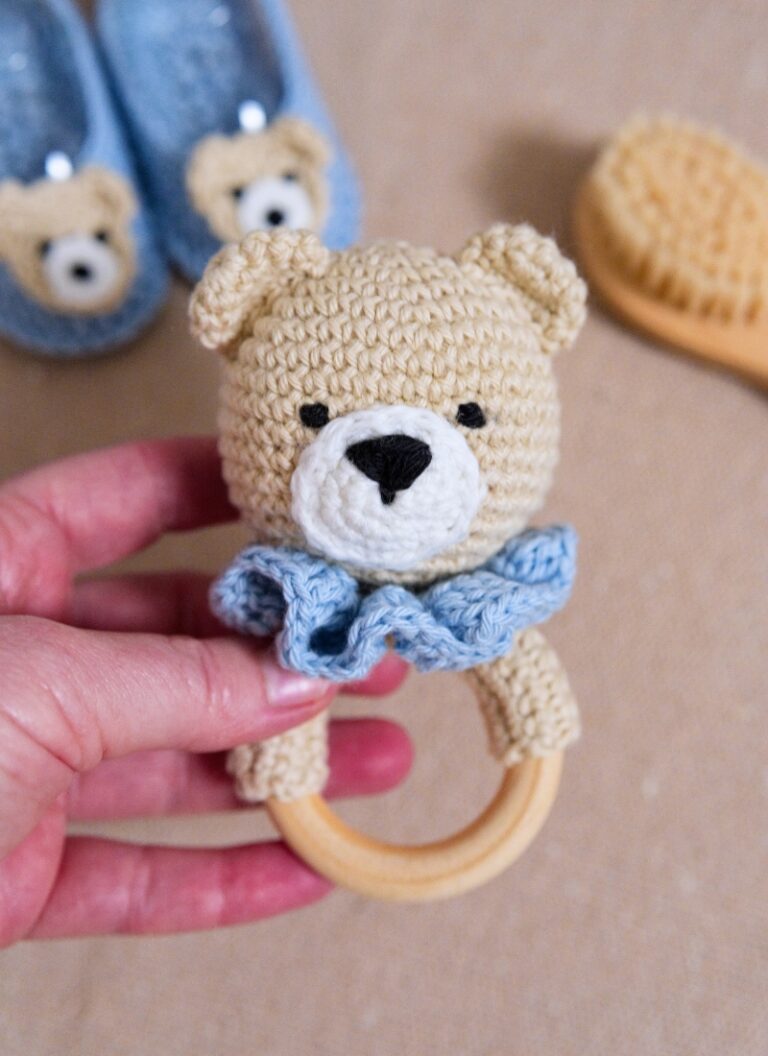
- There is a separate pattern to make the teddy bear applique. You can find it here
MATERIALS
- Yarn: Category #2 (fine) / sport / 4 ply yarn. I used 2 balls of Hobbii Rainbow Cotton 8/4,186yds / 1.75oz (170m / 50g). For the blue romper I used the colour Baby Blue (032); for the pink romper, I used the colour Antique Rose (061).
- ALTERNATIVE YARN SUGGESTIONS: Paintbox Yarns Cotton 4 Ply, Brava Sport, MillaMia Naturally Soft Cotton, Valley Yarns Superwash Sport, Rowan Summerlite 4 Ply.
- Crochet hook: Size E (3.5mm)
- 5 buttons- 13/32″ (10mm)
- Stitch markers x 2
- Yarn needle
- Scissors
GAUGE / TENSION
18 stitches & 11 rows = 4″ in double crochet
In order to achieve the correct size and fit, it is important to test your gauge with a sample square before you begin.
If your tension is tight (too many stitches to 4″), try using a larger hook.
if your tension is loose (fewer stitches to 4″), use a smaller hook.
FINISHED SIZE
NEWBORN:
Width (across chest): 6 3/4″ (17cm)
Length: 10.75″ (27.25cm)
STITCHES & ABBREVIATIONS (US CROCHET TERMS)
beg – beginning
ch(s) – chain(s)
dc – double crochet: Yarn over (yo), insert hook into stitch, yo, pull up a loop (3 loops on hook). Yo, pull through 2 loops (2 loops on hook). Yo, pull through remaining 2 loops. 1 double crochet completed.
dc2tog – double crochet two together (also known as a dc decrease): Yarn over (yo), insert hook into stitch, yo, pull up a loop (3 loops on hook). Yo, pull through 2 loops (2 loops on hook). Yo, insert hook into next st, yo, pull up a loop (4 loops on hook). Yo, pull through 2 loops (3 loops on hook). Yo, pull through remaining 3 loops. Dc2tog completed.
sc – single crochet: Insert hook into stitch, yarn over (yo), pull up a loop (2 loops on hook). Yo, pull through both loops on hook. 1 single crochet completed.
sk – skip: Do not crochet into this stitch / space.
sl st – slip stitch: Insert hook into stitch, yarn over (yo), pull up a loop, you will have 2 loops on your hook. Pull the first loop through the second loop. 1 slip stitch completed.
sp(s) – space(s)
st(s) – stitch(es)
Turn: I prefer to turn my work clockwise.
* to * – Repeat instructions between asterisks as many times as directed.
[ ] – The total number of stitches at the end of a row.
USEFUL TUTORIALS
- How to Increase in Crochet
- Crochet Turning Chain (Does it Count as a Stitch?)
- How to Dc2tog (Double Crochet Two Together)
PATTERN INSTRUCTIONS
YOKE
Chain 45 (make your chain fairly loose)
Row 1. 1sc in 2nd ch from hook, 1sc in every ch until end of the foundation chain, TURN [44sts].
Row 2. Ch3 (counts as your first st here and throughout), 1dc in next 2 sts, 2dc in next st, *1dc in next 3 sts, 2dc in next st*, repeat from * to * across to end of row, TURN [55 sts].
Row 3. Ch3, 1dc in next 3 sts, 2dc in next st, *1dc in next 4 sts, 2dc in next st*, repeat from * to * across to end of row, TURN [66 sts].
Row 4. Ch3, 1dc in next 4 sts, 2dc in next st, *1dc in next 5 sts, 2dc in next st*, repeat from * to * across to end of row, TURN [77 sts].
Row 5. Ch3, 1dc in next 5 sts, 2dc in next st, *1dc in next 6 sts, 2dc in next st*, repeat from * to * across to end of row, TURN [88 sts].
Row 6. Ch3, 1dc in next 6 sts, 2dc in next st, *1dc in next 7 sts, 2dc in next st*, repeat from * to * across to end of row, TURN [99 sts].
Row 7. Ch3, 1dc in next 7 sts, 2dc in next st, *1dc in next 8 sts, 2dc in next st*, repeat from * to * across to end of row, TURN [110 sts].
At the end of row 7, your piece should look like this:
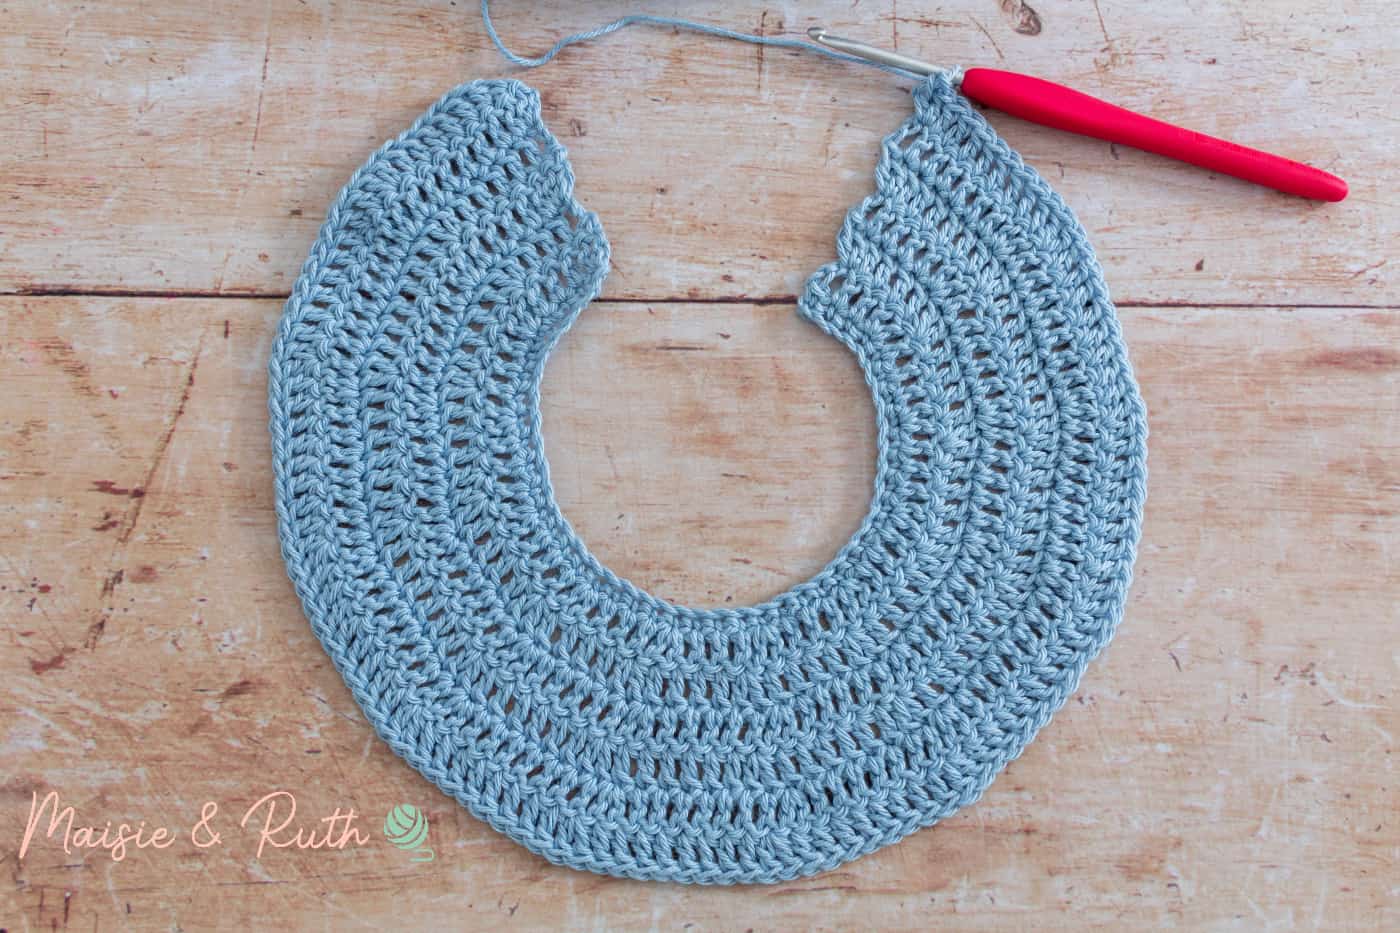
The length should be 2.5″ (6.5cm) approximately.
DIVIDE FOR ARMHOLES
In row 8 you will create two little armholes.
Also, at the end of this row you will join your work so that you can begin working in the round.
Row 8. Ch3, 1dc in next 14 sts, ch1, sk 24 sts, 1dc in next 32 sts, ch1, sk 24 sts, 1dc in next 15 sts, sl st into the top of the ch3 you made at the beginning of the row to join, TURN [62 sts, 2 x ch1 sps].
As you can see from the image below, you have divided your onesie for the sleeves and have created two armholes.
Because you have joined both sides by slip stitching into the top of the beginning ch3, you are now ready to start working in rounds.

MIDDLE SECTION
Round 1. Ch3 (counts as your first st here and throughout), 1 dc in next 14 sts, 1dc in ch1 sp, 1dc in next 32 sts, 1dc in ch1 sp, 1dc in next 15 sts, sl st to top of beg ch3 to join, TURN (64 sts).
Rounds 2 – 12: Ch3, 1dc in next 63 sts, sl st to top of beg ch3 to join, TURN (64 sts).
Cut the yarn, fasten off and weave in your ends.
NOTE: At the end of round 12, instead of joining with a sl st to the top of the beginning ch3, I prefer to make an invisible join.
This method is much neater and as we’ll be working into these stitches again, using an invisible join makes it much easier to do this.
Measuring from the top of the shoulder, your baby onesie should measure 7.75″ (19.5cm) in length.
At this point, your onesie should be looking like this:
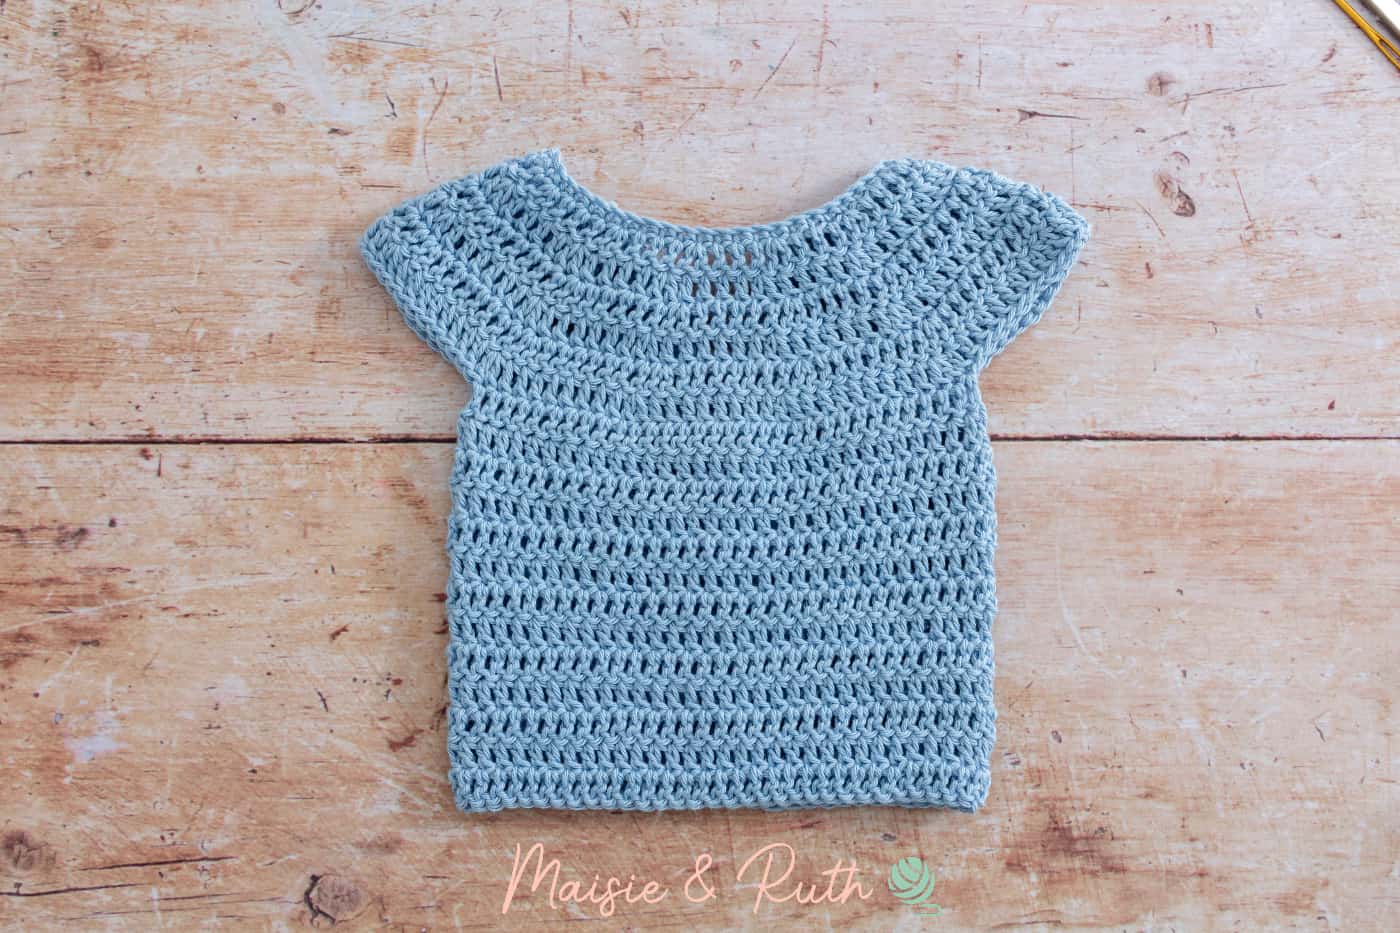
BACK LOWER PART
It is now time to work on the back lower part of your onesie.
You will work decreases at each edge of this section.
Make sure your work is lying with the back part facing up and away from you, as demonstrated in the image below:
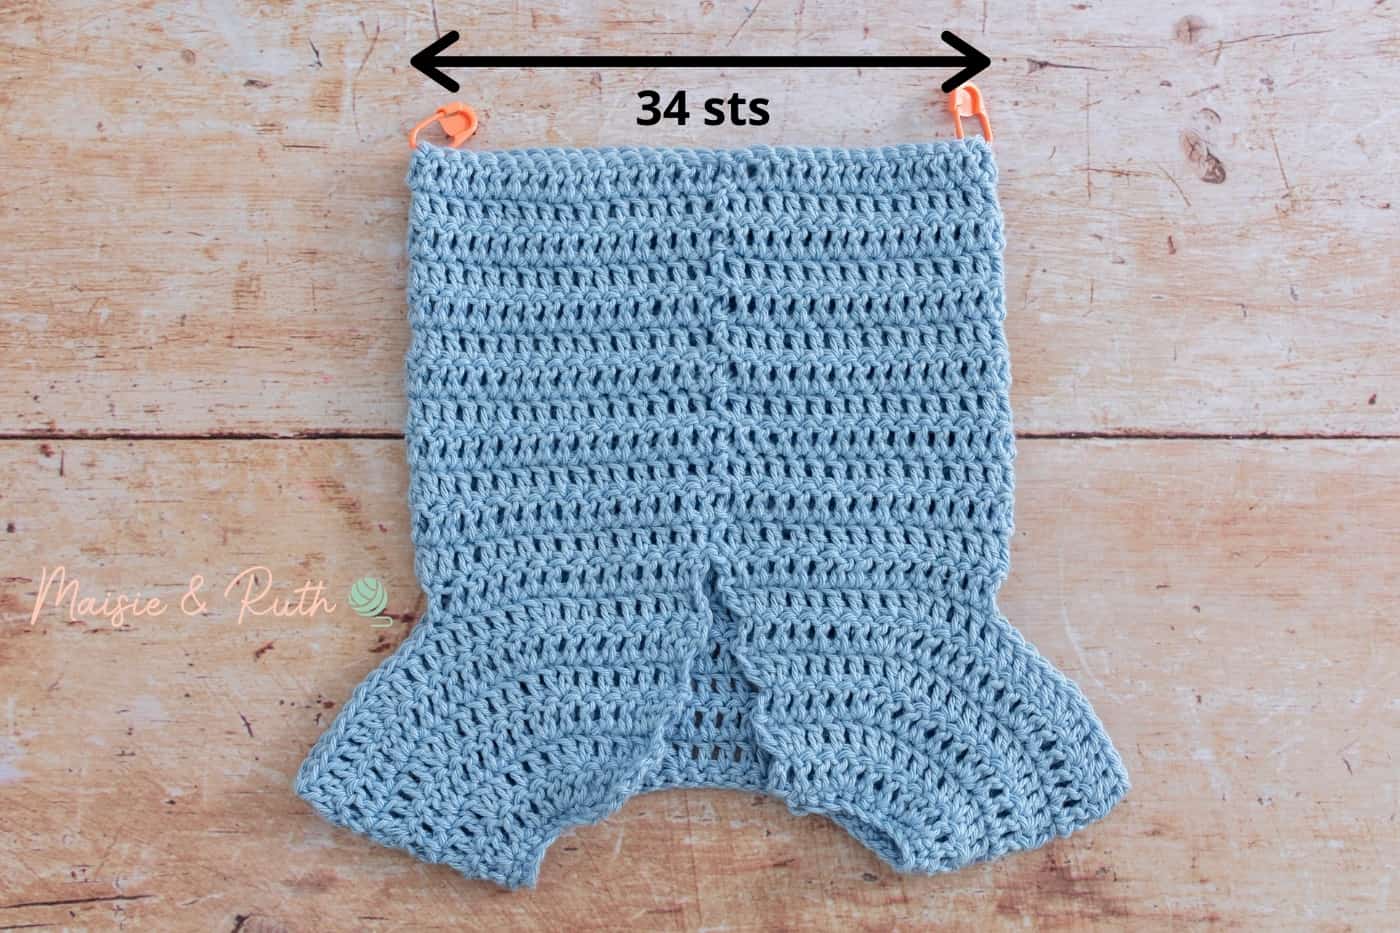
Place a stitch marker into the stitch at the bottom right hand corner of your work. This will be the first stitch that you work into.
Place another stitch marker into the stitch at the bottom left hand corner of your work. This will be the last stitch that you work into.
Make sure that you have 34 stitches along this section (this leaves 30 stitches for the front lower part, which we will work into later).
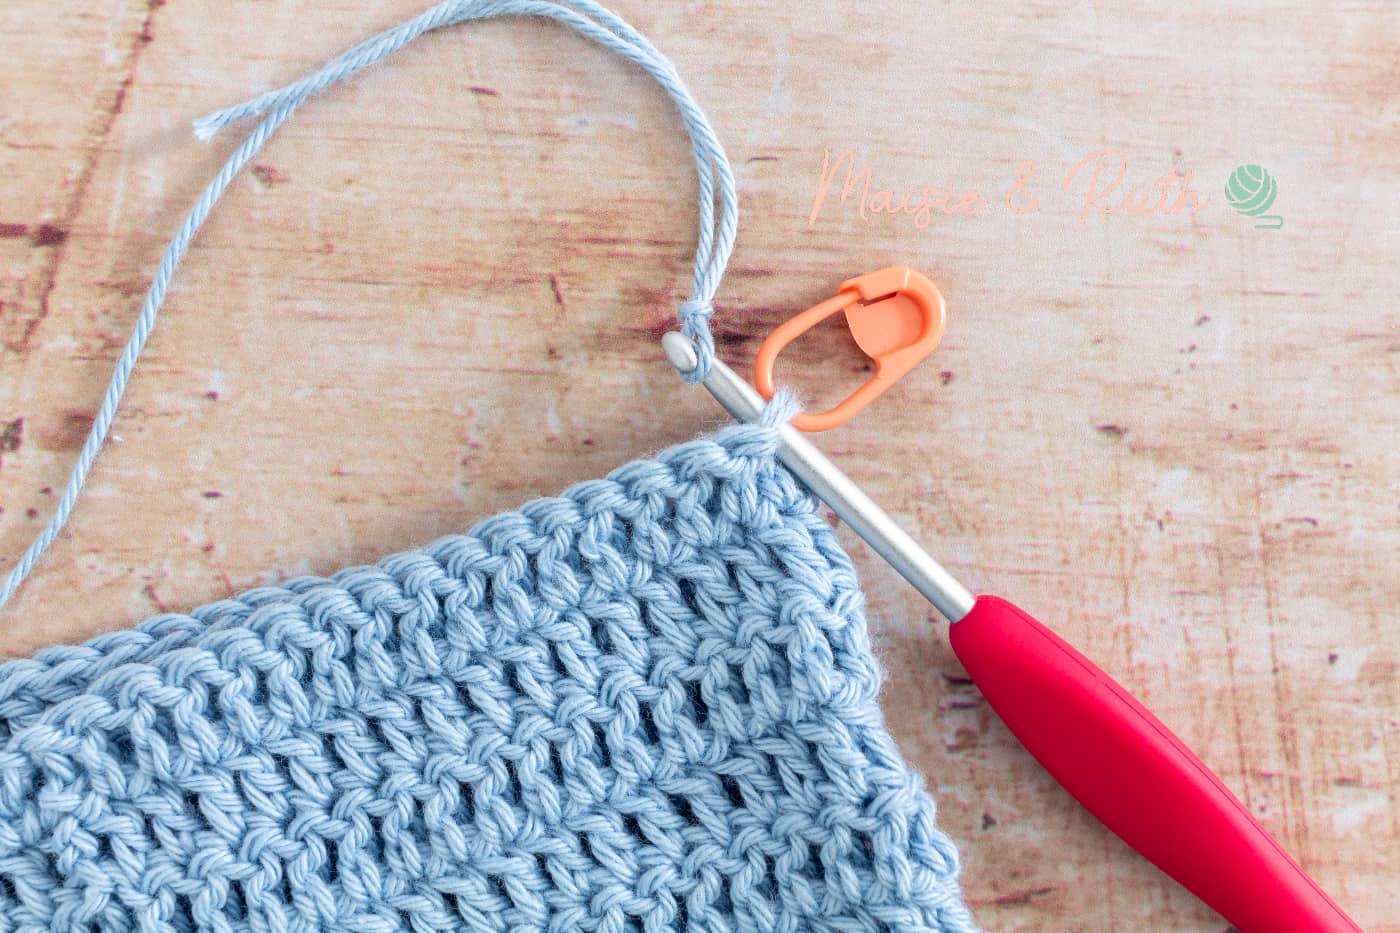
At the bottom right hand corner, attach your yarn to the stitch where the first stitch marker is located:
Row 1. Ch1 (does not count as your first st here and throughout), (dc2tog) twice, 1dc in next 26 sts, (dc2tog) twice, TURN [30 sts].
Row 2. Ch1, dc2tog, 1dc in next 26 sts, dc2tog, TURN [28 sts].
Row 3. Ch1, dc2tog, 1dc in next 24 sts, dc2tog, TURN [26 sts].
Row 4. Ch1, dc2tog, 1dc in next 22 sts, dc2tog, TURN [24 sts].
Row 5. Ch1, dc2tog, 1dc in next 20 sts, dc2tog, TURN [22 sts].
Row 6. Ch1, dc2tog, 1dc in next 18 sts, dc2tog, TURN [20 sts].
Row 7. Ch1, dc2tog, 1dc in next 16 sts, dc2tog, TURN [18 sts].
Row 8. Ch1, dc2tog, 1dc in next 14 sts, dc2tog, TURN [16 sts].
Row 9. Ch1, dc2tog, 1dc in next 12 sts, dc2tog, TURN [14 sts].
Row 10. Ch1, dc2tog, 1dc in next 10 sts, dc2tog, TURN [12 sts].
Cut your yarn, fasten off and weave in ends.
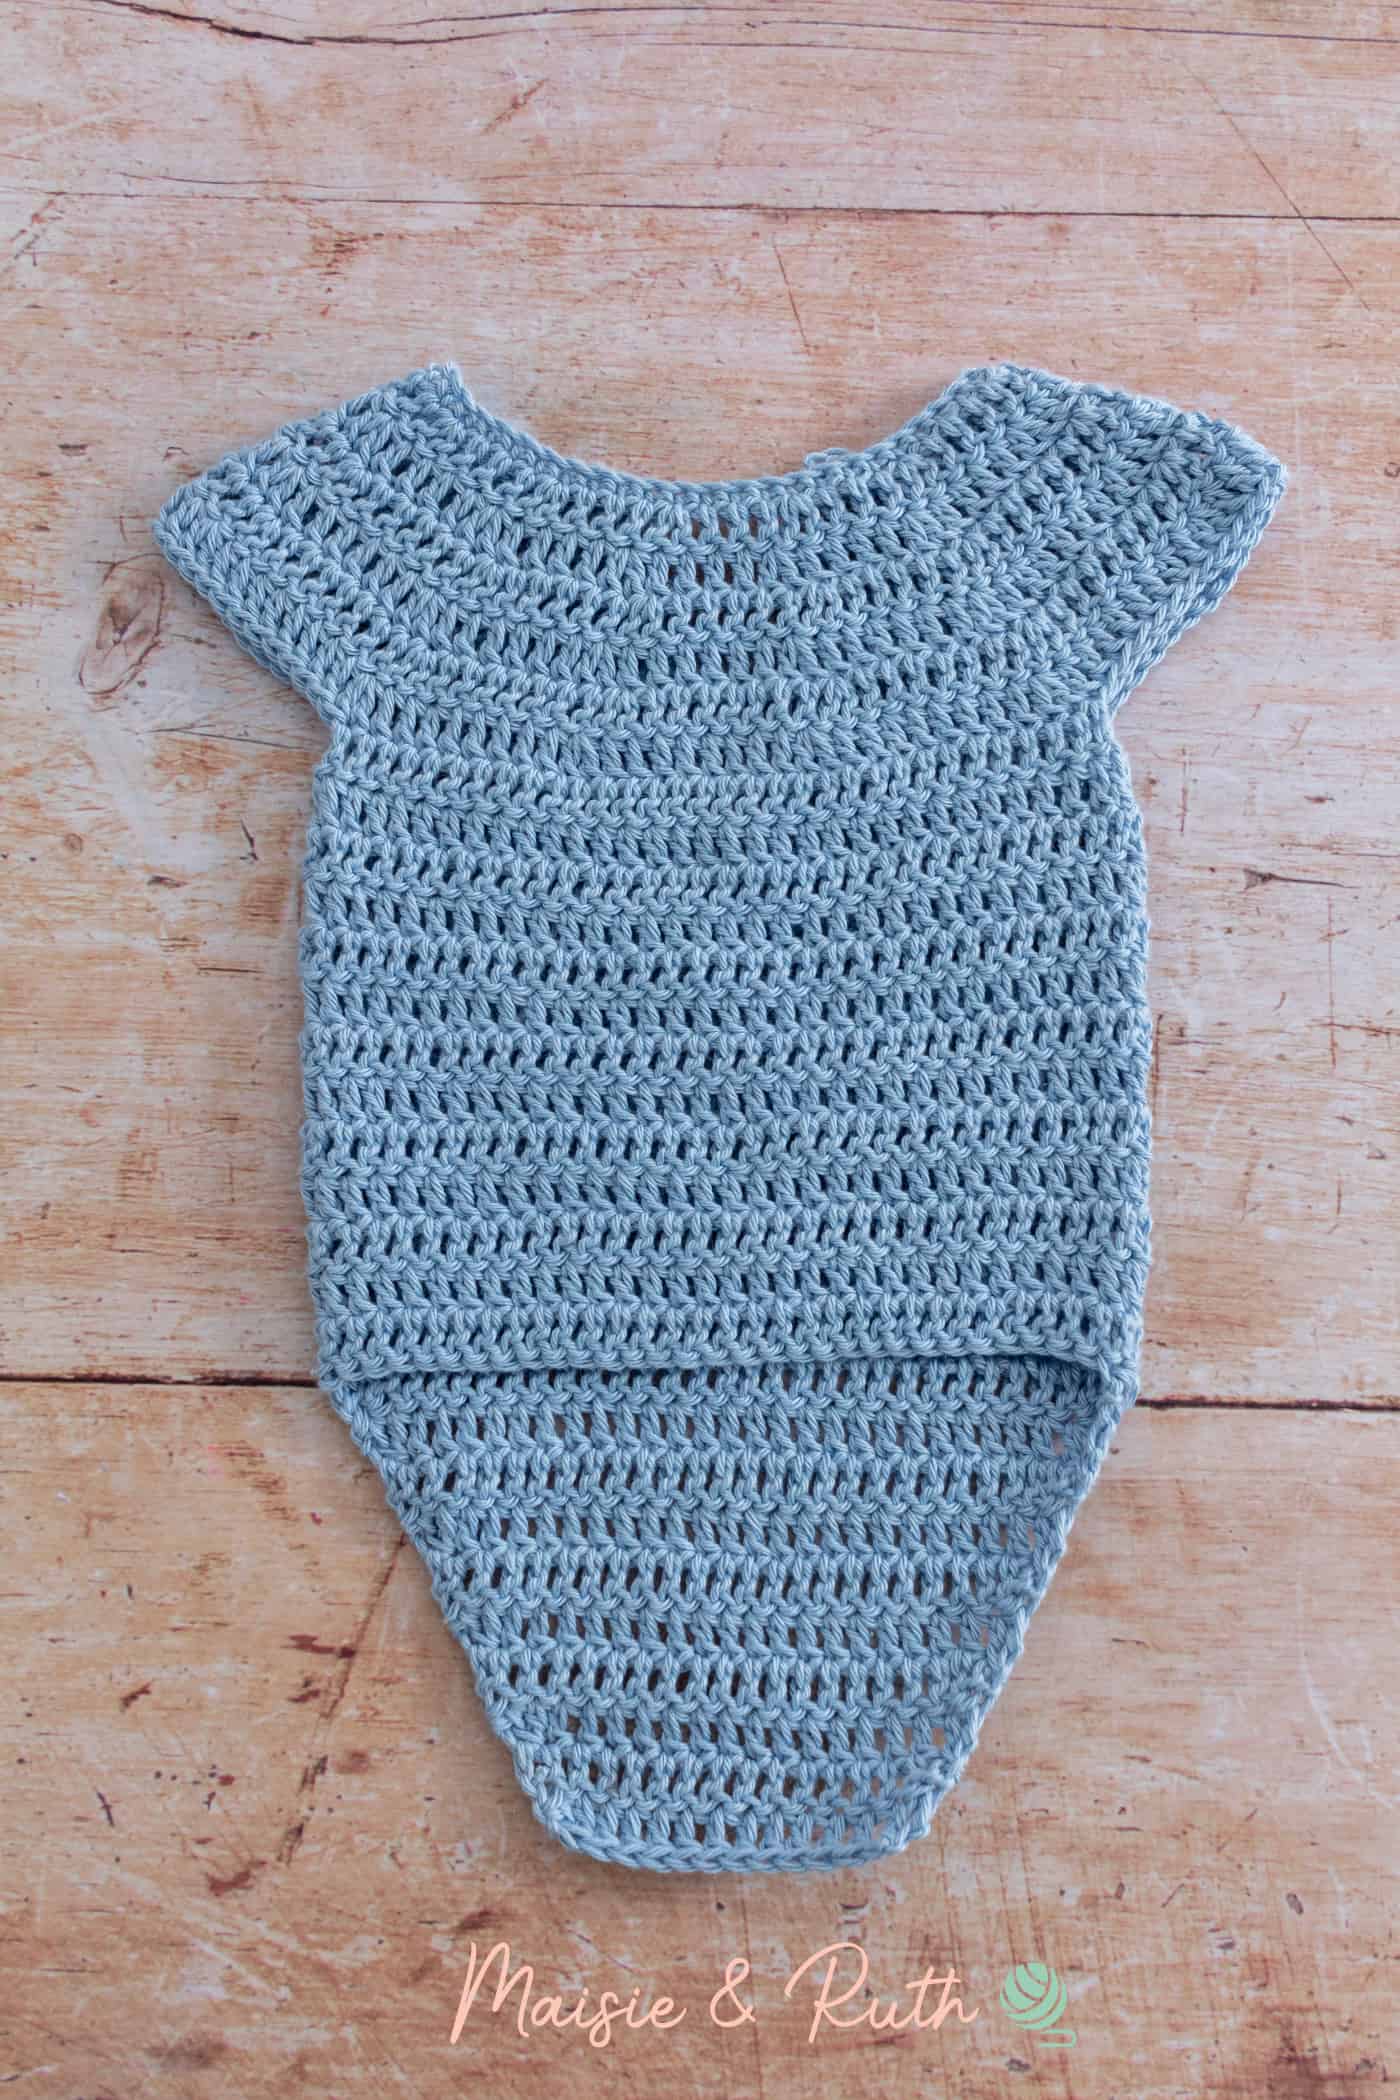
The back lower part of your crochet baby onesie is now completed.
This is what your romper should look like at this point:
FRONT LOWER PART
For the front lower part, you will work decreases at each edge of this section.
To work the front lower part, ensure that your work is lying front side facing up and away from you:
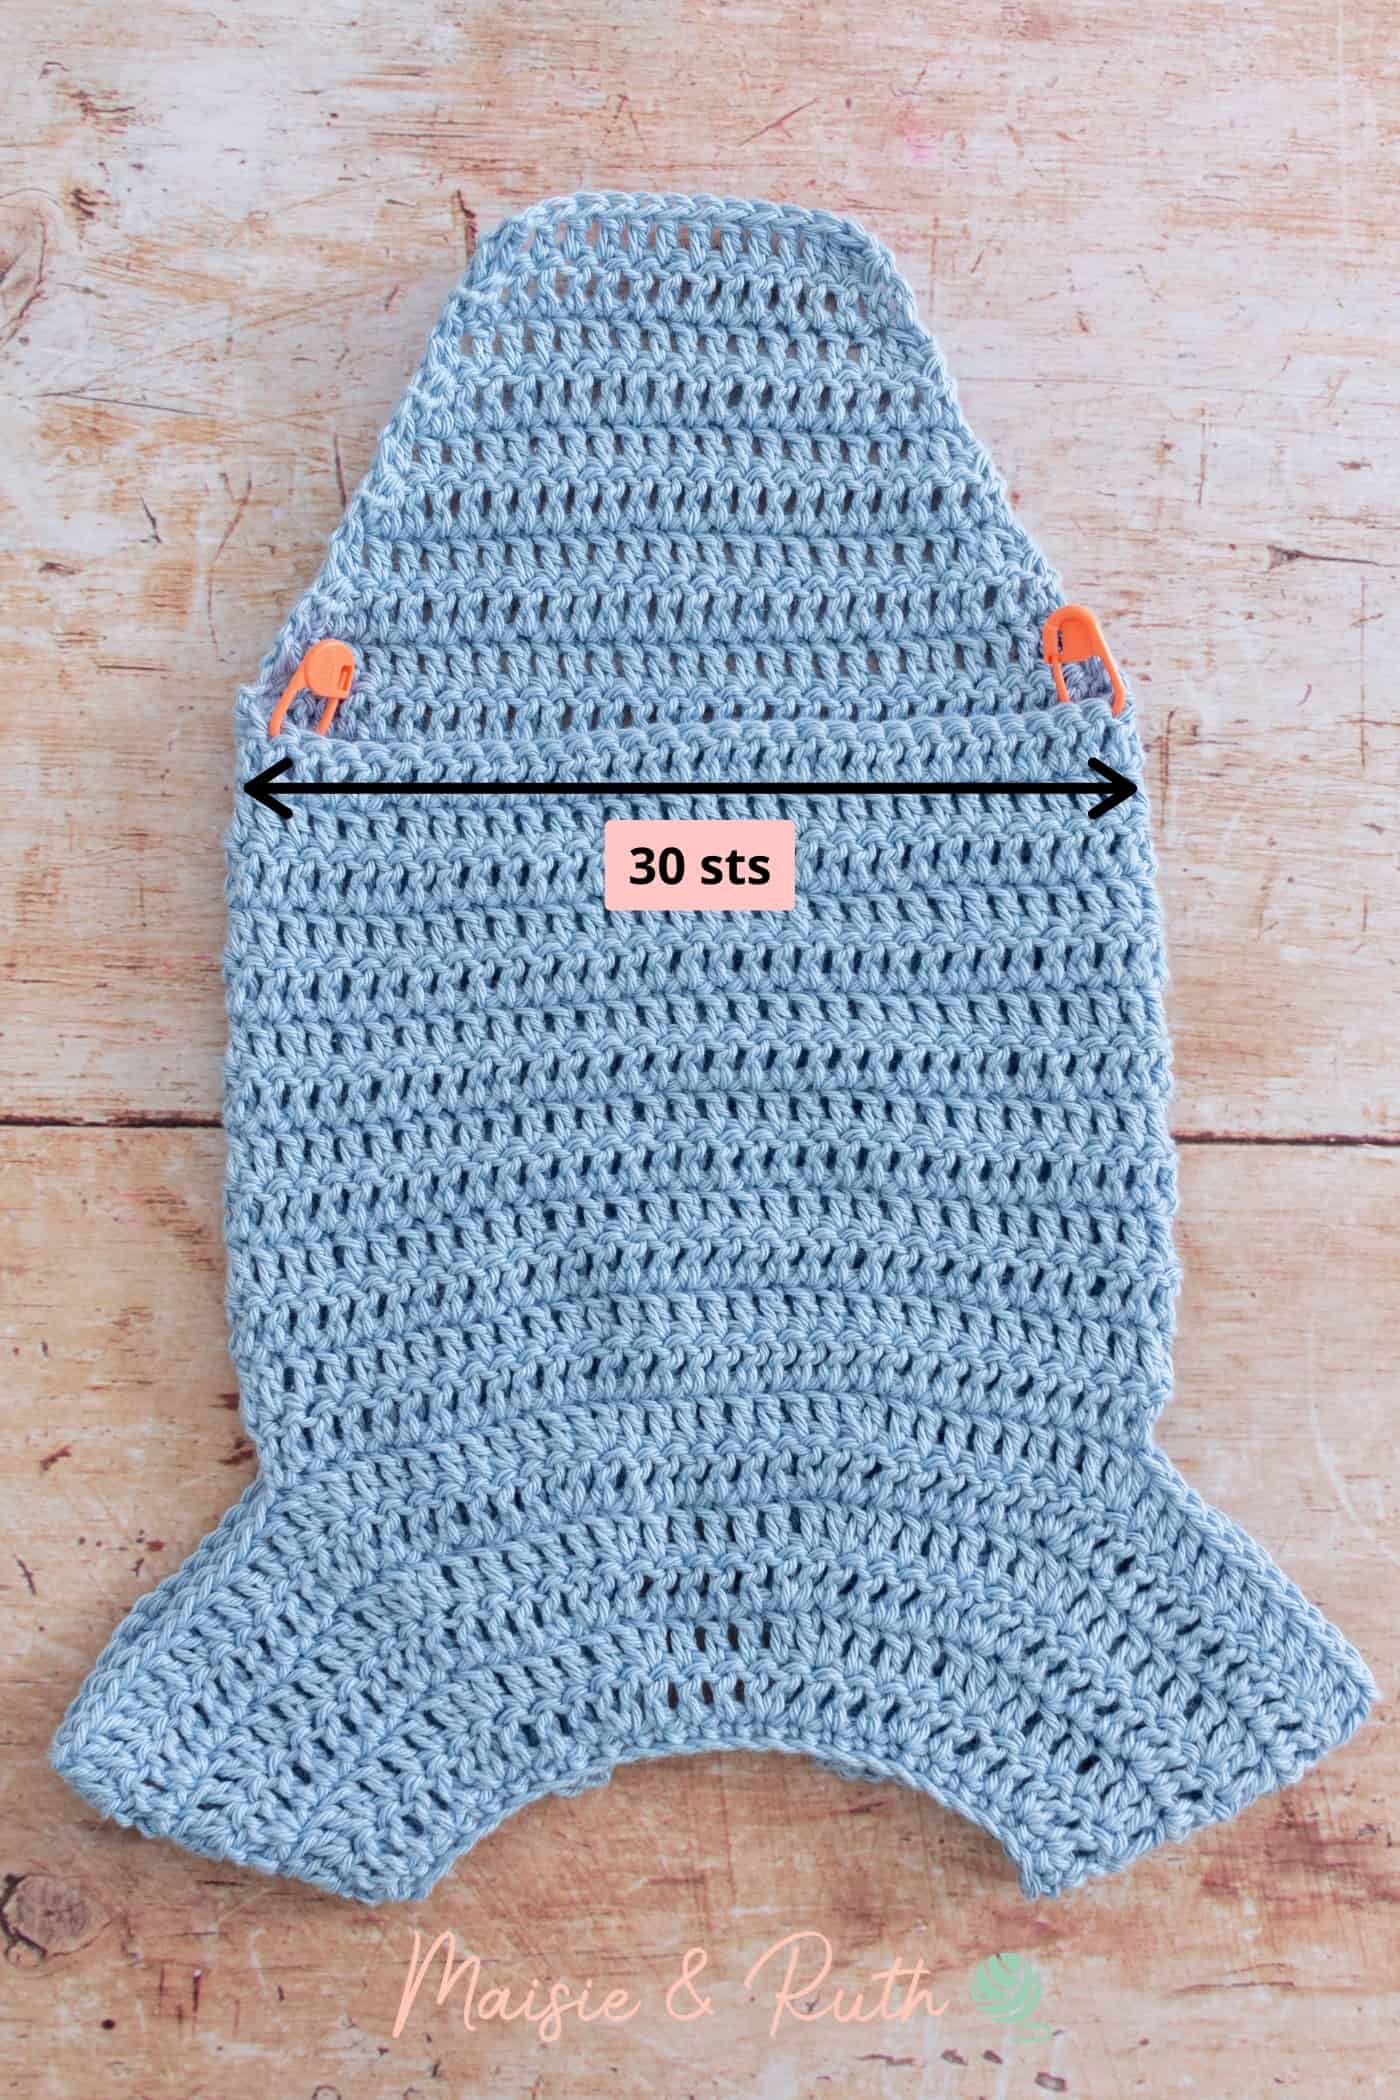
30 stitches will remain at the front of your work. To create the front lower part, you will work across these 30 stitches.
Place a stitch marker into the stitch at the bottom right hand corner of your work. This will be the first stitch that you work into.
Place another stitch marker into the stitch at the bottom left hand corner of your work. This will be the last stitch that you work into.
Attach your yarn to the first stitch at the bottom right hand corner:
Row 1. Ch1 (does not count as your first st here and throughout), (dc2tog) twice, 1dc in next 22sts, (dc2tog) twice, TURN [26 sts].
Row 2. Ch1, (dc2tog) twice, 1dc in next 18sts, (dc2tog) twice, TURN [22 sts].
Row 3. Ch1, dc2tog, 1dc in next 18sts, dc2tog, TURN [20 sts].
Row 4. Ch1, dc2tog, 1dc in next 16sts, dc2tog, TURN [18 sts].
Row 5. Ch1, dc2tog, 1dc in next 14sts, dc2tog, TURN [16 sts].
Row 6. Ch1, dc2tog, 1dc in next 12sts, dc2tog, TURN [14 sts].
Row 7. Ch1, dc2tog, 1dc in next 10sts, dc2tog, TURN [12 sts].
Cut yarn, fasten off and weave in ends.
At this point, your crochet baby onesie should be looking like this:
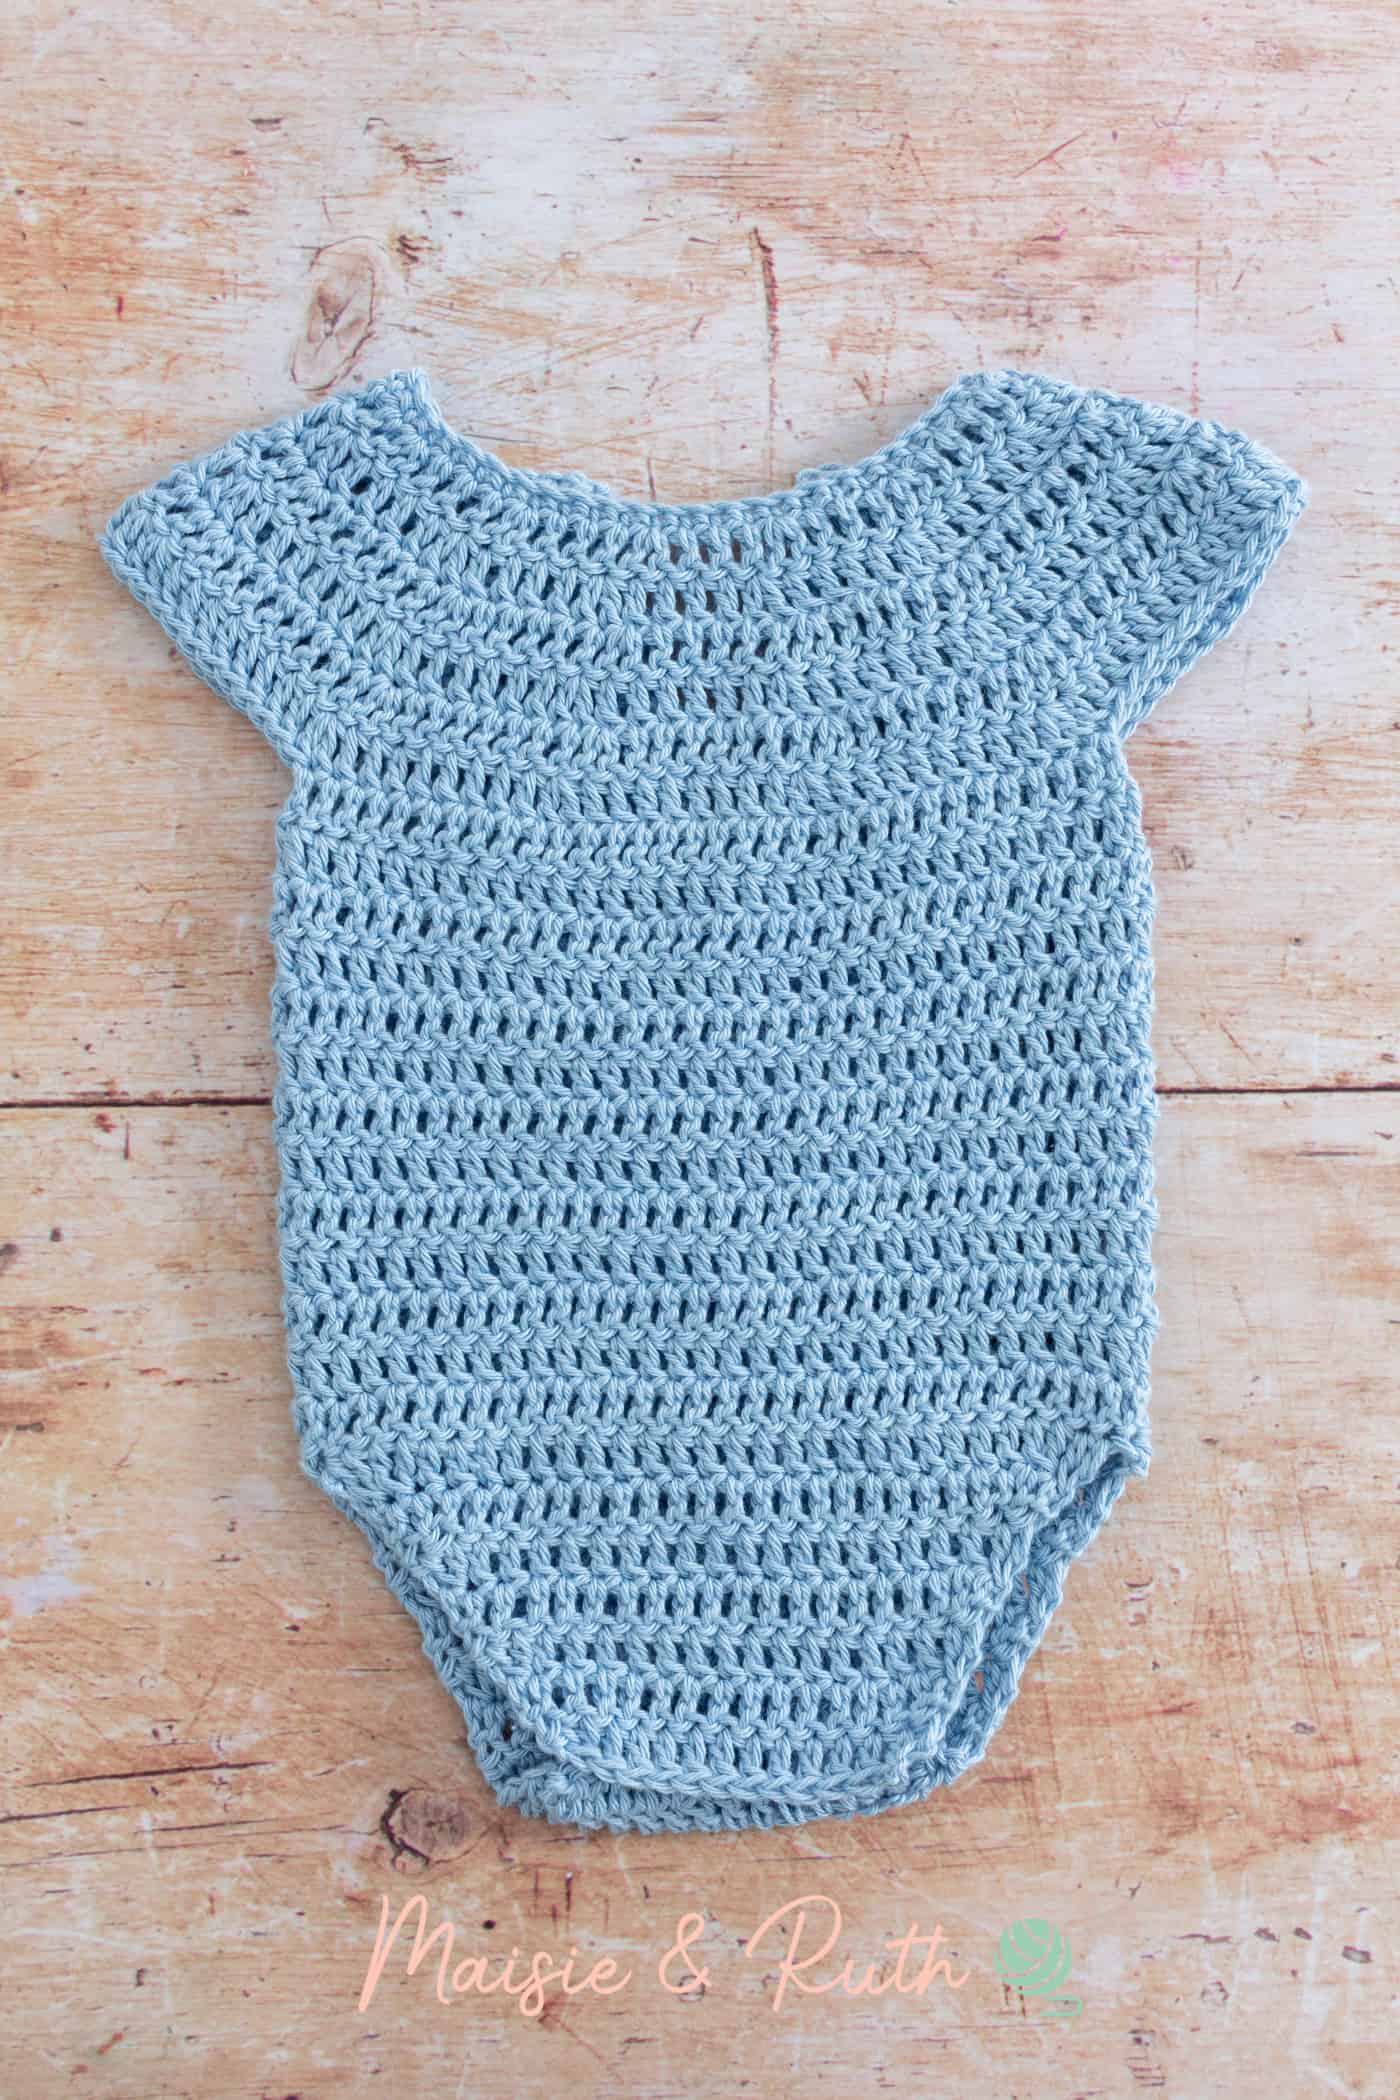
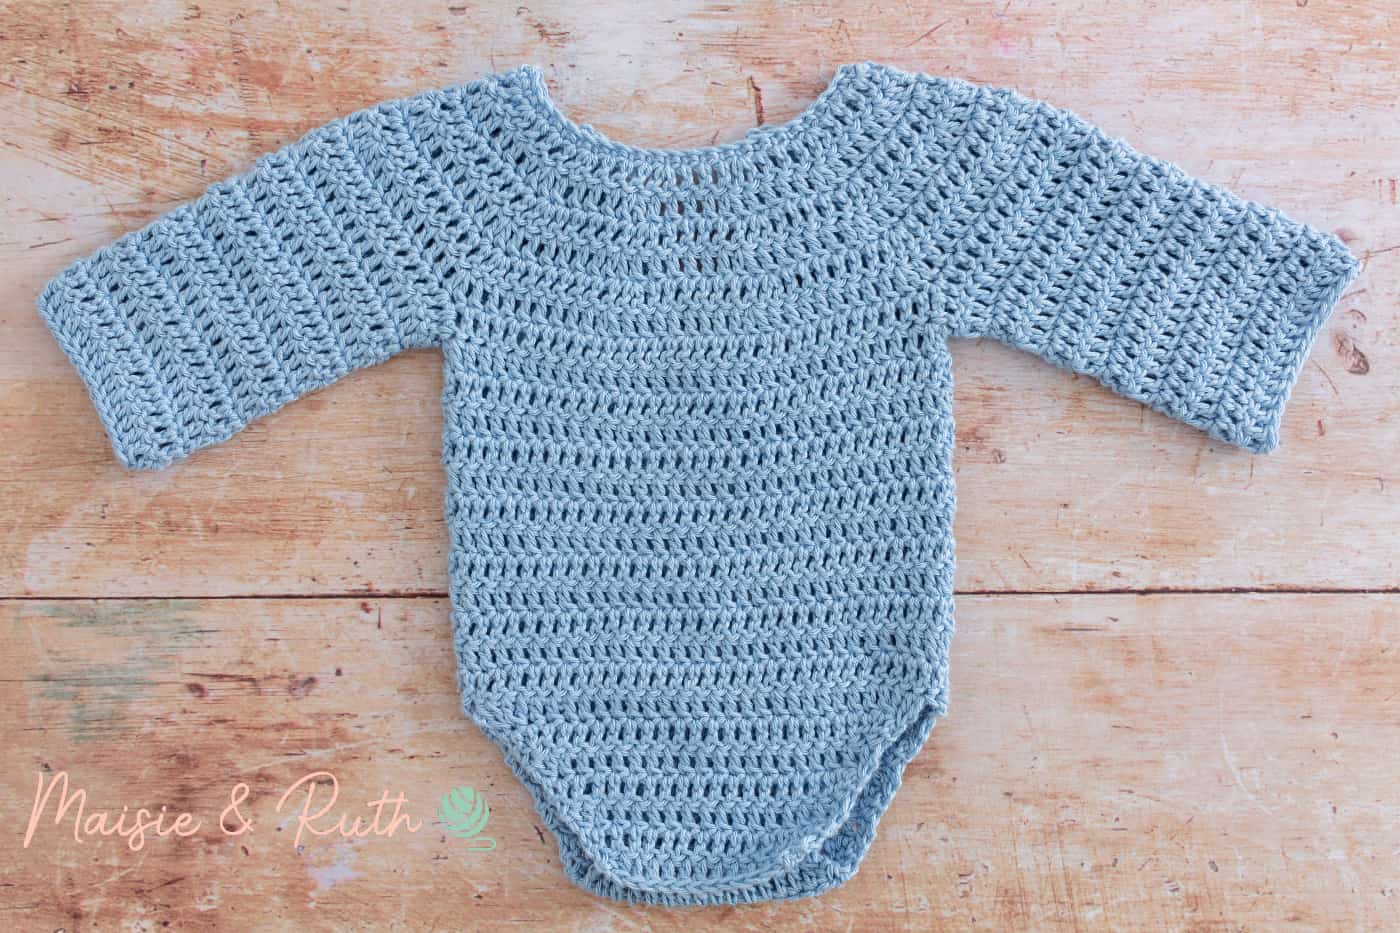
SLEEVES
It’s time to work on the sleeves now.
Beginning at the underarm area, attach your yarn:
Round 1. Ch2 (does not count as your first st here and throughout), 1dc in same st, 1dc in next 30 sts, sl st to 1st dc to join, TURN [31 sts].
Round 2. Ch2, dc2tog, 1dc in next 27 sts, dc2tog, sl st to 1st dc2tog to join, TURN [29 sts].
Rounds 3 – 12. Ch2, 1dc in same st, 1dc in next 28 sts, sl st to 1st dc to join, TURN [29 sts].
At the end of round 12, cut your yarn, fasten off and weave in your ends.
NOTE: At the end of round 12, for a neater finish, you may prefer to make an invisible join instead of slip stitching to the first dc.
Repeat the above process for the other sleeve.
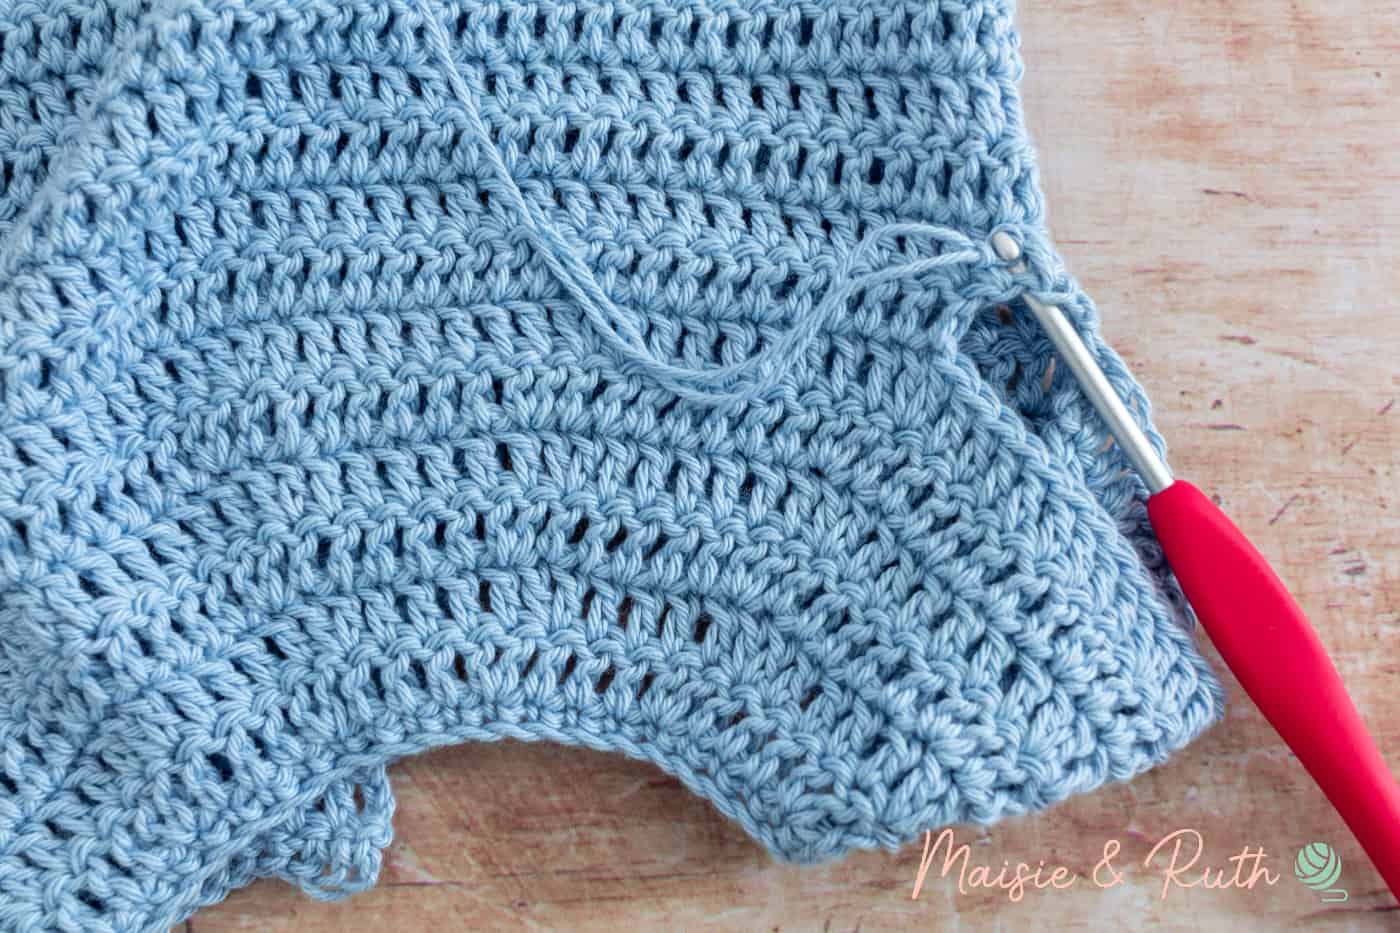
EDGING FOR LEG OPENINGS
I decided to place one round of single crochet stitches around the leg openings and fastening area.
To begin, attach your yarn to the bottom corner of the back lower part, as demonstrated in the photo below:

Round 1. Ch1 (does not count as your 1st st), 1sc in same st, 1sc in next 11 sts, sc evenly around first leg opening, 1sc in next 12 sts along bottom of front lower part, sc evenly around second leg opening, sl st to 1st sc to join.
Cut yarn, fasten off and weave in ends.
EDGING FOR BACK AND NECK OPENING
The last step is to place some simple edging around the back and neck opening of the romper.
This will also be made up of single crochet stitches.
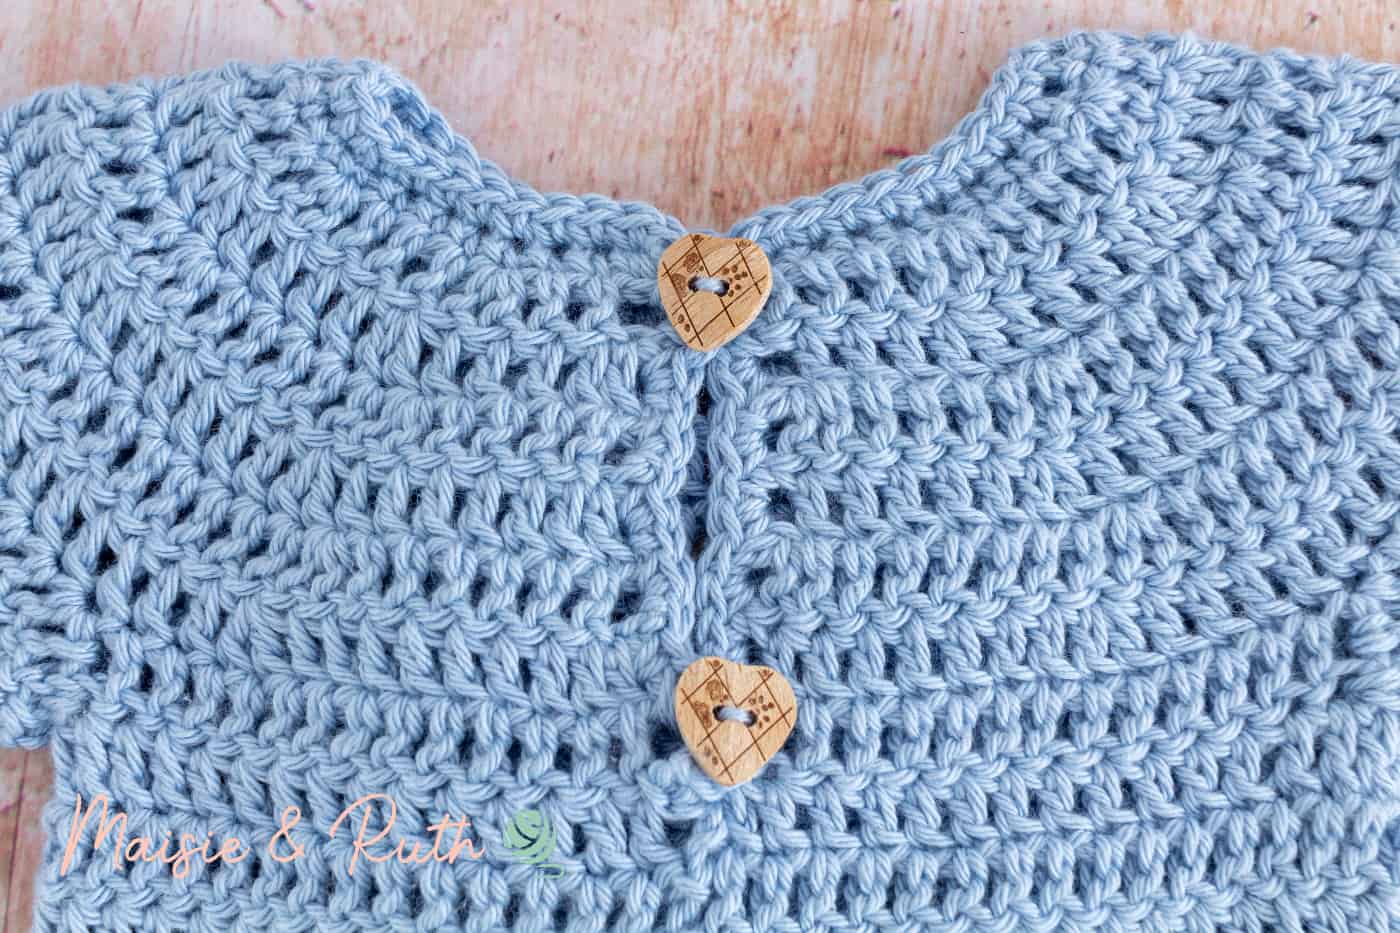
When working the edging, you will also make 2 loops for your buttons at the back opening.
You will begin in the lower left corner of the back opening, work up to the neckline, crochet along the neckline and work down the other side of the back opening to the lower right hand corner.
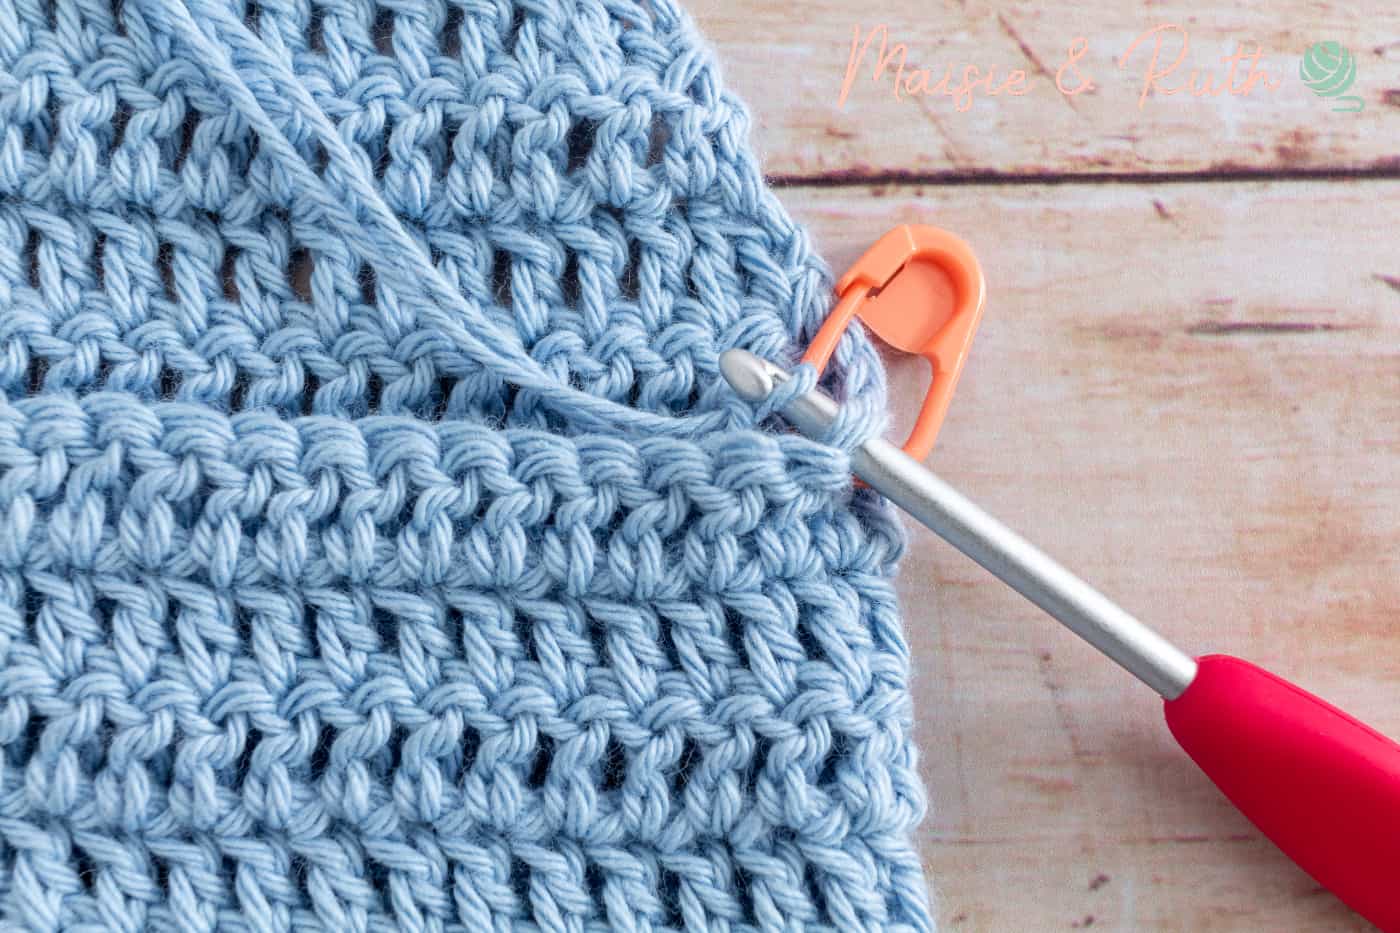
Attach your yarn to the lower left corner (where my hook is):

Row 1. Ch1 (does not count as your first st), 1sc in same st, ch3, 1sc in same st (1 button loop made), sc evenly up left side to just before the corner edge of the neckline, ch3, sc in same st (2nd button loop made), 2sc in corner st, 1sc in each st along neckline, 2sc in corner st, sc evenly down right side.
Cut yarn, fasten off and weave in ends.
FINISHING
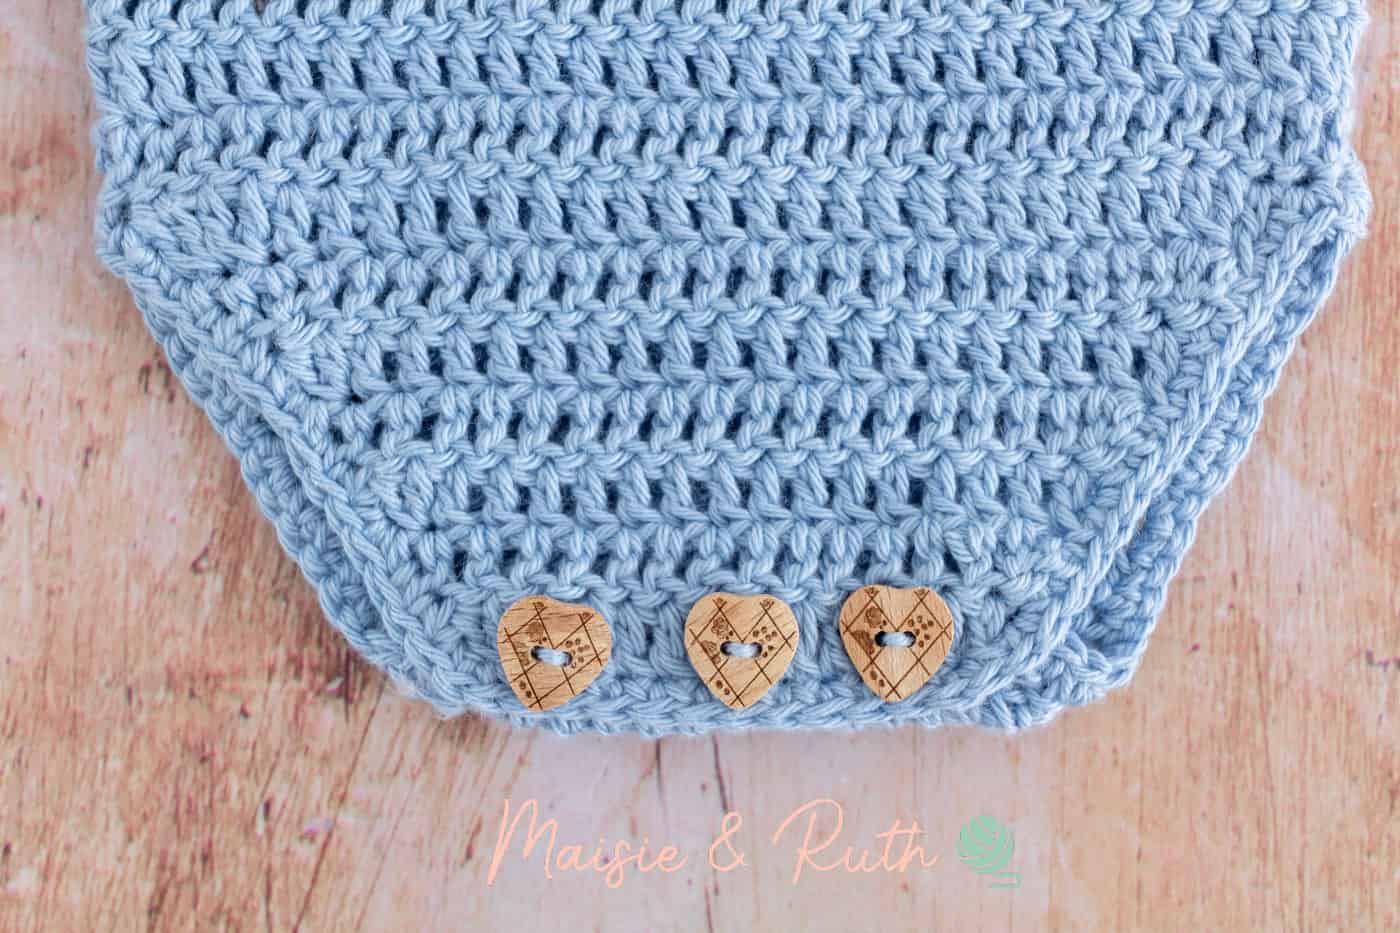
Sew three buttons on the back lower part, at the bottom.
Push the buttons between the stitches on the front lower part:
Sew two buttons on the back of your romper, on the opposite side to where the button loops are:
Make a teddy bear applique and sew it onto the front of your romper. You can find the pattern here
And that’s it! You’ve completed this adorable little crochet baby onesie pattern! 😍

PIN IT FOR LATER!
SHARE YOUR WORK!
I really hope that you enjoyed this free crochet pattern! I would LOVE to see photos of your completed project… please tag me on Instagram using @maisieandruth and / or #maisieandruth
And remember to pin this pattern for later if you can’t make it right now!
PATTERN SUPPORT
Need Help with a Pattern?
We’ve got you! 😊
If you need a hand, come hang out with us in our Facebook group—it’s the best place to ask questions, share your makes, and cheer each other on.
We’ve also put together a step-by-step YouTube tutorial you can follow along with—this should answer most of your questions along the way!
Pop into the Facebook group and join our cozy little community—we’d absolutely love to see you there! 💛
COPYRIGHT
Copyright © 2021 by Maisie and Ruth Limited. All rights reserved. This crochet baby onesie pattern is for personal viewing only. You may view it for free on this blog, but it is protected under applicable copyrights, trademarks, and other proprietary (including but not limited to intellectual property) rights.
You may not copy, redistribute, or sell this pattern in any form, including digital, printed or photographic formats without permission. Sharing this pattern (in whole or in part) on social media, websites, or messaging platforms is strictly prohibited. This is a theft of the author’s intellectual property, which may result in civil or criminal penalties.
Thank you for respecting my work and for your continued support — it truly means a lot!
Frequently Asked Questions (FAQs)
Can I sell items made from this crochet baby onesie pattern?
Yes! You may sell finished items made using the Little Logan Romper pattern in small quantities. Please do not sell, share, or redistribute the pattern itself.
Is this crochet baby onesie pattern suitable for beginners?
This pattern is beginner-friendly (confident beginner). You should be comfortable with basic crochet stitches, simple shaping, and sewing on an appliqué.
What size is the Little Logan Romper?
The Little Logan Romper is designed to fit newborn size.
What yarn is used for this pattern?
The pattern uses DK weight cotton yarn for a soft, breathable, and lightweight finish.
Is there a printable PDF version of the pattern?
Yes! An ad-free, printable PDF version of the Little Logan Romper pattern is available for purchase here.
Does this pattern include a video tutorial?
Yes, a step-by-step video tutorial is included to help guide you through the construction of the romper.
Can I make this romper in a different yarn?
You may substitute yarn, but be sure to check gauge, as different yarns can affect sizing and fit.
Are matching patterns available?
Yes! This romper coordinates with the Teddy Hugs Blanket, pixie bonnet, slippers, and teddy bear teether for a complete newborn set. Purchase the full collection here


Hi, I love this onsie, but I would love to make it a bit bigger, so it can last longer, how would you suggest I go about this?
With kind regards
Lotte
Hi Lotte,
I’m really pleased that you like the little onesie! 😊
To make it up to 3 months in size, I would use a #3 / DK / 8 ply yarn and a G (4mm) hook.
For 3 – 6 months you could try using a 4.5mm hook.
Enjoy making it! 💕
Hi Amanda,
Lovely pattern. Looking forward to making this adoreable baby Logan set. Is there a pattern to the booties and the teething toy? Where did you get the teething ring?
Thanks for sharing,
Have a lovely day!
Hi Susan,
Thank you, I’m so happy to hear that you like the pattern! 🥰
Thanks for your interest… I’m in the middle of writing the blog posts for the booties, bonnet and teething toy.
I’ll put them up one at a time, starting with the booties 😊
I get my teething rings from Amazon. Just type in ‘wooden teething ring’. You can order ones that have been specially formulated for babies and are unpainted and non-toxic.
I can’t give you a date for when I’ll have the other patterns ready but just know that I’m beavering away like mad and hope to have them up on the blog ASAP!! 😅
Hi Amanda love your new Romper can’t wait to do it looks so cute 🤩
Loved doing the other Romper
Your Designs are outstanding
Sinead
Thank you so much, Sinead – that’s lovely of you to say! 🥰
I’m so pleased that you like my designs… I’m busy filming and writing up the patterns for the other items from this teddy bear set 😅 And I’ll be posting them gradually over the next few days 😅
Pattern for the crochet teddybear face wanted Many thanks
Here is the link for the teddy bear applique
https://maisieandruth.com/how-to-crochet-bear-applique-cute-fast-easy/
Thank you and enjoy 😊