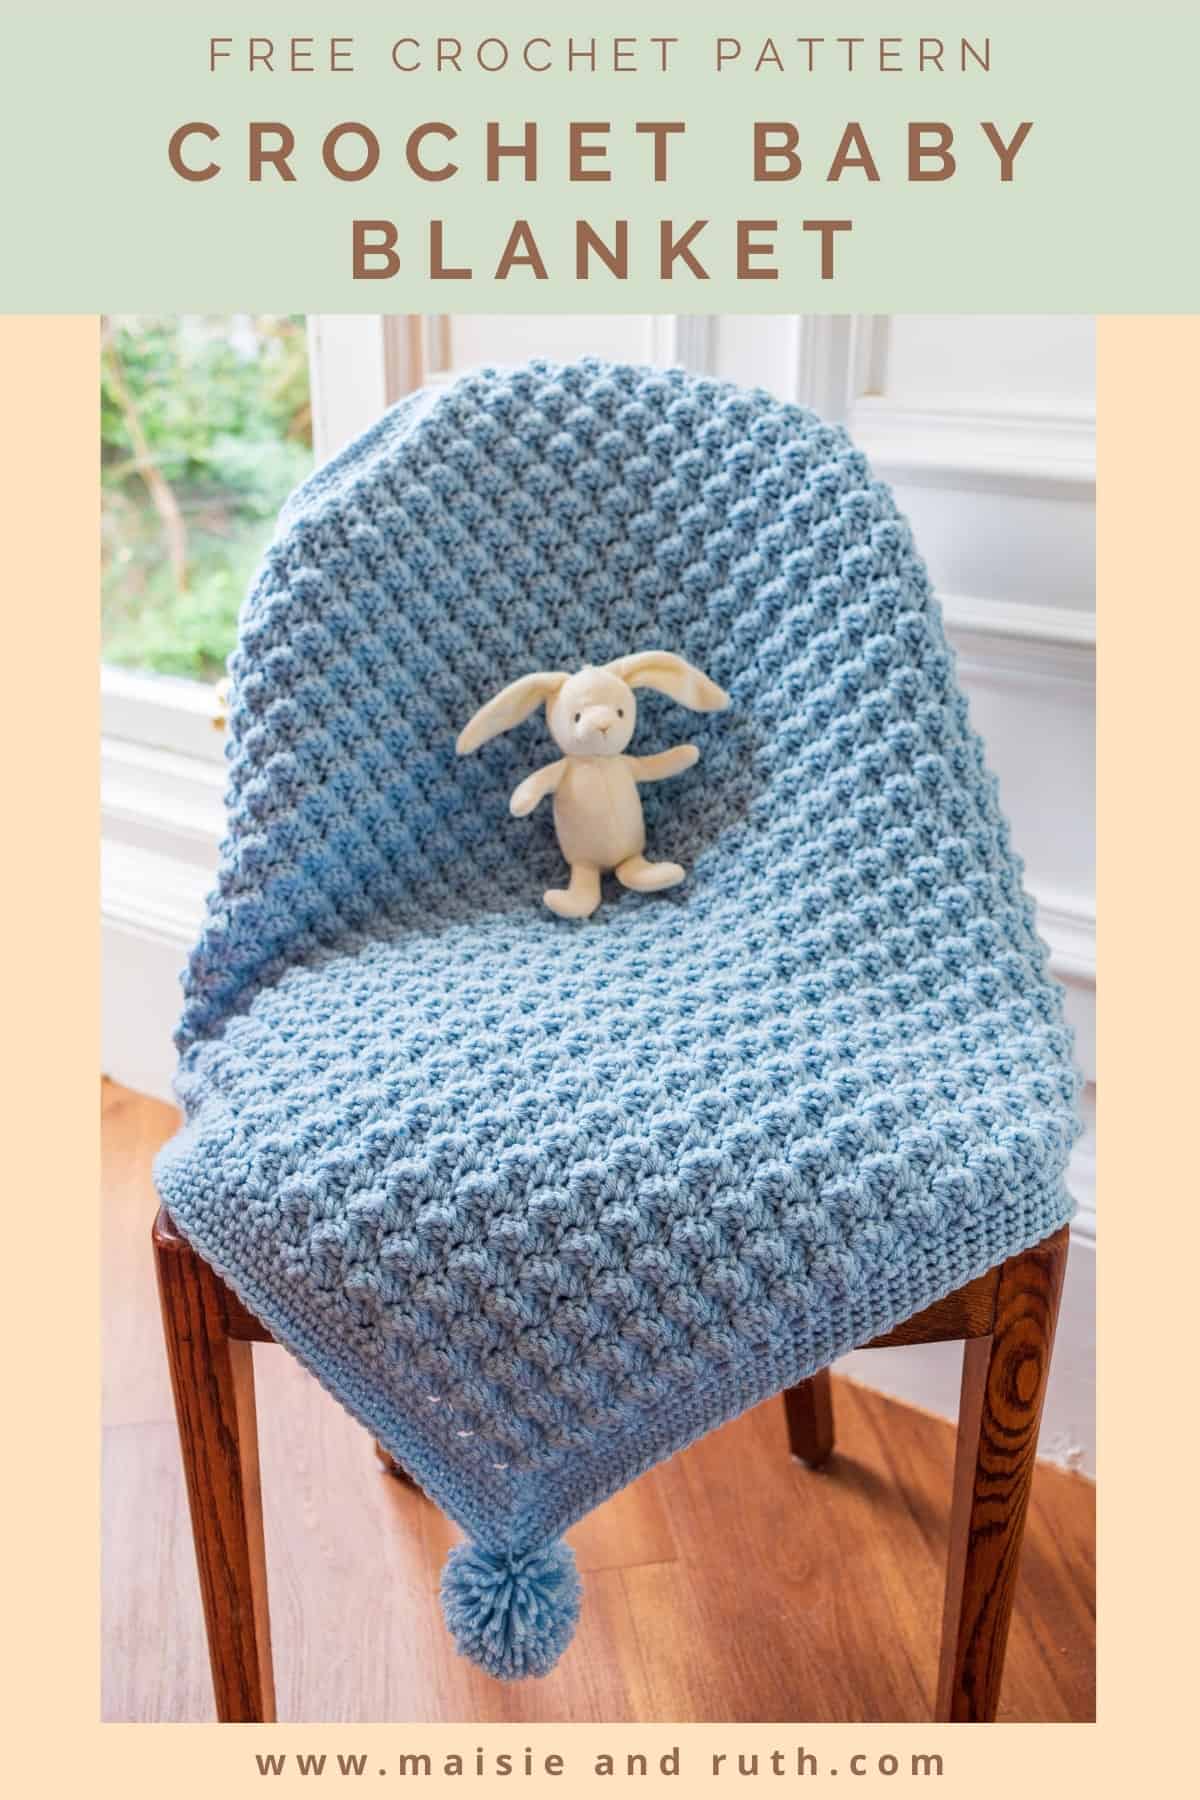
Are you looking for a FREE Easy Crochet Baby Blanket Pattern? Well, welcome to the Barclay Baby Blanket – a pattern that’s fast, fun and perfect for gifting!
I’ve updated this pattern and it now includes three different sizes so you can make the blanket that suits your needs best. For even more options, the ad-free PDF pattern includes an additional 17 sizes!

What to Expect From This Pattern
- Three sizes available in the free version – baby, lapghan and throw.
- Beginner-friendly – no complicated techniques, just simple stitches repeated.
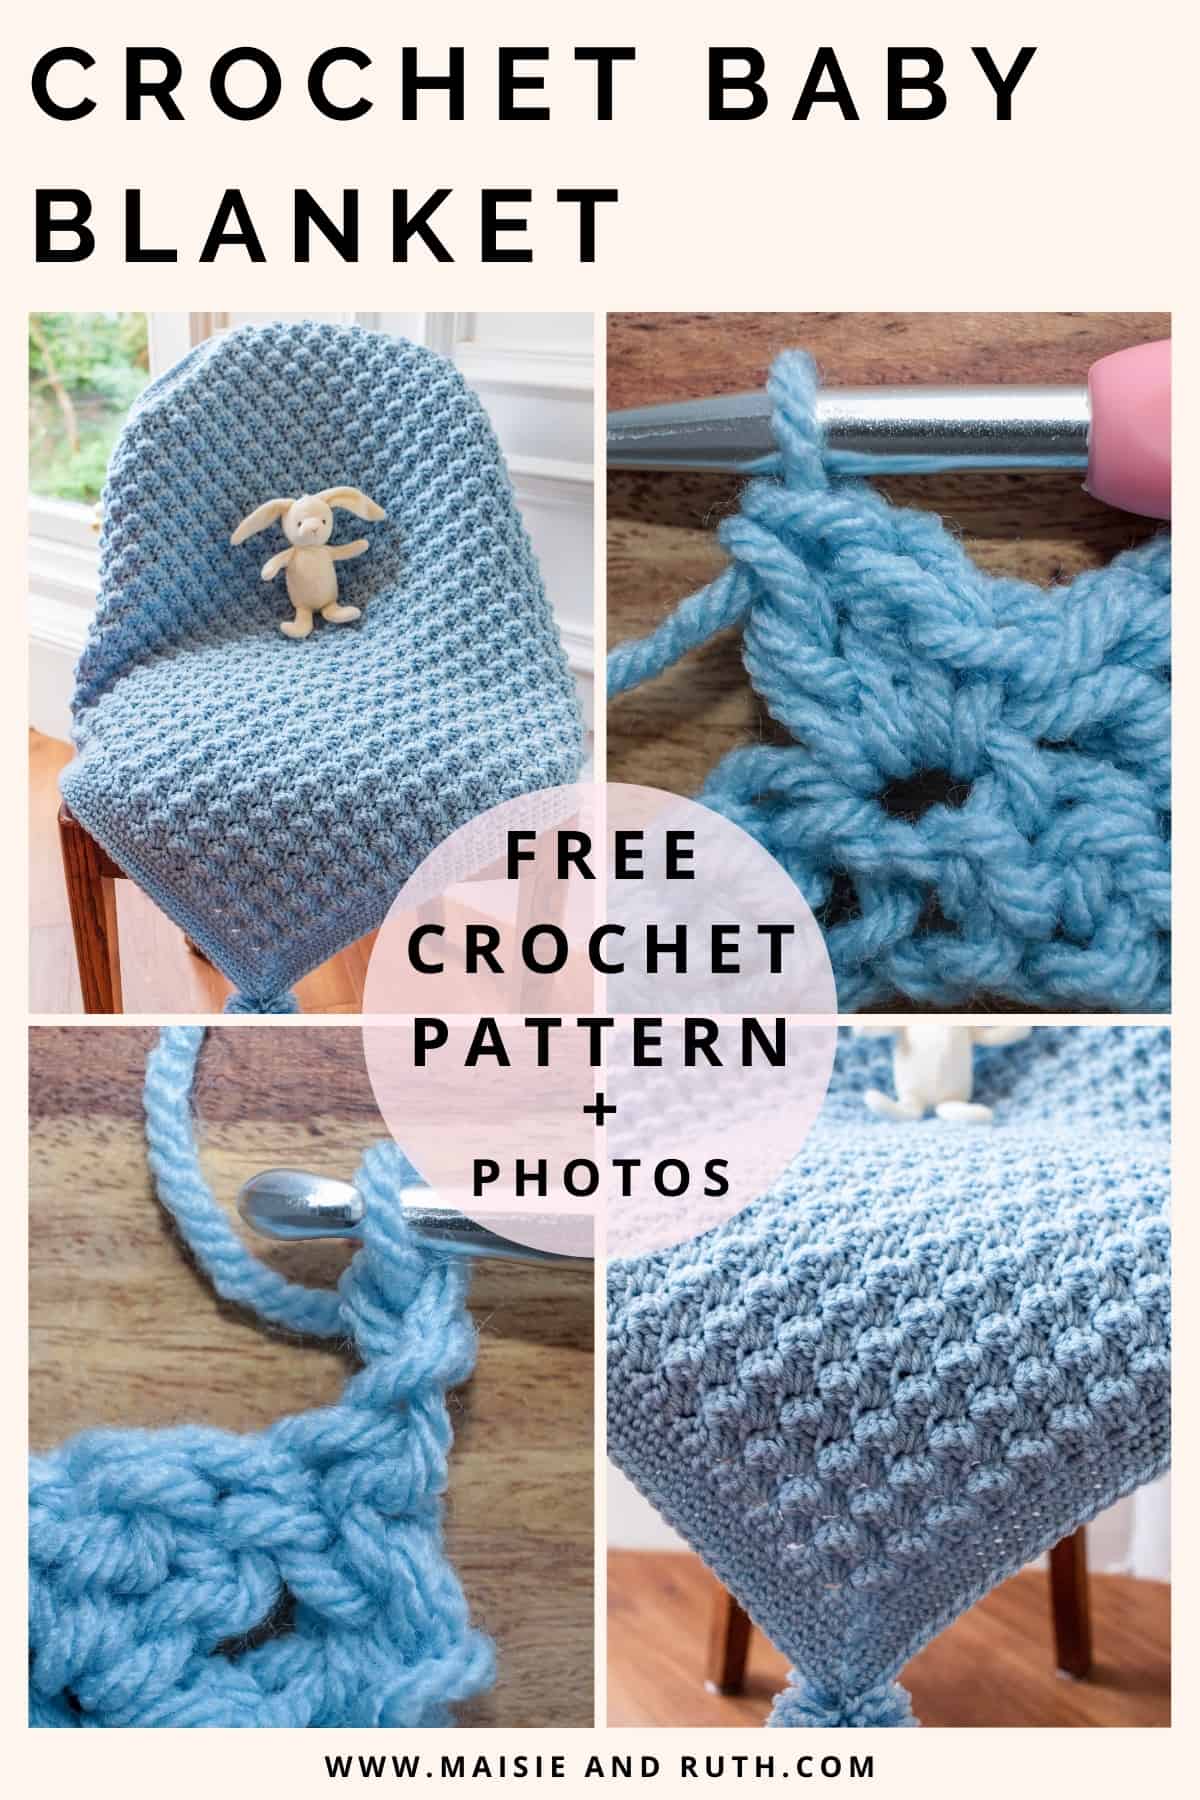
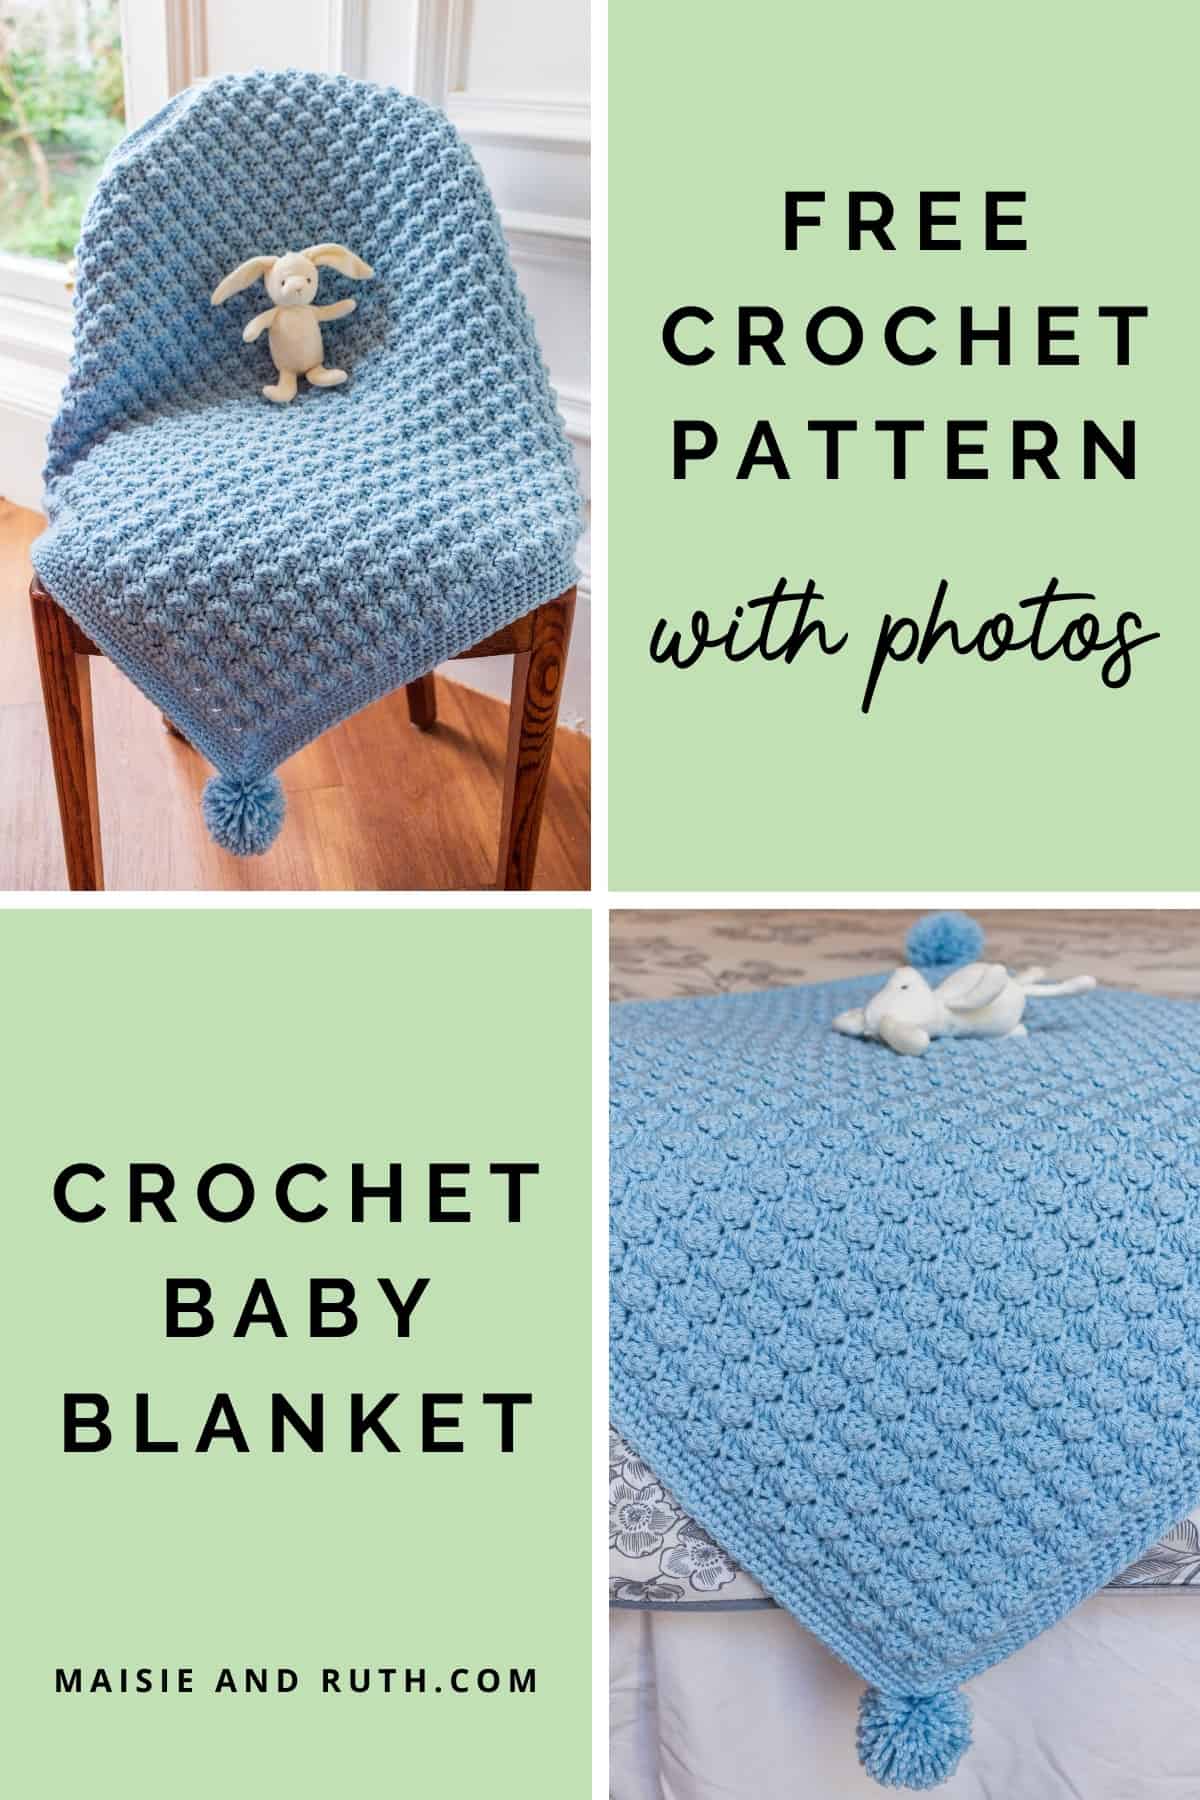
- Clear instructions – with a video tutorial and step-by-step photos.
- Uses a cozy chunky yarn – works up quickly and makes the blanket extra soft and snuggly.
- Easy 1-row repeat – once you get started, the pattern becomes relaxing and almost effortless.
- Made with the popular blanket stitch – a fast and fun stitch.
- Perfect for gifting – handmade blankets, especially baby ones, are always a treasured keepsake.
- Fast gift – ideal for last-minute baby shower gifts due to the bulky yarn.
- Looks great in solid or variegated yarns – the stitch pattern makes any yarn shine.
YOUR NEW GO-TO CROCHET BLANKET PATTERN
There’s nothing better than curling up with your yarn and hook, and bringing a new project to life. If you’ve been looking for a blanket pattern that’s simple, quick, and absolutely beautiful, this one is perfect for you!
With its soft texture, beginner-friendly stitches, and modern look, it’s the kind of project you’ll come back to again and again. Whether you’re making a thoughtful handmade gift for a baby shower, creating a cozy keepsake for your own little one, or looking for a comfy blanket to curl under, this blanket ticks all the boxes.
THE EASIEST BLANKET YOU’LL EVER CROCHET
This pattern is one I return to often because it’s both soothing to make and lovely to gift. Featuring a fun and simple stitch, it’s perfect for a cozy afternoon project. And with its one-row repeat, it’s one of the easiest crochet patterns out there!
Plus, as the blanket is made with a chunky yarn and a size K (6.5mm) hook, it works up in no time at all… perfect if you need a last-minute gift for that upcoming baby shower!
The design is really straightforward. And the basic crochet stitches used throughout ensure that you can complete this project with both ease and speed.

COZY BLANKET SIZES
Three sizes are included in the free version of this blanket pattern. No matter which size you choose, you’ll still enjoy the same easy stitch pattern and beautiful texture:
Baby Size – 28″ x 28″ (71 x 71 cm). Sweet and snuggly, just right for cuddles or tummy time.
Lapghan Size – 36″ x 45″ (91 x 114 cm). A cozy blanket that’s perfect for toddlers, nap time, or keeping your legs warm without too much bulk.
Throw Size – 48″ x 60″ (122 x 152 cm). A larger blanket that works beautifully as a cozy sofa throw or as a crib-sized blanket for extra warmth.
Want a different size? The ad-free PDF pattern includes 20 sizes in total, from a tiny lovey all the way up to a full California king. Perfect for gifting, home décor, or creating beautiful matching sets.

YARN USED FOR THIS BLANKET PATTERN
For this pattern I used Paintbox Yarns Simply Chunky, a soft and very squishy acrylic yarn. It’s machine-washable also (see below for substitute yarns).
The blanket stitch creates the most wonderful texture and I found that this yarn was an excellent choice! Have a look at the photos to see the raised, bobble-like effect created by this unique stitch.

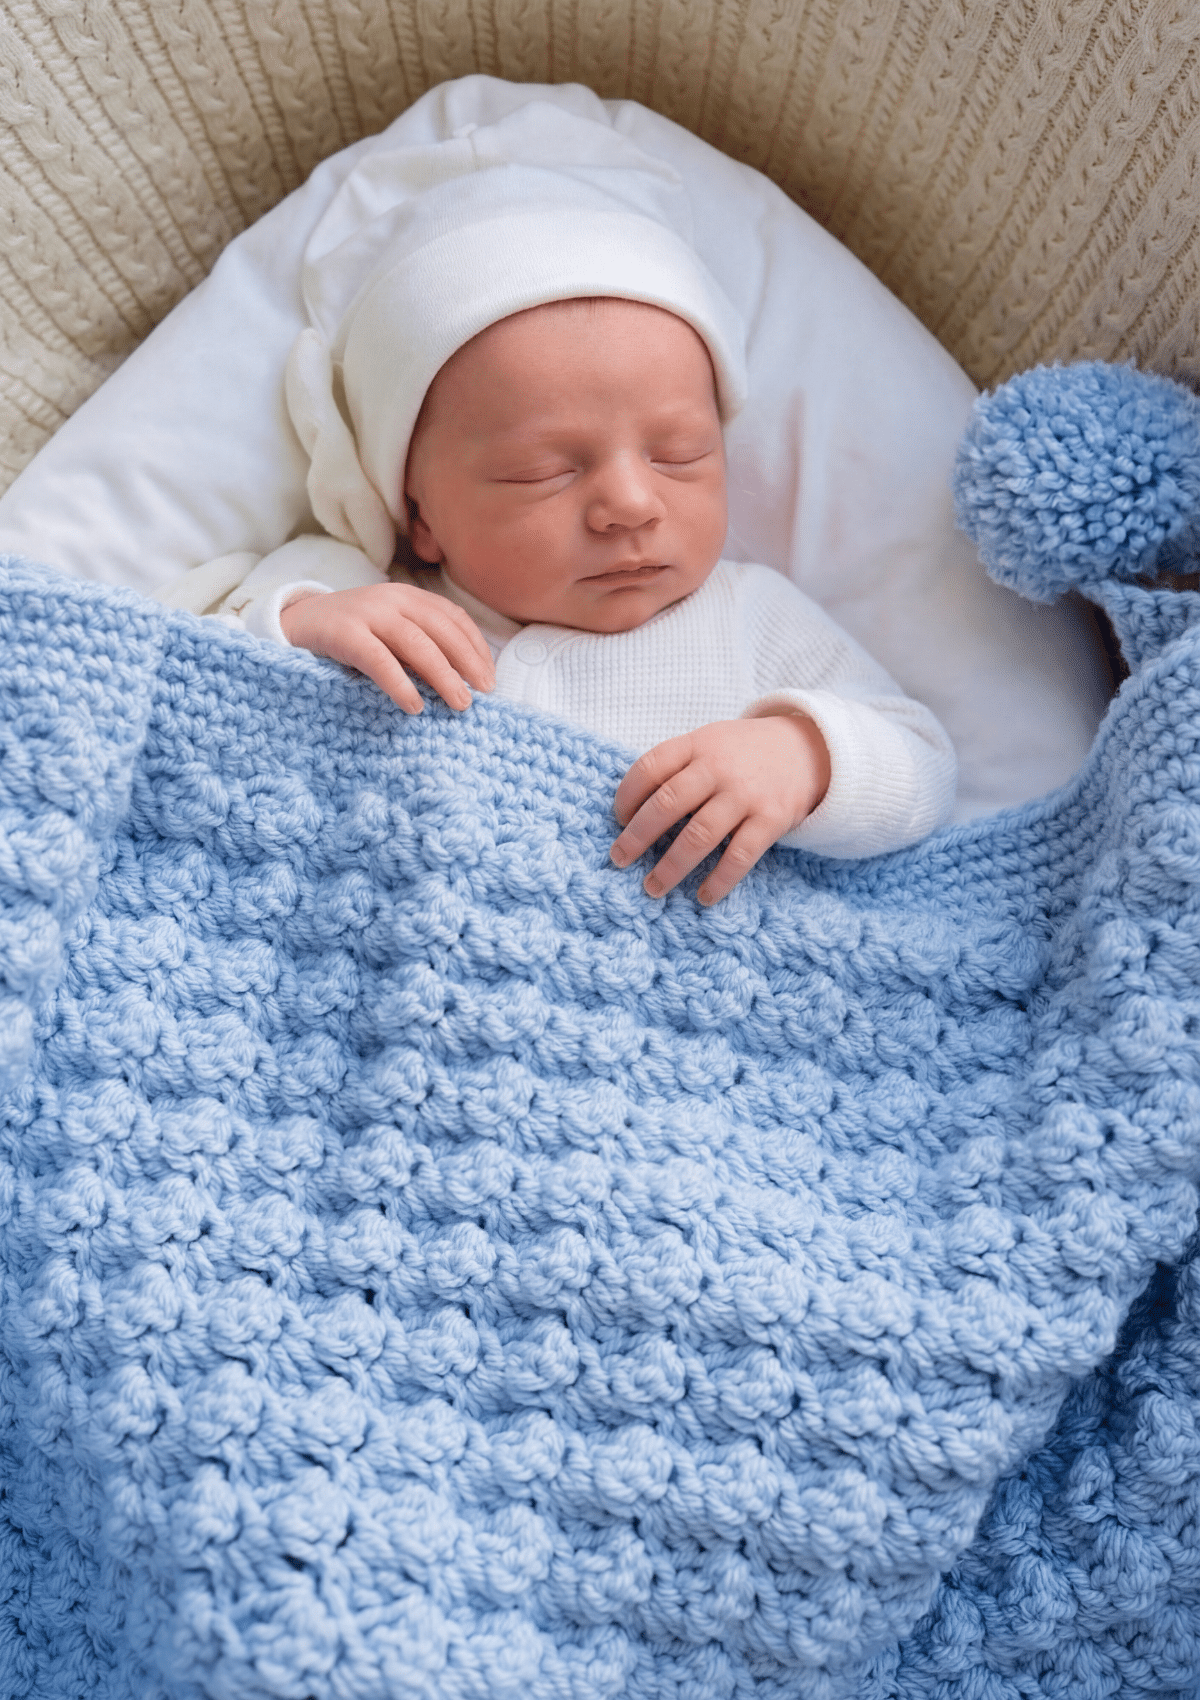
Although it’s a chunky yarn, it’s lightweight and so soft and snuggly, making it a great choice for baby blankets…you won’t be disappointed!
The colour used in this pattern is Duck Egg Blue, a very soft shade of blue that will suit all seasons. However, there are 60 shades to choose from, so have fun browsing through all the different colours on offer.
YARN SUBSTITUTES
Don’t have the exact yarn I used? No problem at all! This blanket pattern is super versatile and works beautifully with a variety of yarn brands. Suitable alternatives include:
Premier Yarns Puzzle (solids and variegated options)
Premier Yarns Anti-Pilling Bamboo Chunky
Yarn Bee Soft and Sleek Chunky


If you’re ready to make this adorable crochet baby blanket, pick up your hook and yarn, and let’s get started now!

PRINT THIS PATTERN
If you’d love all 20 sizes in one place (plus an easy-to-print, ad-free format), you can grab the PDF pattern and start your next project right away!

Ad-Free Download
PDF PRINTABLE PATTERN
- 20 Sizes Included
- Easy-to-read (no ads!)
- Print-friendly & tablet-friendly
Thank you for supporting my shop!
FREE PATTERN: EASY CROCHET BABY BLANKET
Before you begin, please carefully read all the information below… I’ve included useful points that will aid you in making this blanket.
LEVEL

“Projects using basic stitches. May include basic increases and decreases”.
Source: Craft Yarn Council of America’s www.YarnStandards.com
Enjoying the video? Join my YouTube membership to support the channel!
Pattern Notes
- Quick tip: read these notes first… it’ll make everything easier!
- US Crochet Terminology used throughout.
- The pattern offers three sizes, which are written as follows: Baby (Lapghan, Throw). Follow the instructions throughout the pattern for the size you are making.
- A step-by-step video tutorial is available on YouTube. I make the baby sized blanket but you can also follow the stitch tutorial when making the other sizes.
- The blanket is worked in rows from the bottom up. It’s finished with a quick and easy single crochet border.
- Pattern multiple of 3 + 1 ( + 1 extra for the foundation chain).
- 1-row pattern repeat (repeat row 3).
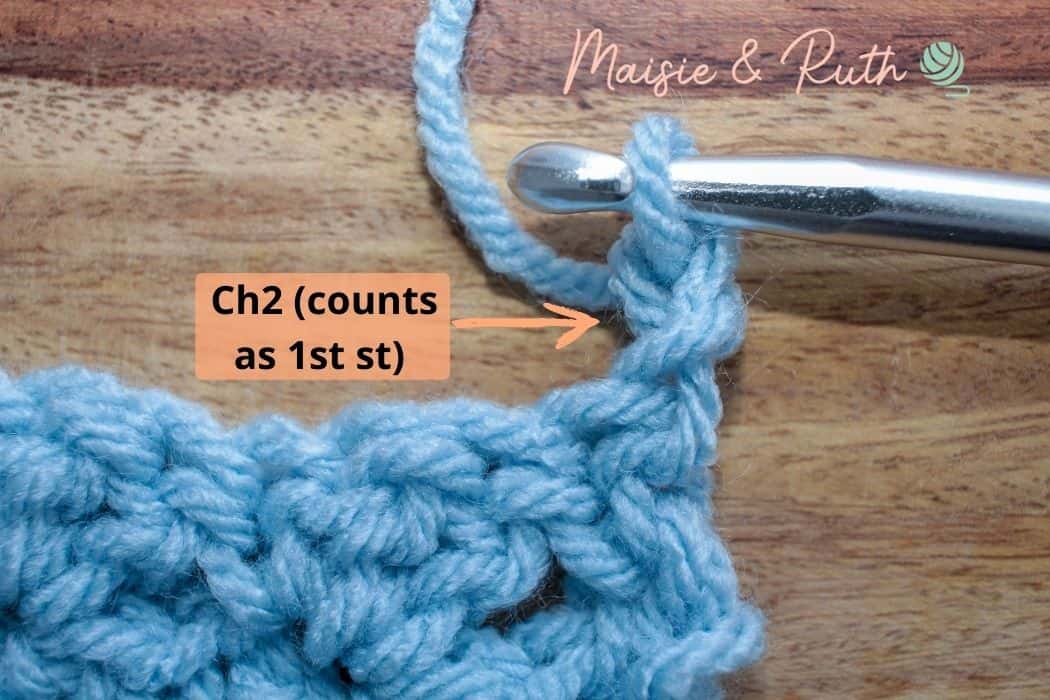
- The ch2 made at the beginning of each row counts as the first stitch of the row.
- At the end of rows, your last stitch should be worked into the top of the ch2 from the previous row.
- For beginners, it will be helpful to add a stitch marker into the first stitch of each row.
- If you wish to add one pom pom in each corner to the lapghan or throw size, please order one extra 3.5oz / 100g ball of yarn (except size Baby as 5 balls covers the blanket and pom poms).
Materials
- Yarn: #5, bulky / chunky / 12 ply. Paintbox Yarns Simply Chunky in the colour Duck Egg Blue (335), 3.5oz / 149 yds (136m / 100g).
- Baby (Lapghan, Throw):
5 (9, 15) balls / 605 (1231, 2191) yards - Crochet Hook: K (6.5mm)
- Scissors
- Yarn needle
- Pom pom maker (optional): 2.5 inches (6cm) in diameter.
Yarn Substitutes:
You may substitute the recommended yarn with another weight 5 / chunky / 12 ply yarn. Some suitable alternatives are:
Premier Yarns Puzzle (solids and variegated options)
Premier Yarns Anti-Pilling Bamboo Chunky
GAUGE / TENSION
12 sts & 8 rows = 4 inches (10cm) in pattern (blanket stitch).
If your tension is tight and you have less stitches per 4 inches (10cm) try using a larger hook.
If your tension is loose and you have more stitches per 4 inches (10cm) try using a smaller hook.
FINISHED SIZE
Baby (Lapghan, Throw):
28″ x 28″ (36″ x 45″, 48″ x 60″)
I didn’t block my blanket, but if you feel like it’s necessary to block your baby blanket, or you’re gifting it to someone, please read my post on How to Block Crochet. In this article, I describe the benefits of blocking and how to block acrylic projects, in particular.
STITCHES AND ABBREVIATIONS (US CROCHET TERMS)
(If you crochet using UK terms, the Craft Yarn Council have a useful page detailing the crochet term differences between the US, UK and Canada).
beg – beginning
ch – chain
dc – double crochet: Yarn over (yo), insert hook into stitch, yo, pull up a loop (3 loops on hook). Yo, pull through 2 loops (2 loops on hook). Yo, pull through remaining 2 loops. 1 double crochet completed.
fasten off – To fasten off securely, work one chain, then cut the yarn leaving a 5 – 6” tail. Pull the tail through the loop that is on your hook. Tighten gently.
sc – single crochet: Insert hook into stitch, yarn over (yo), pull up a loop (2 loops on hook). Yo, pull through both loops on hook. 1 single crochet completed.
sk – skip: Do not crochet into these stitches.
sl st – slip stitch: Insert hook into stitch, yarn over (yo), pull up a loop, you will have 2 loops on your hook. Pull the first loop through the second loop. 1 slip stitch completed
st(s) – stitch(es)
Turn – I prefer to turn my work clockwise.
* to * – Repeat instructions between asterisks as many times as directed.
( ) – Sets of stitches to be worked within one stitch or space.
[ ] – The total number of stitches at the end of a row.
PATTERN INSTRUCTIONS
Size Baby (Lapghan, Throw)
Chain 80 (110, 140)
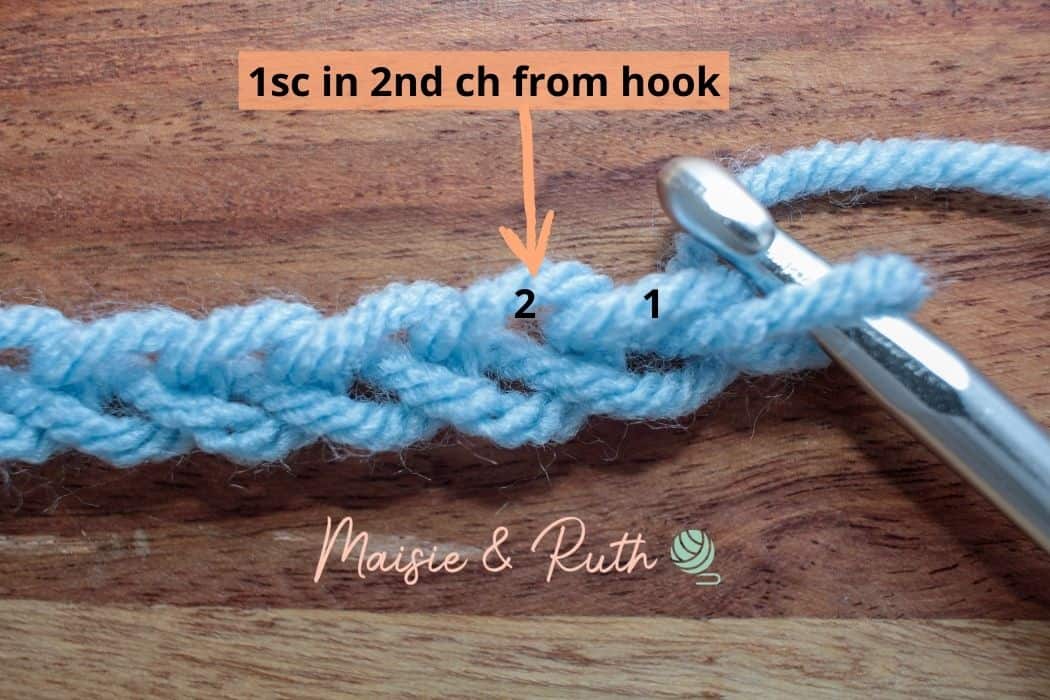
Row 1. 1sc in 2nd ch from hook, 1sc in each ch to end of row, TURN [79 (109, 139) sts].
Work 1sc in the 2nd chain from your hook:
Work 1sc in each chain until the end of the row:
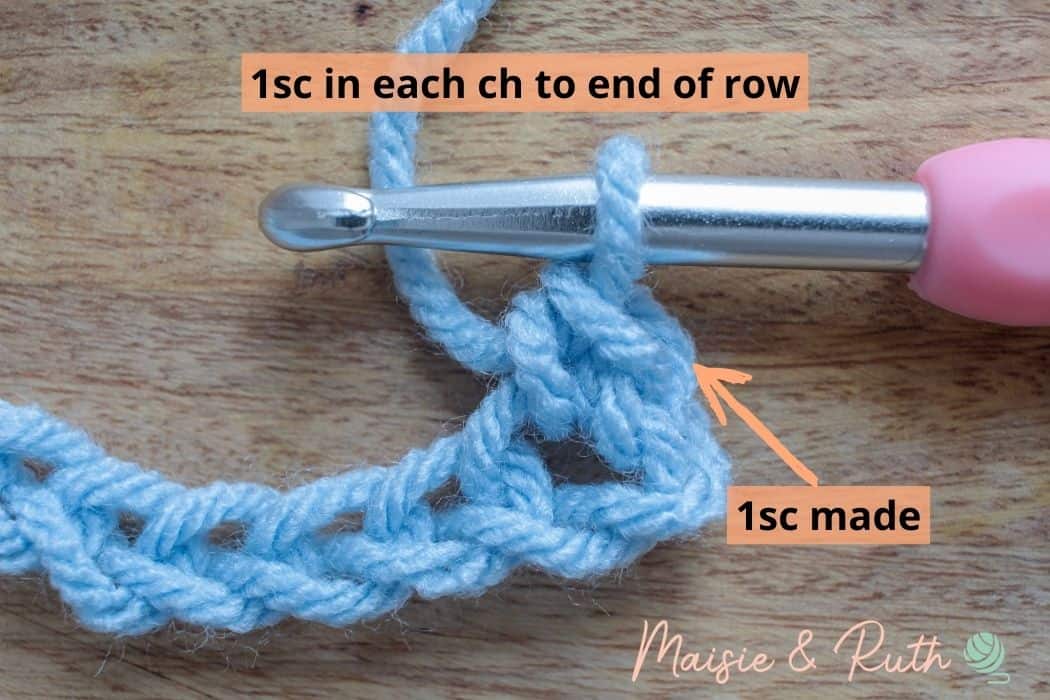
At the end of row 1, turn your work (I prefer to turn my work clockwise). You should have 79 (109, 139) stitches at the end of this row.
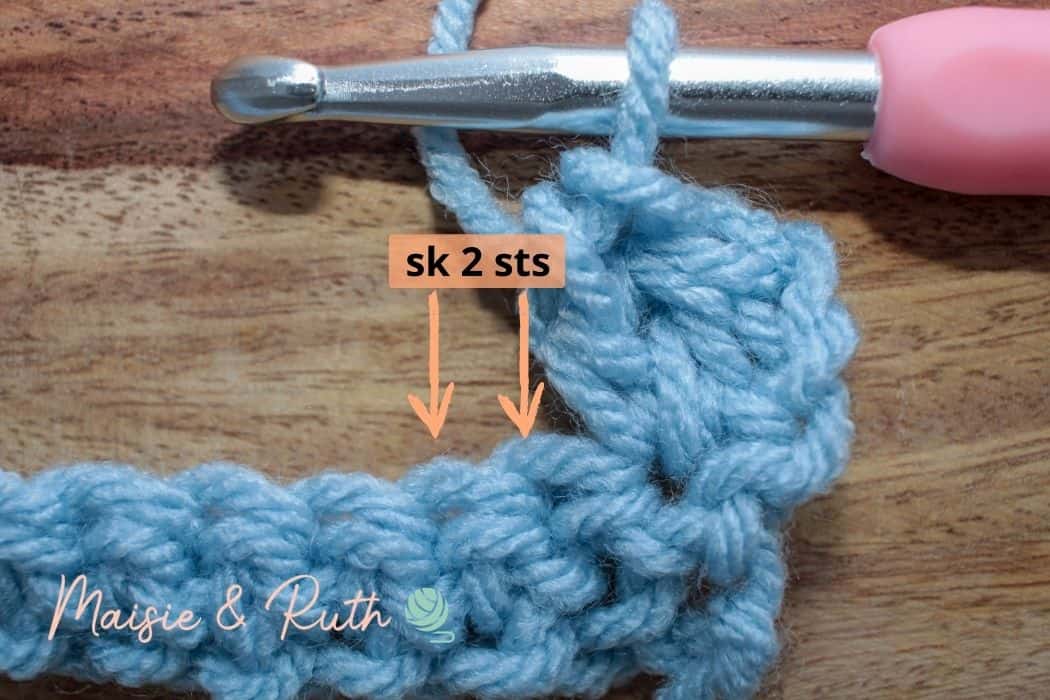
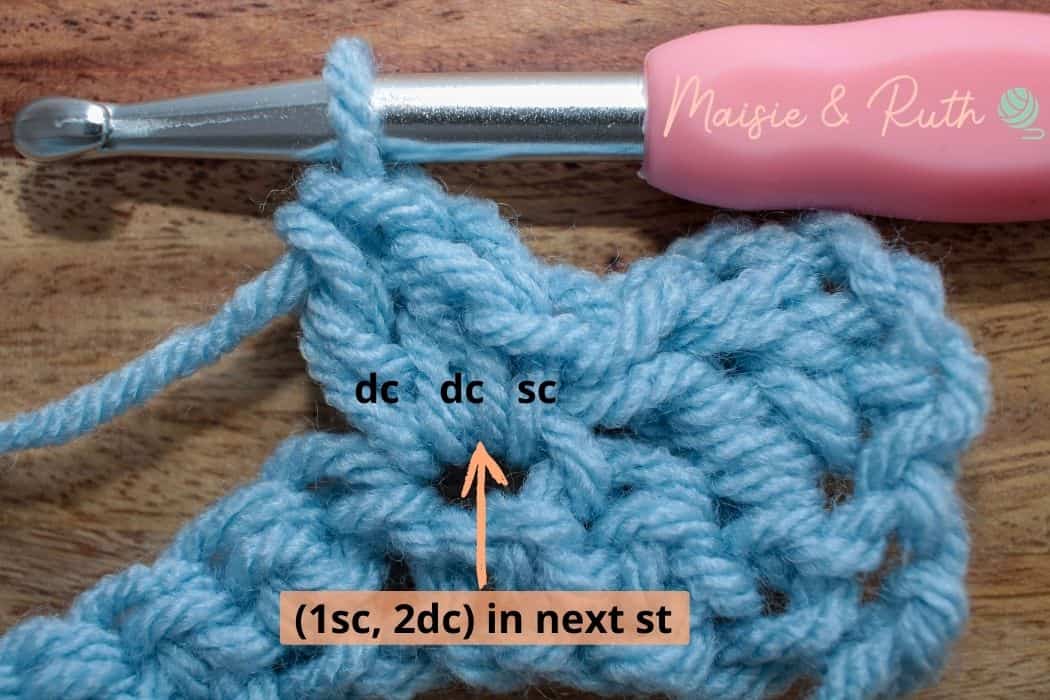
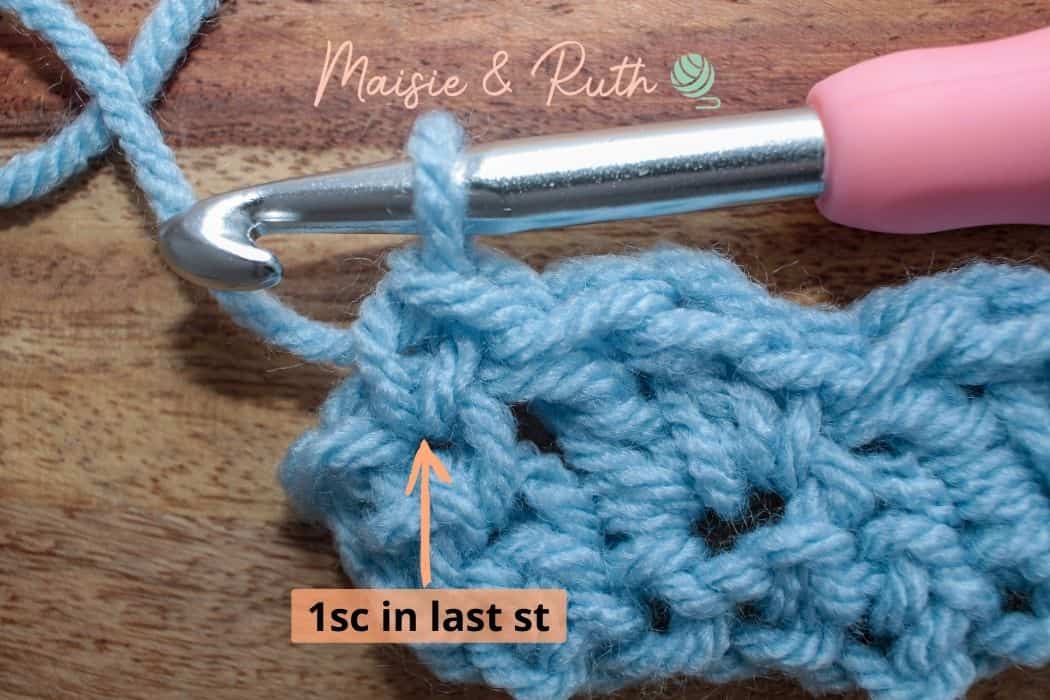
Row 2. Ch2 (counts as your first st), 2dc in same st (at base of ch2), *sk 2 sts, (1sc, 2dc) in next st*, repeat from * to * until 3 sts remain, sk 2 sts, 1sc in last st, TURN [79 (109, 139) sts].
Ch2. The ch2 will count as your first stitch:
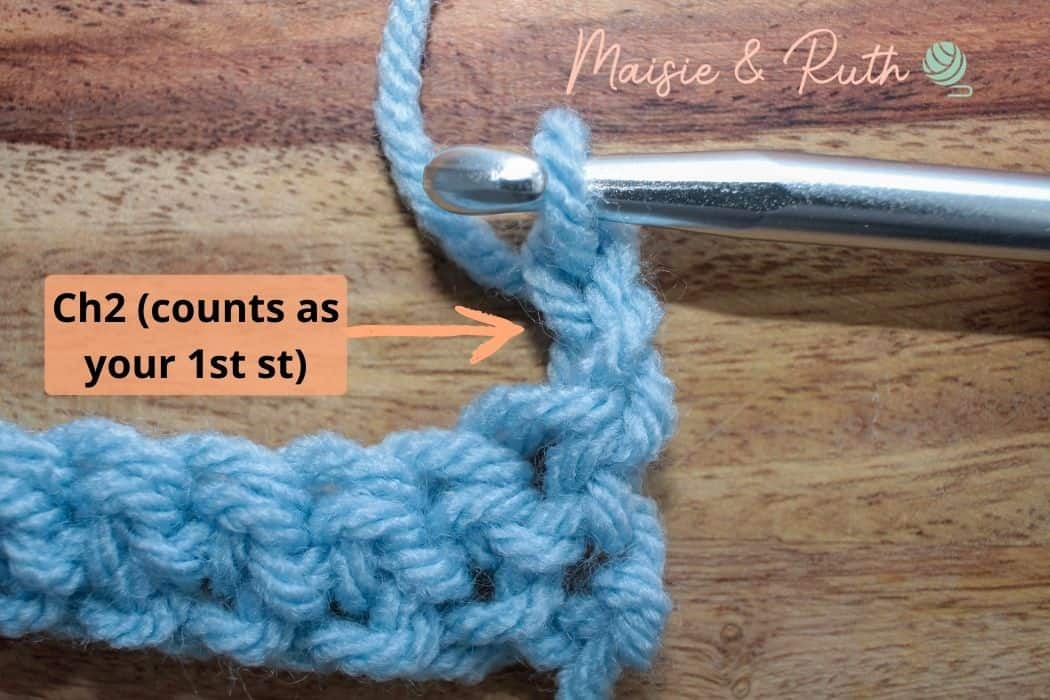
Work 2dc in the same stitch (at the base of your ch2):
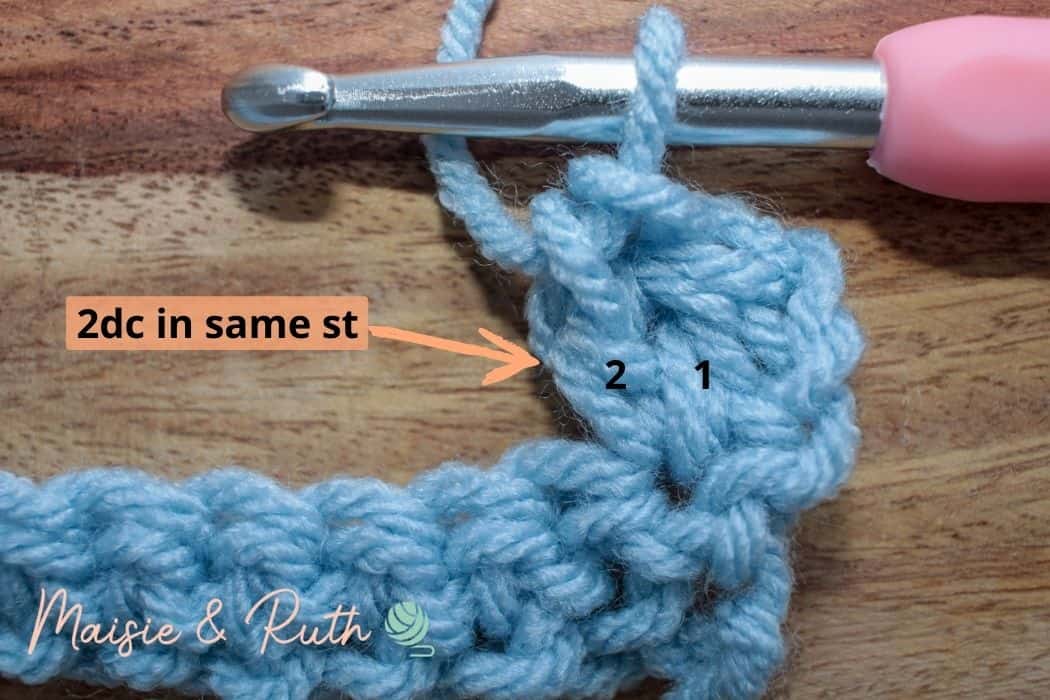
The following stitches that you will now work will form the pattern repeat (the instructions between * to *):
Skip the next 2 stitches:
Work 1sc and 2dc into the next stitch:
Work the pattern repeat across the row to the last 3 stitches.
Work the last 3 stitches as follows:
Skip the next 2 stitches:

Work 1sc into the last stitch:
At the end of row 2, turn your work. You should have 79 (109, 139) stitches at the end of this row.
Tired of scrolling?
You can grab the printable, ad-free PDF version of the Barclay Blanket (with 20 sizes!) here:
It’s much easier to follow and perfect for printing or using on your mobile or tablet.
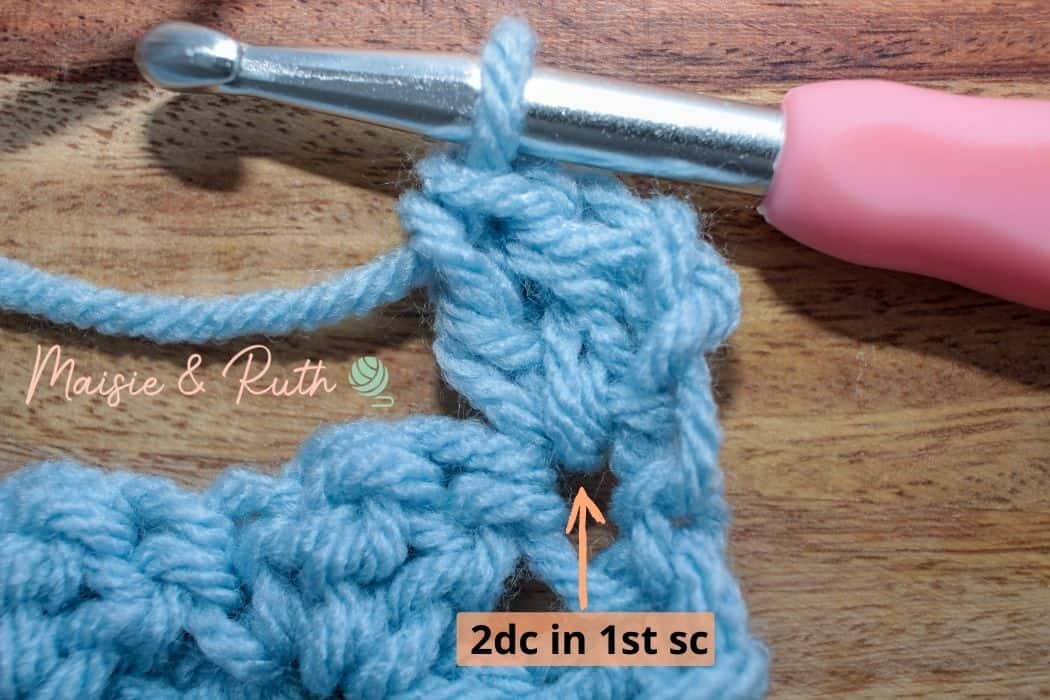
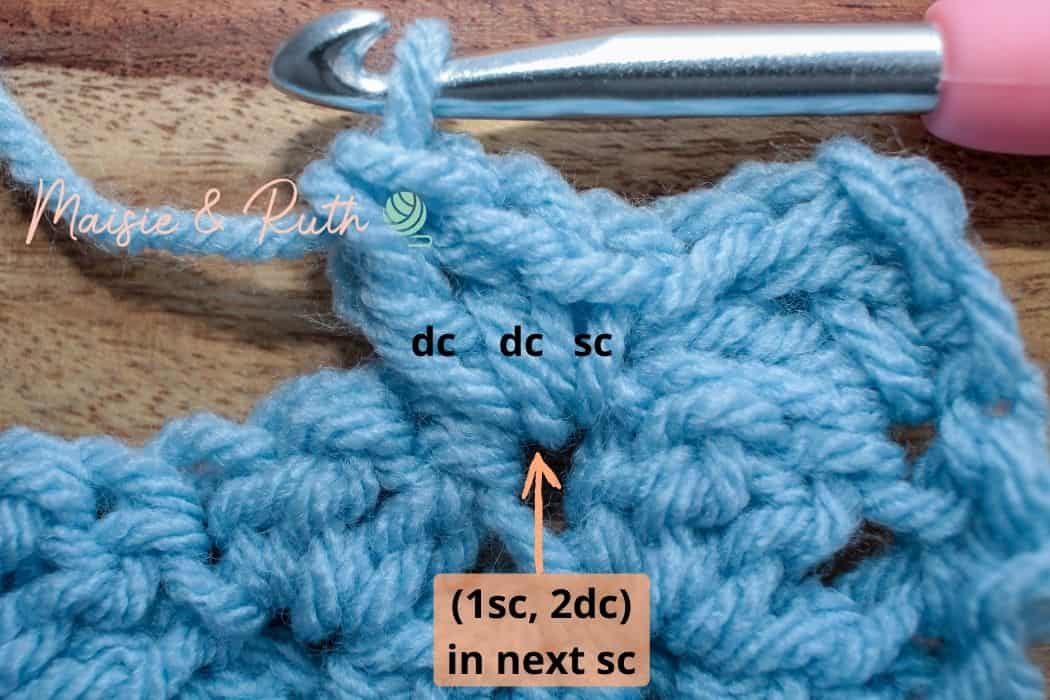
Row 3. Ch2 (counts as your first st), 2dc in first sc (at base of ch2), *sk 2 dc, (1sc, 2dc) in next sc*, repeat from * to * until 3 sts remain, sk 2 dc, 1sc in top of beg ch2, TURN [79 (109, 139) sts].
Ch2. The ch2 will count as your first stitch:
Work 2dc in the first sc of the row (at the base of the ch2):
The following stitches that you will now work will form the pattern repeat (the instructions between * to *):
Skip the next 2 dc stitches:
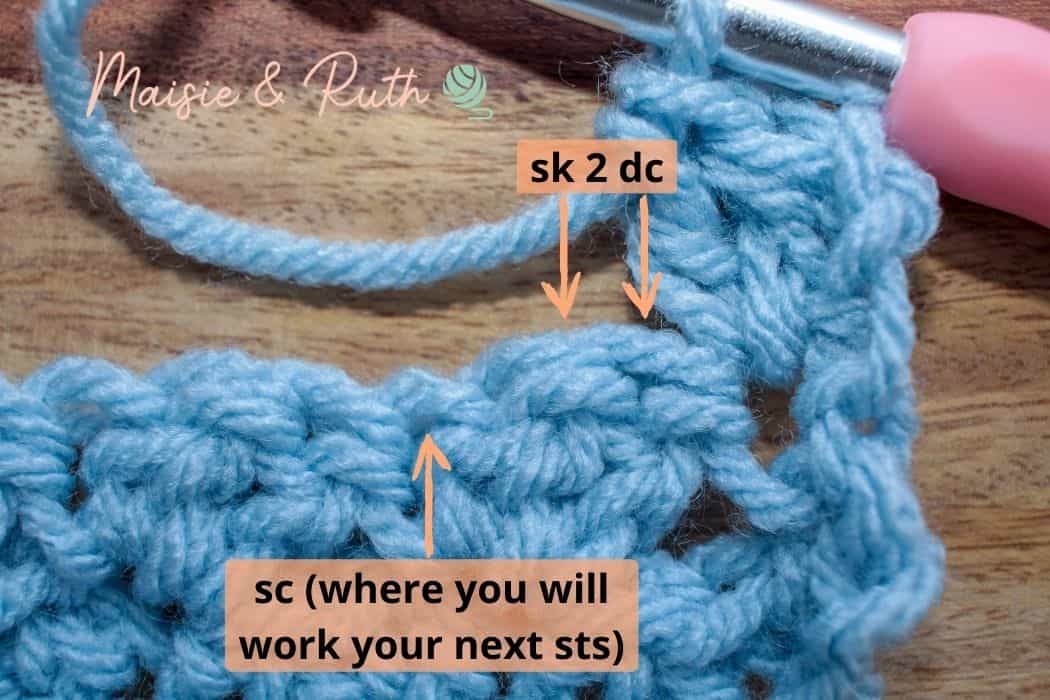
Work 1sc and 2dc in the next sc:
Work the pattern repeat across the row to the last 3 stitches.
Work the last 3 stitches as follows:
Skip the next 2 dc stitches:
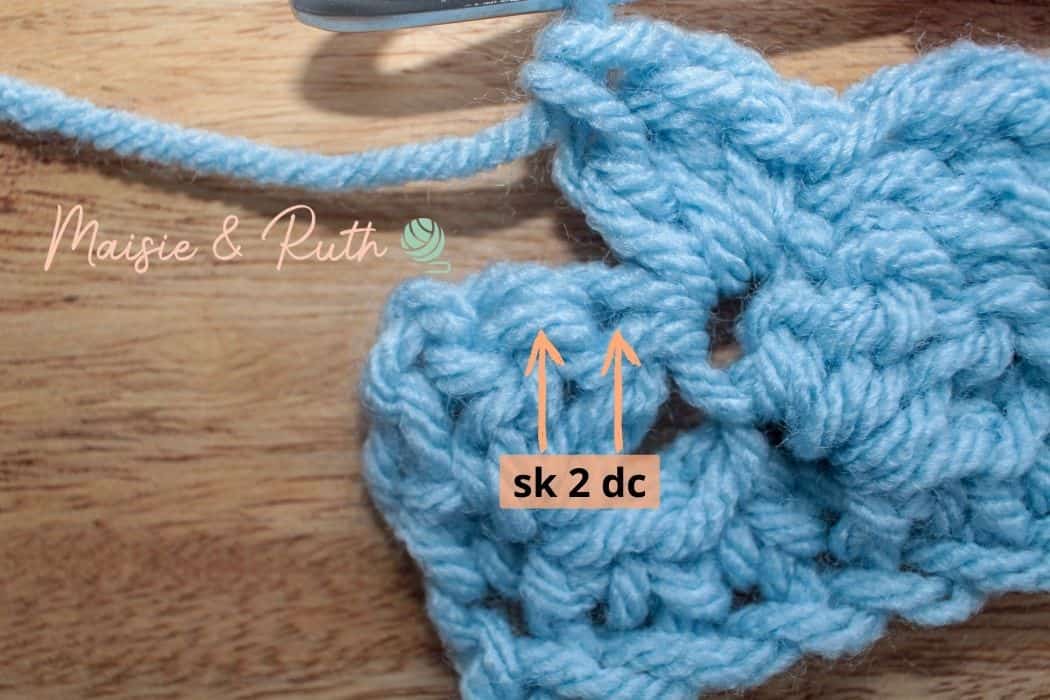
Work 1sc in the top of the ch2 that was made at the beginning of the previous row:
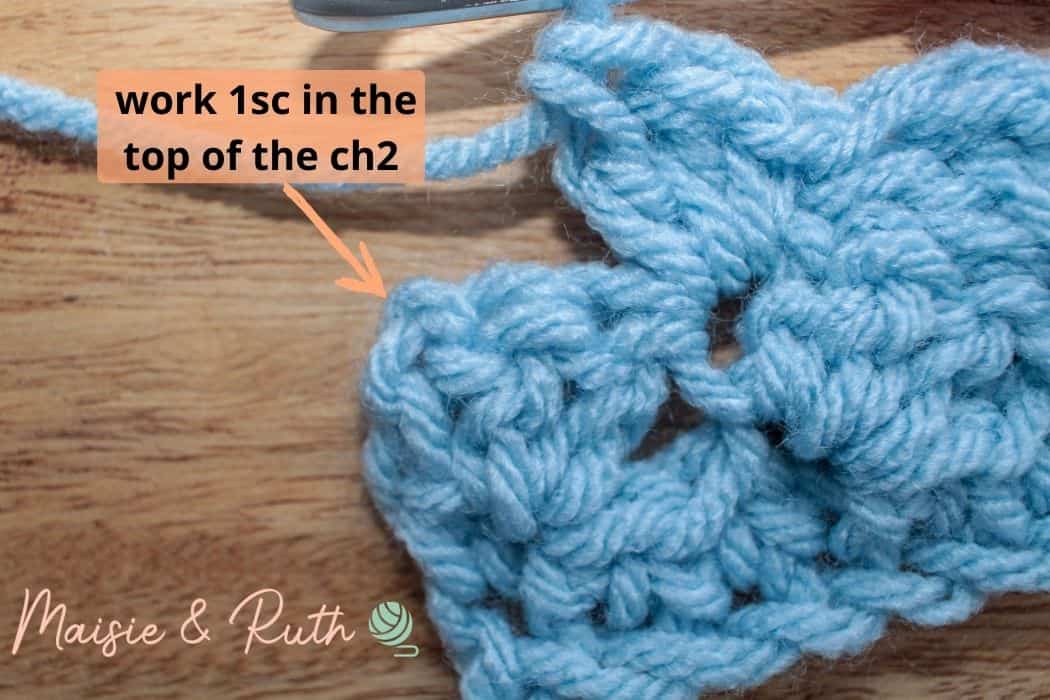
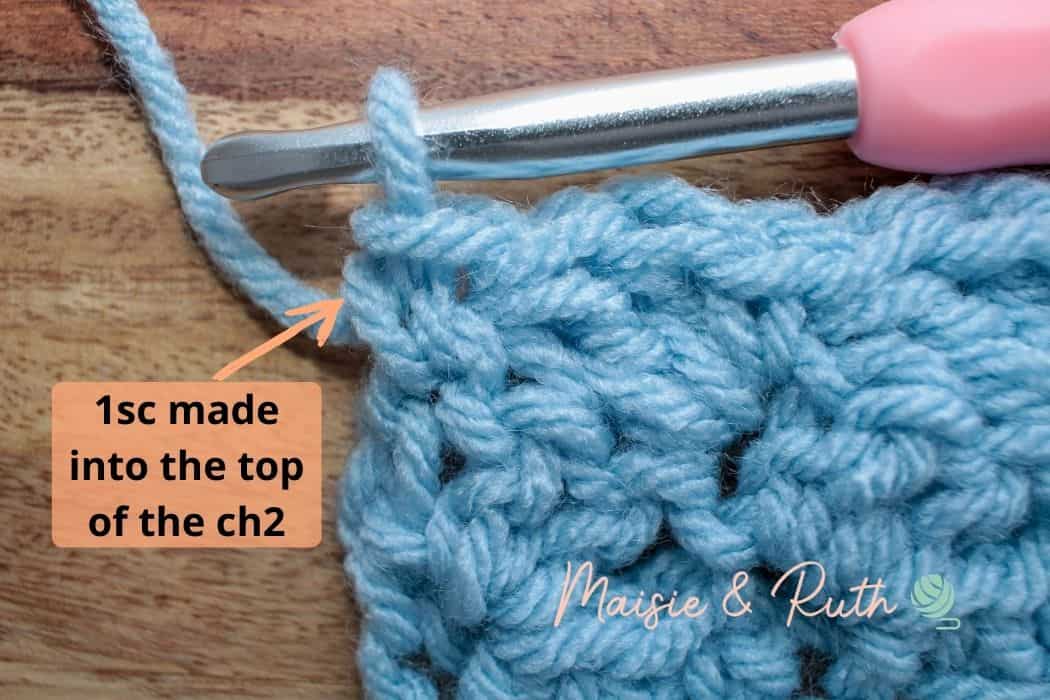
At the end of row 3, turn your work. You should have 79 (109, 139) stitches at the end of this row.
*Repeat row 3 until you have a total of 53 (85, 115) rows, or until your blanket measures 25.5 (42.5, 57.5) in / 65 (108, 146) cm, from the beginning of your work. DO NOT CUT YARN.
*PLEASE NOTE: For the baby size, I’ve updated the written pattern since the video was filmed. So, you will now repeat row 3 for a total of 53 rows, or until your baby blanket measures 25.5 in / 65 cm.
EASY BORDER FOR YOUR CROCHET BABY BLANKET
To better showcase the texture of the ripple stitch, I decided to finish the Barclay Blanket with a simple 4-row border made of single crochet stitches.
When you have finished your last row, do NOT turn. Work the border as follows:
Round 1:
Side 1. Work 2sc in the corner and sc evenly down the side of your blanket (if you work too many stitches down the sides your border will flare out; too few and your border will start to pull).
Side 2 (Bottom of blanket). Work 3sc in next corner, 1sc in each st along the bottom foundation row.
Side 3. Work 3sc in the corner, sc evenly up the other side of the blanket.
Side 4 (Top of blanket). Work 3sc in the corner, 1sc in each st across the top of the blanket, sl st to 1st sc to join, DO NOT TURN.
Round 2. Ch1 (does not count as your first st), work 3sc in corner, work 1sc in each st around blanket, working 3sc in the centre sc of each 3sc corner, sl st to 1st sc to join, DO NOT TURN.
Rounds 3 & 4. Repeat round 2.
At the end of round 4, cut yarn, fasten off and weave in ends.
Using your 2.8 inch (7cm) pom pom maker, make 4 pom poms.
Attach one pom pom in each corner.
And that’s your Barclay Blanket all finished! I loved sharing this pattern with you, and I hope it brings you as much joy to make as it did for me. If you’d like a keepsake version to crochet from your favourite chair (with all 20 sizes), you can purchase and download the pretty, ad-free PDF here

Helpful Links
- 🧶 Watch the full video tutorial – Follow along step by step on YouTube.
- 💛 Join the Maisie and Ruth Community – Share your finished projects, chat with fellow crocheters, and be inspired.
- 🛍️ Shop printable PDF patterns – Browse the complete collection of ad-free PDF patterns on Etsy.
- 📺 Join YouTube Membership – Get early access to new patterns and exclusive perks.
PATTERN SUPPORT
Need Help with a Pattern?
We’ve got you! 😊
If you need a hand, come hang out with us in our Facebook group—it’s the best place to ask questions, share your makes, and cheer each other on.
We’ve also put together a step-by-step YouTube tutorial you can follow along with—this should answer most of your questions along the way!
Pop into the Facebook group and join our cozy little community—we’d absolutely love to see you there!💛
SHARE YOUR WORK!
I really hope that you enjoyed this free crochet pattern! I would LOVE to see photos of your completed project… please tag me on Instagram using @maisieandruth and / or #maisieandruth
And remember to pin this pattern for later if you can’t make it right now!
COPYRIGHT
Copyright © 2021 by Maisie and Ruth Limited. All rights reserved. This easy crochet baby blanket pattern for the Barclay Baby Blanket is for personal viewing only. You may view it for free on this blog, but it is protected under applicable copyrights, trademarks, and other proprietary (including but not limited to intellectual property) rights.
You may not copy, redistribute, or sell this pattern in any form, including digital, printed or photographic formats without permission. Sharing this pattern (in whole or in part) on social media, websites, or messaging platforms is strictly prohibited. This is a theft of the author’s intellectual property, which may result in civil or criminal penalties.
Thank you for respecting my work and for your continued support — it truly means a lot!
FAQ
1. What skill level is this blanket pattern?
This pattern is beginner-friendly! If you can chain, single crochet, and double crochet, you can make this blanket.
2. How much yarn will I need?
It depends on the size: the baby, lapghan, and throw sizes all require different amounts. I’ve included yarn amounts in the pattern so you can plan ahead.
3. Can I use a different yarn weight?
This blanket is written for chunky yarn, but you can substitute with lightweight / DK weight yarn, holding two strands together. Always do a gauge swatch beforehand.
4. How do I make the blanket bigger or smaller?
For even more options, the ad-free PDF pattern includes an additional 17 sizes, from a tiny lovey all the way up to a full California king.
5. Can I sell blankets made from this pattern?
Absolutely! I ask that you credit me as the designer and link back to this pattern when possible.
6. How should I wash the finished blanket?
Most chunky acrylic yarns are machine washable on a gentle cycle. Lay flat to dry, or tumble dry on low if your yarn label allows. Always check your yarn’s care instructions.