


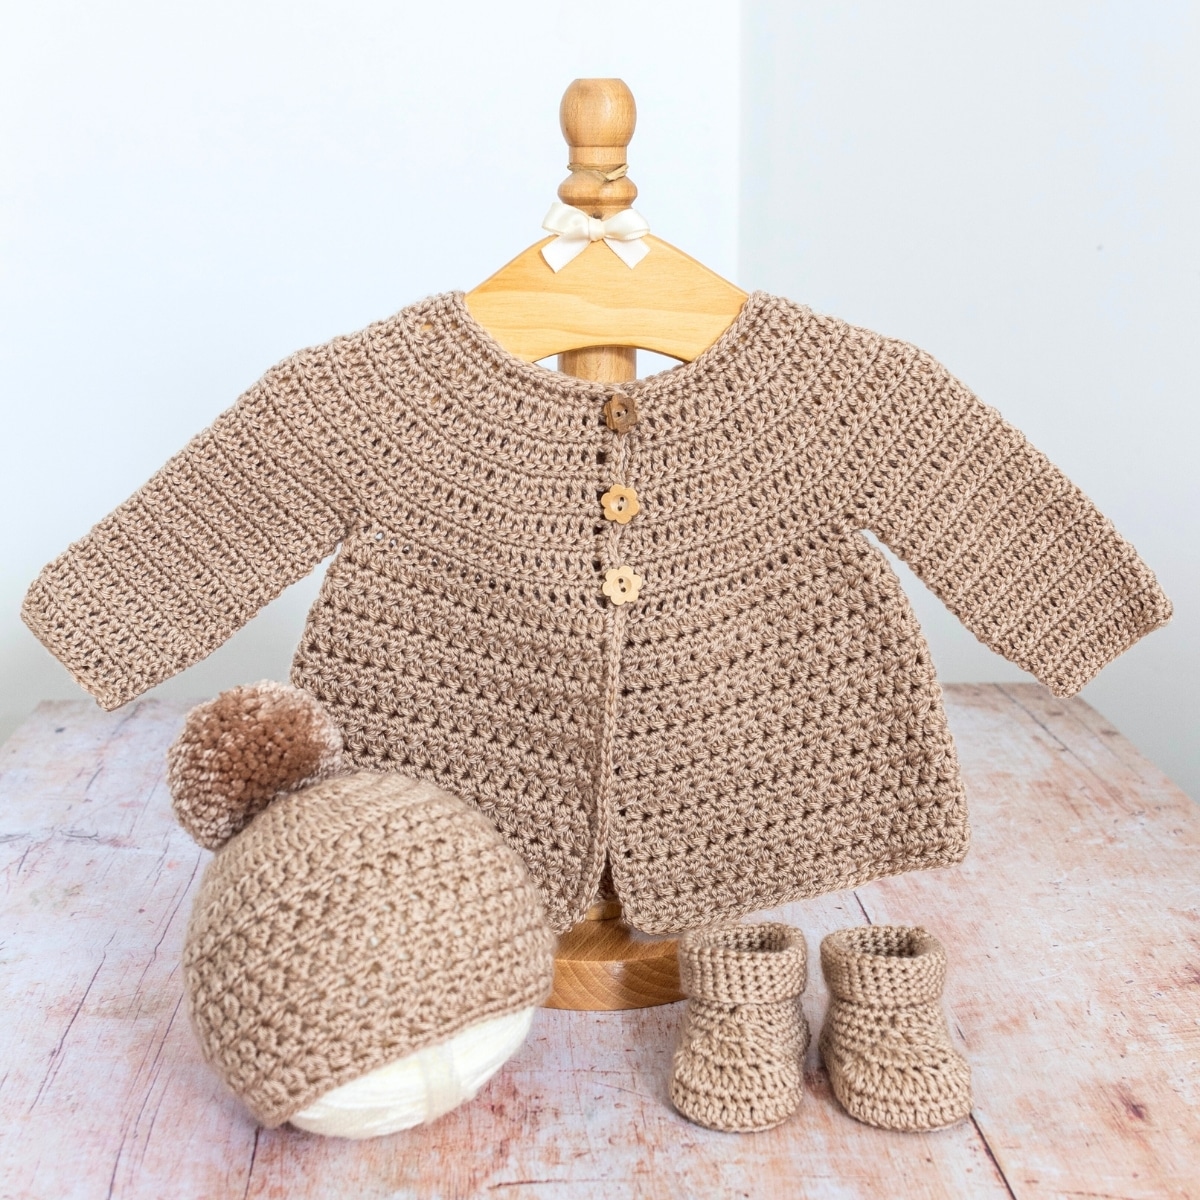
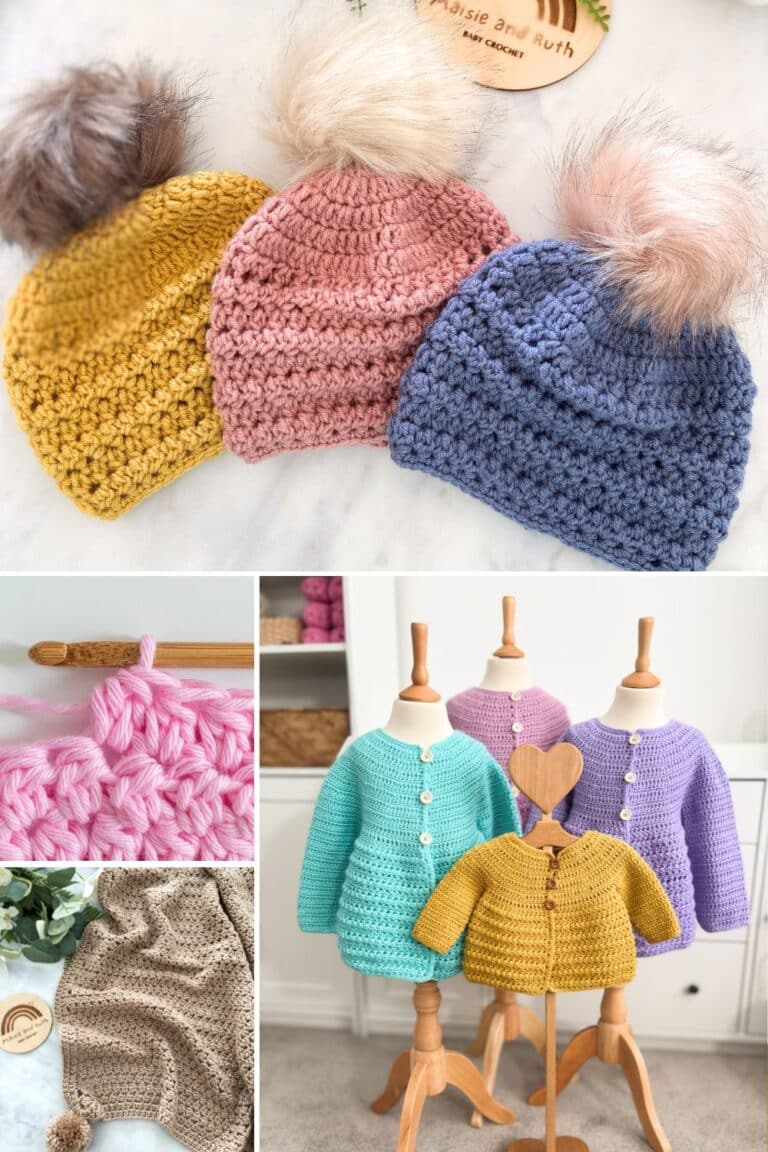
I’m so excited to share the FREE and updated Ella Crochet Baby Cardigan with you! This cozy crochet cardigan has become one of my most popular patterns, and it’s now even better with 8 included sizes ranging from newborn all the way up to 7–8 years.
If you’d like this design in an ad-free format you can slip into a binder or basket, I’ve made a PDF just for you. You can grab it here and enjoy a cozier way to crochet.

Key Features
- Beginner-friendly construction
- Beautiful textured stitch pattern
- Includes 8 sizes from newborn to 7–8 years
- Great for gifts and everyday wear
- Step-by-step video tutorial available
- Optional printable, ad-free PDF available for purchase
- Timeless design you’ll crochet again and again

Stylecraft Bambino DK in the shade Mellow Yellow
What’s New?
The original yarn used for the Ella Cardigan has now been discontinued, so I’ve updated the pattern with readily available yarn alternatives that produce equally beautiful results.
I’ve also expanded the pattern to include 8 sizes, making it easier than ever to crochet matching cardigans for babies and children. The available sizes are:
- Newborn
- 0–3 months
- 3–6 months
- 6–12 months
- 1–2 years
- 3–4 years
- 5–6 years
- 7–8 years
To keep the pattern easy to follow, it has been organised into three separate sets of instructions:
- Set 1: Newborn, 0–3 months, 3–6 months, and 6–12 months
- Set 2: 1–2 years and 3–4 years
- Set 3: 5–6 years and 7–8 years
Each group uses the appropriate yarn weight and hook size for those sizes, so be sure to refer to the materials section and size charts before getting started.

Cardigan made in a now discontinued DK yarn
A Little Cardigan with Lots of Love
There’s something so special about crocheting for a new baby! When I found out we had a new little arrival in the family, I was inspired to design the Ella Cardigan—a sweet, timeless piece that’s as practical as it is adorable.
Perfect for layering throughout the year, this cardigan can be popped over a summer outfit on cooler days or worn as an extra cozy layer during the winter months. No matter the season, it’s sure to become a well-loved wardrobe staple for your little one.

Stylecraft Bambino DK in the shade Mellow Yellow
How the Ella Cardigan Comes Together
The Ella Cardigan is worked from the top down, beginning at the neckline and gradually shaping the yoke as you crochet. The yoke is wonderfully beginner-friendly, using alternating rows of single crochet and double crochet (with simple increases).
For the body of the cardigan, you’ll switch to a beautiful textured cluster stitch made from a combination of double crochet and half double crochet stitches worked in the same stitch. It’s easy to master and adds a lovely touch of texture that makes the design really stand out.
Once the body is complete, you’ll crochet the sleeves before finishing the cardigan with a neat edging of single crochet stitches for a polished, professional finish.
Best of all, the cardigan is worked in one piece with no sewing required, making it an enjoyable and relaxing project from start to finish.

Premier Yarns Anti-Pilling Everyday Worsted in the shade African Violet
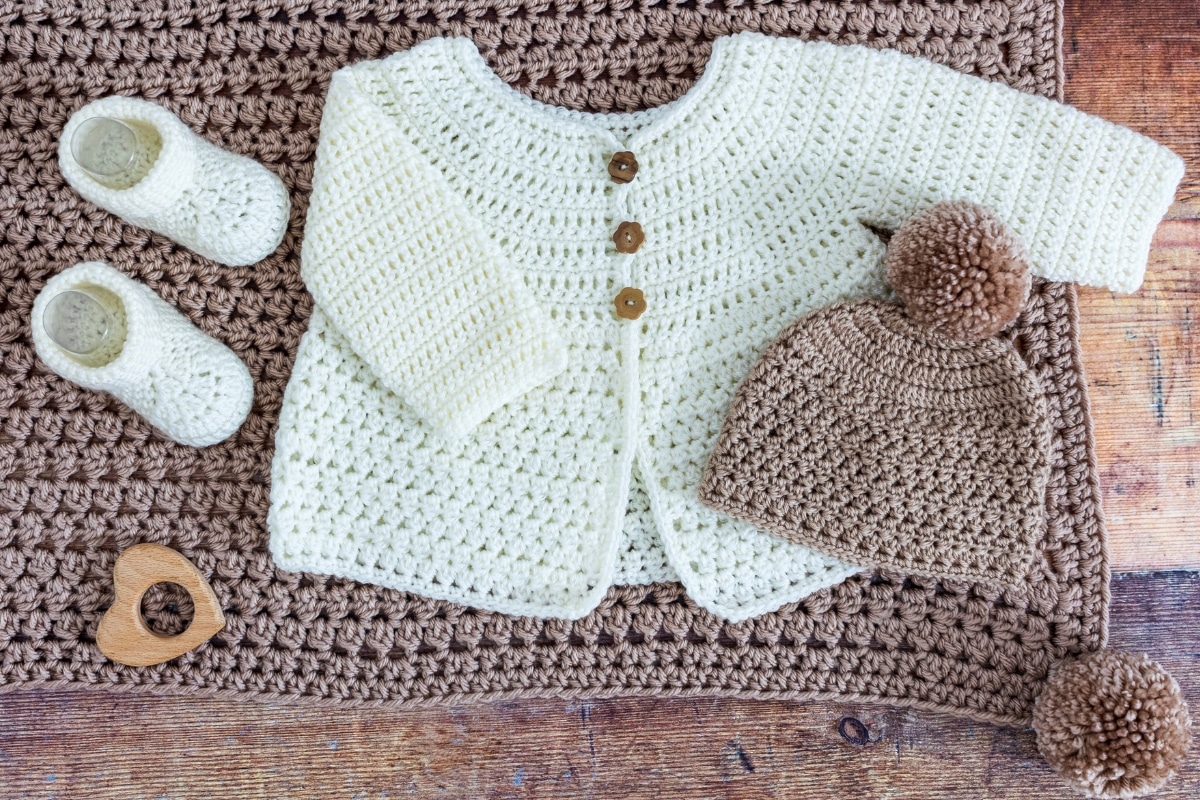
Complete the Collection
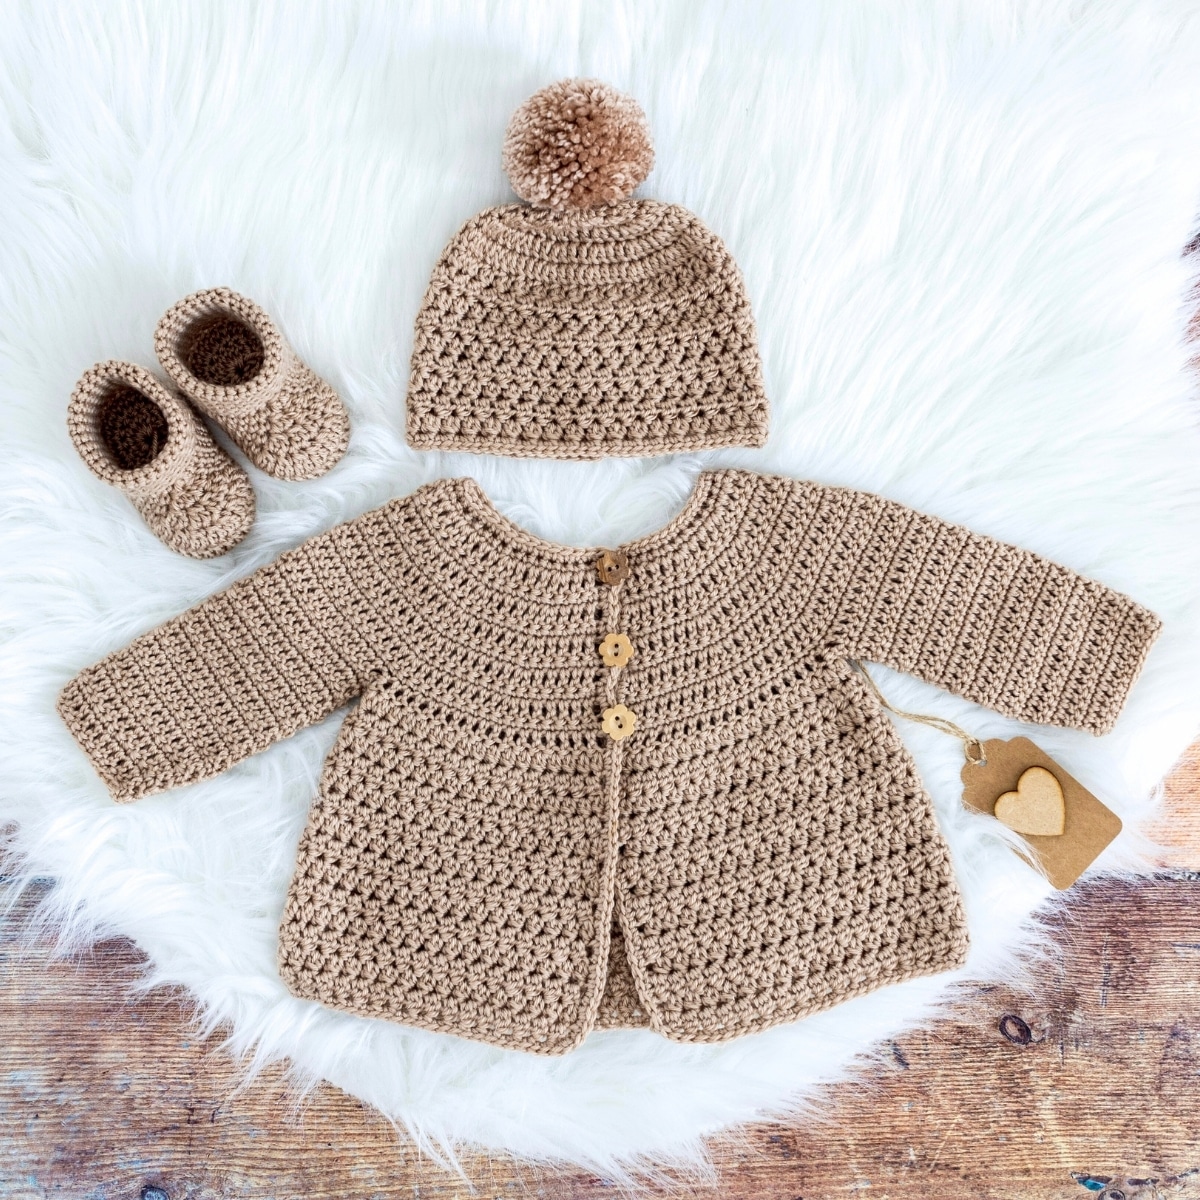
The Ella Cardigan is part of a beautiful coordinating collection of crochet patterns. Pair it with the Cozy Steps Booties, Willow Ridge Beanie, and Willow Ridge Blanket to create a timeless handmade set that’s perfect for baby showers, birthdays, or everyday wear.
Whether you make just one piece or the entire collection, these matching designs come together to create a cozy, heirloom-quality wardrobe for little ones.

Yarn Used
For the newborn, 0–3 months, and 3–6 months sizes, I used Stylecraft Bambino DK, a wonderfully soft DK weight yarn with excellent stitch definition that’s perfect for delicate baby garments.
For the 6–12 months, 1–2 years, 3–4 years, 5–6 years, and 7–8 years sizes, I used Caron Simply Soft, a smooth worsted weight yarn that creates a cozy fabric with beautiful drape and durability.

Yarn Substitutes
If you’d like to use a different yarn, there are plenty of great alternatives that work beautifully with this pattern!
For the DK sizes (newborn, 0–3 months, and 3–6 months), I recommend:
- Premier Yarns Anti-Pilling Everyday DK
- Paintbox Yarns Anti-Pilling DK
- Nako Elit Baby (available on Etsy)

Red Cardigan: Lion Brand Wool Ease in the colour Cranberry
For the worsted weight sizes (6–12 months through 7–8 years), excellent substitutes include:
Whichever yarn you choose, be sure to check your gauge for your chosen size to achieve the best fit.

Cardigan made with Caron Simply Soft worsted yarn in the colours Blackberry and Robin’s Egg


Prefer an Ad-Free Version?
If you’d like to crochet from a clean, printable copy, the ad-free PDF is available in my shops. It includes the complete pattern in an easy-to-read format, along with bonus extras including a schematic, easy-to-follow size charts, and a measuring guide.
This cardigan is also part of a Crochet Pattern Bundle! Check it out here

Ad-Free Download
PDF PRINTABLE PATTERN
Easy-to-read (no ads!)
Printer-friendly layout
Link to the full video tutorial
Thank you for supporting my shop!

Let’s Get Started!
The pattern below is beginner-friendly, works up quickly, and is completely free here on the blog—perfect for your next cozy project.
So, gather your yarn and hook, choose your size, and enjoy making your own Ella Cardigan. I can’t wait to see your finished creations!

FREE PATTERN: ELLA CROCHET BABY CARDIGAN
Please carefully read all the information below.
LEVEL
Easy. See details of project difficulty levels at the Craft Yarn Council website.

Enjoying the video? Join my YouTube membership to support the channel!
Pattern Notes
- Instructions are written in standard US crochet terminology.
- The pattern is written in three separate sets of instructions: one for newborn, 0–3 months, 3–6 months, and 6–12 months; one for 1–2 years and 3–4 years; and one for 5–6 years and 7–8 years. The yarn weight and hook size vary depending on the size being made, so please refer carefully to the materials section below for the correct information for your chosen size.
- Yardage and ball quantities are based on Stylecraft Bambino DK and Caron Simply Soft yarn.
- I’ve made samples of the cardigan using other brands: The red cardigan in the images was made with Lion Brand Wool Ease (weight 4) in the colour Cranberry. And the purple sample seen in the photos was made with Premier Yarns Anti-Pilling Everyday Worsted (weight 4) in the colour African Violet.
- Starting Chain: Work the starting chain fairly tightly, or drop down half a hook size. A loose foundation chain may result in a larger neckline.
- The ch3 turning chain counts as the first stitch of the next row; please do not crochet into the same stitch. Instead, make one double crochet into the next stitch. At the end of rows, crochet into the top of the beginning ch3.
- The ch1 turning chain does not count as the first stitch of the next row. Therefore, you should make the first stitch of the row in the same stitch (at the base of the ch1). At the end of rows, do not crochet into the top of the ch1.
- For the sleeves: The ch2 turning chain counts as the first stitch of the next round; do not crochet into the same stitch. Instead, make one double crochet into the next stitch. At the end of rounds, slip stitch into the top of the beginning ch2 to join.
Materials
Numbers given below in this section are for smallest size, with numbers for larger sizes in ( ) brackets . E.g. newborn (0–3 mos, 3–6 mos, 6–12 mos) (1–2 yrs, 3–4 yrs, 5–6 yrs, 7–8 yrs).
Yarn for sizes newborn, 0–3 mos, 3–6 mos: Weight 3 (DK / 8 ply). Stylecraft Bambino DK, 293 yds / 3.5 oz (268m / 100g). 100% acrylic. Colours used in samples are Denim Dungarees, Mellow Yellow and Vintage Pink.
Yarn for sizes 6–12 mos, 1–2 yrs, 3–4 yrs, 5–6 yrs, 7–8 yrs: Weight 4 (worsted, aran, 10 ply). Caron Simply Soft, 315 yds / 6 oz (288m / 170g).100% acrylic. Colours used in samples are Blackberry and Robin’s Egg.
Yarn amounts for sizes newborn (0–3 mos, 3–6 mos, 6–12 mos) (1–2 yrs, 3–4 yrs, 5–6 yrs, 7–8 yrs): 2 (2, 2, 2) (3, 3, 3, 4) balls or 358 (400, 460, 463) (677, 710, 926, 1065) yards
Crochet Hooks for sizes newborn (0–3 mos, 3–6 mos, 6–12 mos) (1–2 yrs, 3–4 yrs, 5–6 yrs, 7–8 yrs): G/4mm (4.5mm, H/5mm, H/5mm) (H/5mm, I/5.5mm, I/5.5mm, J/6mm) or hook size to obtain gauge
Extras: 2x stitch markers; yarn needle for weaving in ends; scissors.
Buttons for sizes newborn, 0–3 mos, 3–6 mos: 3 x 15mm
Buttons for size 6–12 mos: 3 x 17mm
Buttons for sizes 1–2 yrs & 3–4 yrs: 3 x 20mm
Buttons for sizes 5–6 yrs & 7–8 yrs: 4 x 20mm
Substitute Yarns
DK Yarn
- Premier Yarns Anti-Pilling Everyday DK
- Paintbox Yarns Anti-Pilling DK
- Nako Elit Baby (available on Etsy
Worsted Yarn
Finished Sizes
The sizes in this pattern are based on the standard baby and child measurements from the Craft Yarn Council, and this garment is designed with 2–4″ positive ease for a comfortable fit and room to move.
Sizes newborn (0–3 mos, 3–6 mos, 6–12 mos) (1–2 yrs, 3–4 yrs, 5–6 yrs, 7–8 yrs):
To fit chest (IN): 14 (16, 17, 18) (20, 23, 25, 26.5)
To fit chest (CM): 35.5 (40, 43, 46) (51, 58, 63.5, 67)
Finished chest (IN): 16 (18, 20, 21.5) (24, 27, 29, 30)
Finished chest (CM): 41, (46, 51, 55) (61, 69, 74, 76)
Sleeve length (underarm to cuff) (IN): 5.5 (6, 6.5, 7.5) (9, 9.5, 10, 11)
Sleeve length (underarm to cuff) (CM): 14 (15, 16.5, 19) (23, 24, 25, 28)
Underarm-to-hem length (IN): 6.5 (7, 7.5, 8.5) (10, 11, 12, 13)
Underarm-to-hem length (CM): 16.5 (18, 19, 21.5) (25, 28, 30.5, 33)
Gauge / Tension
It is essential that you check you gauge / tension before you begin. This helps ensure your finished project turns out the correct size.
NEWBORN:
→With a G (4mm) hook & DK yarn: 19 stitches & 13 rows = 4″ (10cm) worked in alternating rows of single crochet and double crochet (after blocking).
0–3 MOS:
→With a size 7 (4.5mm) hook & DK yarn: 27 stitches & 19 rows = 6″ (15cm) worked in alternating rows of single crochet and double crochet (after blocking).
3–6 MOS:
→With a H (5mm) hook & DK yarn: 17 stitches & 12 rows = 4″ (10cm) worked in alternating rows of single crochet and double crochet (after blocking).
6–12 MOS & 1–2 YRS:
→With a H (5mm) hook & worsted yarn: 23 stitches & 18 rows = 6″ (15cm) worked in alternating rows of single crochet and double crochet (after blocking).
3–4 YRS & 5–6 YRS:
→With a I (5.5mm) hook & worsted yarn: 15 stitches & 11 rows = 4″ (10cm) worked in alternating rows of single crochet and double crochet (after blocking).
7–8 YRS:
→With a J (6mm) hook & worsted yarn: 14 stitches & 10 rows = 4″ (10cm) worked in alternating rows of single crochet and double crochet (after blocking).
Stitches & Abbreviations (US Crochet Terms)
beg – beginning
ch(s) – chain(s)
dc – double crochet
dc2tog – double crochet two together (also known as a dc decrease)
fasten off – To fasten off securely, work one chain, then cut the yarn leaving a 5 – 6” tail. Pull the tail through the loop that is on your hook. Tighten gently.
sc – single crochet
sl st – slip stitch
st(s) – stitch(es)
Turn: I prefer to turn my work clockwise
* to * – Repeat instructions between asterisks as many times as directed.
( ) – Sets of stitches to be worked as many times as directed.
[ ] – The total number of stitches at the end of a row.
Special Stitches
SpCL – special cluster: 1 double crochet and 1 half double crochet worked together as follows: yarn over (yo), insert hook into stitch, yo, pull up a loop (3 loops on hook), yo, pull through first 2 loops (2 loops on hook), yo, insert hook into same stitch, yo, pull up a loop (4 loops on hook), yo, pull through all 4 loops. 1 special cluster completed (see photo tutorial).
💡 Tired of scrolling?
- You can grab the printable, ad-free PDF version of the Ella Cardigan here:
- Get the PDF pattern
- It’s much easier to follow and perfect for printing or using on your mobile or tablet.

Pattern Instructions: Newborn, 0–3 mos, 3–6 mos & 6–12 mos:
Yoke
See ‘materials’ section above for the recommended yarn weight and hook size for your chosen size.
Chain 57 (fairly tightly)
Row 1. 1sc in 2nd ch from hook, 1sc in every ch until end of the foundation chain, TURN [56 sts].
Row 2. Ch3 (counts as your first st here and throughout), 1dc in next 2 sts, 2dc in next st, *1dc in next 3 sts, 2dc in next st*, repeat from * to * across to end of row, TURN [70sts].
Row 3. Ch1 (does not count as your first st here and throughout), 1sc in same st (at base of ch1), 1sc in next 69 sts, TURN (70 sts).
Row 4. Ch3, 1dc in next 3 sts, 2dc in next st, *1dc in next 4 sts, 2dc in next st*, repeat from * to * across to end of row, TURN [84sts].
Row 5. Ch1, 1sc in same st (at base of ch1) , 1sc in next 83 sts, TURN (84 sts).
Row 6. Ch3, 1dc in next 4 sts, 2dc in next st, *1dc in next 5 sts, 2dc in next st*, repeat from * to * across to end of row, TURN [98 sts].
Row 7. Ch1, 1sc in same st (at base of ch1), 1sc in next 97 sts, TURN (98sts).
Row 8. Ch3, 1dc in next 5 sts, 2dc in next st, *1dc in next 6 sts, 2dc in next st*, repeat from * to * across to end of row, TURN [112 sts].
Row 9. Ch1, 1sc in same st (at base of ch1) , 1sc in next 111 sts, TURN (112sts).
Row 10. Ch3, 1dc in next 6 sts, 2dc in next st, *1dc in next 7 sts, 2dc in next st*, repeat from * to * across to end of row, TURN [126 sts].
Row 11. Ch1, 1sc in same st (at base of ch1), 1sc in next 125 sts, TURN (126 sts).
Divide for Armholes
In row 12 the yoke will be divided for the armholes.
Row 12. Ch3, 1dc in next 17 sts, sk next 27 sts, 1dc in next 36 sts, sk next 27 sts, 1dc in next 18 sts, TURN [72 sts].
The yoke has now been formed and two armholes have been created (see photo 1 below).
Skirt
Continuing with the skirt section:
Row 13. Ch3, SpCL in next 70 sts, 1hdc in top of beg ch3 TURN [ch3, 70 SpCL, 1hdc].
Rows 14 – 26. Repeat Row 13.
Cut yarn, fasten off and weave in ends.
Photo 2 below shows how your work should be shaping up at the end of this section.
Sleeves
For both the right and left sleeve:
Make sure that the right side is facing up (the beginning yarn tail will be on the left hand side — photo 3 below).
You will work into the 27 stitches that were skipped in row 12. I placed one stitch marker in both the 1st and 27th stitch. 3 extra stitches will also be created, giving you a total of 30 stitches when working the sleeves. (photo 4)
Position your work as seen in photo 5 below and re-attach yarn with a sl st to the centre stitch at the underarm area.
Round 1. Ch2 (counts as your first st here and throughout), 1dc in next dc row end, 1dc in next 27 sts, 1dc in next dc row end, sl st to top of beg ch2 to join, TURN [30 sts].
Round 2. Ch1 (does not count as your 1st st here and throughout), 1sc in same st (at base of ch1), 1sc in next 29 sts, sl st to 1st sc to join, TURN [30 sts].
Round 3. Ch2, 1dc in next 29 sts, sl st to top of beg ch2 to join, TURN, [30 sts].
Round 4. Ch1, 1sc in same st (at base of ch1), 1sc in next 29 sts, sl st to 1st sc to join, TURN [30 sts].
Rounds 5 – 14. Repeat rounds 3 and 4.
Round 15. Ch2, dc2tog. 1dc in next 25 sts, dc2tog, sl st to top of beg ch2 to join, TURN, [28 sts].
Round 16. Ch1, 1sc in same st, 1sc in next 27 sts, sl st to 1st sc to join, TURN [28 sts].
Round 17. Ch2, dc2tog. 1dc in next 23 sts, dc2tog, sl st to top of beg ch2 to join, TURN, [26 sts].
Round 18. Ch1, 1sc in same st, 1sc in next 25 sts, sl st to 1st sc to join, TURN [26 sts].
Round 19. Ch2, 1dc in next 25 sts, sl st to top of beg ch2 to join, TURN, [26 sts].
Round 20. Ch1, 1sc in same st, 1sc in next 25 sts, sl st to 1st sc to join, TURN [26 sts].
Cut yarn, fasten off and weave in ends. Repeat process for the other sleeve.
Edging
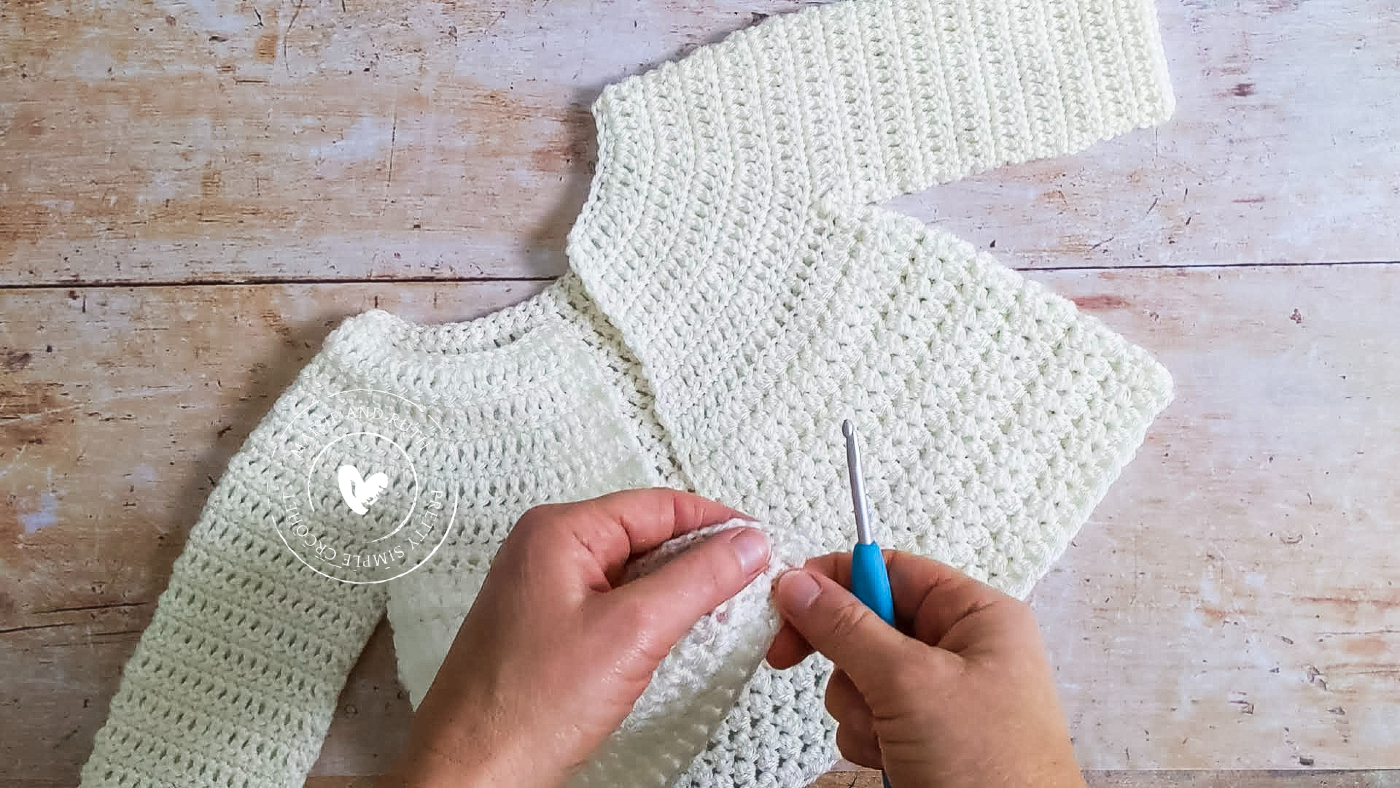
A single crochet edging will be made up the right front panel (3 button loops will also be made on this side), around the neckline, down the left front panel and finally around the bottom of the cardigan.
The edging is made in one continuous round.
With the right side facing up, re-attach your yarn with a sl st to the bottom corner of right front. (photo 6)
Right Front
Ch1, (2sc in each SpCL row end) 14 times (NOT 13 times as seen in video tutorial), (1sc, ch3) in next dc row end, 1sc in next sc row end (1st button loop made), 1sc in next dc row end, 1sc in next sc row end, (1sc, ch3) in next dc row end, 1sc in next sc row end (2nd button loop made), 1sc in next dc row end, 1sc in next sc row end, 1sc in next dc row end, (1sc, ch3) in next sc row end, 1sc in last dc row end (3rd button loop made).
Around Neck
2sc in top corner of right front, 1sc in each st along neckline to left front, 2sc in top corner of left front.
Left Front
(1sc in next sc row end, 1 sc in next dc row end) 6 times, (2sc in each SpCL row end) 14 times (NOT 13 times as seen in video tutorial).
Around Bottom
*2sc in next SpCL, 1sc in next SpCL*, repeat from * to * along to bottom corner of right front, sl st to 1st sc made at beg of round to join.
Cut yarn, fasten off and weave in ends.
Sew three buttons on the left front of the cardigan, making sure that they are aligned with the three button loops on the right front.
💡 Tired of scrolling?
You can grab the printable, ad-free PDF version of the Ella Cardigan here:
It’s much easier to follow and perfect for printing or using on your mobile or tablet.
Pattern Instructions: 1–2 yrs & 3–4 yrs
Yoke
See ‘materials’ section above for the recommended yarn weight and hook size for your chosen size.
Chain 57 (fairly tightly)
Row 1. 1sc in 2nd ch from hook, 1sc in every ch until end of the foundation chain, TURN [56 sts].
Row 2. Ch3 (counts as your first st here and throughout), 1dc in next 2 sts, 2dc in next st, *1dc in next 3 sts, 2dc in next st*, repeat from * to * across to end of row, TURN [70sts].
Row 3. Ch1 (does not count as your first st here and throughout), 1sc in same st (at base of ch1), 1sc in next 69 sts, TURN (70 sts).
Row 4. Ch3, 1dc in next 3 sts, 2dc in next st, *1dc in next 4 sts, 2dc in next st*, repeat from * to * across to end of row, TURN [84sts].
Row 5. Ch1, 1sc in same st (at base of ch1) , 1sc in next 83 sts, TURN (84 sts).
Row 6. Ch3, 1dc in next 4 sts, 2dc in next st, *1dc in next 5 sts, 2dc in next st*, repeat from * to * across to end of row, TURN [98 sts].
Row 7. Ch1, 1sc in same st (at base of ch1), 1sc in next 97 sts, TURN (98sts).
Row 8. Ch3, 1dc in next 5 sts, 2dc in next st, *1dc in next 6 sts, 2dc in next st*, repeat from * to * across to end of row, TURN [112 sts].
Row 9. Ch1, 1sc in same st (at base of ch1) , 1sc in next 111 sts, TURN (112sts).
Row 10. Ch3, 1dc in next 6 sts, 2dc in next st, *1dc in next 7 sts, 2dc in next st*, repeat from * to * across to end of row, TURN [126 sts].
Row 11. Ch1, 1sc in same st (at base of ch1), 1sc in next 125 sts, TURN (126 sts).
Row 12. Ch3, 1dc in next 7 sts, 2dc in next st, *1dc in next 8 sts, 2dc in next st*, repeat from * to * across to end of row, TURN [140 sts].
Row 13. Ch1, 1sc in same st (at base of ch1), 1sc in next 139 sts, TURN (140 sts).
Row 14. Ch3, 1dc in next 8 sts, 2dc in next st, *1dc in next 9 sts, 2dc in next st*, repeat from * to * across to end of row, TURN [154 sts].
Row 15. Ch1, 1sc in same st (at base of ch1), 1sc in next 153 sts, TURN (154 sts).
Row 16. Ch3, 1dc in next 153 sts, TURN (154 sts).
Row 17. Ch1, 1sc in same st (at base of ch1), 1sc in next 153 sts, TURN (154 sts).
Divide for Armholes
In row 18 the yoke will be divided for the armholes.
Row 18. Ch3, 1dc in next 21 sts, sk next 34 sts, 1dc in next 42 sts, sk next 34 sts, 1dc in next 22 sts, TURN [86 sts].
The yoke has now been formed and two armholes have been created. (photo 1 below)
Skirt
Continuing with the skirt section:
Row 19. Ch3, SpCL in next 84 sts, 1hdc in top of beg ch3, TURN [ch3, 84 SpCL, 1hdc].
Rows 20 – 36. Repeat row 19.
Cut yarn, fasten off and weave in ends.
Photo 2 below shows how your work should be shaping up at the end of this section.
Sleeves
For both the right and left sleeve:
Make sure that the right side is facing up (the beginning yarn tail will be on the left hand side — photo 3 below).
You will work into the 34 stitches that were skipped in row 18. I placed one stitch marker in both the 1st and 34th stitch. 3 extra stitches will also be created, giving you a total of 37 stitches when working the sleeves. (photo 4)
Position your cardigan as seen in photo 5 below and re-attach yarn with a sl st to the centre stitch at the underarm area.
Round 1. Ch2 (counts as your first st here and throughout), 1dc in next dc row end, 1dc in next 34 sts, 1dc in next dc row end, sl st to top of beg ch2 to join, TURN [37 sts].
Round 2. Ch1 (does not count as your 1st st here and throughout), 1sc in same st (at base of ch1), 1sc in next 36 sts, sl st to 1st sc to join, TURN [37 sts].
Round 3. Ch2, 1dc in next 36 sts, sl st to top of beg ch2 to join, TURN, [37 sts].
Round 4. Ch1, 1sc in same st (at base of ch1), 1sc in next 36 sts, sl st to 1st sc to join, TURN [37 sts].
Rounds 5 – 20. Repeat rounds 3 and 4.
Round 21. Ch2, dc2tog, 1dc in next 32 sts, dc2tog, sl st to top of beg ch2 to join, TURN, [35 sts].
Round 22. Ch1, 1sc in same st (at base of ch1), 1sc in next 34 sts, sl st to 1st sc to join, TURN [35 sts].
Round 23. Ch2, dc2tog, 1dc in next 30 sts, dc2tog, sl st to top of beg ch2 to join, TURN, [33 sts].
Round 24. Ch1, 1sc in same st (at base of ch1), 1sc in next 32 sts, sl st to 1st sc to join, TURN [33 sts].
Round 25. Ch2, dc2tog, 1dc in next 28 sts, dc2tog, sl st to top of beg ch2 to join, TURN, [31 sts].
Round 26. Ch1, 1sc in same st (at base of ch1), 1sc in next 30 sts, sl st to 1st sc to join, TURN [31 sts].
Cut yarn, fasten off and weave in ends.
Repeat the same process for the other sleeve.
Edging
A single crochet edging will be made up the right front panel (3 button loops will also be made on this side), around the neckline, down the left front panel and finally around the bottom of the cardigan.
The edging is made in one continuous round.
With the right side facing up, re-attach your yarn with a sl st to the bottom corner of right front. (photo 6)
Right Front
Ch1, (2sc in each SpCL row end) 18 times, (2sc) in next dc row end, (1sc, ch3) in next sc row end, 1sc in next dc row end (1st button loop made), (1sc in next sc row end, 2sc in next dc row end) 3 times, ch3, 1sc in next sc row end (2nd button loop made), (2sc in next dc row end, 1sc in next sc row end) 3 times, ch3, 1sc in last dc row end (3rd button loop made).
Around Neck
2sc in top corner of right front, 1sc in each st along neckline to left front, 2sc in top corner of left front.
Left Front
(1sc in next sc row end, 2sc in next dc row end) 9 times, (2sc in each SpCL row end) 18 times.
Around Bottom
*2sc in next SpCL, 1sc in next SpCL*, repeat from * to * along to bottom corner of right front, sl st to 1st sc made at beg of round to join.
Cut yarn, fasten off and weave in ends.
Sew three buttons on the left front of the cardigan, making sure that they are aligned with the three button loops on the right front.
Pattern Instructions: 5–6 yrs & 7–8 yrs
Yoke
See ‘materials’ section above for the recommended yarn weight and hook size for your chosen size.
Chain 57 (fairly tightly)
Row 1. 1sc in 2nd ch from hook, 1sc in every ch until end of the foundation chain, TURN [56 sts].
Row 2. Ch3 (counts as your first st here and throughout), 1dc in next 2 sts, 2dc in next st, *1dc in next 3 sts, 2dc in next st*, repeat from * to * across to end of row, TURN [70sts].
Row 3. Ch1 (does not count as your first st here and throughout), 1sc in same st (at base of ch1), 1sc in next 69 sts, TURN (70 sts).
Row 4. Ch3, 1dc in next 3 sts, 2dc in next st, *1dc in next 4 sts, 2dc in next st*, repeat from * to * across to end of row, TURN [84sts].
Row 5. Ch1, 1sc in same st (at base of ch1) , 1sc in next 83 sts, TURN (84 sts).
Row 6. Ch3, 1dc in next 4 sts, 2dc in next st, *1dc in next 5 sts, 2dc in next st*, repeat from * to * across to end of row, TURN [98 sts].
Row 7. Ch1, 1sc in same st (at base of ch1), 1sc in next 97 sts, TURN (98sts).
Row 8. Ch3, 1dc in next 5 sts, 2dc in next st, *1dc in next 6 sts, 2dc in next st*, repeat from * to * across to end of row, TURN [112 sts].
Row 9. Ch1, 1sc in same st (at base of ch1) , 1sc in next 111 sts, TURN (112sts).
Row 10. Ch3, 1dc in next 6 sts, 2dc in next st, *1dc in next 7 sts, 2dc in next st*, repeat from * to * across to end of row, TURN [126 sts].
Row 11. Ch1, 1sc in same st (at base of ch1), 1sc in next 125 sts, TURN (126 sts).
Row 12. Ch3, 1dc in next 7 sts, 2dc in next st, *1dc in next 8 sts, 2dc in next st*, repeat from * to * across to end of row, TURN [140 sts].
Row 13. Ch1, 1sc in same st (at base of ch1), 1sc in next 139 sts, TURN (140 sts).
Row 14. Ch3, 1dc in next 8 sts, 2dc in next st, *1dc in next 9 sts, 2dc in next st*, repeat from * to * across to end of row, TURN [154 sts].
Row 15. Ch1, 1sc in same st (at base of ch1), 1sc in next 153 sts, TURN (154 sts).
Row 16. Ch3, 1dc in next 9 sts, 2dc in next st, *1dc in next 10 sts, 2dc in next st*, repeat from * to * across to end of row, TURN [168 sts].
Row 17. Ch1, 1sc in same st (at base of ch1), 1sc in next 167 sts, TURN (168 sts).
Row 18. Ch3, 1dc in next 10 sts, 2dc in next st, *1dc in next 11 sts, 2dc in next st*, repeat from * to * across to end of row, TURN [182 sts].
Row 19. Ch1, 1sc in same st (at base of ch1), 1sc in next 181 sts, TURN (182 sts).
Divide for Armholes
In row 20 the yoke will be divided for the armholes.
Row 20. Ch3, 1dc in next 25 sts, sk next 40 sts, 1dc in next 50 sts, sk next 40 sts, 1dc in next 26 sts, TURN [102 sts].
The yoke has now been formed and two armholes have been created. (photo 1 below)
Skirt
Continuing with the skirt section:
Row 21. Ch3, SpCL in next 100 sts, 1hdc in top of beg ch3, TURN [ch3, 102 SpCL, 1hdc].
Rows 22 – 40. Repeat row 21.
Cut yarn, fasten off and weave in ends.
Photo 2 below shows how your work should be shaping up at the end of this section.
Sleeves
For both the right and left sleeve:
Make sure that the right side is facing up (the beginning yarn tail will be on the left hand side — photo 3).
You will work into the 40 stitches that were skipped in row 20. I placed one stitch marker in both the 1st and 40th stitch. 3 extra stitches will also be created, giving you a total of 43 stitches when working the sleeves. {photo 4}
Position your cardigan as seen in photo 5 below and re-attach yarn with a sl st to the centre stitch at the underarm area.
Round 1. Ch2 (counts as your first st here and throughout), 1dc in next dc row end, 1dc in next 40 sts, 1dc in next dc row end, sl st to top of beg ch2 to join, TURN [43 sts].
Round 2. Ch1 (does not count as your 1st st here and throughout), 1sc in same st (at base of ch1), 1sc in next 42 sts, sl st to 1st sc to join, TURN [43 sts].
Round 3. Ch2, 1dc in next 42 sts, sl st to top of beg ch2 to join, TURN, [43 sts].
Round 4. Ch1, 1sc in same st (at base of ch1), 1sc in next 42 sts, sl st to 1st sc to join, TURN [43 sts].
Rounds 5 – 22. Repeat rounds 3 and 4.
Round 23. Ch2, dc2tog, 1dc in next 38 sts, dc2tog, sl st to top of beg ch2 to join, TURN, [41 sts].
Round 24. Ch1, 1sc in same st (at base of ch1), 1sc in next 40 sts, sl st to 1st sc to join, TURN [41 sts].
Round 25. Ch2, dc2tog, 1dc in next 36 sts, dc2tog, sl st to top of beg ch2 to join, TURN, [39 sts].
Round 26. Ch1, 1sc in same st (at base of ch1), 1sc in next 38 sts, sl st to 1st sc to join, TURN [39 sts].
Round 27. Ch2, dc2tog, 1dc in next 34 sts, dc2tog, sl st to top of beg ch2 to join, TURN, [37 sts].
Round 28. Ch1, 1sc in same st (at base of ch1), 1sc in next 36 sts, sl st to 1st sc to join, TURN [37 sts].
Row 29. Round 27. Ch2, dc2tog, 1dc in next 32 sts, dc2tog, sl st to top of beg ch2 to join, TURN, [35 sts].
Row 30. Ch1, 1sc in same st (at base of ch1), 1sc in next 34 sts, sl st to 1st sc to join, TURN [35 sts].
Cut yarn, fasten off and weave in ends. Repeat process for the other sleeve.
Edging
A single crochet edging will be made up the right front panel (4 button loops will also be made on this side), around the neckline, down the left front panel and finally around the bottom of the cardigan.
The edging is made in one continuous round.
With the right side facing up, re-attach your yarn with a sl st to the bottom corner of right front. (photo 6 below)
Right Front
Ch1, (2sc in each SpCL row end) 20 times, (1sc, ch3) in next dc row end, 1sc in next sc row end (1st button loop made), 2dc in next dc row end, (1sc in next sc row end) twice, ch3, 1sc in next dc row end (2nd button loop made), 1sc in next sc row end, (2dc in next dc row end) twice, (1sc, ch3) in next sc row end, 1sc in next dc row end (3rd button loop made), 1sc in next sc row end, (2sc in next dc row end) twice, (1sc, ch3) in next sc row end, 1sc in last dc row end (4th button loop made).
Around Neck
2sc in top corner of right front, 1sc in each st along neckline to left front, 2sc in top corner of left front.
Left Front
(1sc in next sc row end, 2sc in next dc row end) 10 times, (2sc in each SpCL row end) 20 times.
Around Bottom
*2sc in next SpCL, 1sc in next SpCL*, repeat from * to * along to bottom corner of right front, sl st to 1st sc made at beg of round to join.
Cut yarn, fasten off and weave in ends.
Sew four buttons on the left front of the cardigan, making sure that they are aligned with the four button loops on the right front.
Photo Section
Photo 1:
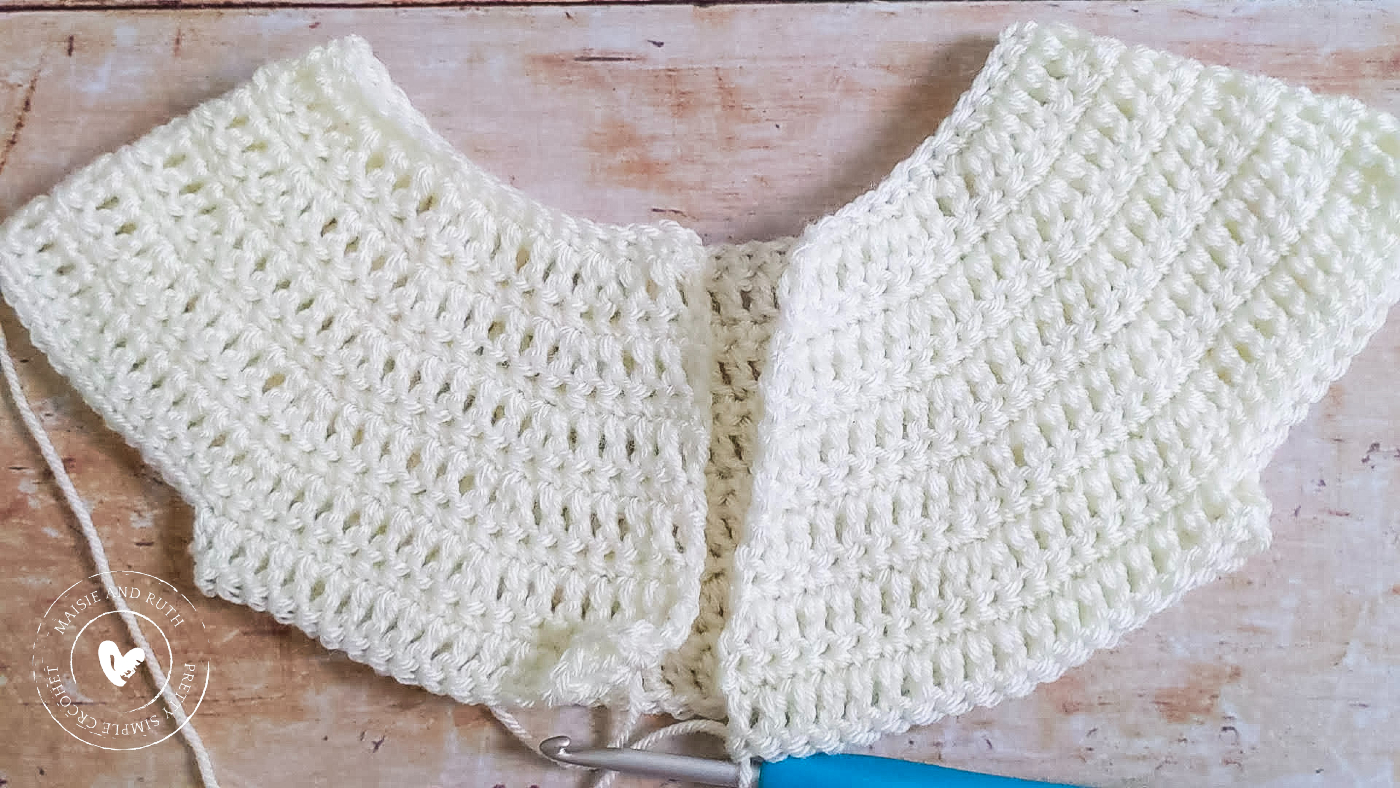
Photo 2:

Photo 3:

Photo 4:
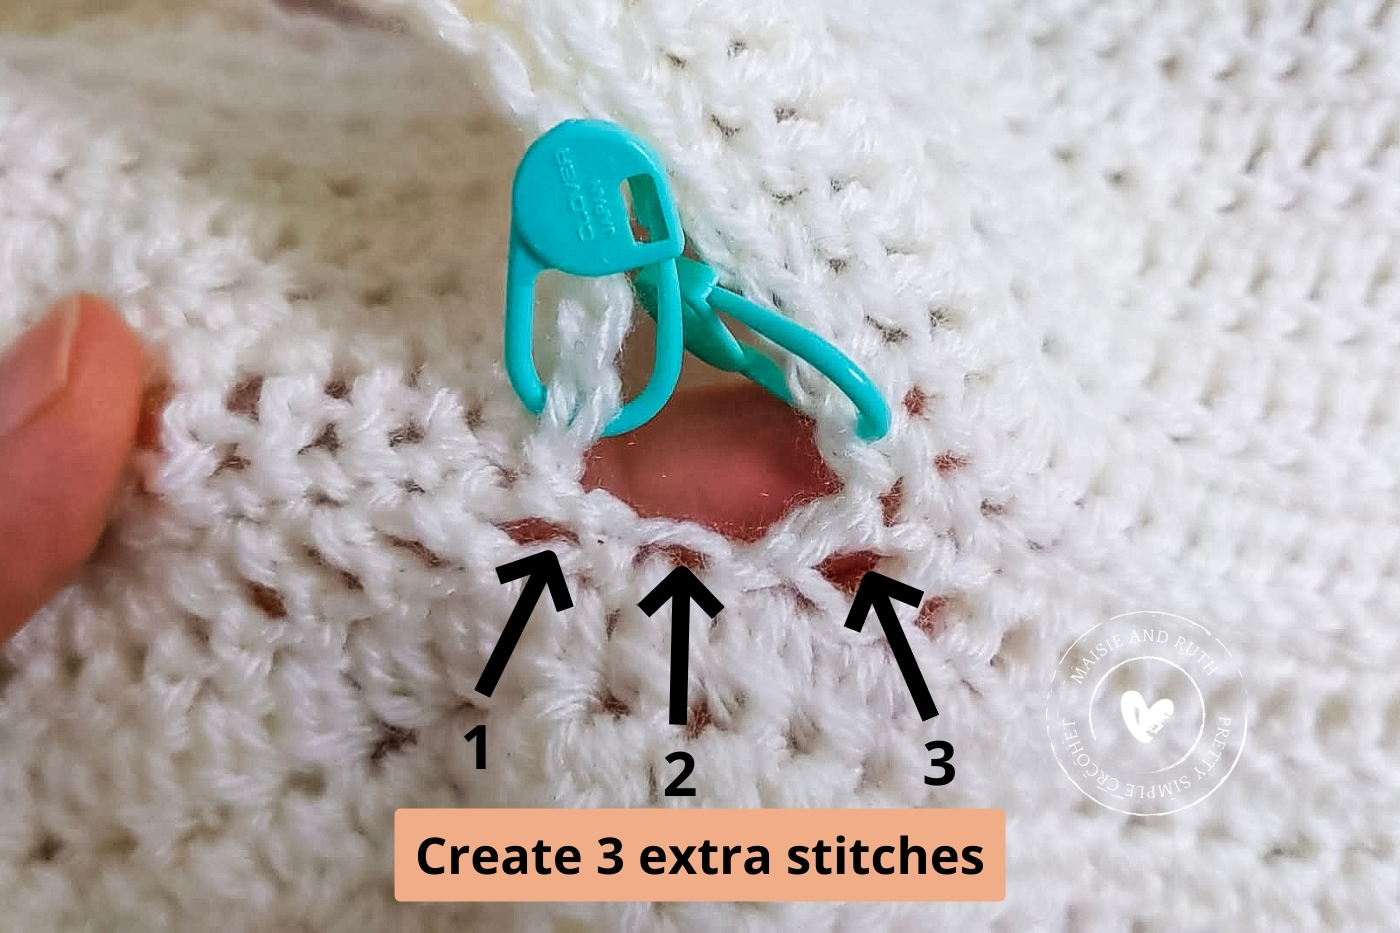
Photo 5:
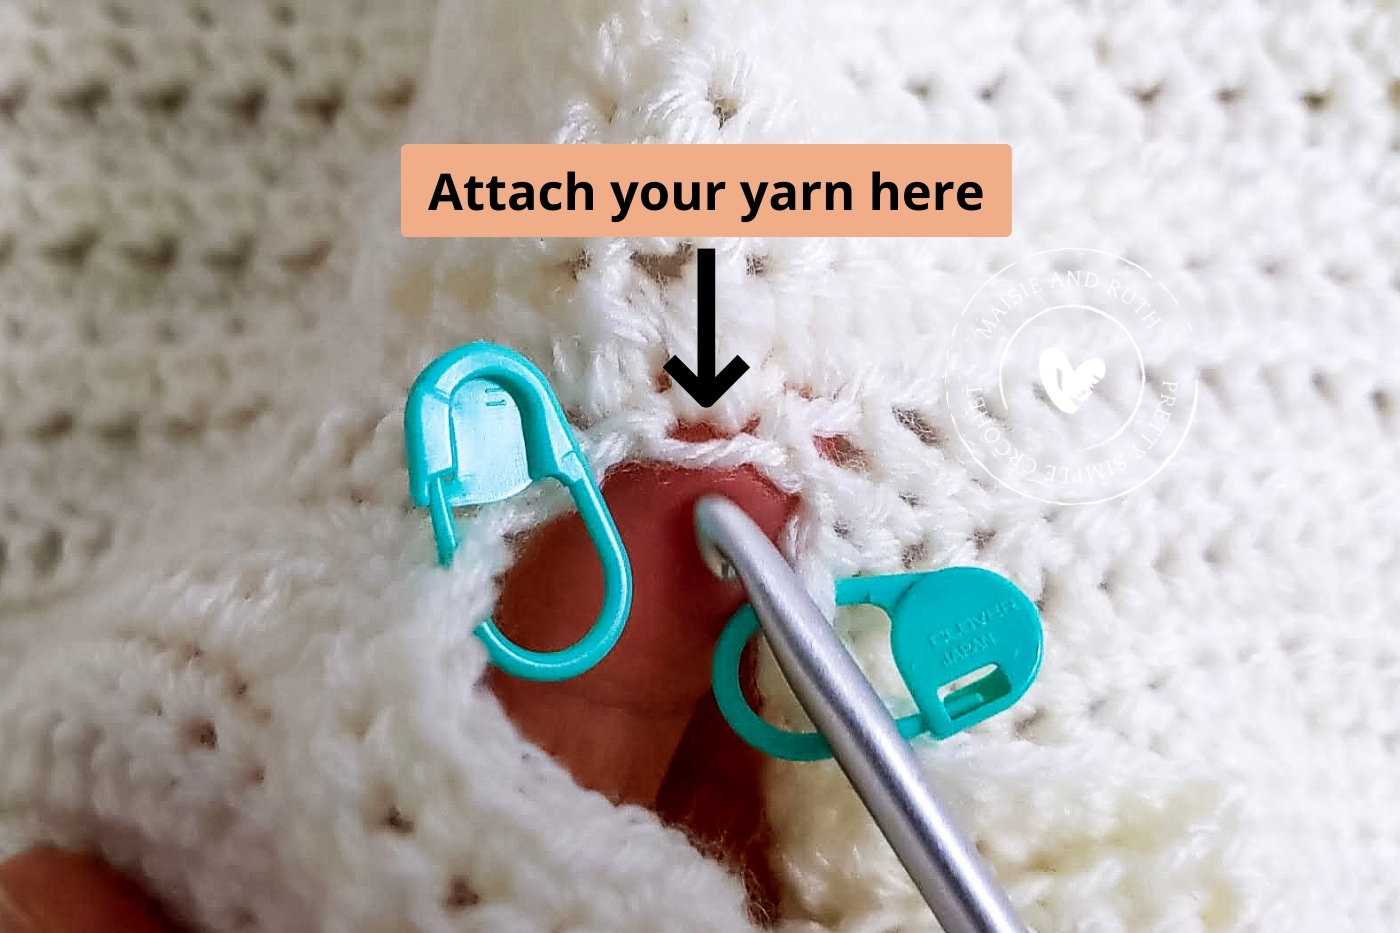
Photo 6:
And that’s your Ella cardigan all finished! I loved sharing this pattern with you, and I hope it brings you as much joy to make as it did for me. If you’d like a keepsake version to crochet from your favourite chair, you can purchase and download the pretty, ad-free PDF here
Helpful Links
- 🧶 Watch the full video tutorial – Follow along step by step on YouTube.
- 💛 Join the Maisie and Ruth Community – Share your finished projects, chat with fellow crocheters, and be inspired.
- 🛍️ Shop printable PDF patterns – Browse the complete collection of ad-free PDF patterns on Etsy.
- 📺 Join YouTube Membership – Get early access to new patterns and exclusive perks.
PATTERN SUPPORT
Need Help with a Pattern?
We’ve got you! 😊
If you need a hand, come hang out with us in our Facebook group—it’s the best place to ask questions, share your makes, and cheer each other on.
We’ve also put together a step-by-step YouTube tutorial you can follow along with—this should answer most of your questions along the way!
Pop into the Facebook group and join our cozy little community—we’d absolutely love to see you there!💛

SHARE YOUR WORK!
I really hope that you enjoyed this free crochet pattern! I would LOVE to see photos of your completed project… please tag me on Instagram using @maisieandruth and / or #maisieandruth
And remember to pin this pattern for later if you can’t make it right now!

COPYRIGHT
Copyright © 2021 by Maisie and Ruth Limited. All rights reserved. This crochet baby cardigan pattern for the Ella Cardigan is for personal viewing only. You may view it for free on this blog, but it is protected under applicable copyrights, trademarks, and other proprietary (including but not limited to intellectual property) rights.
You may not copy, redistribute, or sell this pattern in any form, including digital, printed or photographic formats without permission. Sharing this pattern (in whole or in part) on social media, websites, or messaging platforms is strictly prohibited. This is a theft of the author’s intellectual property, which may result in civil or criminal penalties.
Thank you for respecting my work and for your continued support — it truly means a lot!
FAQ:
Q: Is this crochet baby cardigan pattern beginner-friendly?
Yes! This free crochet baby cardigan pattern is written with beginners in mind. If you know basic stitches like chain, single crochet, and double crochet, you’ll be able to follow along easily.
Q: What yarn works best for a crochet baby and children’s cardigan?
Soft, washable yarns such as cotton or baby acrylic blends are perfect. They’re gentle on sensitive skin and easy to care for, which makes them ideal for baby and kids clothes.
Q: What sizes does this baby and child cardigan pattern include?
This free crochet baby cardigan pattern is for newborns to 8 years of age.
Q: How long does it take to crochet a baby and child cardigan?
Most crocheters can complete this pattern in a few evenings. It’s a quick project compared to adult garments, making it a wonderful handmade baby gift idea.
Q: Can I get a printable version of this pattern?
Yes! While the full instructions are available for free in this post, you can also purchase a beautifully formatted, ad-free PDF crochet baby cardigan pattern for convenience.
SHARE YOUR WORK!
I really hope that you enjoyed this free crochet pattern! I would LOVE to see photos of your completed project… please tag me on Instagram using @maisieandruth and / or #maisieandruth
And remember to pin this pattern for later if you can’t make it right now!


Love the pattern.
How to get size 6-12 month pattern?
Thank you, glad you like the design! 🥰
I’ve only designed the cardigan for up to 6 months of age.
For 6-12 months you could try using a #4 / worsted / Aran / 12 ply yarn and a H (5mm) crochet hook.
As you’re making it, periodically place it up against an existing cardigan / sweater to see how you’re getting on for size (you may need to adjust the hook size as you go along).
Hope this helps and good luck!
Hi, thanks to your amazing videos and instructions I am now mastering and enjoying crochet! Have made the baby blanket and just finished the baby cardigan which was a little more challenging but well worth it. Thank you.
That’s really great to hear, thank you so much! 🥰 Keep up the good work – crochet has so many benefits, it’s a wonderful hobby to have 💕💕
Bedankt voor dit mooie patroon, dat jij, ook voor beginners als ik toegankelijk hebt gemaakt!
Na het haken van het lijfje heb ik de draad niet afgehecht, maar heb ik gelijk de omrandend gehaakt. Hiermee kon ik ook de begin draad in de hals wegwerken, en het scheelt weer een extra draad afhechten.
Dat is geweldig! 😀 Ik ben blij dat je de tutorial leuk vond. Goed werk… heel logisch!
Adorable and classy! I can’t wait to work this up! I’ll make several to have handy for upcoming baby showers etc
Thank you so much! What a good idea… enjoy! 😀💞
How do I print out the pattern please
You can purchase a printable, PDF version of this pattern here: https://tidd.ly/4noKz2z Thank you and enjoy! 💕