

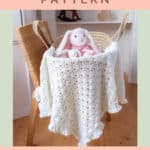
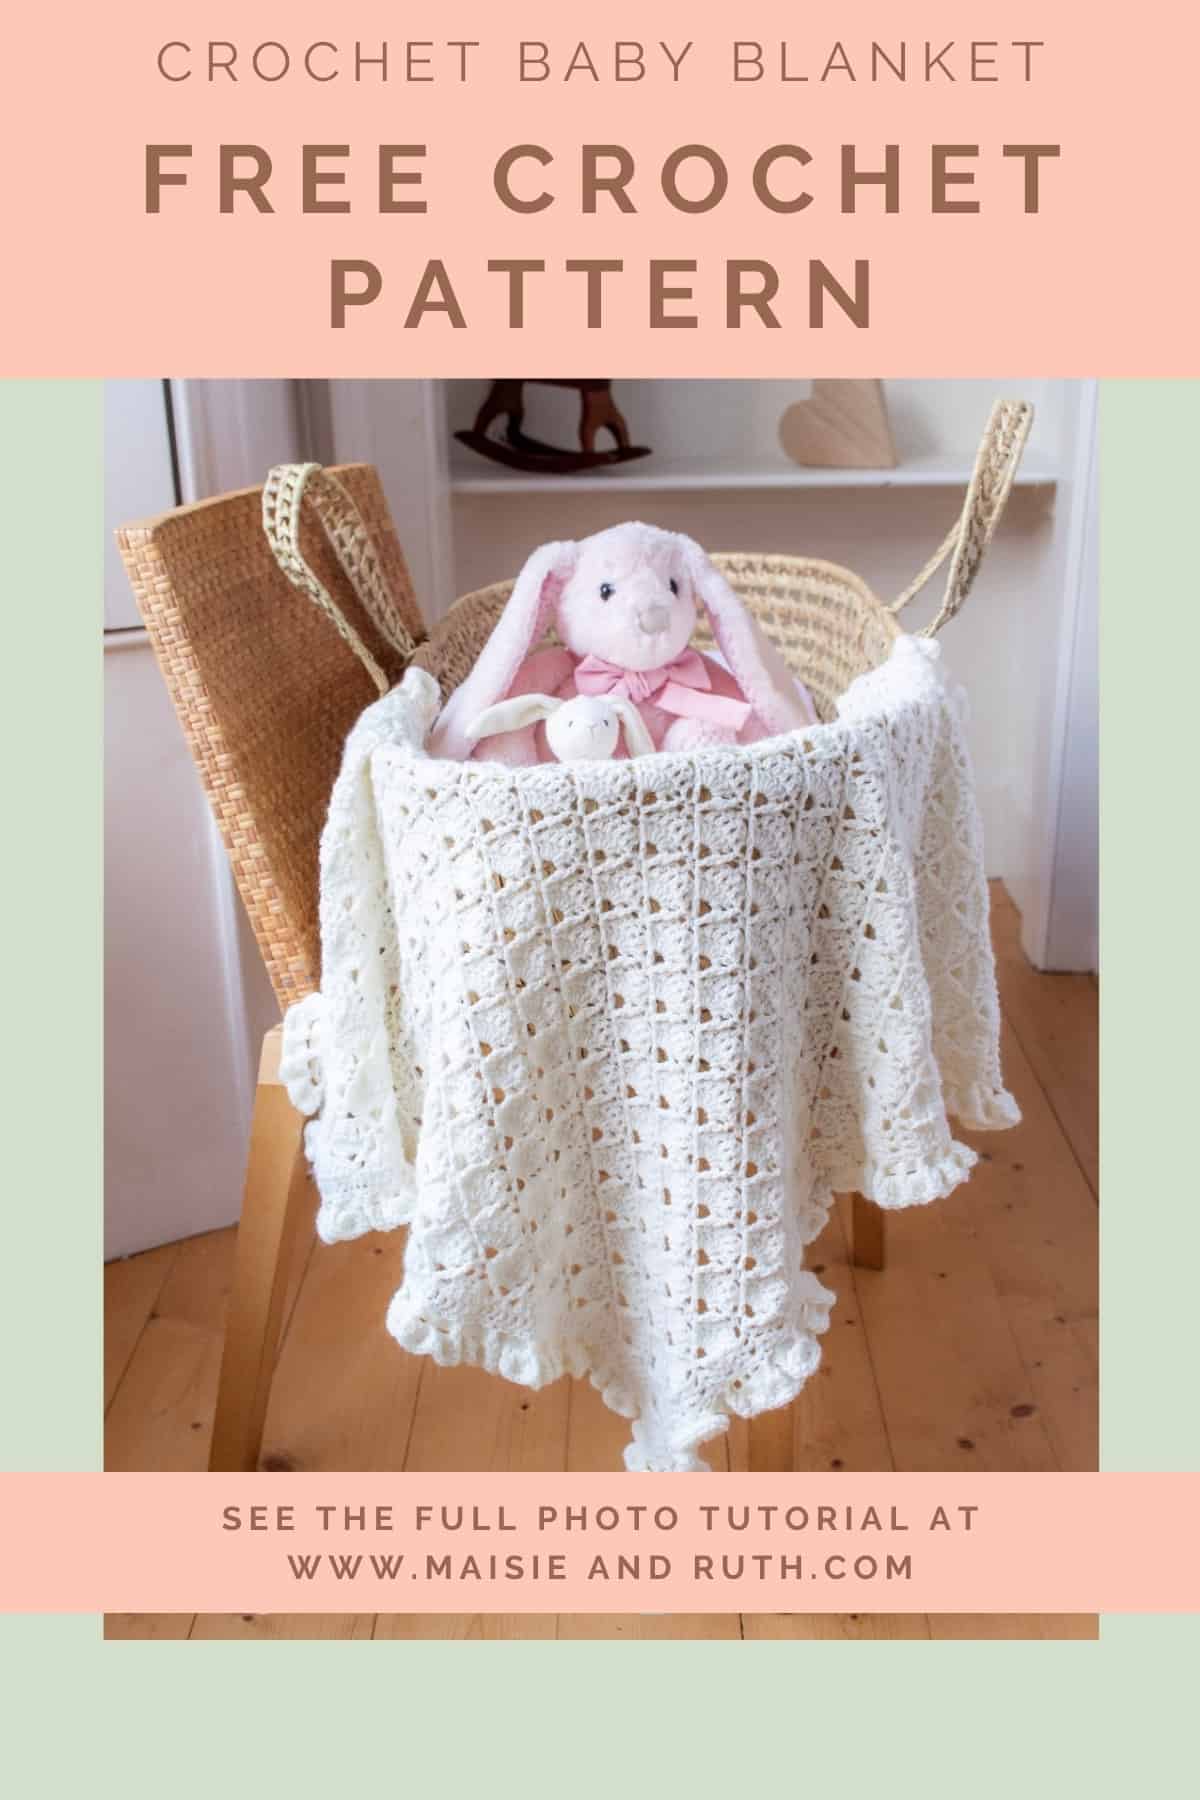
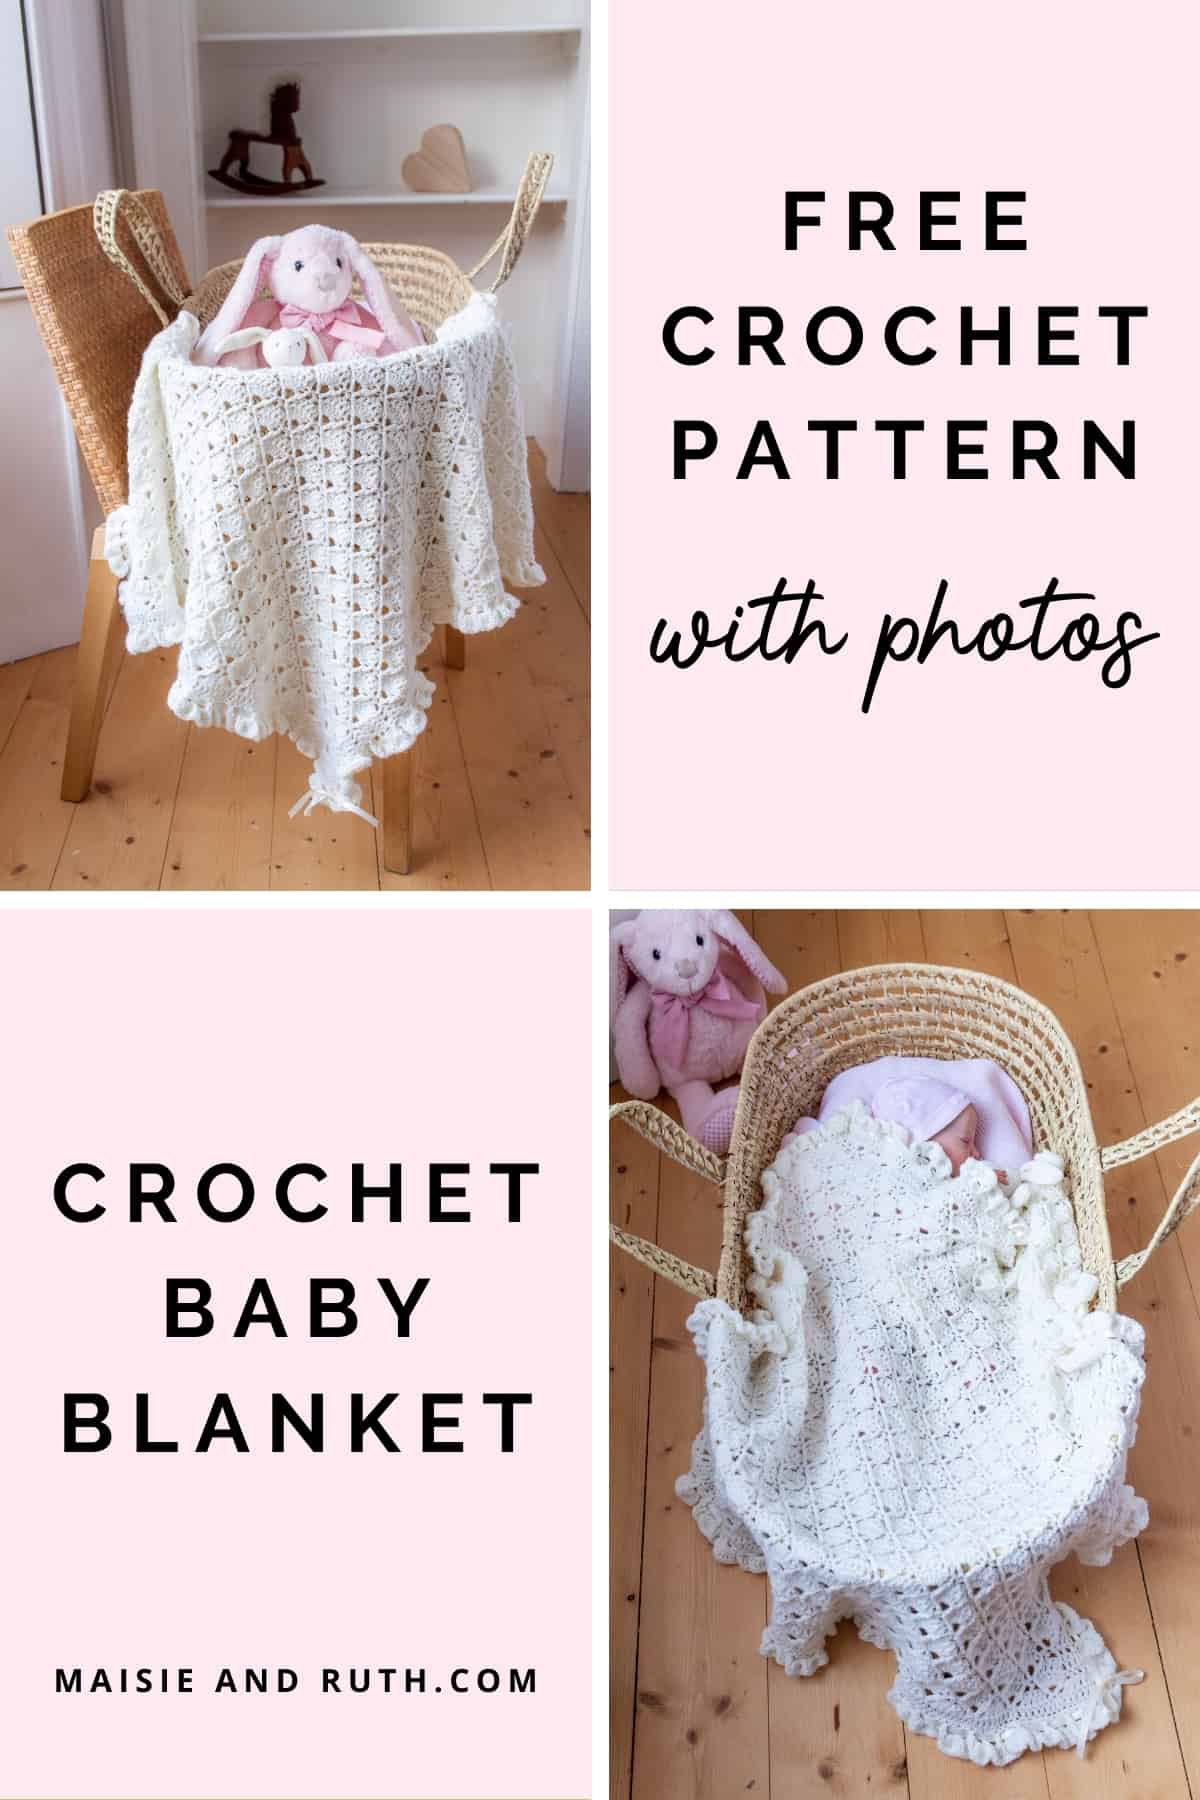
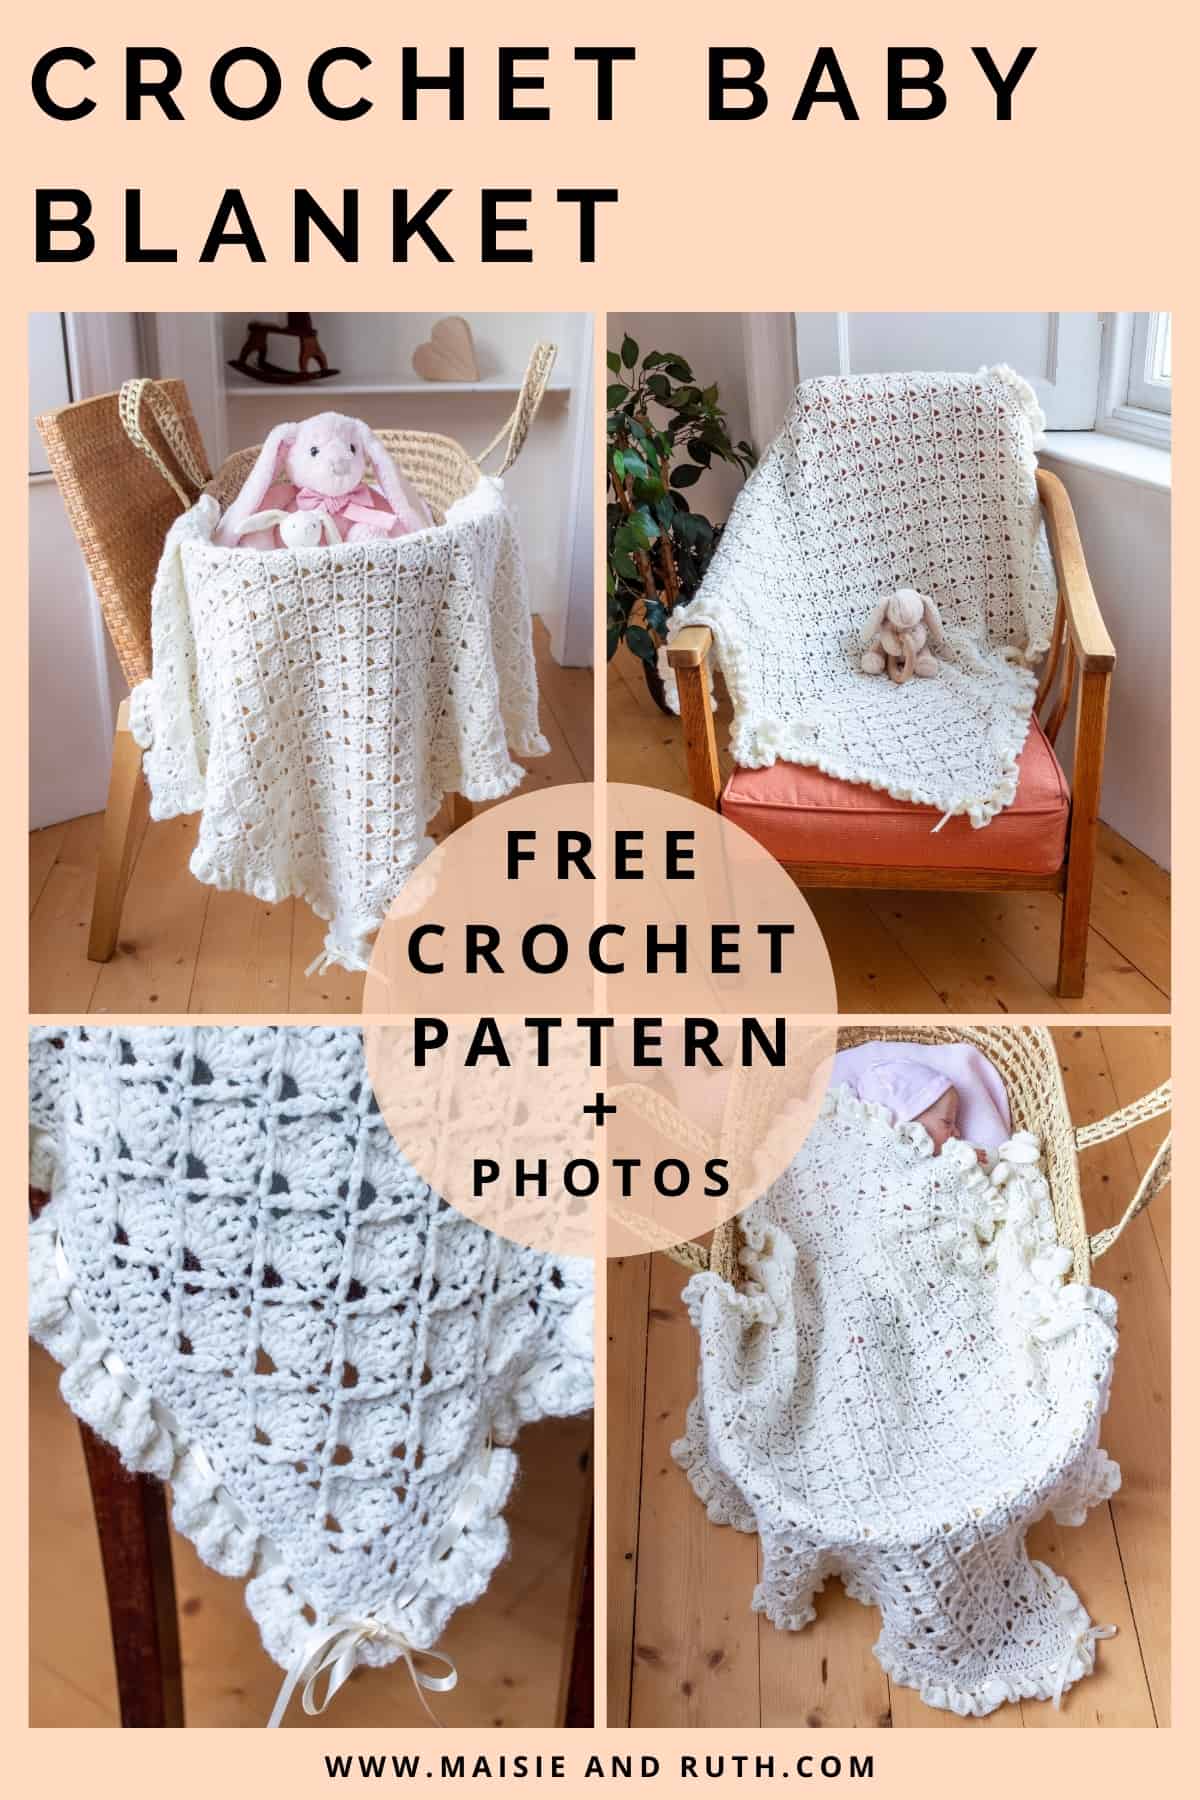
If you’re looking for an elegant Crochet Baby Blanket Pattern then look no further as I have a great FREE pattern for you to try!
There’s also a VIDEO TUTORIAL to accompany this pattern. And to purchase an ad-free printable version, please visit my Etsy store HERE

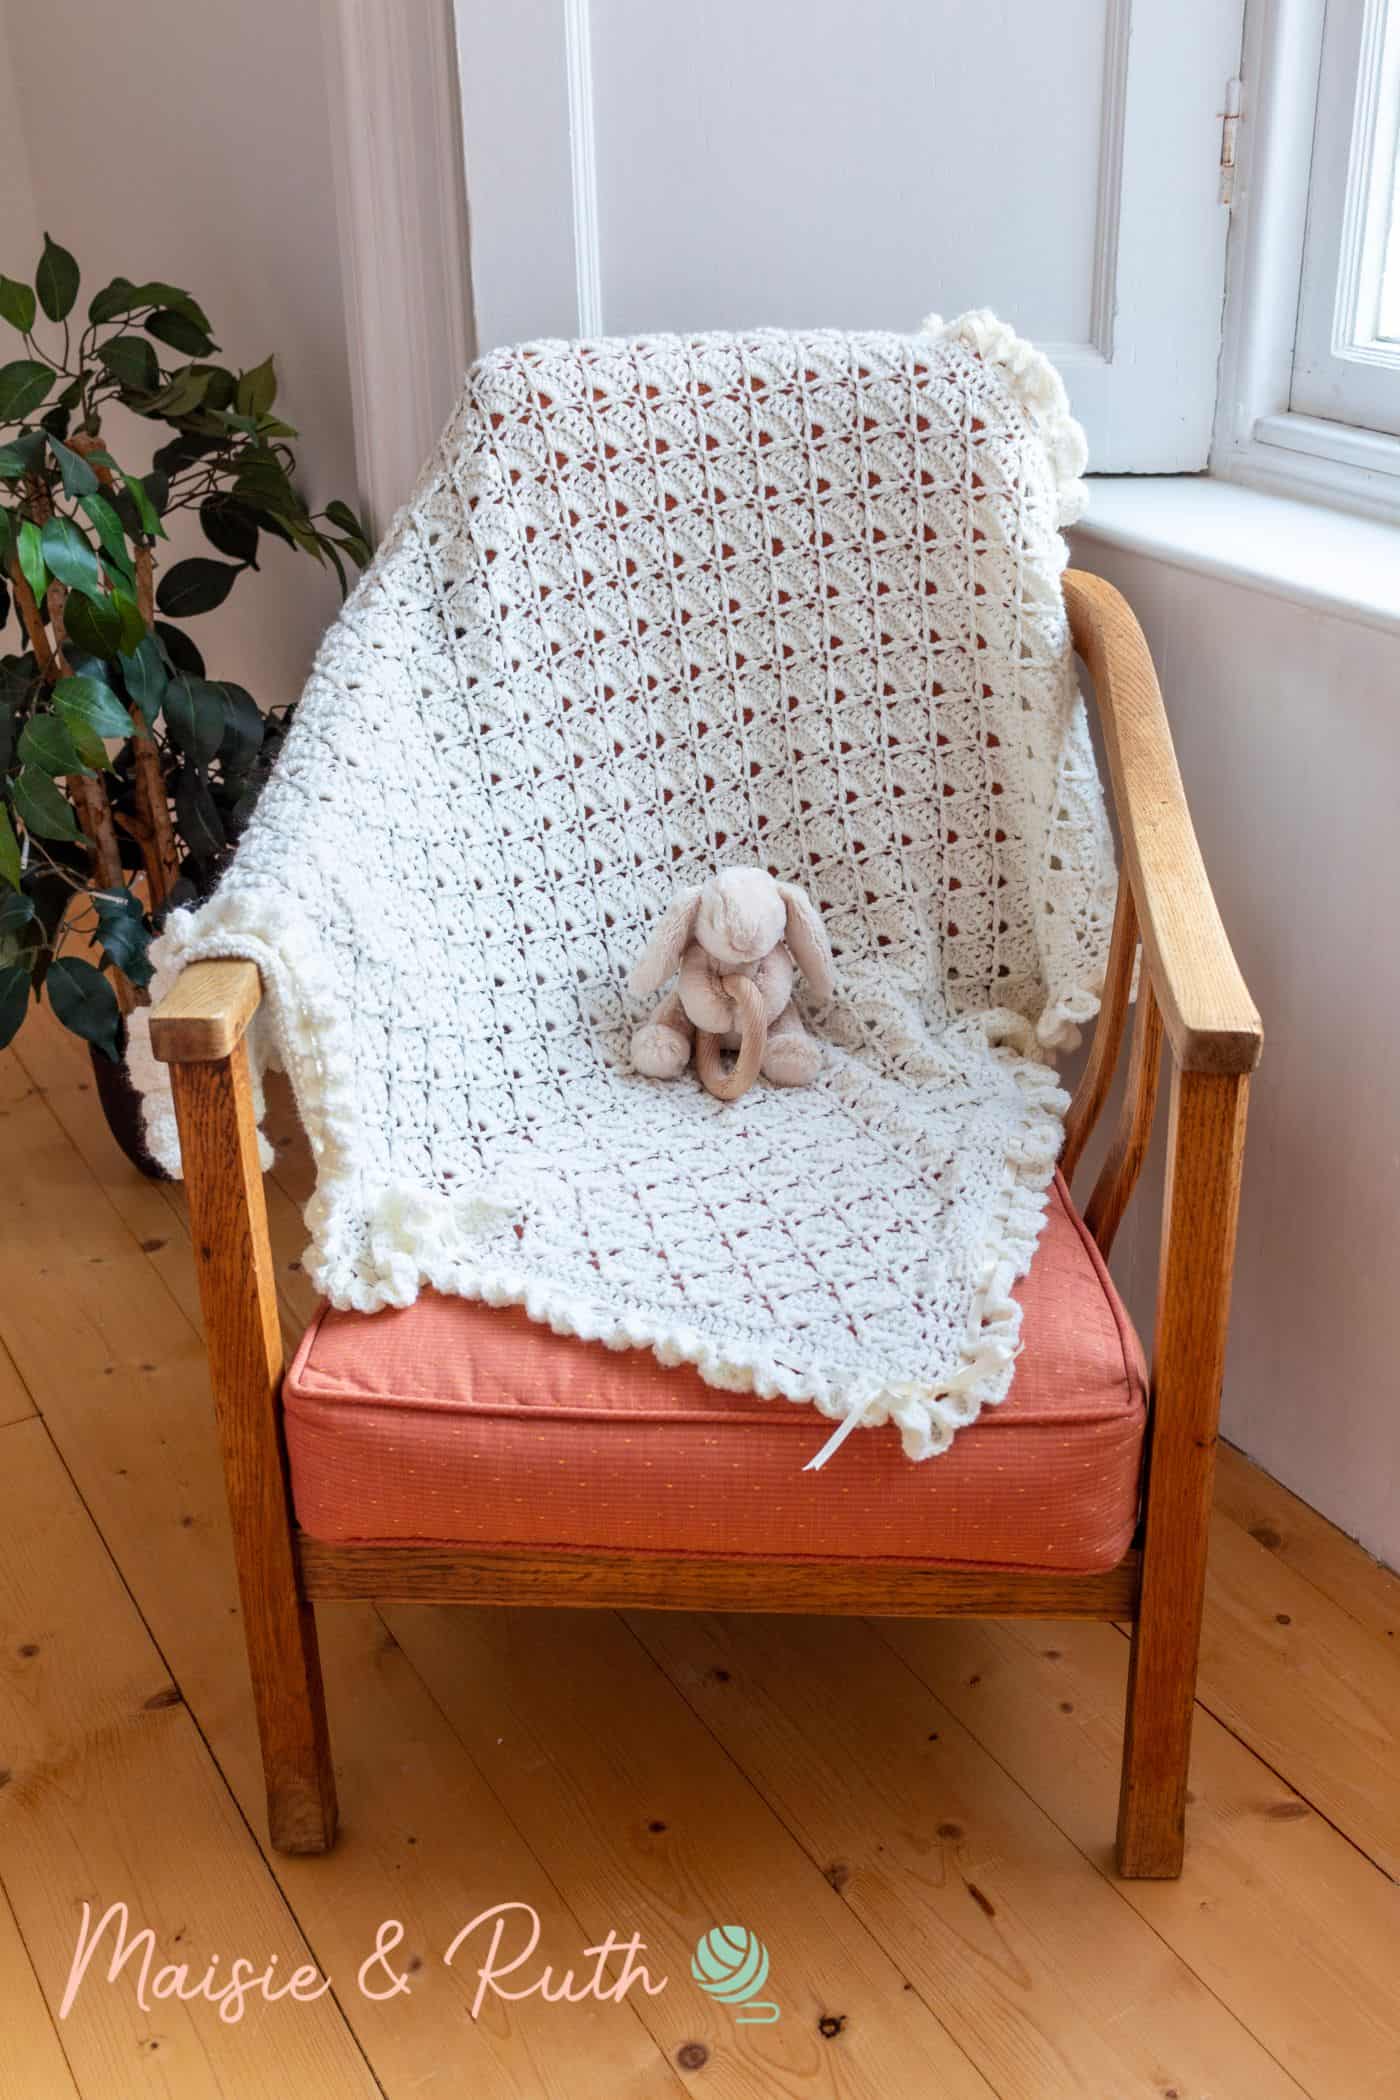
This crochet baby blanket pattern, with its beautiful raised texture, looks pretty complex at first glance, but follow along with the detailed step-by-step photo tutorial below and you’ll soon discover that it’s not that complicated.
By the time you’ve completed the 4-row pattern repeat a few times, you’ll be well and truly in the swing of things and will have no trouble in working up this blanket!
STYLE OF BLANKET
I decided to assign the name ‘Bonnie’ to this crochet baby blanket pattern (meaning pretty in Scottish) as it truly is a very charming and elegant blanket that I think will stand the test of time.
It could easily fit into the heirloom category and it will certainly look good in any baby nursery.
I used the Crochet Diamond Trellis Stitch throughout the pattern. If you would like to practise this stitch and make a small swatch beforehand, head on over to the detailed photo tutorial.
By using a slightly larger hook size (size 7 / 4.5mm) than the recommended size, the result is a crochet blanket with lovely drape and an even softer and cosier feel, especially when you gently squish the blanket between your fingers!
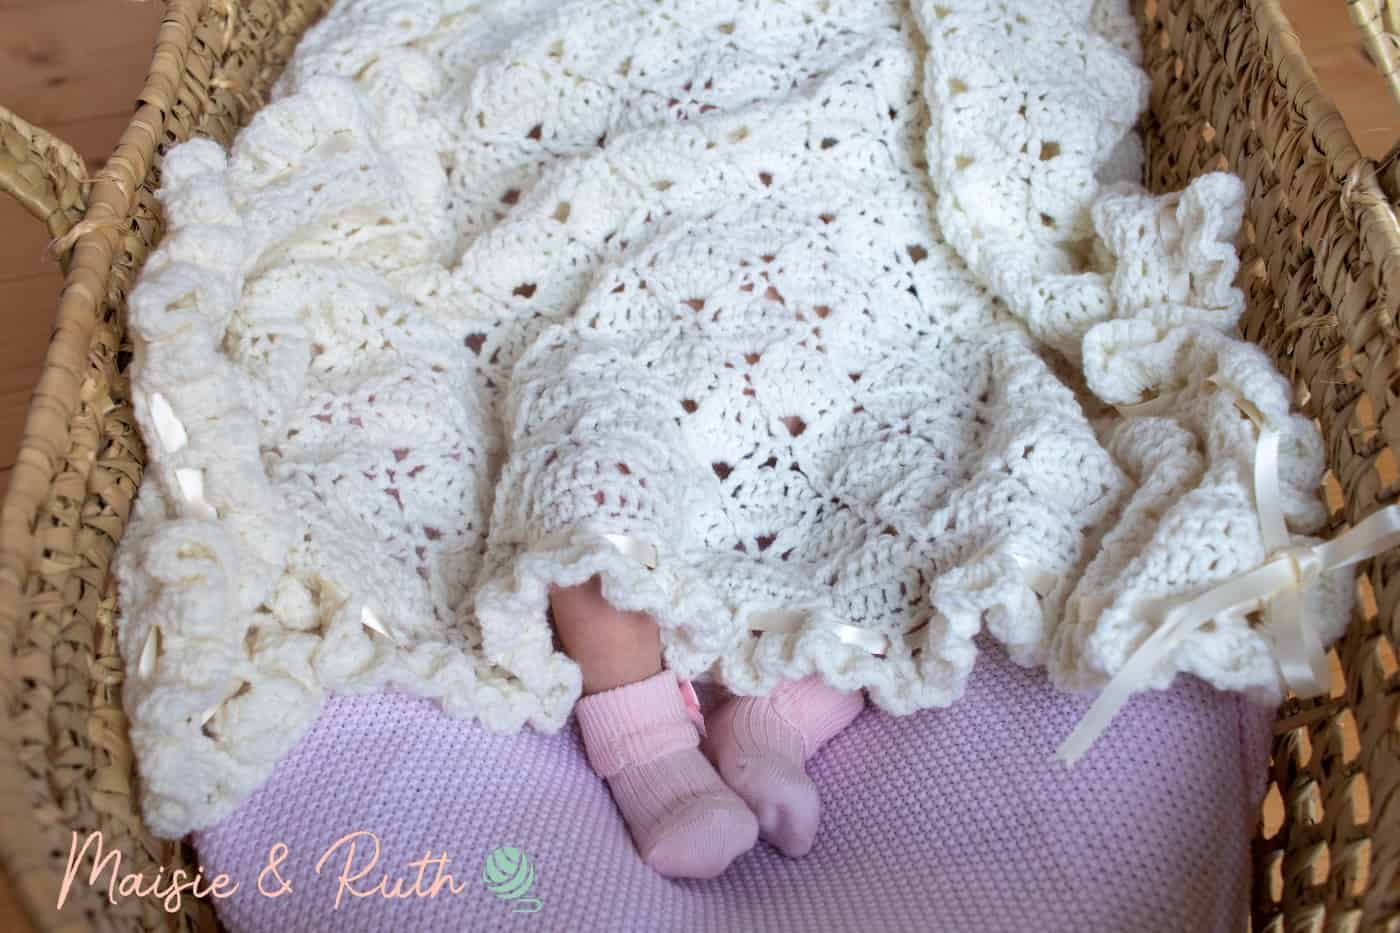
The Bonnie Blanket is finished off with a border that I designed especially for this blanket. It’s a simple pattern consisting of 4 rounds and uses the stitches found within the main body of the pattern.
OTHER CROCHET BABY PATTERNS
I have other crochet baby blanket patterns on the blog; the Barclay Baby Blanket and Paisley Baby Blanket are both free patterns on the blog and also include step-by-step photos.
If you would like to make something to accompany the Bonnie Blanket, check out my free patterns for Bella the Bunny and the Gracie Baby Bootie. They would make lovely gifts for an upcoming baby shower.
ADJUST THE SIZE OF YOUR CROCHET BABY BLANKET
If you prefer, you can make this blanket in any size you wish…just make sure that your foundation chain is a multiple of 8 + 5 (add an extra 2 for the foundation chain).
If you would like to make the Bonnie Blanket in a larger size, you could consider using a bulkier yarn and larger hook so that it works up a little more quickly.
I think that the blanket would also look very sweet in a sport (4 ply) weight yarn.
For more information about yarn weights and corresponding hook sizes, see the Craft Yarn Council’s helpful article Standard Yarn Weight System
Get additional details about resizing blankets by checking out my posts Crochet Baby Blanket Size Chart and How to Resize a Crochet Blanket Pattern. Both these articles contain useful tips and handy charts of the most common blanket sizes.

YARN USED
For this crochet baby blanket pattern I decided to use Paintbox Yarns Baby DK. I’m a big fan of this brand and the Baby DK is a perfect blend of acrylic and nylon.
This combination of materials results in a soft yarn that holds up to many cycles in the washing machine – an important factor to consider when you’re crocheting a blanket for that special baby in your life!
In addition to being perfectly soft it’s also easy to handle and crochets up evenly.
Front post double crochet stitches are used throughout the pattern and the Baby DK yarn does not disappoint in creating a wonderfully textured blanket.
For the colour, I selected Champagne White, which is a subtle, off-white shade. It’s a very elegant colour and is certainly in-keeping with the traditional look of the blanket.
However, bear in mind that the colour range for this yarn is extensive, so feel free to work up this blanket in whatever shade takes your fancy!
SUBSTITUTE YARN
According to Yarnsub, there are many suitable substitutes for Paintbox Yarns Baby DK. Sirdar Snuggly DK and King Cole Comfort DK are great alternatives and ones that I’ve used many times in the past.
Please remember, however, that using a different brand of DK yarn may result in a blanket of slightly different dimensions to the ones that I’ve specified.
A great and very economical alternative would be to use the Paintbox Yarns Simply DK (not the baby version). I frequently work with this yarn and it’s a great choice for crochet baby blankets.
The specified gauge for both the DK and the Baby DK is identical.
Sold in 3.5oz / 100g skeins, you would need 5 balls of the Paintbox Yarns Simply DK for this crochet project.
Let’s dive in now and get to all the essential information in order to make this pretty crochet baby blanket.

PRINT THIS PATTERN!
Prefer a Printable Version? You can purchase the ad-free, printable PDF of the Bonnie Blanket pattern! It includes all the same information as the free version. It’s just in a more convenient, easy-to-read format… perfect for crocheting on-the-go (or on the couch!).

Ad-Free Download
PDF PRINTABLE PATTERN
- Easy-to-read (no ads!)
- Print-friendly & tablet-friendly
- Yours to keep and use forever
Thank you for supporting my shop!
THE BONNIE BLANKET: A FREE CROCHET BABY BLANKET PATTERN
Before you begin, please carefully read all the information below… I’ve included useful points that will aid you in making this blanket.
If you are an experienced crocheter and do not require the aid of photos, scroll down to the bottom to get the full pattern set out in one go!
LEVEL
Intermediate (see details of project levels at the Craft Yarn Council).
MATERIALS
- Yarn: #3, light worsted / DK / 8 ply. I used 7 balls of Paintbox Yarns Baby DK in the colour Champagne White (1702), 183 yds/ 1.8oz (167m / 50g)
- Crochet Hook: Size 7 (4.5mm)
- Scissors
- Yarn needle
- Ribbon (optional): 5.5yds (5 metres) of ribbon size 5/8″ (14mm)
GAUGE
I made a small swatch which measures 6.25 inches wide by 5 inches long. In addition to measuring your gauge / tension, working up this swatch will allow you to practise the pattern before working up the full blanket.
FINISHED SIZE
Before blocking:
Width – 26 inches
Length – 28 inches
After blocking:
W -28 inches
L – 30 inches
For tips on blocking, please read my post How to Block Crochet (3 Easy methods). In this article, I describe the benefits of blocking and how you can block all fibres, including items made from acrylic yarn.
STITCHES AND ABBREVIATIONS (US CROCHET TERMS)
(If you crochet using UK terms, the Craft Yarn Council have a useful page detailing the crochet term differences between the US, UK and Canada).
beg – beginning
ch(s) – chain(s)
dc – double crochet: Yarn over (yo), insert hook into stitch, yo, pull up a loop, 3 loops remaining on hook. Yo, pull through 2 loops, 2 loops remaining on hook. Yo, pull through remaining 2 loops. 1 double crochet completed.
fasten off – To fasten off securely, work one chain, then cut the yarn leaving a 5 – 6” tail. Pull the tail through the loop that is on your hook. Tighten gently.
RS – right side: The side of your work that you want to have on display – the ‘pretty’ side.
sc – single crochet: Insert hook into stitch, yarn over (yo), pull up a loop, 2 loops remaining on hook. Yo, pull through both loops on hook. 1 single crochet completed.
sk – skip: Do not crochet into these stitches.
sl st – slip stitch: Insert hook into stitch, yarn over (yo), pull up a loop, 2 loops on hook. Pull the first loop through the second loop. 1 slip stitch completed.
sp – space
st(s) – stitch(es)
WS – wrong side: The back of your crochet piece.
* to * – Repeat instructions between asterisks as many times as directed.
( ) – Sets of stitches to be worked within one stitch or space.
[ ] – The total number of stitches at the end of a row.
SPECIAL STITCHES
FPdc – front post double crochet: Yarn over (yo), insert hook from front to back to front around the post of the next stitch, yo, pull up a loop, 3 loops remaining on hook. Yo, pull up a loop and pull through 2 loops on hook, 2 loops remaining on hook. Yo, pull up a loop and pull through remaining 2 loops on hook. 1 FPdc completed.
V stitch – (1dc, ch3, 1dc) worked in the same stitch
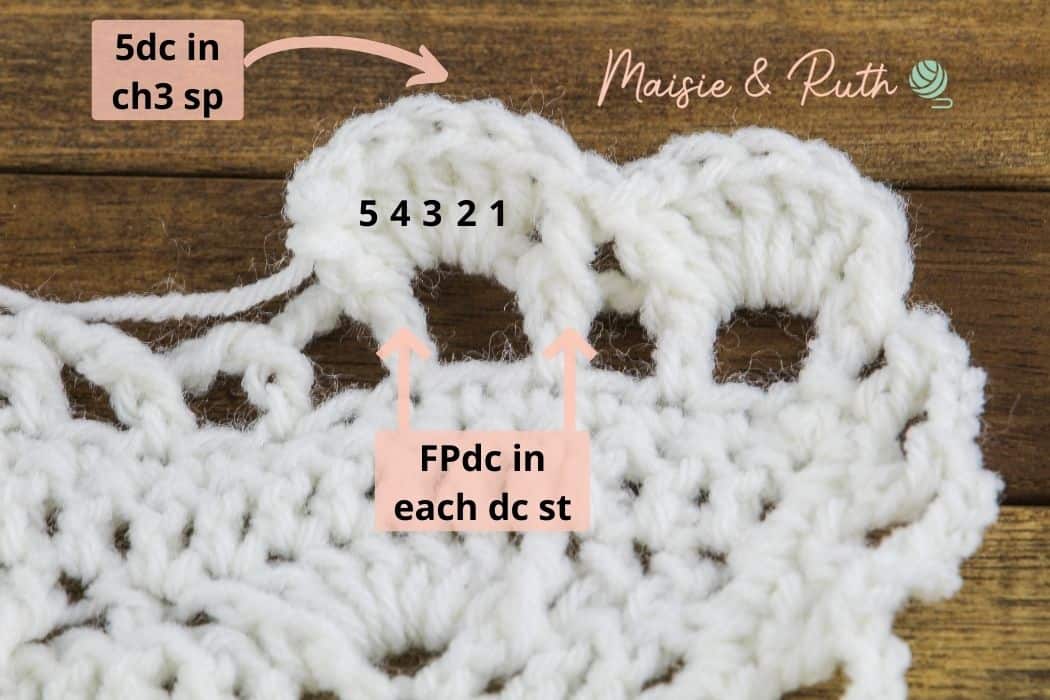
Shell – 5dc in ch3 space
PATTERN NOTES
- US crochet terms used throughout.
- 4-row pattern repeat (repeat rows 4 – 7).
- You can easily adjust the size of this blanket: the pattern uses a multiple of 8 + 5 (add an extra 2 for the foundation chain). For this particular pattern I chained 119 in total (I chained 112, which is divisible by 8, then 5 extra chains were made. A further 2 chains were added for the foundation chain).
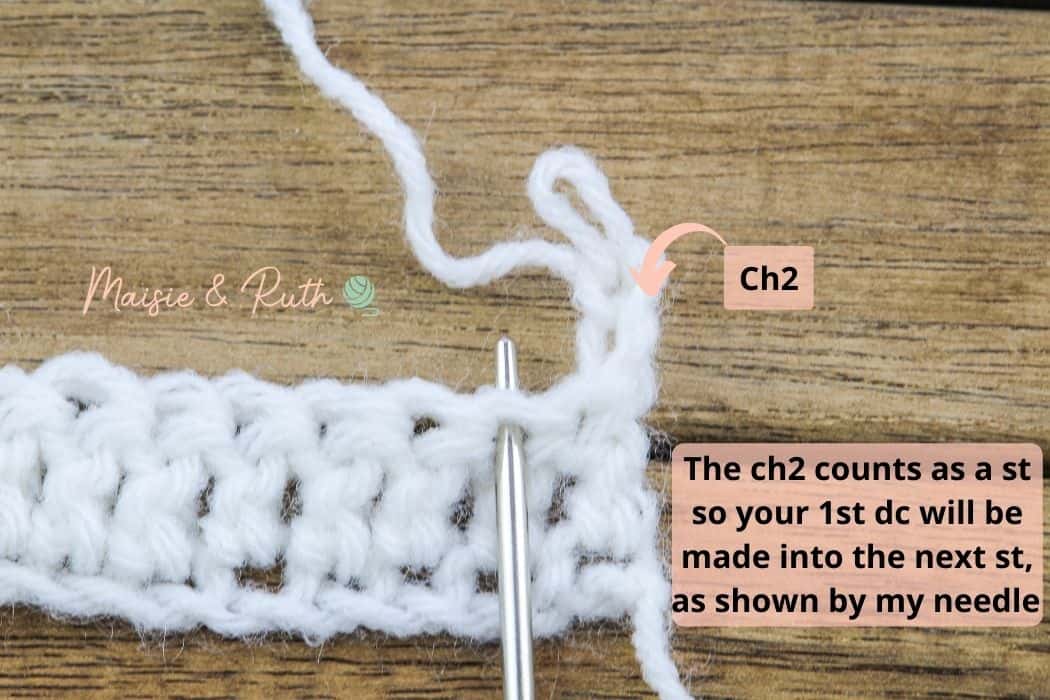
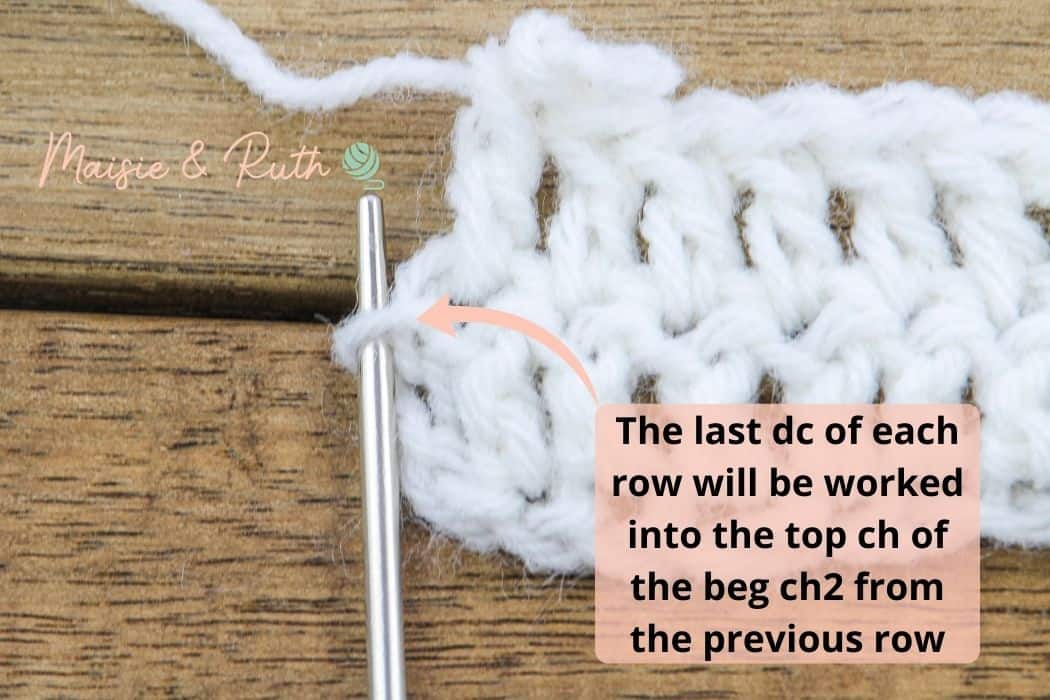
- The ch2 made at the beginning of each row counts as the first dc of the row.
- At the end of rows, your last stitch should be worked into the top of the ch2 from the previous row.
- I have provided full written instructions at the beginning of each row. I then break down these instructions and provide photos of the required steps / stitches for greater clarification.
PATTERN INSTRUCTIONS
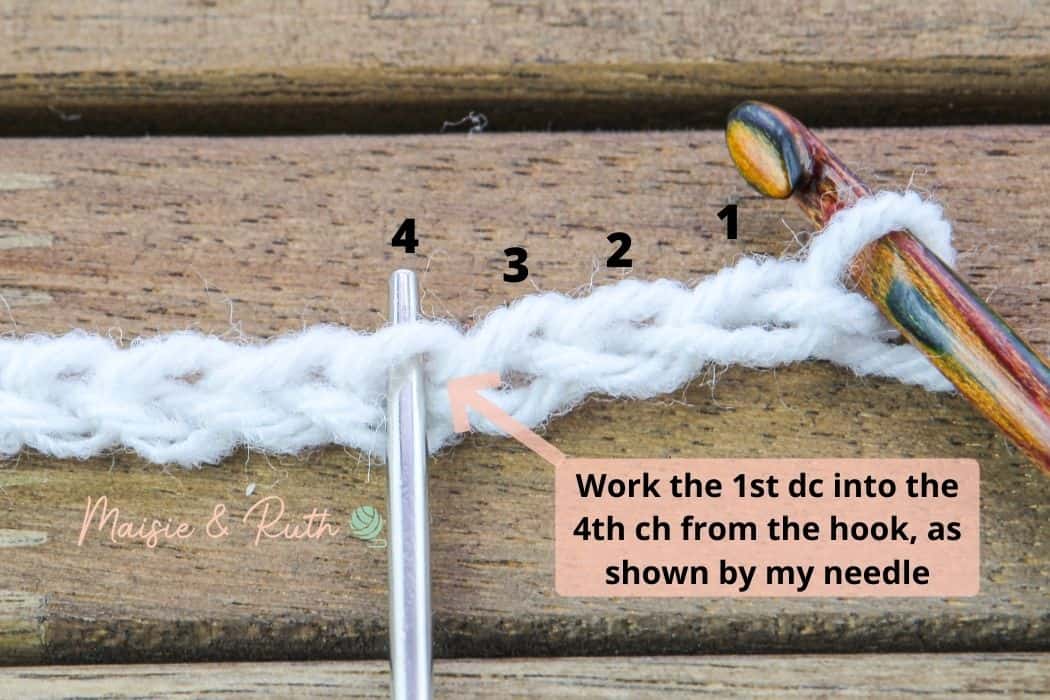
Chain 119 (make sure that your foundation chain is fairly tight)
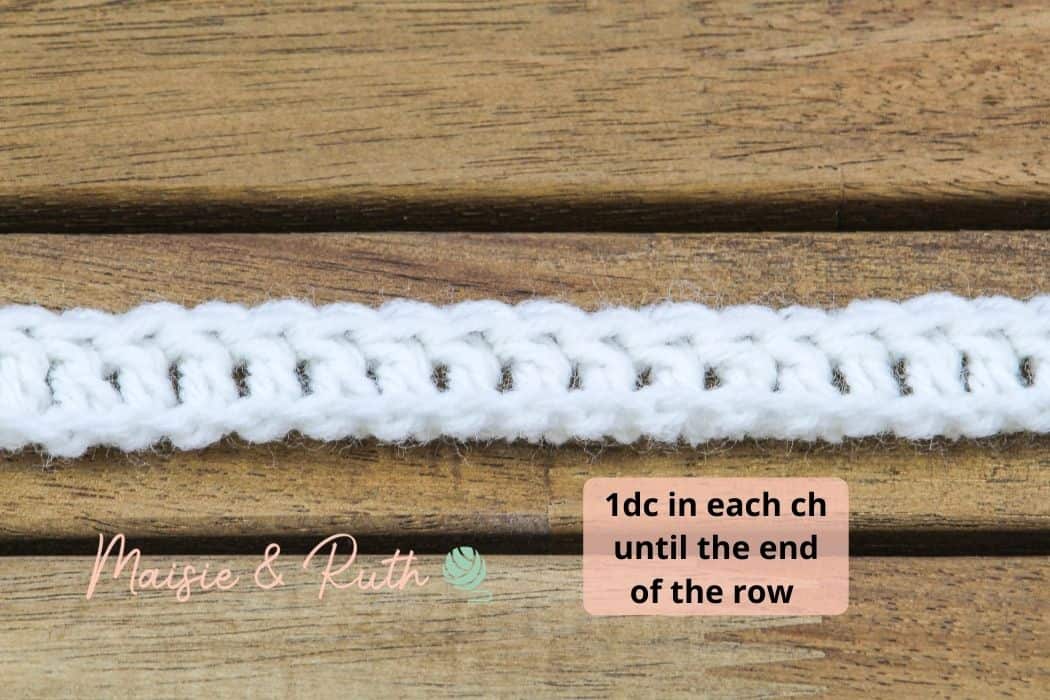
Row 1. 1dc in the 4th ch from hook (skipped 3 chs count as 1st dc), 1dc in each ch until end of row, TURN, [117 sts].
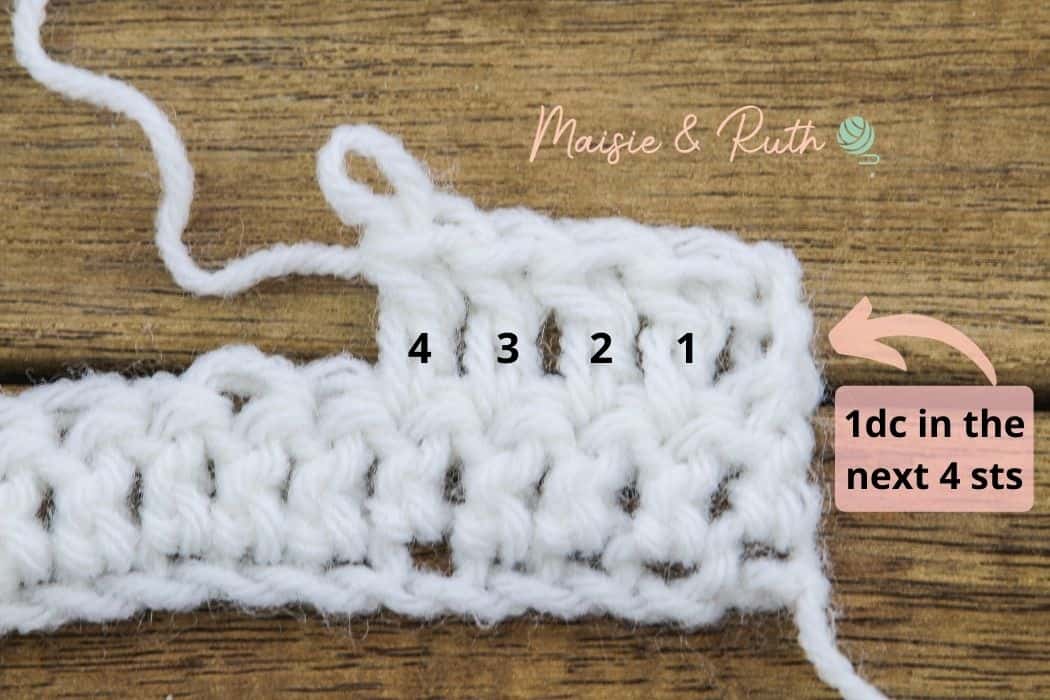
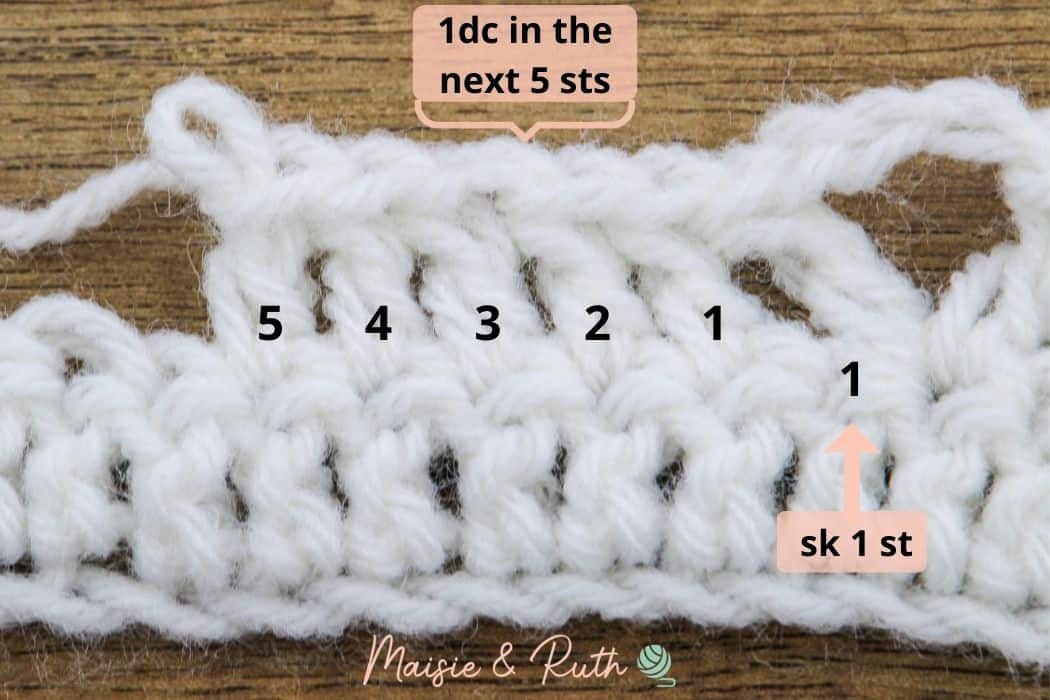
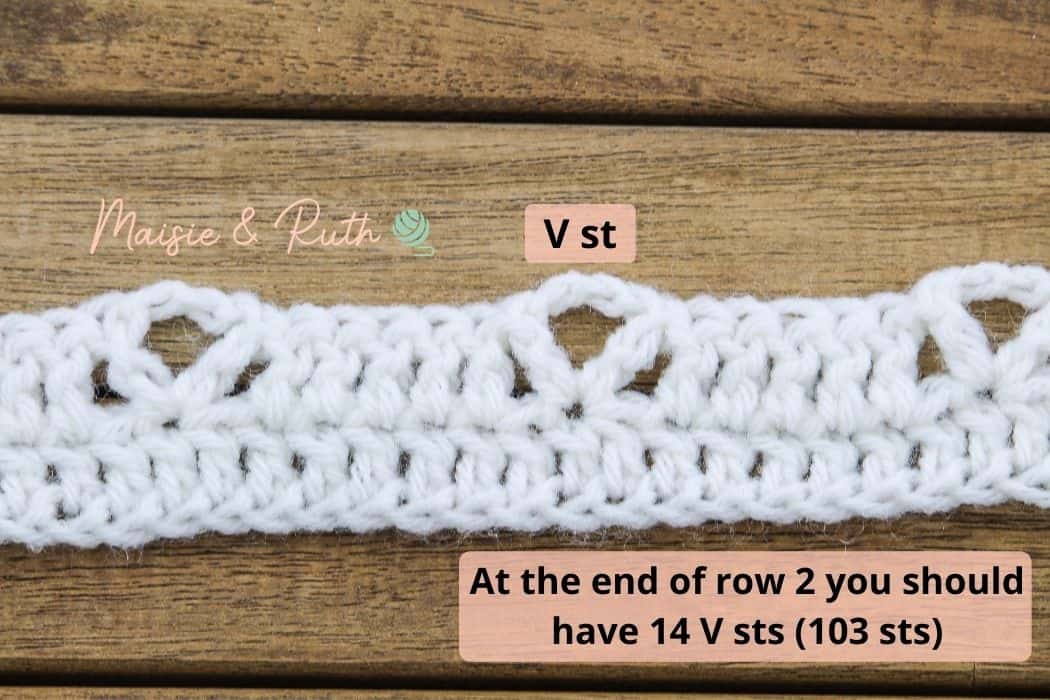
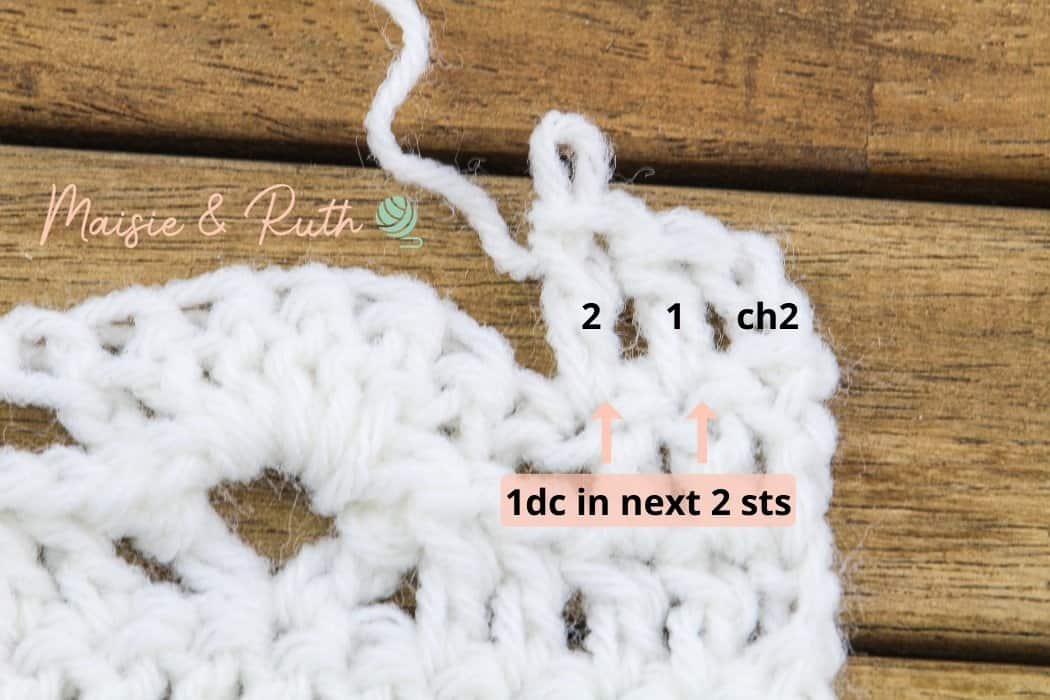
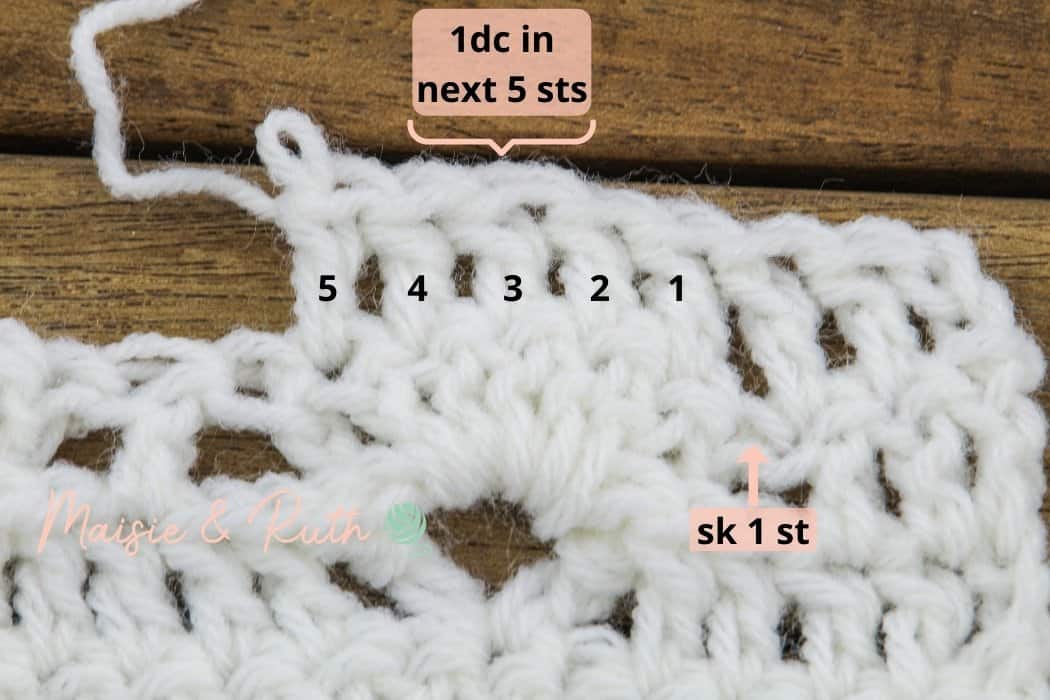
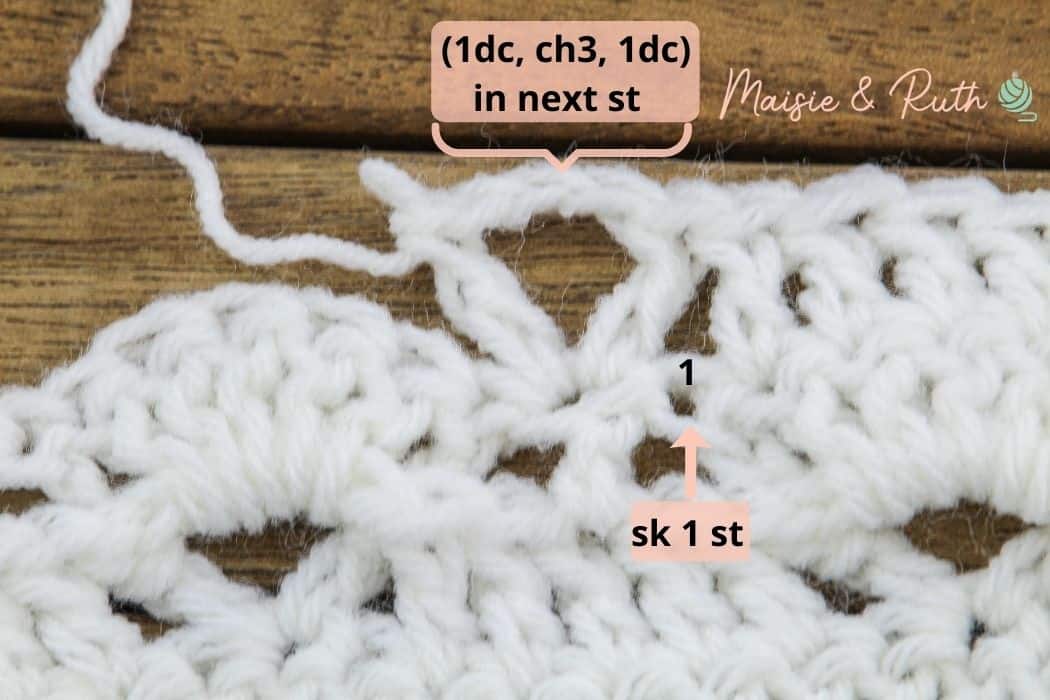
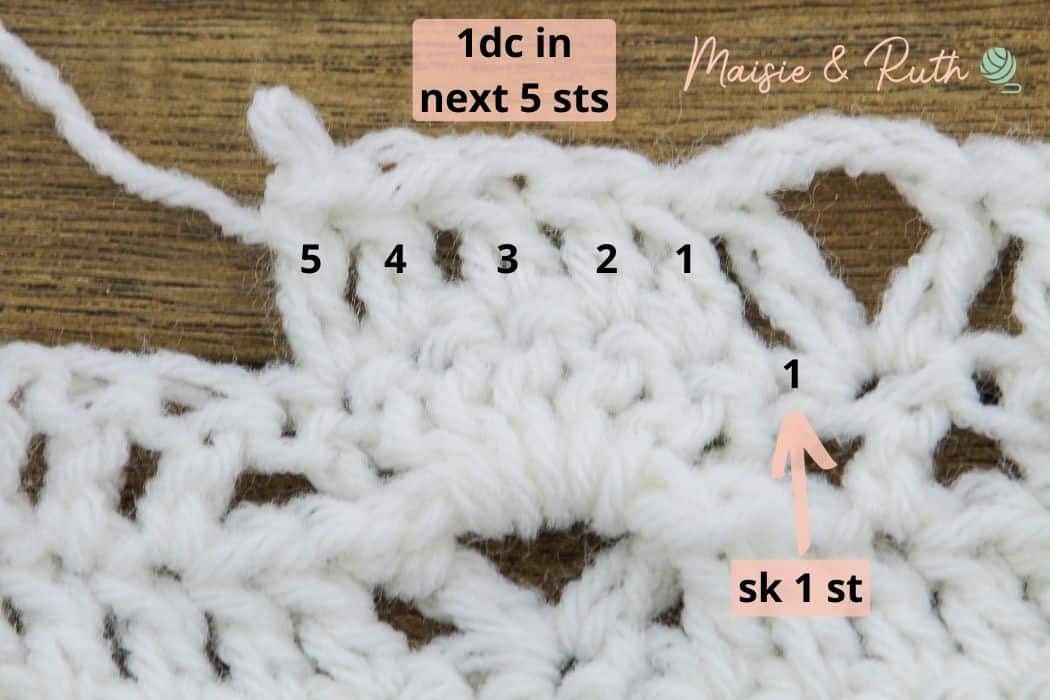
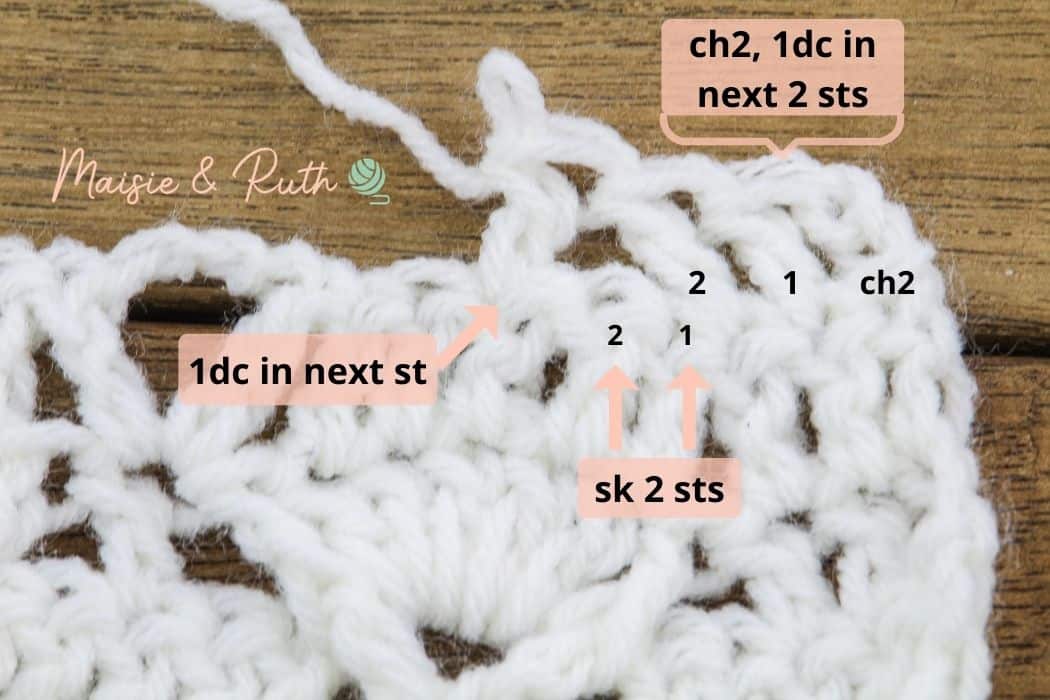
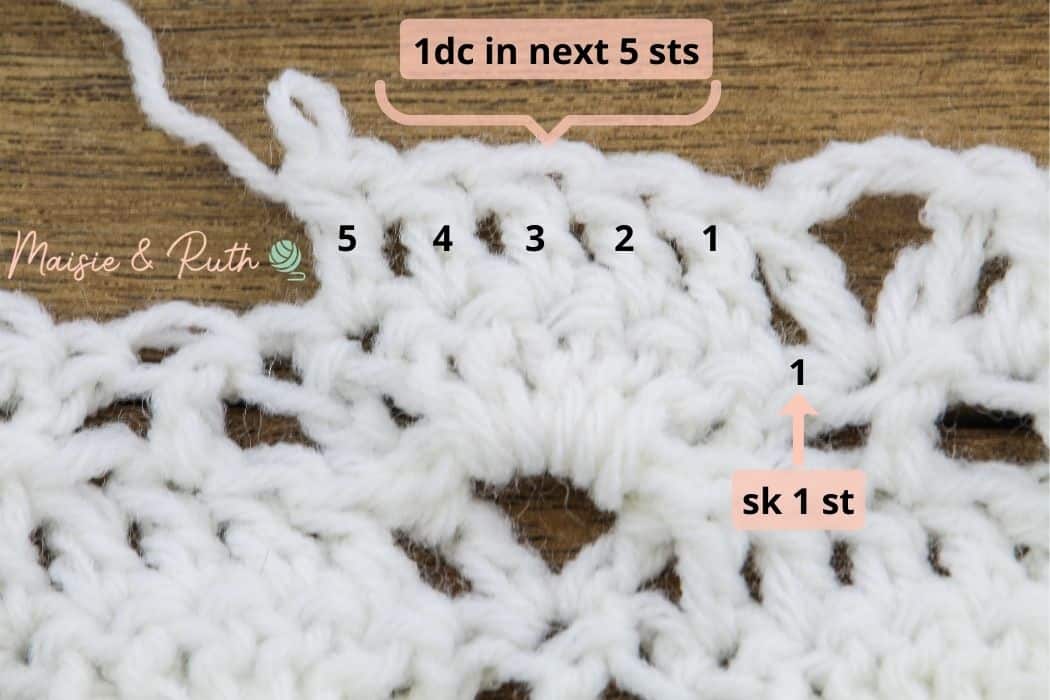
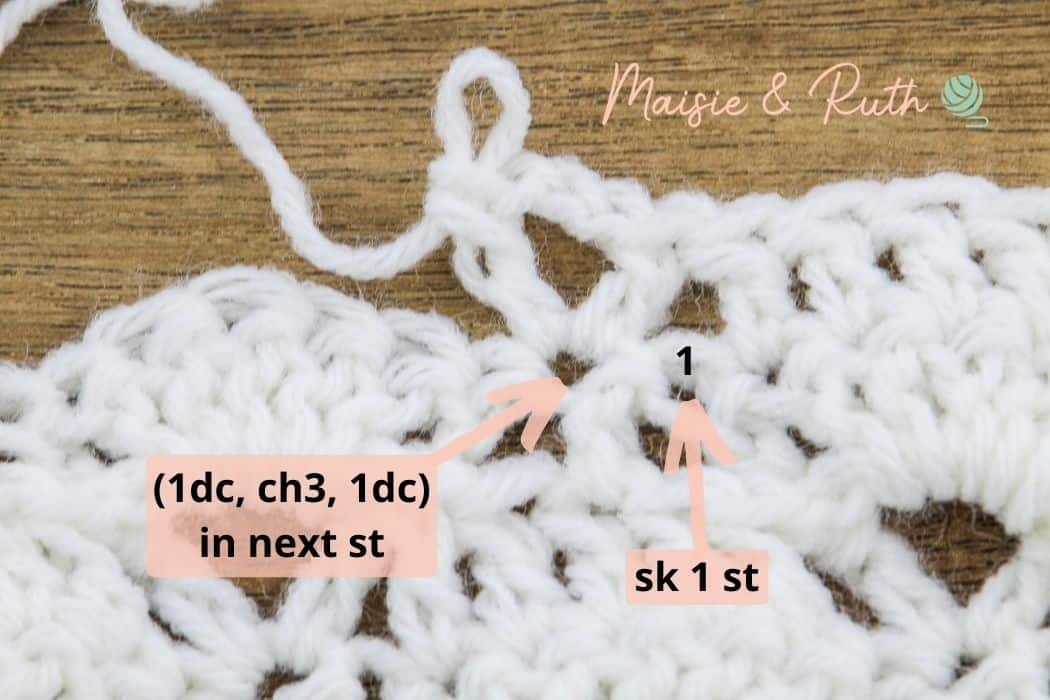
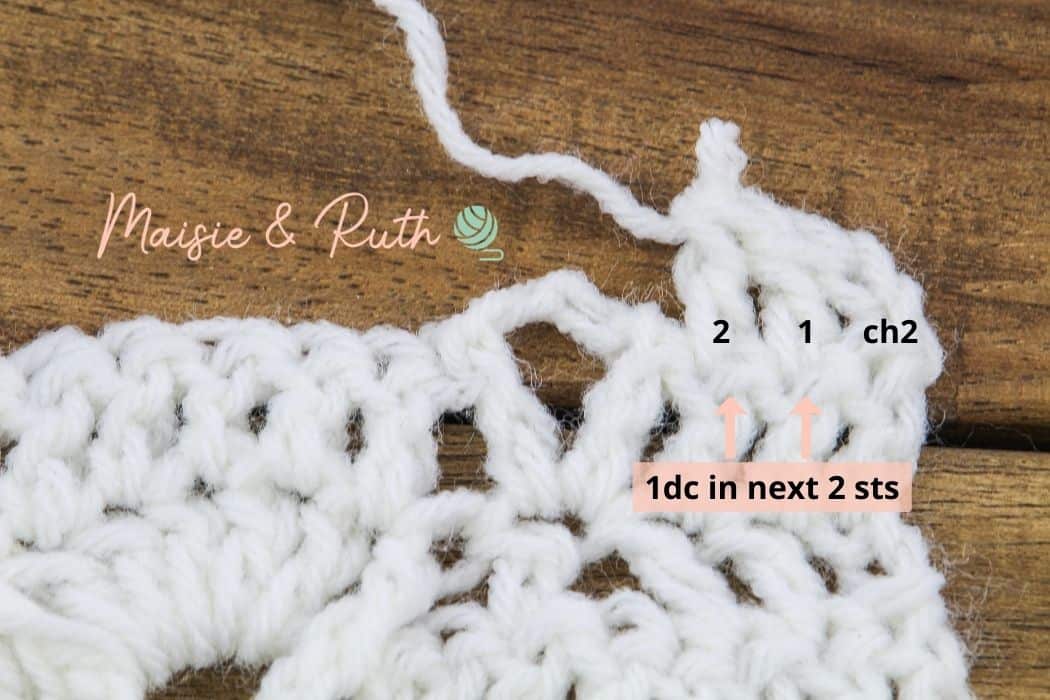
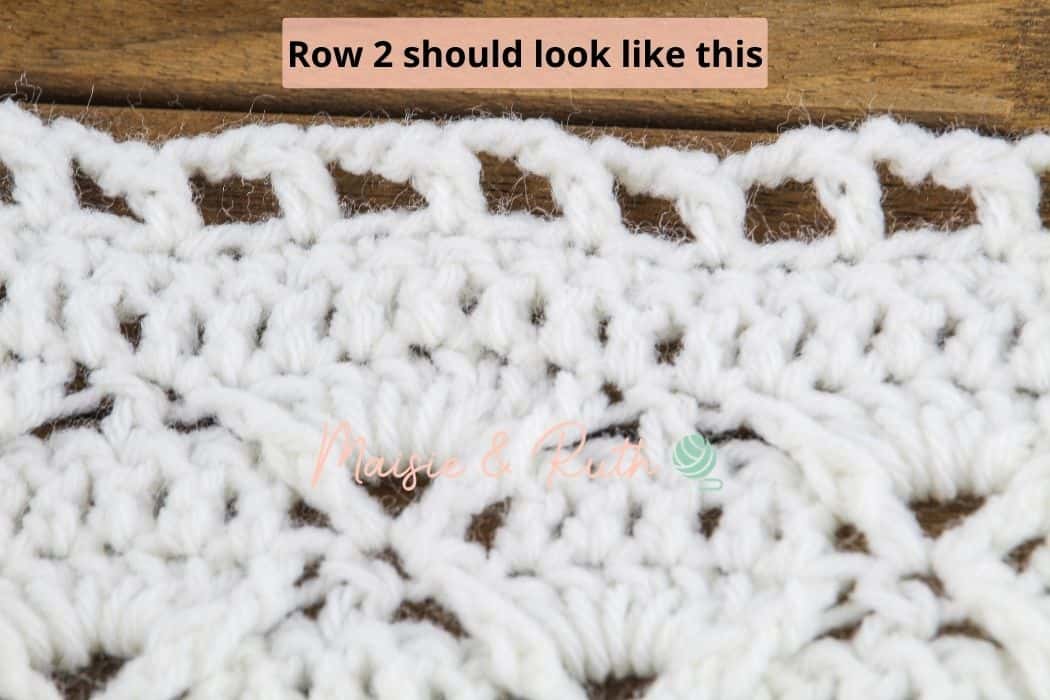
Row 2. Ch2 (counts as a dc here and throughout), 1dc in next 4 sts, *sk 1 st, (1dc, ch3, 1dc) in the next st, sk 1 st, 1dc in next 5 sts*, repeat from * to * across the row, TURN, [14 V stitches (103 sts in total)].
The following stitches that you will now work will form the row repeat (the instructions between * to *):

Work the row repeat across to the very end of the row.
Once you get to the end of each row, it’s important not to forget to work into the top of the beginning ch2 from the previous row… it’s very easy to miss this last stitch! (see image below).
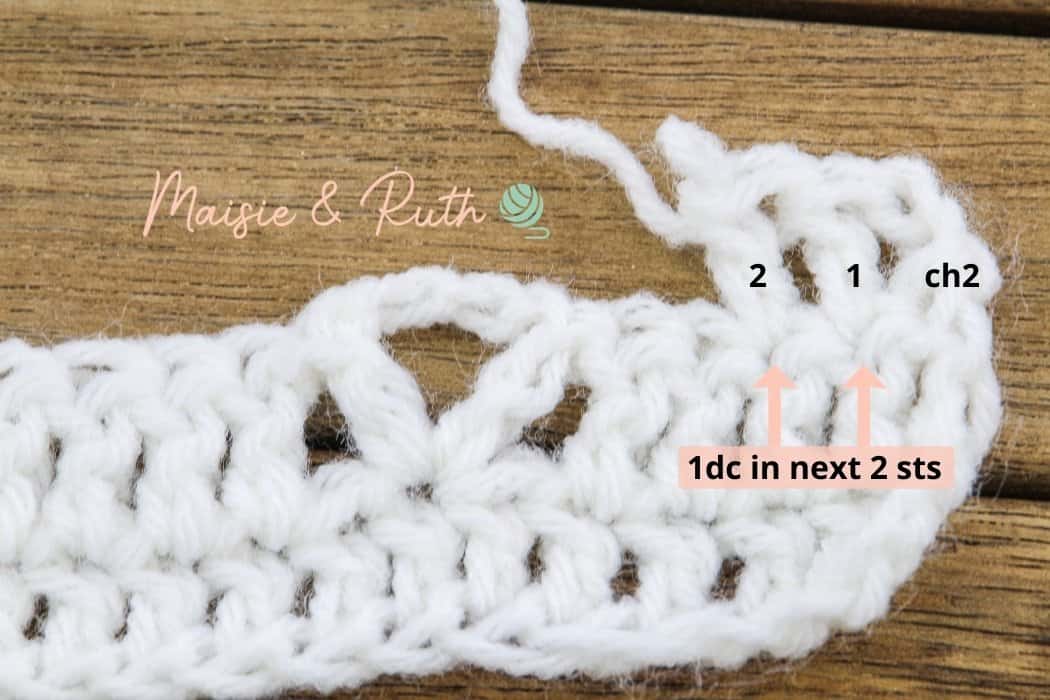
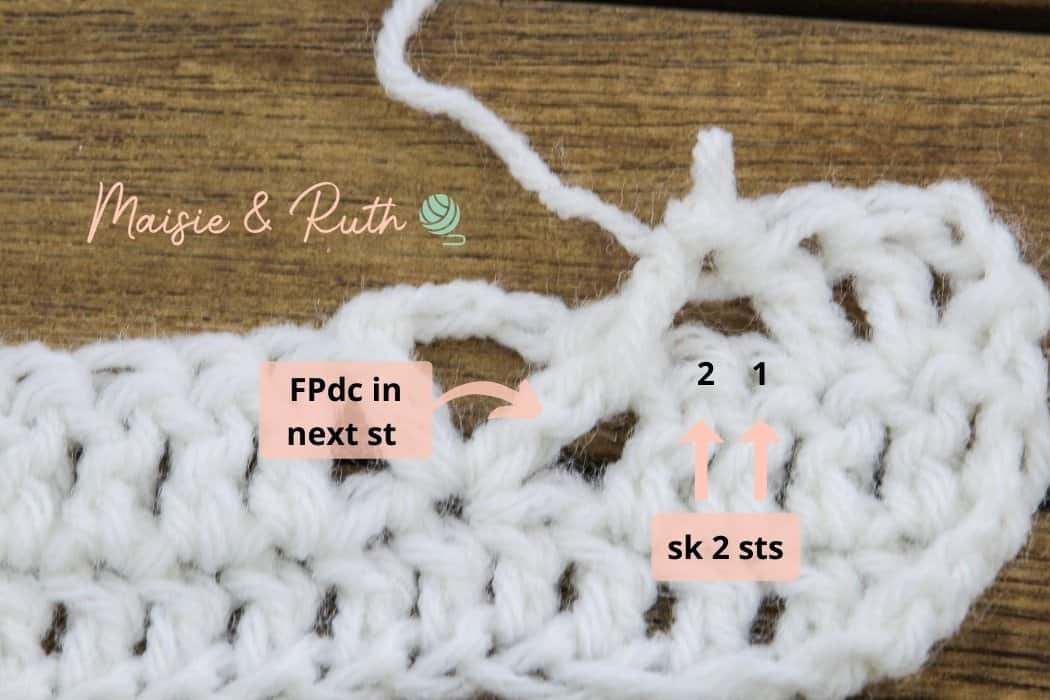
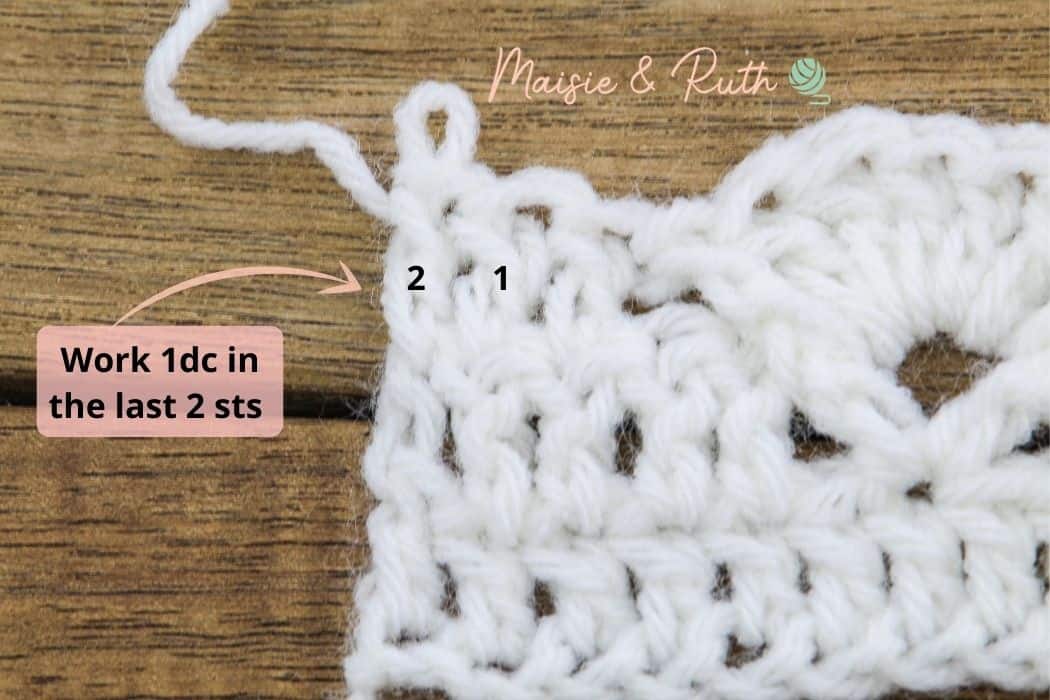
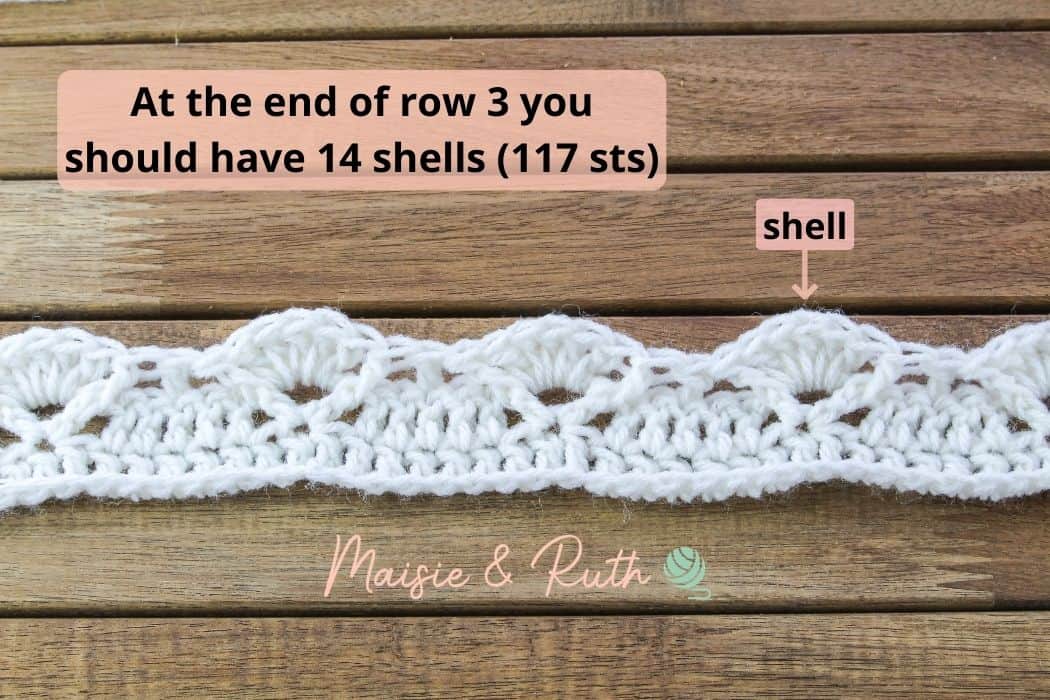
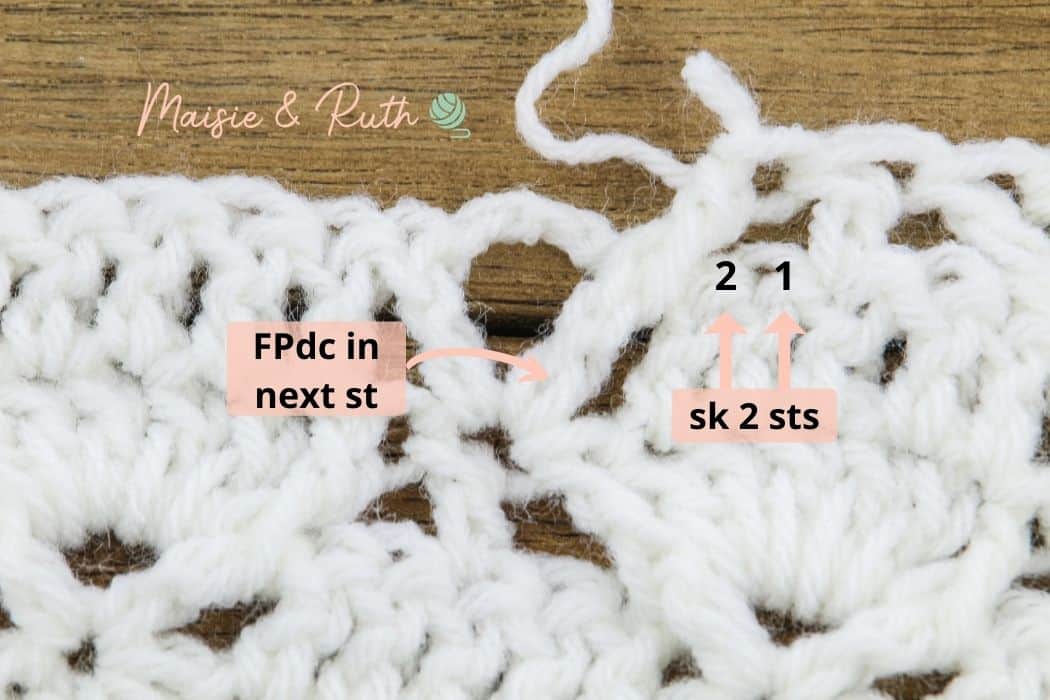
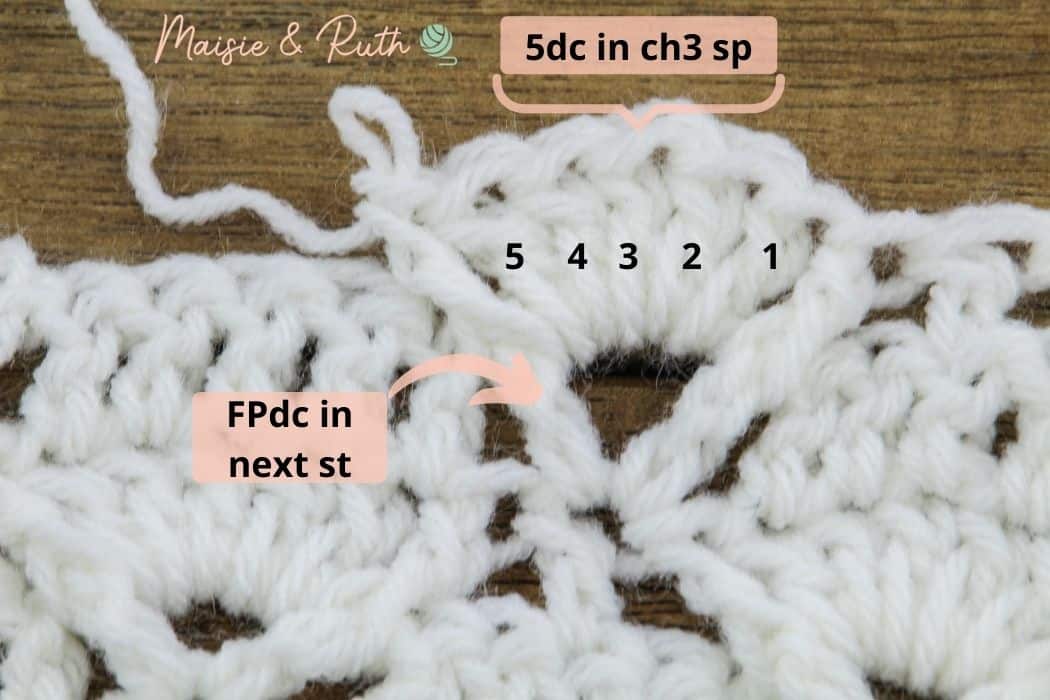
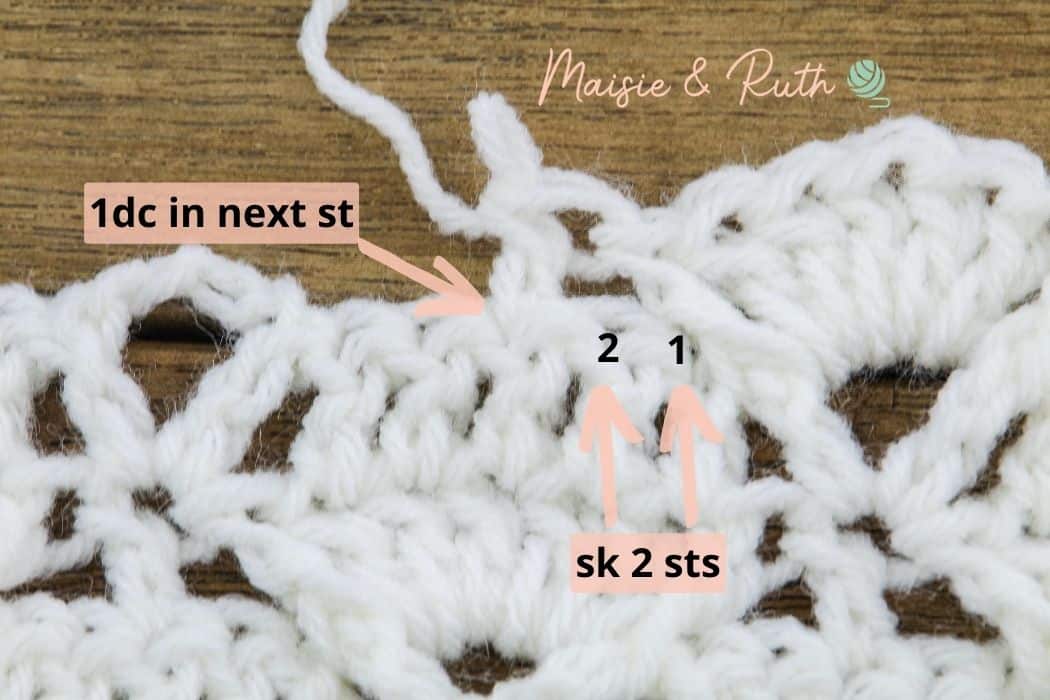
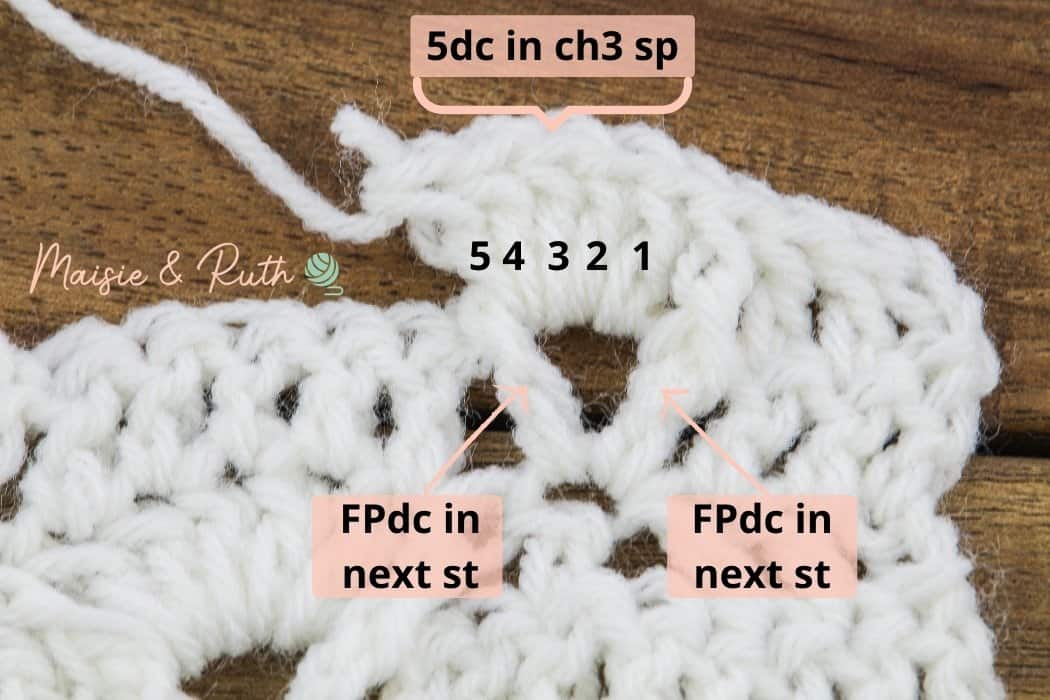
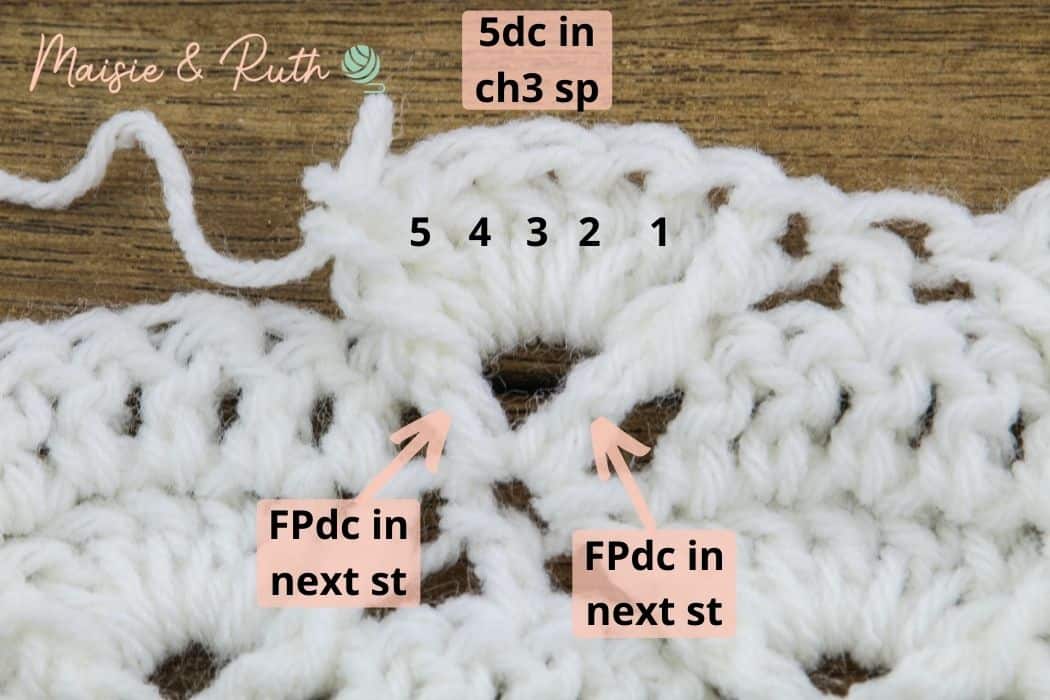
Row 3. Ch2, 1dc in next 2 sts, *sk 2 sts, FPdc in next st, 5dc in ch3 sp, FPdc in next st, sk 2 sts, 1dc in next st*, repeat from * to * across the row to last 2 sts, 1dc in last 2 sts, TURN [14 shells (117 sts in total)].
The following stitches that you will now work will form the row repeat:
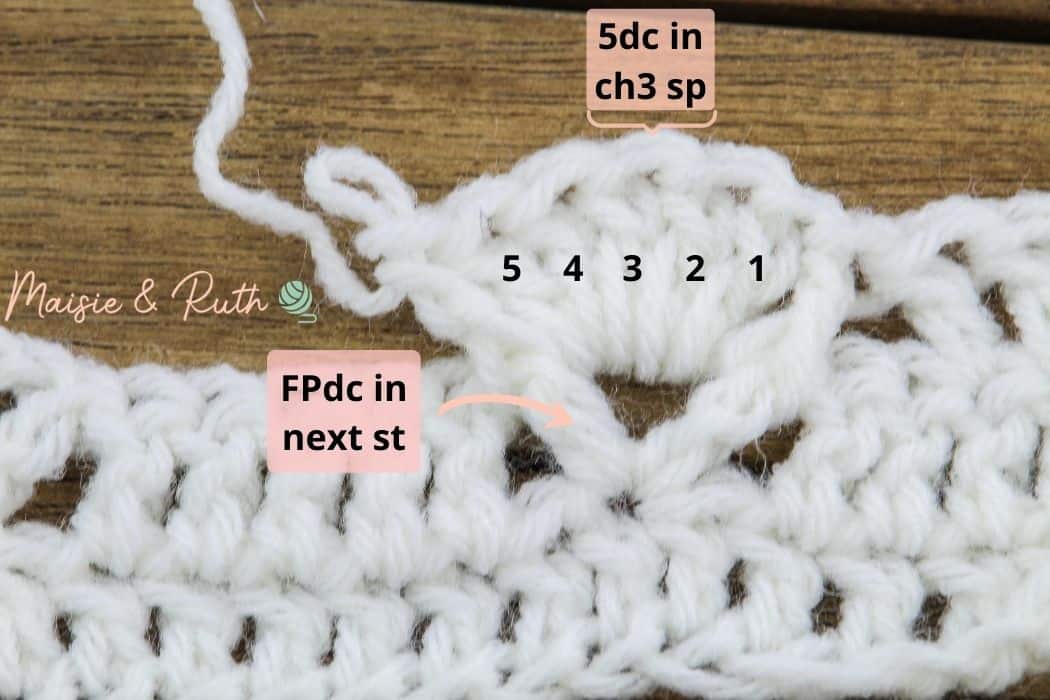
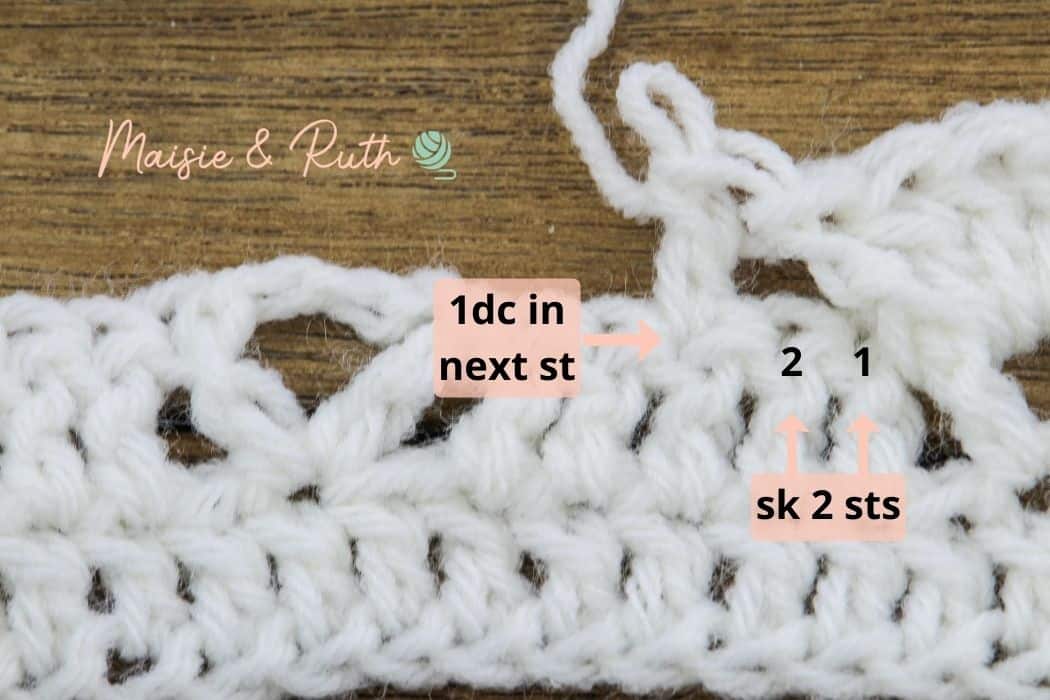
Work the row repeat across the row to the last 2 sts.
Work the last 2 stitches as follows:
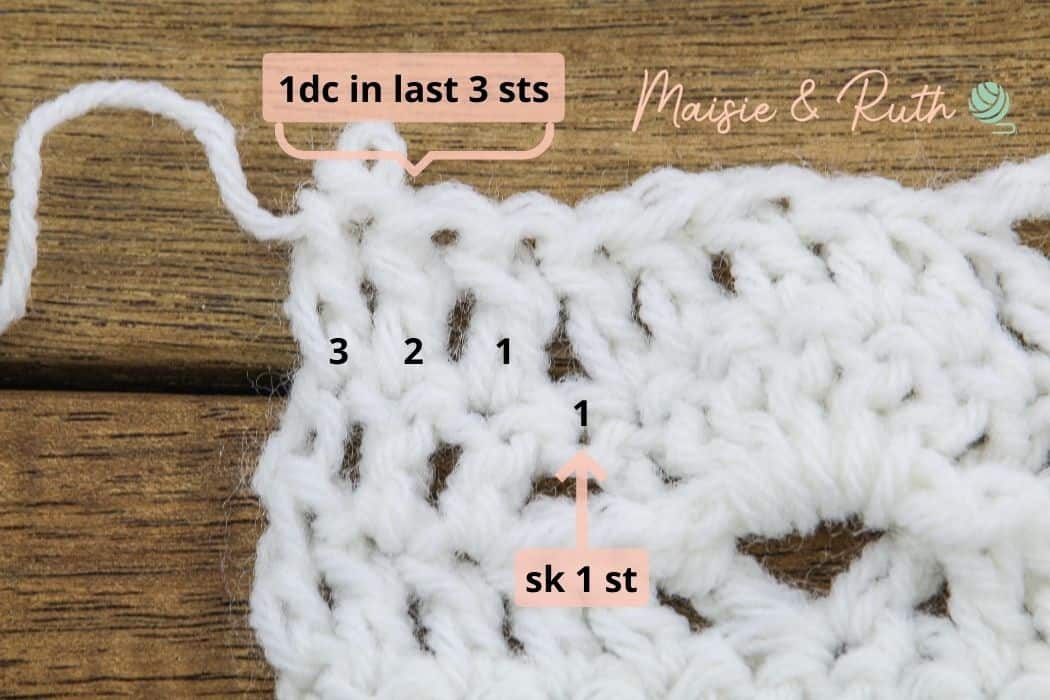
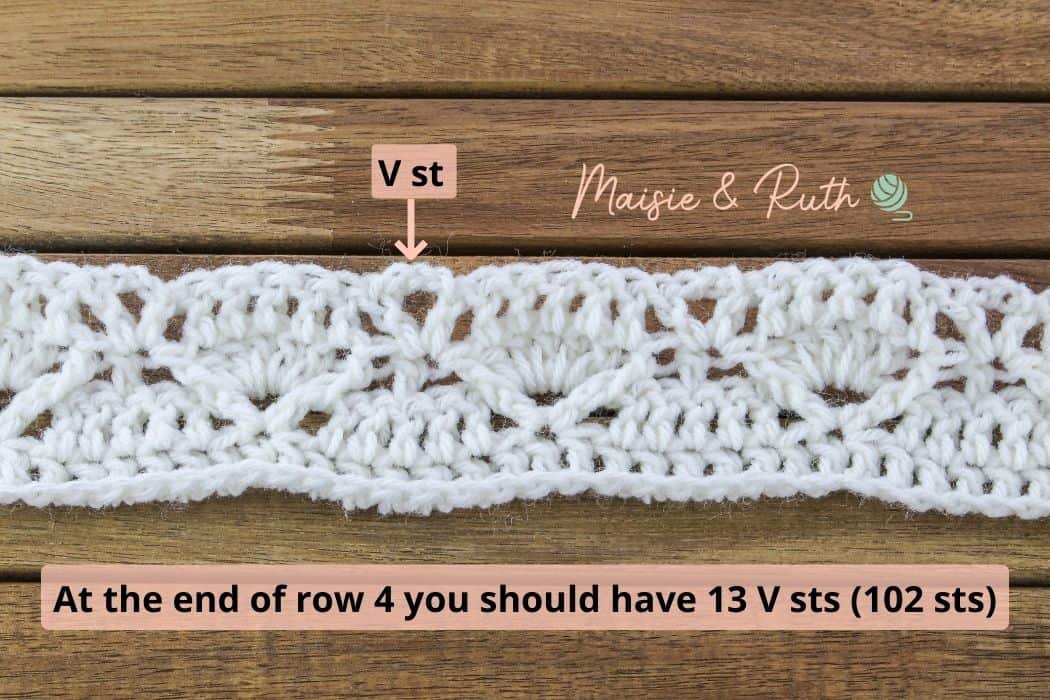
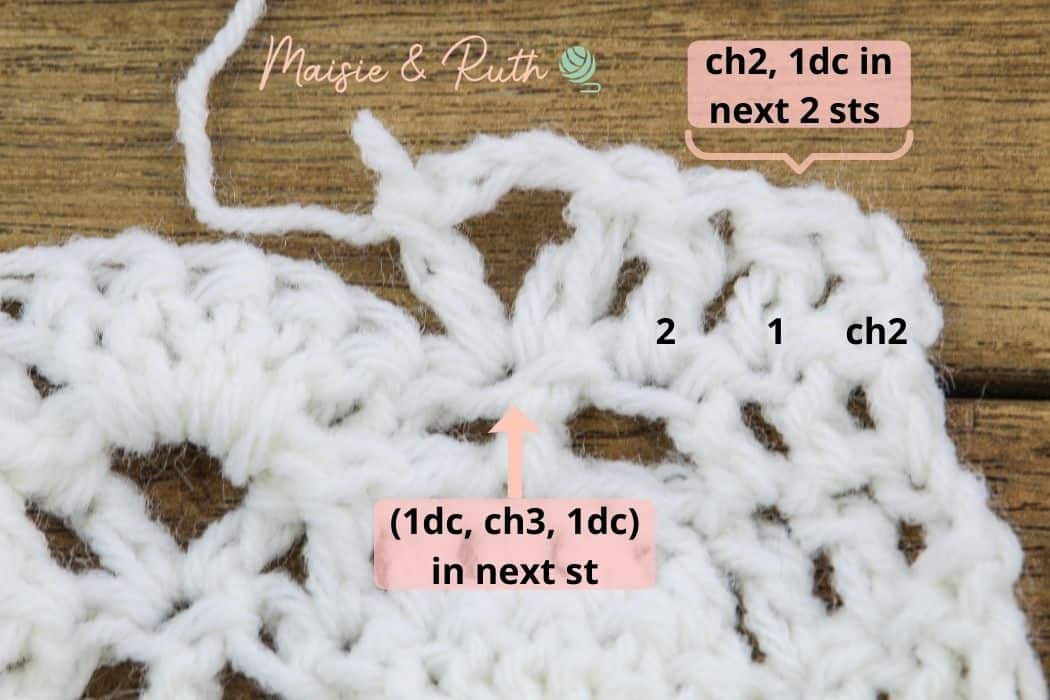
Row 4. Ch2, 1dc in next 2 sts, sk 1 st, 1dc in next 5 sts, *sk 1 st, (1dc, ch3, 1dc) in next st, sk 1 st, 1dc in next 5 sts*, repeat from * to * across the row to last 4 sts, sk 1 st, 1 dc in last 3 sts, TURN, [13 V sts (102 sts in total)].
The following stitches that you will now work will form the row repeat:
Work the row repeat across the row to the last 4 sts.
Work the last 4 stitches as follows:
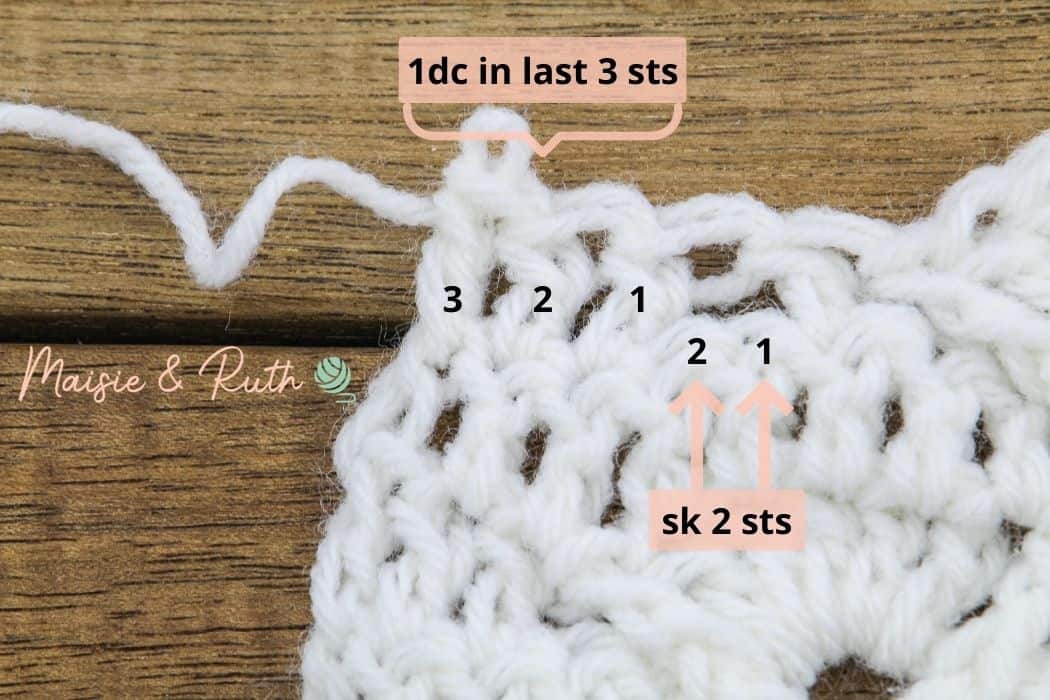
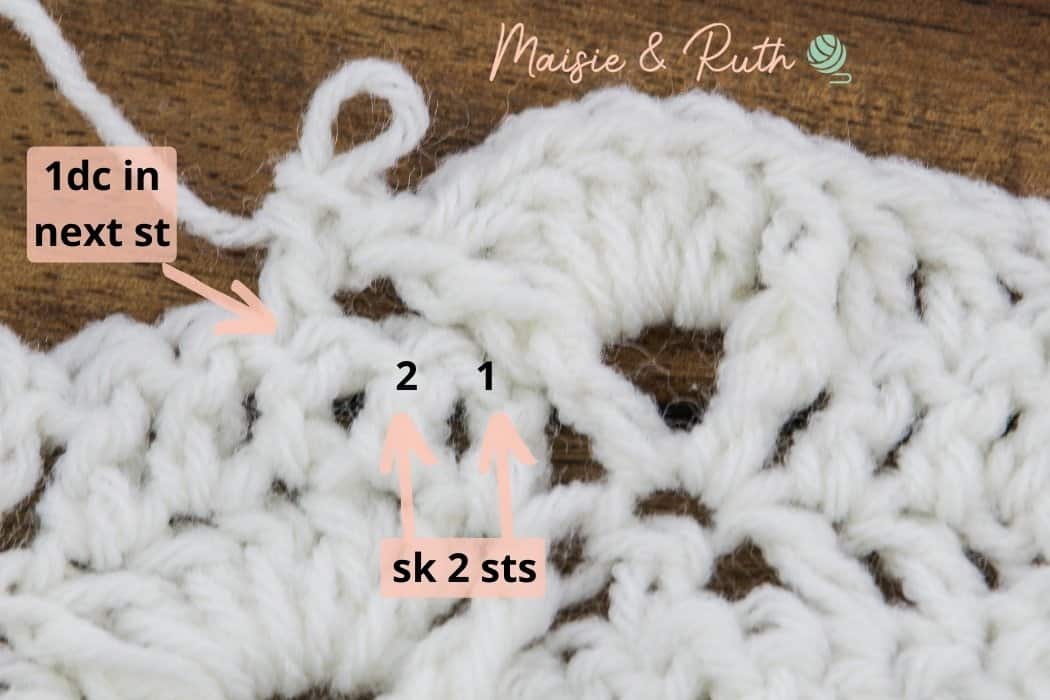
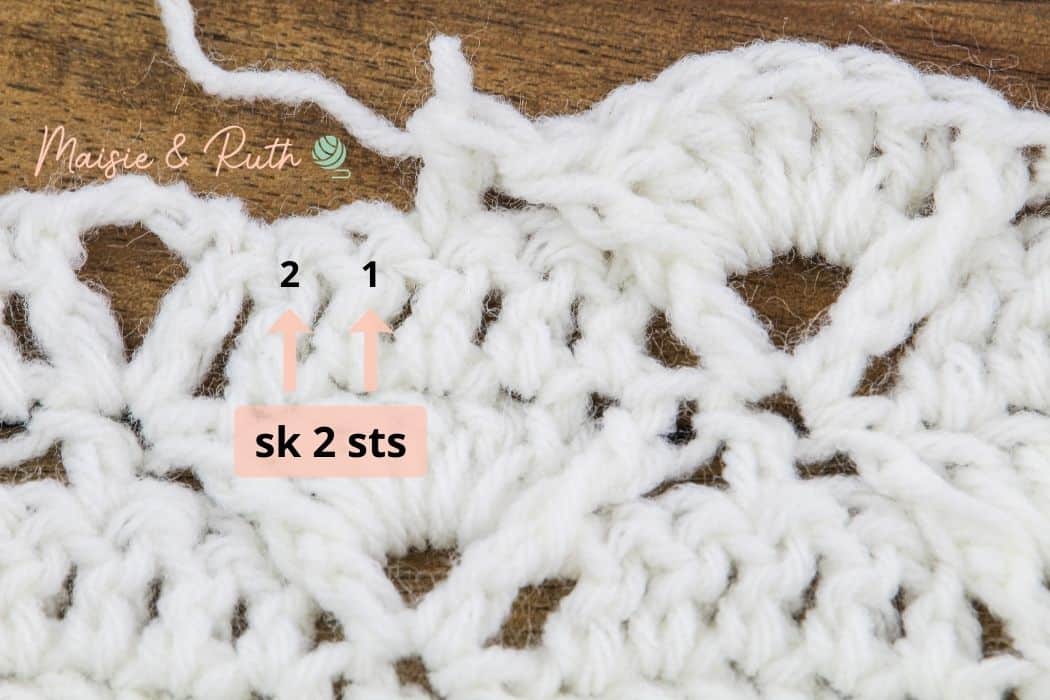
Row 5. Ch2, 1dc in next 2sts, sk 2 sts, 1dc in next st, *sk 2 sts, FPdc in next st, 5dc in ch3 sp, FPdc in next st, sk 2 sts, 1dc in next st*, repeat from * to * across the row to last 5 sts, sk 2sts, 1dc in last 3 sts, TURN, [13 shells (112 sts in total)].
The following stitches that you will now work will form the row repeat.
Work the row repeat across the row to the last 5 sts.
Work the last 5 stitches as follows:

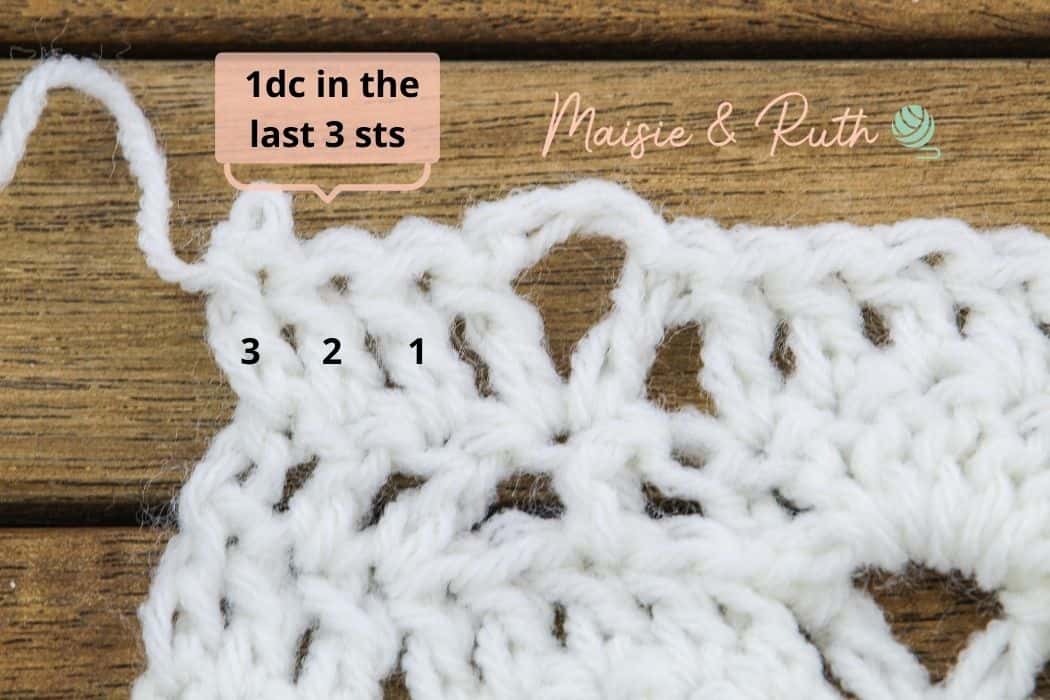
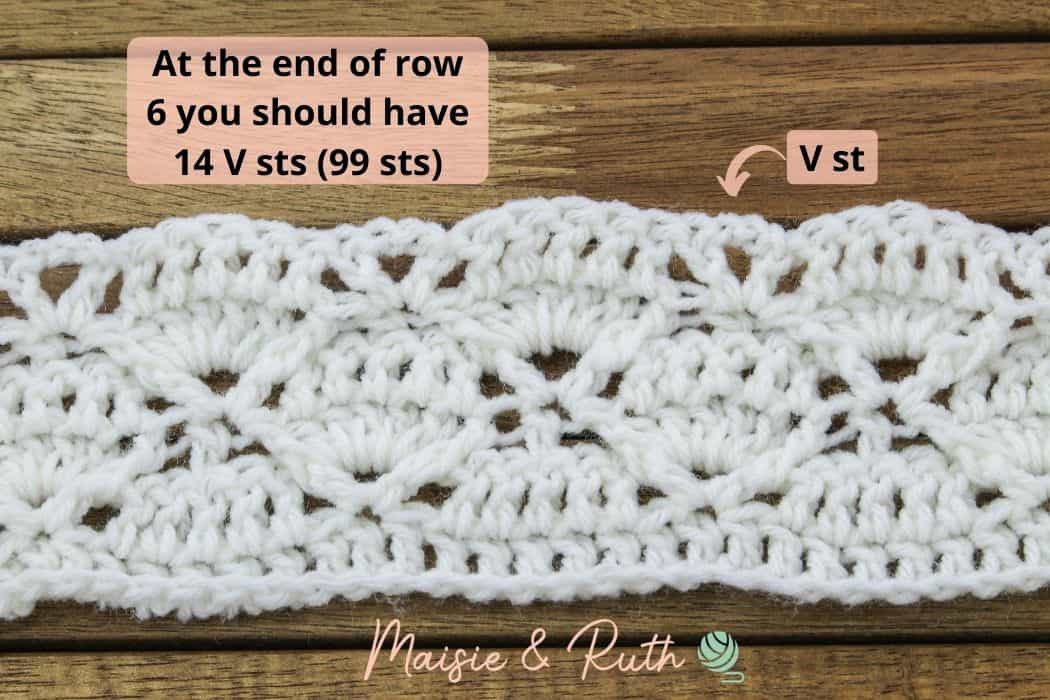
Row 6. Ch2, 1dc in next 2 sts, (1dc, ch3, 1dc) in next st, *sk 1 st, 1dc in next 5 sts, sk 1 st, (1dc, ch3, 1dc) in next st*, repeat from * to * across the row to last 3 sts, 1dc in last 3 sts, TURN, [14 V sts (99 sts in total)].
The following stitches that you will now work will form the row repeat:
Work the row repeat across the row to the last 3 sts.
Work the last 3 stitches as follows:
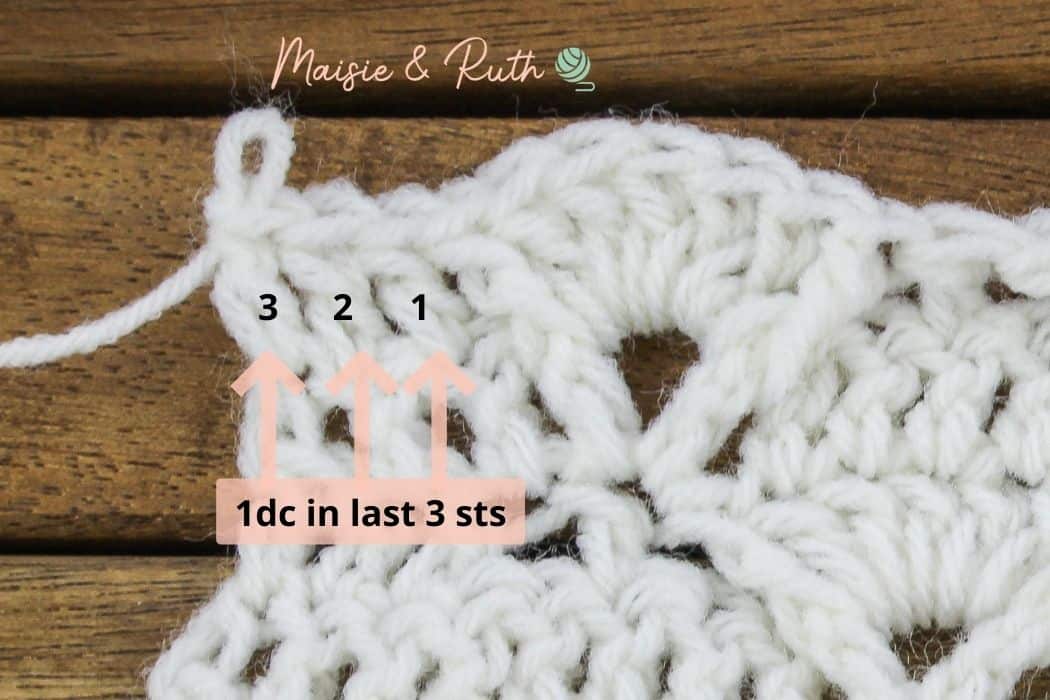
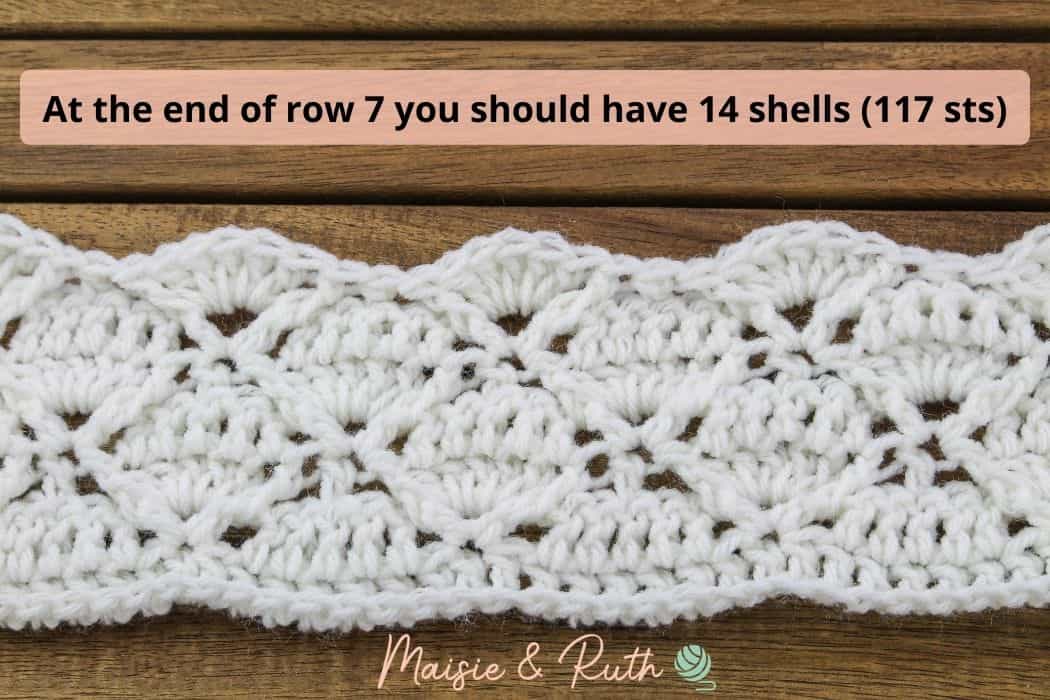
Row 7. Ch2, 1dc in next 2 sts, FPdc in next st, 5dc in ch3 sp, FPdc in next st, *sk 2 sts, 1dc in next st, sk 2 sts, FPdc in next st, 5dc in ch3 sp, FPdc in next st*, repeat from * to * across the row to last 3 sts, 1dc in last 3 sts ,TURN, [14 shells (117 sts in total)].
The following stitches that you will now work will form the row repeat:
Work the row repeat across the row to the last 3 sts.
Work the last 3 stitches as follows:
Repeat rows 4 – 7 for fourteen times more, until you have a total of 63 rows.
Make sure that you finish the blanket at the end of a row 7 repeat.
To begin the last row (row 64), cut your yarn and with the right side of the blanket facing you, re-attach it to the top of the chain 2 at the beginning of the row you just worked.
Row 64. Ch2 (counts as your first st), 1dc in next 116 sts [117 sts].
You are now ready to begin working on the border.
BORDER FOR YOUR CROCHET BABY BLANKET
When you have finished your last row, work the border as follows:
Round 1:
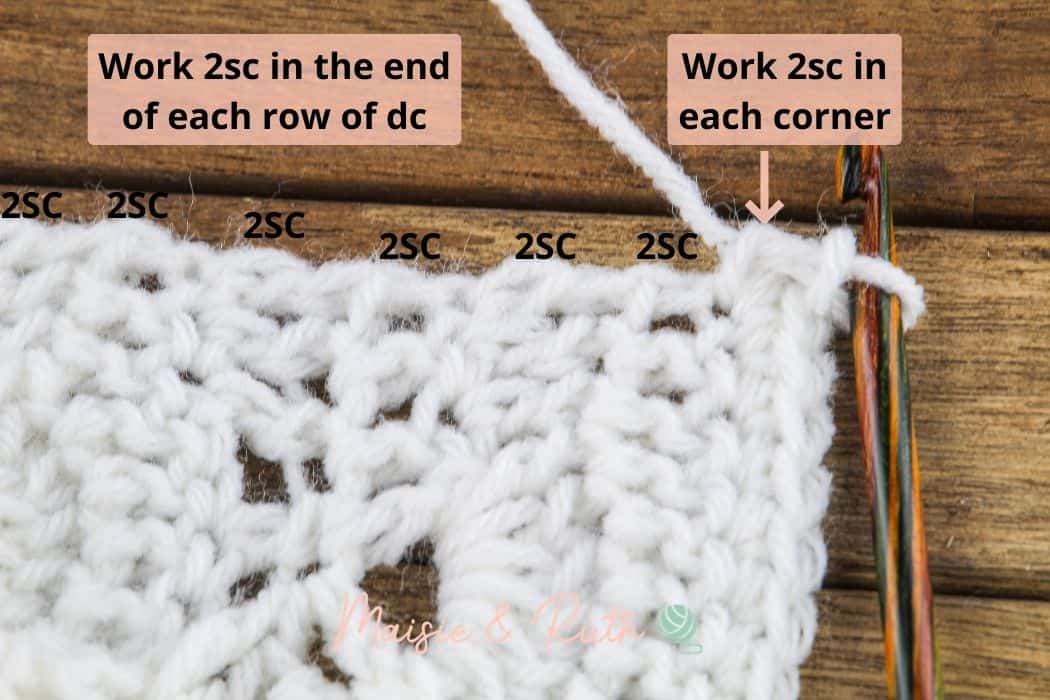
SIDE 1. 2sc in the corner of the blanket, then work 2sc in each dc row end down the side of the blanket, 2sc in the corner st (see photo below).
The image below shows you where you should work 2sc in each dc row end. Take care to work your sc sts around the st (do not try and wriggle your hook into the st).
SIDE 2 (Bottom of blanket). 1sc in each st along the bottom foundation row, 2sc in the corner st.
SIDE 3. 2sc in each dc row end up the side of the blanket, 2sc in the corner st
SIDE 4 (Top of blanket). 1sc in each st along the top. Sl st to 1st sc to join. DO NOT TURN.
Round 2. Ch5 (counts as 1dc and a ch3), *sk 1 st, 1dc in next st, ch3*, repeat from * to * around all 4 sides of blanket, sl st to 3rd ch of beg ch5 to join, DO NOT TURN.
Round 3. *FPdc, 5dc in ch3 sp*, repeat from * to * around all 4 sides of blanket, sl st to 1st FPdc to join, DO NOT TURN.
Round 4. Ch1 (does not count as a st), 1sc in each st around all 4 sides of blanket, sl st to 1st sc to join. Cut yarn & fasten off.
OPTIONAL: Weave a ribbon through row 2 in the color of your choice. This step is completely optional… the blanket looks pretty with and without a ribbon!
PATTERN IN FULL
Ch119
Row 1 (RS). 1dc in the 4th ch from hook (skipped 3 chs count as 1st dc), 1dc in each ch until end of row, TURN, [117 sts].
Row 2 (WS). Ch2 (counts as a dc here and throughout), 1dc in next 4 sts, *sk 1 st, (1dc, ch3, 1dc) in the next st, sk 1 st, 1dc in next 5 sts*, repeat from * to * across the row, TURN, [14 V stitches (103 sts in total)].
Row 3. Ch2, 1dc in next 2 sts, *sk 2 sts, FPdc in next st, 5dc in ch3 sp, FPdc in next st, sk 2 sts, 1dc in next st*, repeat from * to * across the row to last 2 sts, 1dc in last 2 sts, TURN [14 shells (117 sts in total)].
Row 4. Ch2, 1dc in next 2 sts, sk 1 st, 1dc in next 5 sts, *sk 1 st, (1dc, ch3, 1dc) in next st, sk 1 st, 1dc in next 5 sts*, repeat from * to * across the row to last 4 sts, sk 1 st, 1 dc in last 3 sts, TURN, [13 V sts (102 sts in total)].
Row 5. Ch2, 1dc in next 2sts, sk 2 sts, 1dc in next st, *sk 2 sts, FPdc in next st, 5dc in ch3 sp, FPdc in next st, sk 2 sts, 1dc in next st*, repeat from * to * across the row to last 5 sts, sk 2sts, 1dc in last 3 sts, TURN, [13 shells (112 sts in total)].
Row 6. Ch2, 1dc in next 2 sts, (1dc, ch3, 1dc) in next st, *sk 1 st, 1dc in next 5 sts, sk 1 st, (1dc, ch3, 1dc) in next st*, repeat from * to * across the row to last 3 sts, 1dc in last 3 sts, TURN, [14 V sts (99 sts in total)].
Row 7. Ch2, 1dc in next 2 sts, FPdc in next st, 5dc in ch3 sp, FPdc in next st, *sk 2 sts, 1dc in next st, sk 2 sts, FPdc in next st, 5dc in ch3 sp, FPdc in next st*, repeat from * to * across the row to last 3 sts, 1dc in last 3 sts ,TURN, [14 shells (117 sts in total)].
Repeat rows 4 – 7 for fourteen times more, until you have a total of 63 rows.
Make sure that you finish the blanket at the end of a row 7 repeat.
To begin the last row (row 64), cut your yarn and with the right side of the blanket facing you, re-attach it to the top of the chain 2 at the beginning of the row.
Row 64. Ch2 (counts as your first st), 1dc in next 116 sts [117 sts].
You are now ready to begin working on the border.
BORDER
Round 1:
SIDE 1. 2sc in the corner of the blanket, then work 2sc in each dc row end down the side of the blanket, 2sc in the corner st (see photo below).
SIDE 2 (Bottom of blanket). 1sc in each st along the bottom foundation row, 2sc in the corner st.
SIDE 3. 2sc in each dc row end up the side of the blanket, 2sc in the corner st
SIDE 4 (Top of blanket). 1sc in each st along the top. Sl st to 1st sc to join. DO NOT TURN.
Round 2. Ch5 (counts as 1dc and a ch3), *sk 1 st, 1dc in next st, ch3*, repeat from * around all 4 sides of blanket, sl st to 3rd ch of beg ch5 to join, DO NOT TURN.
Round 3. *FPdc, 5dc in ch3 sp*, repeat from * to * around all 4 sides of blanket, sl st to 1st FPdc to join, DO NOT TURN.
Round 4. Ch1 (does not count as a st), 1sc in each st around all 4 sides of blanket, sl st to 1st sc to join. Cut yarn, fasten off and weave in ends.
OPTIONAL: Weave a ribbon through row 2 in the colour of your choice. This step is completely optional… the blanket looks pretty with and without a ribbon!

I hope that this crochet baby blanket pattern was easy for you to follow!
Be sure to pin this pattern and save it for later if you can’t make the blanket right now.
And if you’ve already made the Bonnie Blanket I would love to hear how it turned out!
Did you find the photo tutorial helpful? Leave me a comment below to let me know how you got on 😊
You can also tag me using @maisieandruth if you post a photo of your blanket on Instagram.
Happy crocheting!


This is beautiful. I would love to make one. Thank you for the pictures; considered to do add a graph? So much easier (for some of us) to follow, save & print to do sometime.
Thanks Cor – I’m glad you like it! I don’t have much experience with the software for creating charts and diagrams but I’ll look into this for you.