


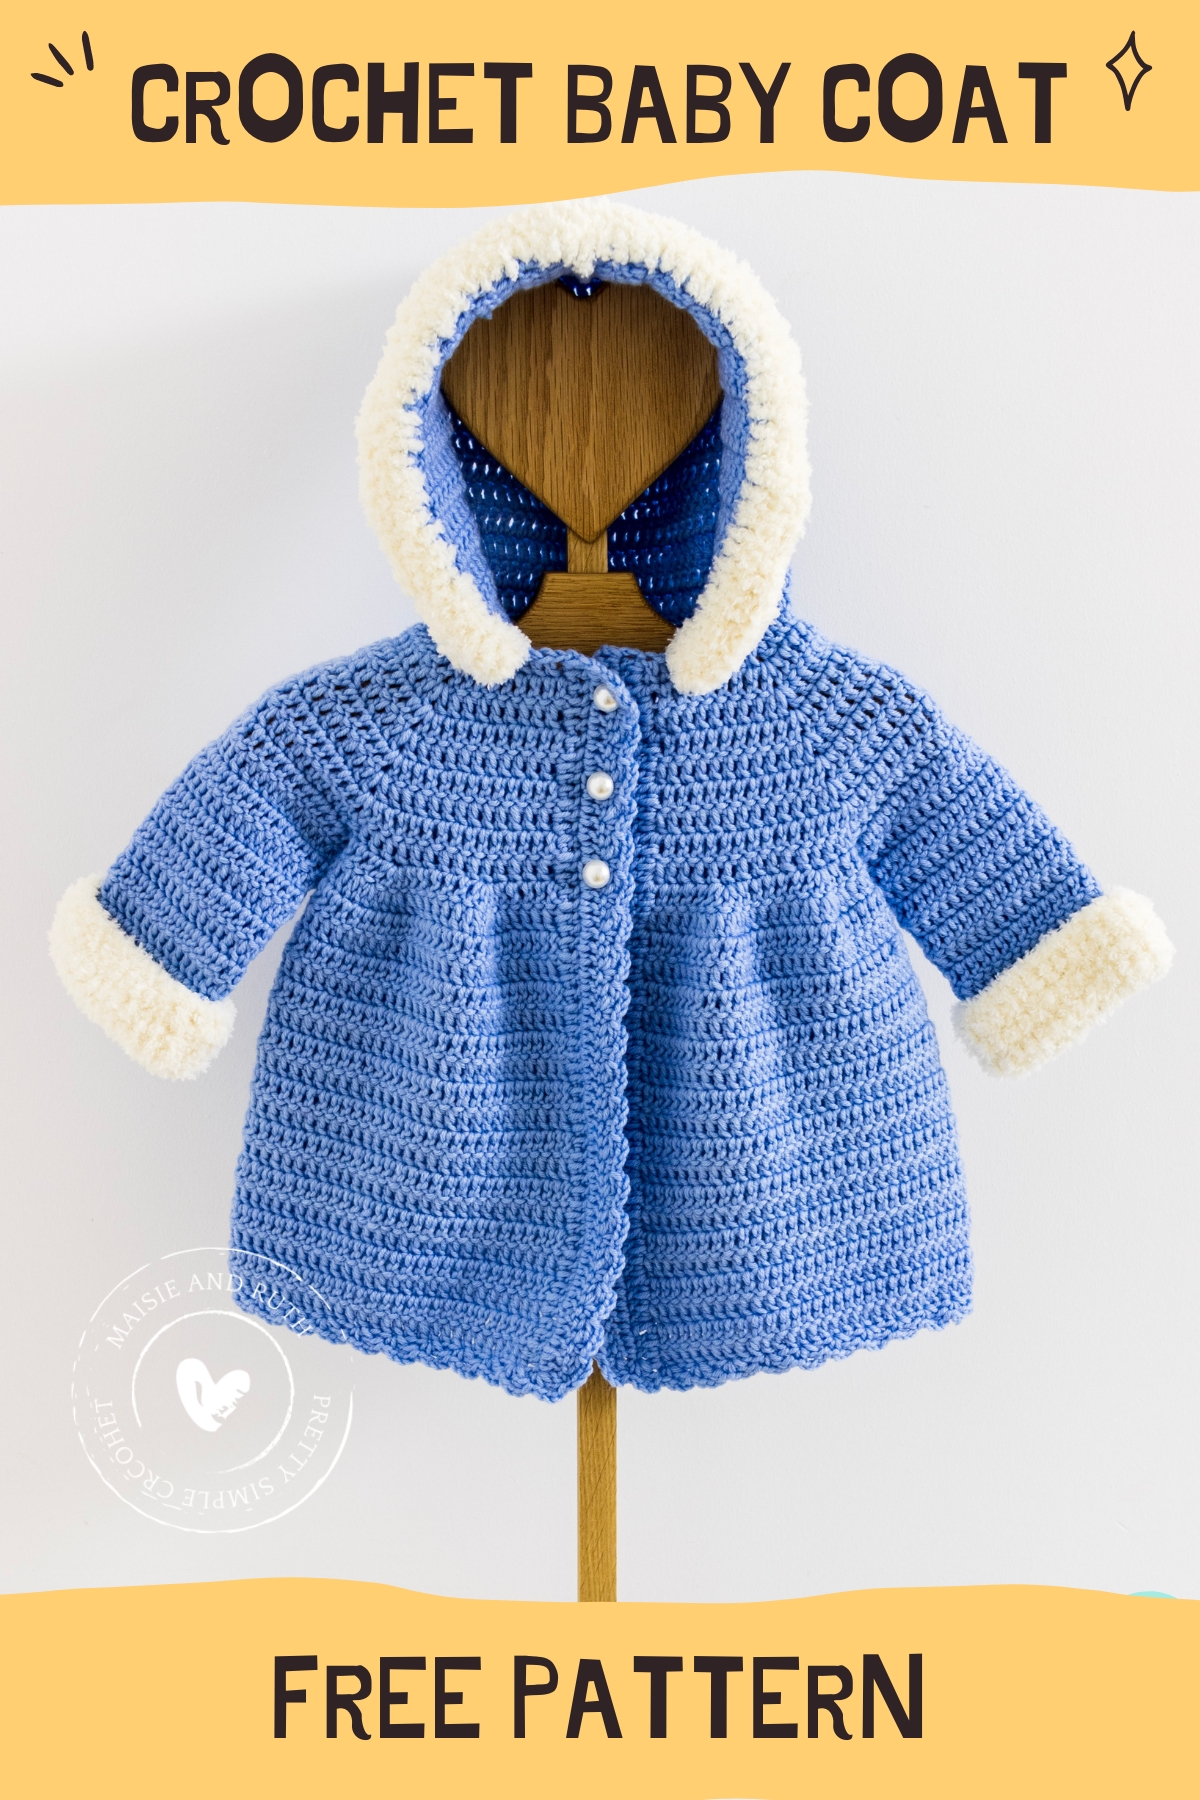
I’m so excited to share with you the FREE pattern for The Arabella Baby Coat – a gorgeous little crochet cardigan with a hood!
A video tutorial is also provided and accompanies the written instructions for this crochet baby coat with hood below! And to purchase an ad-free printable version, please visit my Etsy store HERE

SIMPLE, ELEGANT DESIGN
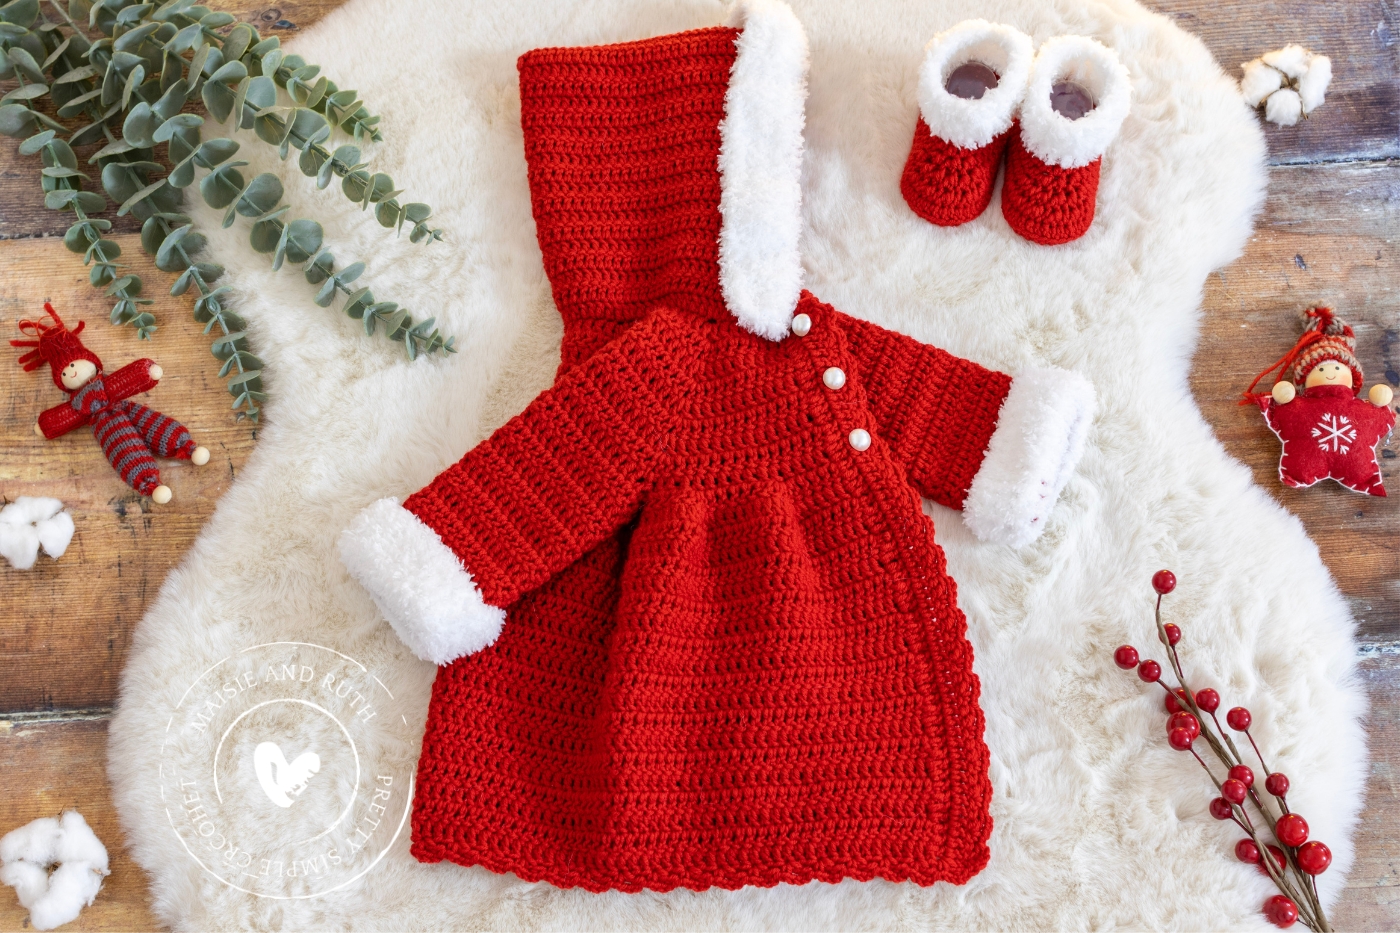
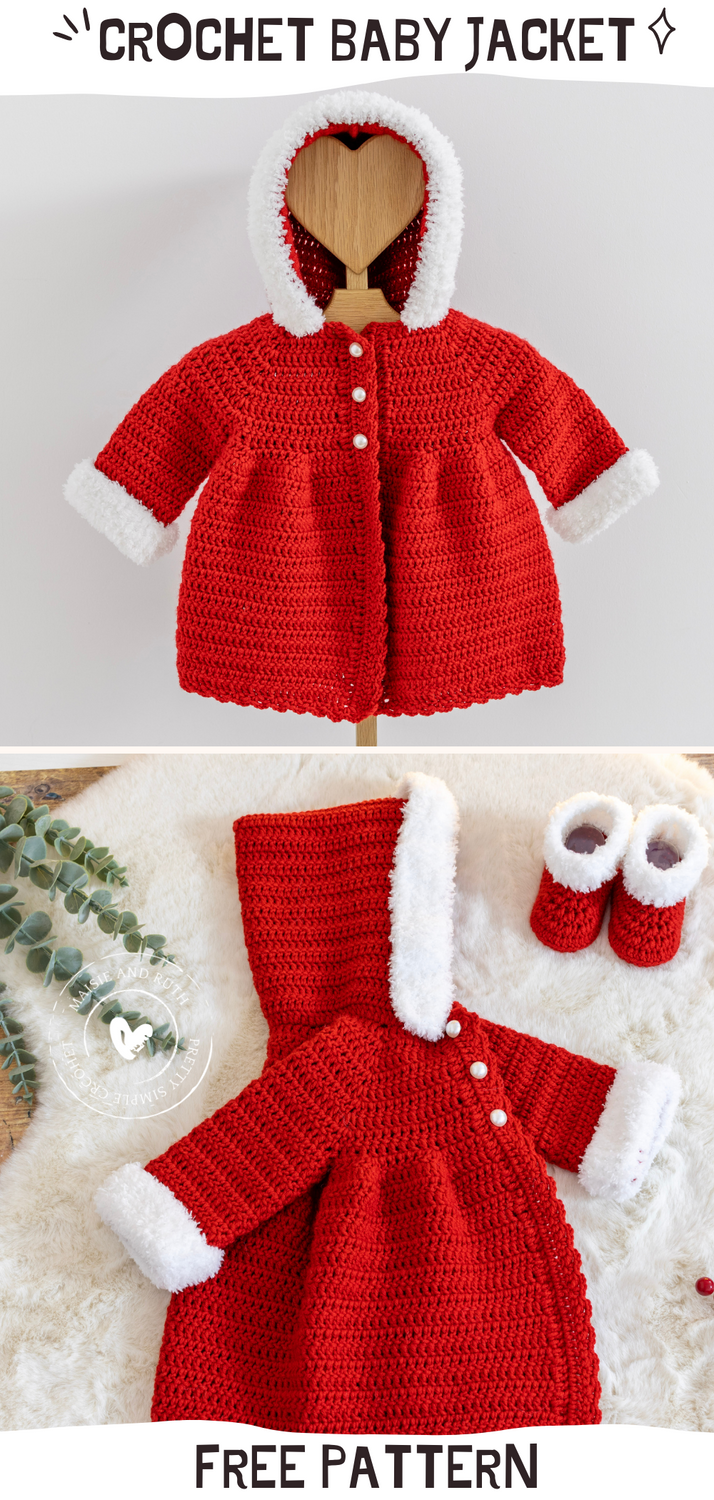
The Arabella Baby Coat, with dainty little pleats on both the front and back, is a stylish way to keep baby warm during the colder months!
The design is simple and classic, with everything worked in double crochet stitches (apart from the edging, which is made up from a really pretty shell stitch trim).
For an added touch of glamour, I crocheted a furry cuff onto both sleeves. And I used the same fluffy yarn for the edging around the hood.
The hood, by the way, is optional and may be added on at the very end of your project!

SIZES AVAILABLE
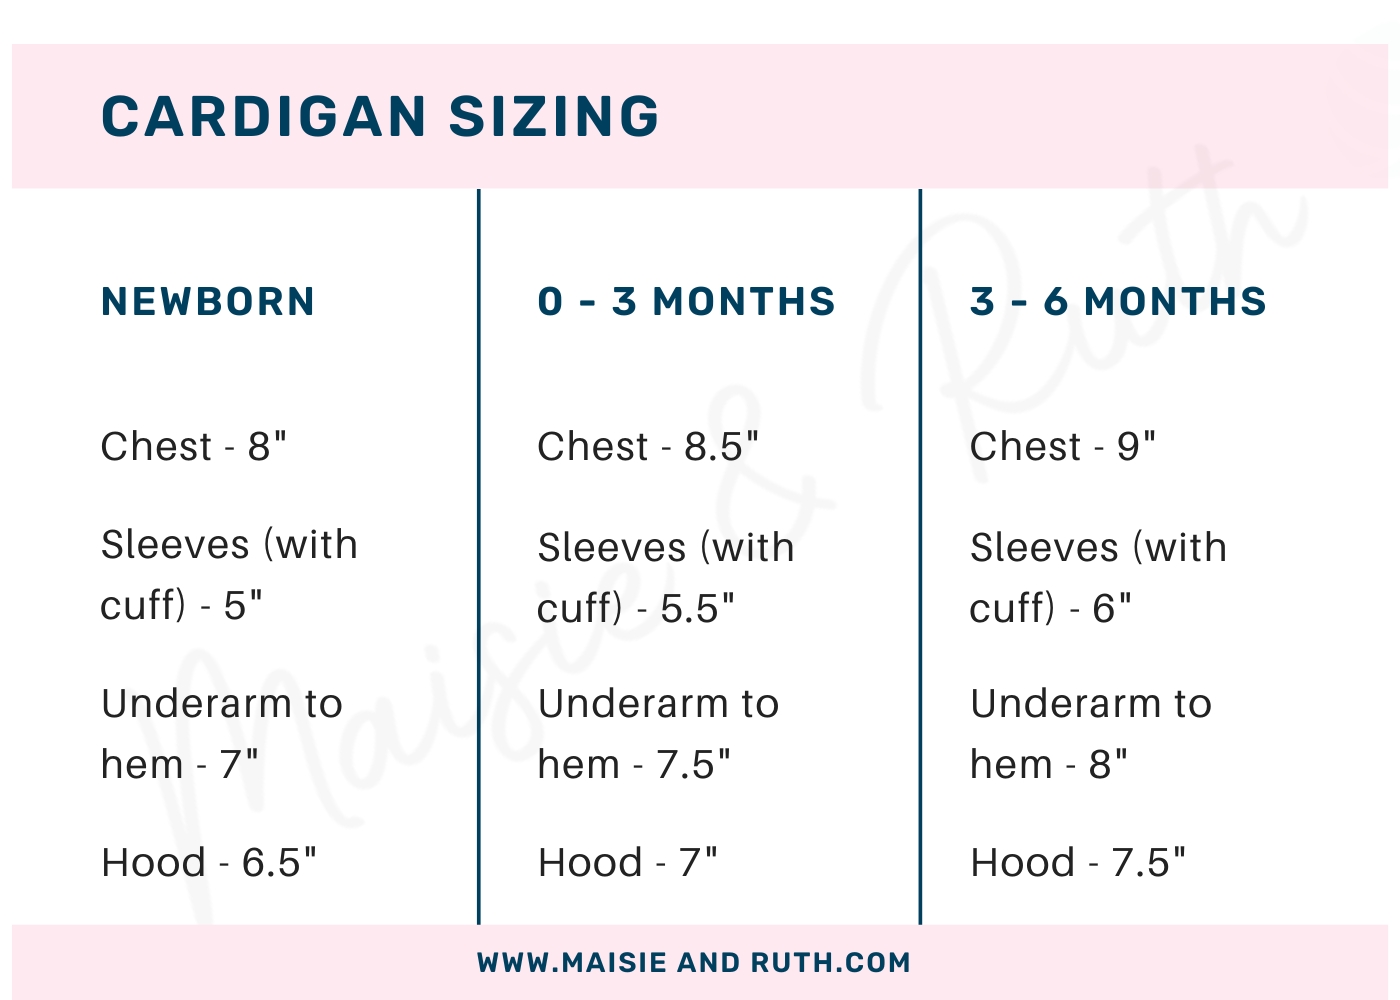
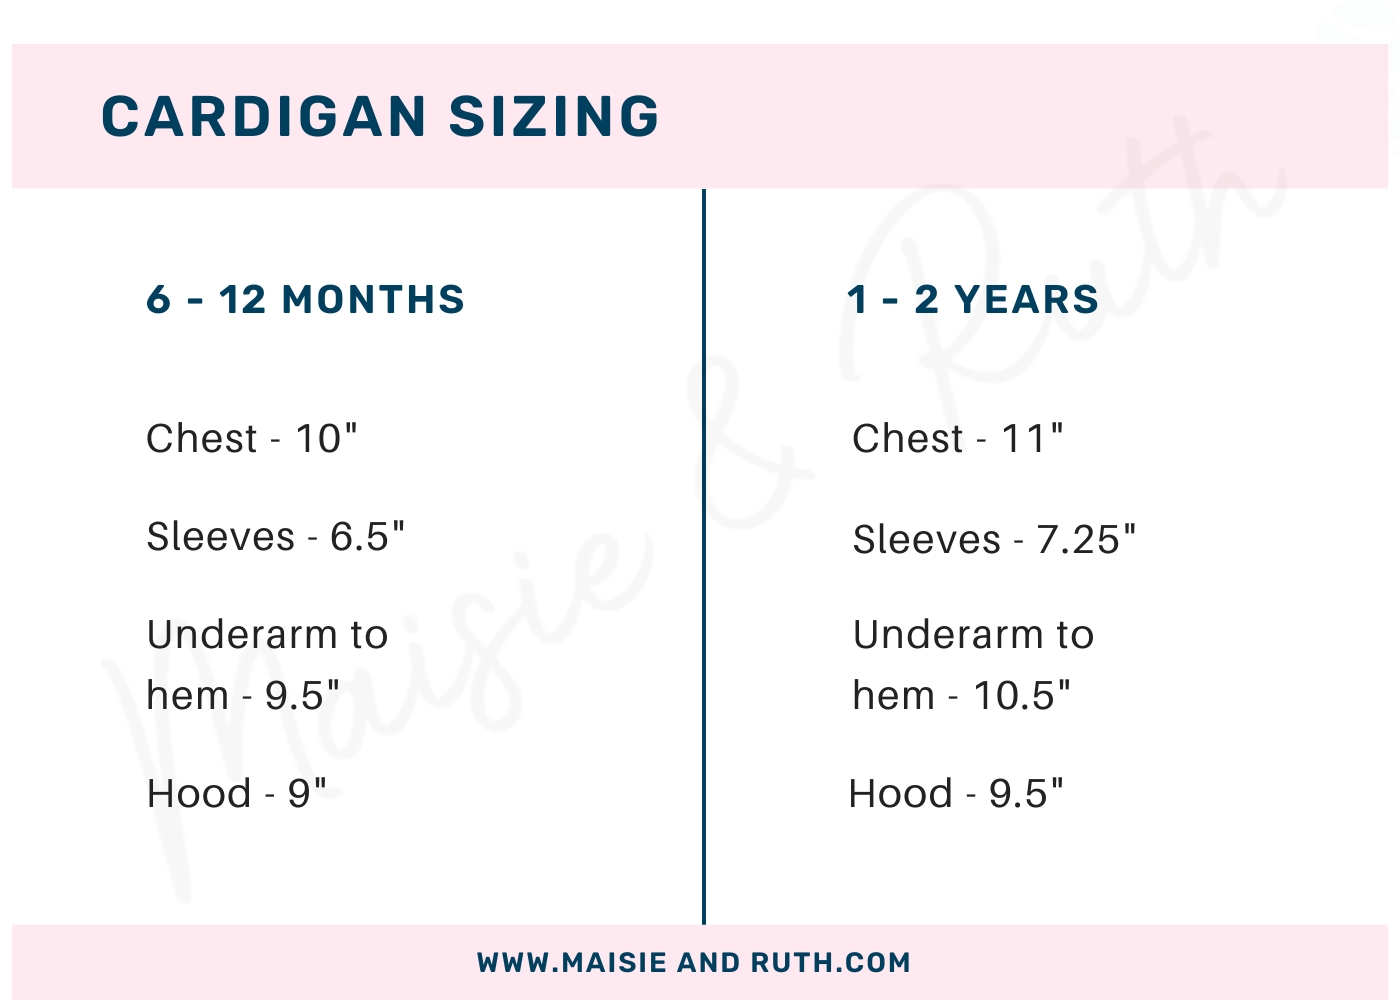
This crochet baby coat with hood comes in 5 sizes.
There are 3 sets of instructions:
To complete the cardigan in sizes newborn, 0-3 months and 3-6 months, you’ll need a #3 / light worsted / DK / 8 ply yarn.
If you plan on making sizes 6-12 months or 1-2 years, you’ll make your cardigan using a #4 / worsted / aran / 10 ply yarn.
You can find all the details about how much yarn you’ll need, plus what size of crochet hook to use, in the ‘Materials‘ section below.

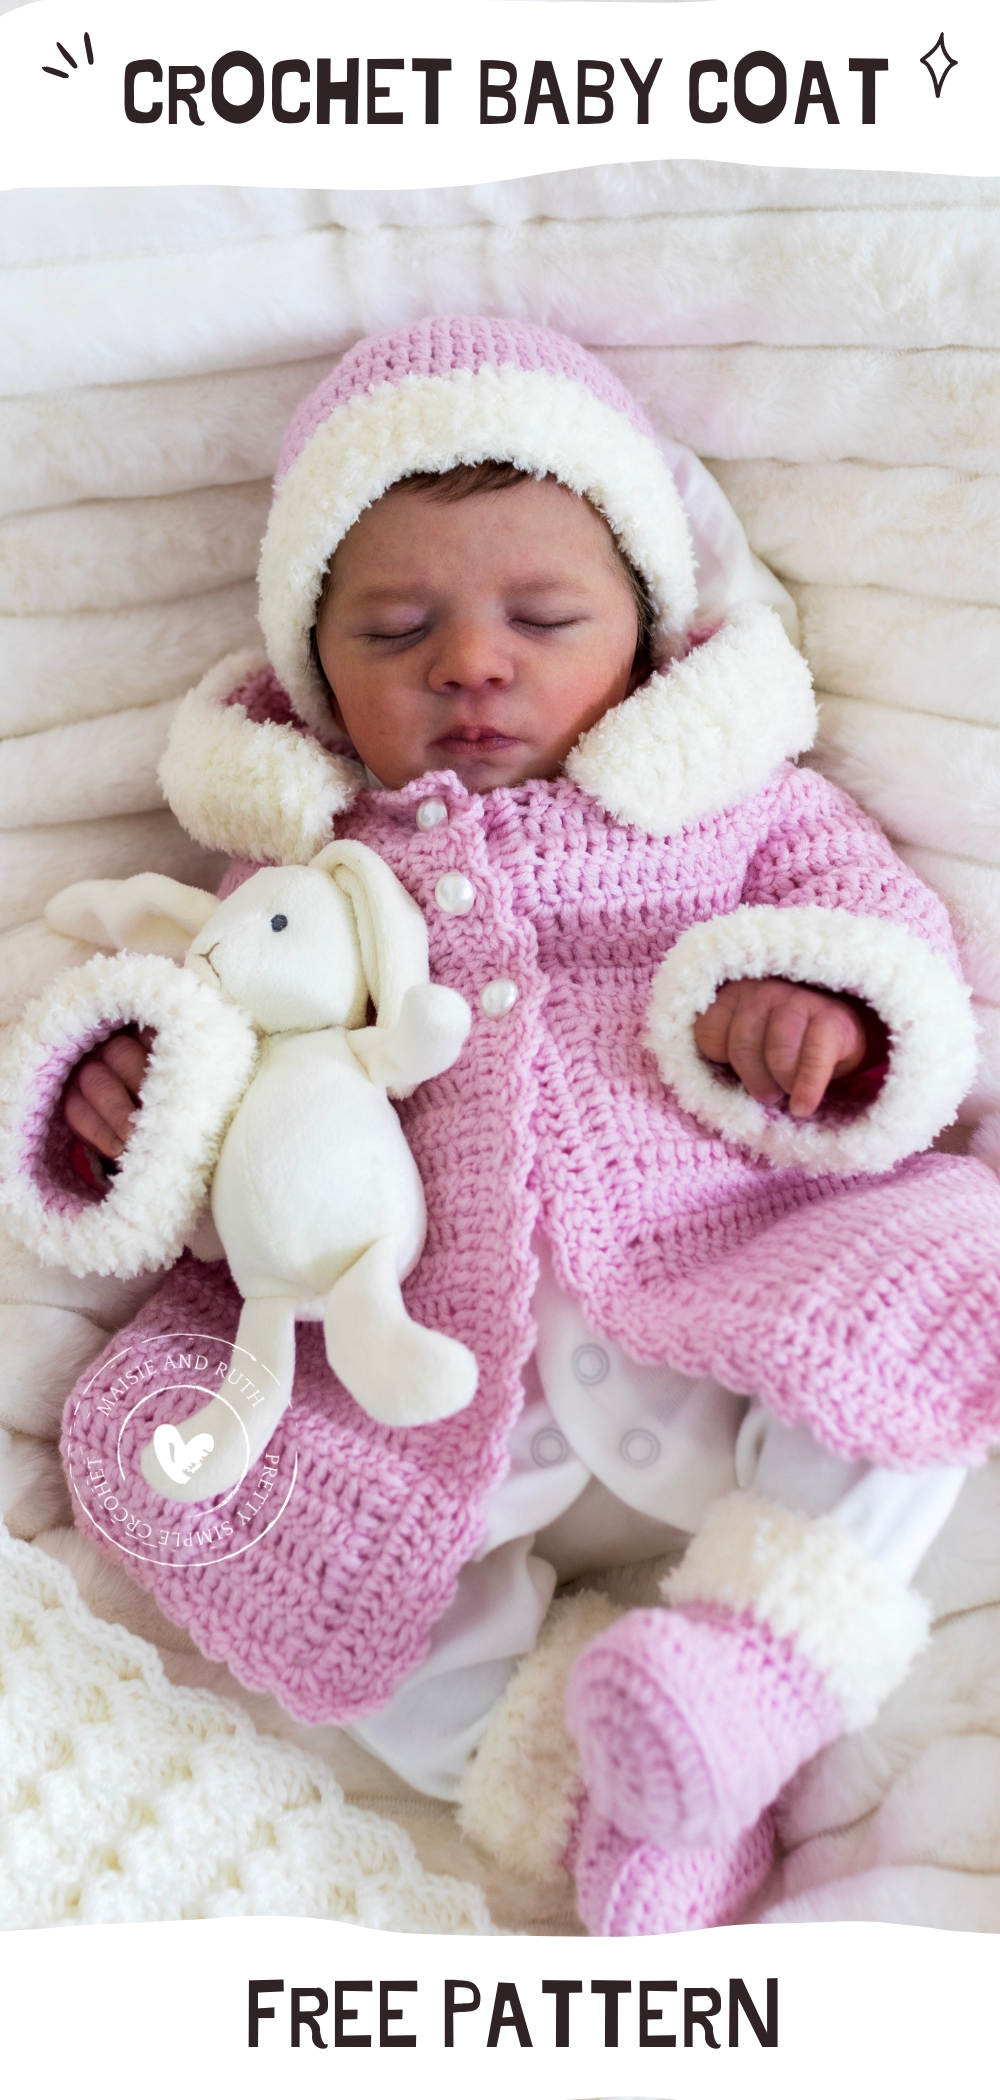
BEAUTIFUL BABY SET
This crochet baby coat with hood is part of a sweet little baby layette.
There’s a matching hat, booties, blanket and mittens.

VIDEO TUTORIAL
Crochet along with me to make this adorable crochet baby coat with a hood!
Although the video only covers sizes 0-3 months and 6-12 months, you can use it as a guide when making the other sizes.
To view the first part of the video tutorial, just click on the play button below (the rest of the tutorial is on the Maisie and Ruth YouTube channel):

PIN IT FOR LATER!
If you can’t make this crochet baby coat with hood right now, then you can always pin it for later!
You can also follow me on Pinterest here

Ready? Let’s take a look at the instructions to make this crochet baby coat with a hood now…

PDF PRINTABLE PATTERNS!
If you would prefer an ad-free, printable version of the Arabella Baby Coat pattern, you can purchase it from my Etsy shop here
This crochet baby coat is also part of a pattern bundle here
Thank you for supporting my store!
CROCHET BABY COAT WITH HOOD: A FREE PATTERN
This post for a crochet baby coat with a hood may contain affiliate links, which means I’ll receive a commission if you purchase through my links, at no extra cost to you. Please read full disclosure for more information.
Please carefully read all the information below.
LEVEL

“Projects may include simple stitch patterns, color work, and/or shaping”.
Source: Craft Yarn Council of America’s www.YarnStandards.com
PATTERN NOTES
- US crochet terminology used throughout.
- There are three sets of instructions: 1. Newborn 2. 0-3 & 6-12 months 3. 3-6 months & 1-2 years.
- Use the weight of yarn and hook size according to the size of coat that you wish to make (details below in ‘Materials’).
- For sizes newborn, 0-3 & 3-6 months, you can use any #3 / light worsted / DK / 8 ply yarn for this project, providing you meet the gauge as detailed below.
- For ages 6-12 months and 1-2 years, you can use any #4 / worsted / aran / 10 ply yarn for this project, providing you meet the gauge as detailed below.
- The coat is worked in one piece from the neck edge down. You will then re-attach your yarn to work both sleeves and the hood.
- When working the yoke: the ch2 turning chain does not count as the first stitch of the next row. Therefore, you should make the first stitch of the row in the same stitch (at the base of the ch2). At the end of rows, do not crochet into the top of the ch2.
- When counting the total number of stitches at the end of each row, please be careful not to include the ch2 in the final stitch count.
- For beginners, it will be helpful to place a stitch marker in the first stitch made at the beginning of each row.
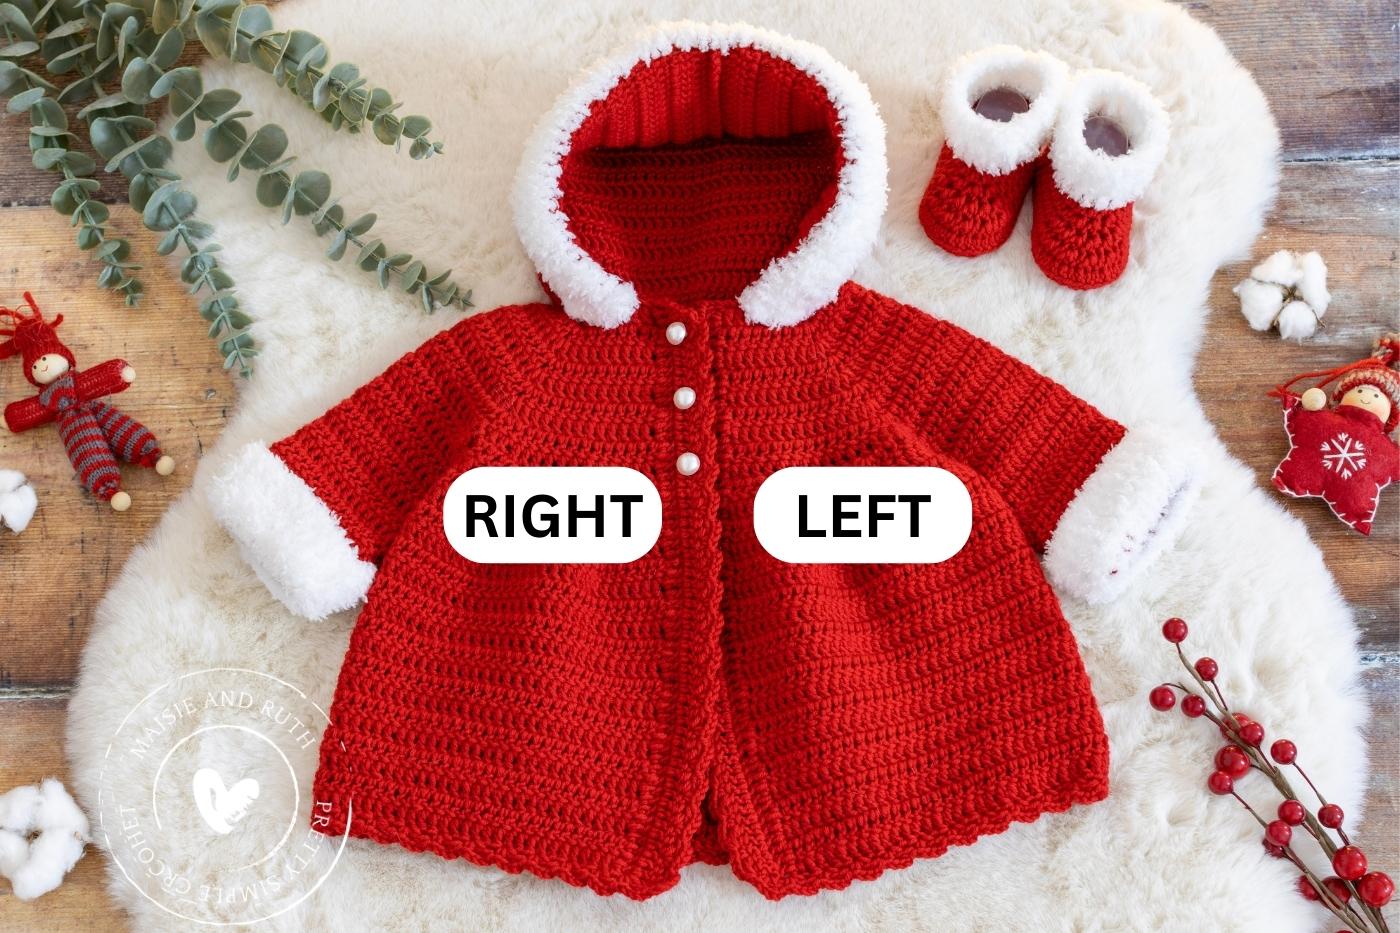
- Throughout the pattern, I refer to the left and right side of your work. Please see below an image clarifying this:
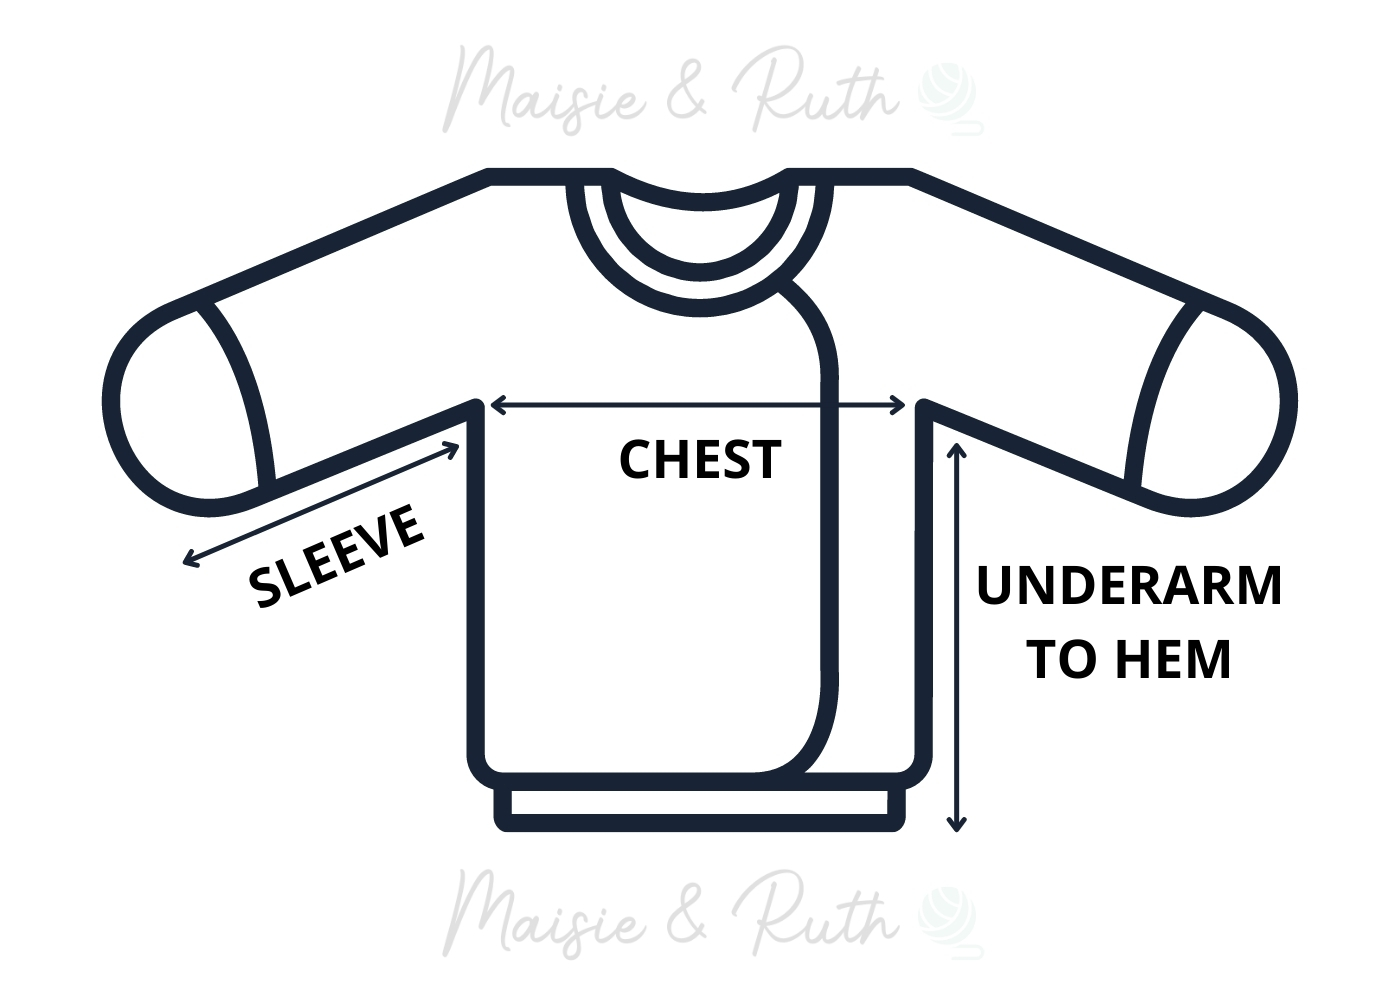
MATERIALS
- YARN FOR NEWBORN / 0-3 MONTHS / 3-6 MONTHS
YARN A. Category #3 / light worsted / DK / 8 ply yarn. I used Debbie Bliss Rialto DK, 115 yds / 1.8 oz (105m / 50g). For each size you’ll need:
Newborn – 415m / 454 yds (I used 4 balls of Debbie Bliss Rialto DK).
0-3 months – 520m / 569 yds (I used 5 balls of Debbie Bliss Rialto DK).
3-6 months – 625m / 684 yds (I used 6 balls of Debbie Bliss Rialto DK).
ALTERNATIVE YARN: Premier Basix DK Yarn, Cascade 220 Superwash Yarn, Paintbox Yarns Simply DK, Paintbox Yarns Baby DK, Stylecraft Special DK.
If using a substitute yarn, please ensure that you order enough yarn.
YARN B. Fluffy yarn for the sleeve cuffs and hood edging: 1 ball of Sirdar Snowflake Chunky, 136 yds / 1.8 oz (124m / 50g).
ALTERNATIVE YARN: Bernat PipSqeak
- YARN FOR 6-12 MONTHS / 1-2 YEARS
YARN A. Category #4 / worsted / aran / 10 ply yarn. I used Stylecraft Special Aran, 214 yds / 3.5 oz (196m / 100g). For each size you’ll need:
6-12 months – 960m / 1050 yds (I used 5 balls of Stylecraft Special Aran).
1-2 years – 1110m / 1214 yds (I used 6 balls of Stylecraft Special Aran).
ALTERNATIVE YARN: Premier Yarns Just Yarn Worsted Value, Bernat Supervalue
YARN B. Fluffy yarn for the sleeve cuffs and hood edging: 1 ball of Sirdar Snowflake Chunky, 136 yds / 1.8 oz (124m / 50g).
ALTERNATIVE YARN: Bernat PipSqeak
- CROCHET HOOKS:
Newborn / 0-3 months / 3-6 months – A G (4mm) hook
6-12 months / 1-2 years – An H (5mm) hook
- BUTTONS:
Newborn / 0-3 months / 3-6 months – 3 x 15mm buttons
6-12 months / 1-2 years – 3 x 20mm buttons
- Yarn needle (the bent tip makes sewing much easier)
- Scissors (super sharp… and pretty)
- 4 x stitch markers (these interlocking ones will not fall out!)
GAUGE / TENSION
In order to achieve the correct size and fit, it is important to test your gauge with a sample square before you begin.
If your tension is tight (too many stitches to ″), try using a larger hook.
if your tension is loose (fewer stitches to ″), use a smaller hook.
Newborn / 0-3 months / 3-6 months (G / 4mm hook):
26 stitches & 15 rows = 6″ (15cm) in double crochet
6-12 months / 1-2 years (H / 5mm hook):
20 stitches & 12 rows = 6” (15cm) in double crochet
FINISHED SIZE
The sizes given are based on the standard measurements from the Craft Yarn Council. The cardigan has been designed with some positive ease, which means that it will quite comfortably fit over clothing.
STITCHES & ABBREVIATIONS (US CROCHET TERMS)
beg – beginning
ch(s) – chain(s)
dc – double crochet: Yarn over (yo), insert hook into stitch, yo, pull up a loop (3 loops on hook). Yo, pull through 2 loops (2 loops on hook). Yo, pull through remaining 2 loops. 1 double crochet completed.
hdc – half double crochet: Yarn over (yo), insert hook into stitch, yo, pull up a loop (3 loops on hook). Yo, pull through all 3 loops. 1 half double crochet completed.
sc – single crochet: Insert hook into stitch, yarn over (yo), pull up a loop (2 loops on hook). Yo, pull through both loops on hook. 1 single crochet completed.
sk – skip: Do not crochet into this stitch / space.
sl st – slip stitch: Insert hook into stitch, yarn over (yo), pull up a loop, you will have 2 loops on your hook. Pull the first loop through the second loop. 1 slip stitch completed.
sp(s) – space(es)
st(s) – stitch(es)
Turn: I prefer to turn my work clockwise.
* to * – Repeat instructions between asterisks as many times as directed.
( ) – Sets of stitches to be worked within one stitch or space. Or sets of stitches to be worked as many times as directed.
[ ] – The total number of stitches at the end of a row.
SPECIAL STITCHES
Shell – (4dc) in same stitch
SL/shell – slanted shell (1sc, ch3, 1dc) in same stitch
V-st – (1dc, ch1, 1dc) in same stitch
PATTERN INSTRUCTIONS (NEWBORN)
YOKE
With Yarn A
Chain 49
OPTIONAL (for a neater edge): When working on row 1 below, work your stitches through the back bump.
Row 1. 1dc in 3rd ch from hook (skp’d 2 ch do not count as your 1st dc), 1dc in next 5 ch, V-st in next ch, 1dc in next 8 ch, V-st in next ch, 1dc in next 15 ch, V-st in next ch, 1dc in next 8 ch, V-st in next ch, 1dc in next 6 ch, TURN [51 dc, 4x ch1 sps].
Row 2. Ch2 (does not count as your 1st st here and throughout), 1dc in same st (at base of ch2), 1dc in next 6 sts, V-st in next ch1 sp, 1dc in next 10 sts, V-st in next ch1 sp, 1dc in next 17 sts, V-st in next ch1 sp, 1dc in next 10 sts, V-st in next ch1 sp, 1dc in next 7 sts, TURN [59 dc, 4x ch1 sps].
Row 3. Ch2, 1dc in same st (at base of ch2), 1dc in next 7 sts, V-st in next ch1 sp, 1dc in next 12 sts, V-st in next ch1 sp, 1dc in next 19 sts, V-st in next ch1 sp, 1dc in next 12 sts, V-st in next ch1 sp, 1dc in next 8 sts, TURN [67 dc, 4x ch1 sps].
Row 4. Ch2, 1dc in same st (at base of ch2), 1dc in next 8 sts, V-st in next ch1 sp, 1dc in next 14 sts, V-st in next ch1 sp, 1dc in next 21 sts, V-st in next ch1 sp, 1dc in next 14 sts, V-st in next ch1 sp, 1dc in next 9 sts, TURN [75 dc, 4x ch1 sps].
Row 5. Ch2, 1dc in same st (at base of ch2), 1dc in next 9 sts, V-st in next ch1 sp, 1dc in next 16 sts, V-st in next ch1 sp, 1dc in next 23 sts, V-st in next ch1 sp, 1dc in next 16 sts, V-st in next ch1 sp, 1dc in next 10 sts, TURN [83 dc, 4x ch1 sps].
Row 6. Ch2, 1dc in same st (at base of ch2), 1dc in next 10 sts, V-st in next ch1 sp, 1dc in next 18 sts, V-st in next ch1 sp, 1dc in next 25 sts, V-st in next ch1 sp, 1dc in next 18 sts, V-st in next ch1 sp, 1dc in next 11 sts, TURN [91 dc, 4x ch1 sps].
Row 7. Ch2, 1dc in same st (at base of ch2), 1dc in next 11 sts, V-st in next ch1 sp, 1dc in next 20 sts, V-st in next ch1 sp, 1dc in next 27 sts, V-st in next ch1 sp, 1dc in next 20 sts, V-st in next ch1 sp, 1dc in next 12 sts, TURN [99 dc, 4x ch1 sps].
Row 8. Ch2, 1dc in same st (at base of ch2), 1dc in next 12 sts, V-st in next ch1 sp, 1dc in next 22 sts, V-st in next ch1 sp, 1dc in next 29 sts, V-st in next ch1 sp, 1dc in next 22 sts, V-st in next ch1 sp, 1dc in next 13 sts, TURN [107 dc, 4x ch1 sps].
DIVIDE FOR ARMHOLES
Row 9. Ch2, 1dc in same st (at base of ch2), 1dc in next 13 sts, (1dc, ch1) in next ch1 sp, sk next 24 sts, 1dc in next ch1 sp, 1dc in next 31 sts, (1dc, ch1) in next ch1 sp, sk next 24 sts, 1dc in next ch1 sp, 1dc in next 14 sts, TURN [63 dc, 2x ch1 sps].
Do NOT cut yarn.
SKIRT SECTION
Continuing with the skirt section:
Row 1. Ch2, 1dc in same st (at base of ch2), 1dc in next 3 sts, shell in next st, 1dc in next 5 sts, shell in next st, 1dc in next 4 sts, 1dc in next ch1, 1dc in next 2 sts, shell in next st, (1dc in next 6 sts, shell in next st) 4 times, 1dc in next 2 sts, 1dc in next ch1, 1dc in next 4 sts, shell in next st, 1dc in next 5 sts, shell in next st, 1dc in last 4 sts, TURN [92 sts].
Row 2. Ch2, 1dc in same st (at base of ch2), 1dc in next 3 sts, 2dc in next 4 sts of shell, 1dc in next 5 sts, 2dc in next 4 sts of shell, 1dc in next 7 sts, 2dc in next 4 sts of shell, (1dc in next 6 sts, 2dc in next 4 sts of shell) 4 times, 1dc in next 7 sts, 2dc in next 4 sts of shell, 1dc in next 5 sts, 2dc in next 4 sts of shell, 1dc in last 4 sts, TURN [128 sts].
Row 3. Ch2, 1dc in same st (at base of ch2), 1dc in next 127 sts, TURN [128 sts].
Rows 4 – 18: Repeat row 3.
Do NOT cut yarn.
HOOD PLACEMENT
Before moving on and working on the buttonhole band, you will mark out stitches for the hood.
Please ensure that you mark out these stitches before working on the buttonhole band (it will be easier to distinguish what stitches have to be worked in).
With the front of your work facing you, place a stitch marker into the 3rd stitch from the neck edge on both the right and left side.
Once this has been done, you can commence working on the buttonhole band below.
BUTTONHOLE BAND
Row 1. Ch2 (counts as your 1st dc), work 54 dc up right front, TURN [55 dc].
Row 2. Ch2, (counts as your 1st dc), 1dc in next 2 sts, ch1, sk next st, 1dc in next st (1st buttonhole made), (1dc in next 5 sts, ch1, sk next st, 1dc in next st) TWICE (2nd and 3rd buttonholes made), 1dc in next 35 sts, 1dc in top of beg ch2, TURN.
Cut yarn, fasten off and weave in ends.
BUTTON BAND
With Yarn A
With the front of your work facing you, attach yarn to the top corner of the left front (in to the first stitch).
Row 1. Ch2 (counts as your 1st dc), 2dc in corner, work 52 dc evenly down left front, TURN [55 dc].
Row 2. Ch2 , (counts as your 1st dc), 1dc in next st and in next 52 sts, 1dc in top of beg ch2, TURN [55 dc].
Row 3. Ch5, 1dc in next st, *sk next 2 sts, SL/shell in next st*, repeat from * to * to end of button band, work a SL/shell in bottom corner.
Do NOT cut yarn.
Sew buttons on left front, ensuring that you align them with the buttonholes on right front.
EDGING AROUND BOTTOM OF COAT
When you have completed row 3 of the button band above, you will continue working the slanted shell stitch (SL/shell) edging around the bottom of your coat:
Row 1. *sk next 2 sts, SL/shell in next st*, repeat from * to * around bottom of coat.
Do not cut yarn.
EDGING UP BUTTONHOLE BAND
Continue with the slanted shell stitch (SL/shell) edging up the buttonhole band:
Row 1. *sk next 2 sts, SL/shell in next st*, repeat from * to * up buttonhole band (each ch1 sp = 1 st), ending with 1hdc in top of ch2 at end of buttonhole band.
Cut yarn, fasten off and weave in ends.
SLEEVES: RIGHT SLEEVE
With Yarn A
It’s time to work on the sleeves now and you’ll begin with the right sleeve first.
You will be working into the 24 stitches that you skipped in row 9.
5 extra stitches will also be created, giving you a total of 29 stitches when working the sleeves.
With the back of your work facing you, attach your yarn to the end of row 9 of the yoke, at the right armhole.
Round 1. Ch2 (does not count as your 1st st), 1dc in same st (at base of ch2), 1dc in next 24 sts around armhole, work an extra 4 dc evenly spaced at underarm area, sl st to 1st dc to join, TURN [29 sts].
Round 2. Ch2 (does not count as your 1st st), 1dc in same st (at base of ch2), 1dc in next 28 sts, sl st to 1st dc to join, TURN [29 sts].
Rounds 3-13: Repeat round 2.
Cut yarn, fasten off and weave in ends.
CUFF
With Yarn B
Attach yarn to last stitch worked.
Round 14. Ch2 (counts as your 1st st), 1dc in next 28 sts, sl st in sp between beg ch2 and 1st dc to join, DO NOT TURN [29 sts].
NOTE: From round 15 onwards, you will work your double crochet stitches in the spaces in between each stitch. You will also need to feel your way with the fluffy yarn as it’s difficult to see your stitches. Please take care not to inadvertently work 2 stitches into the same space as this will cause your work to flare / ruffle out.
Round 15. Ch2 (counts as your 1st st), 1dc in next 28 sps, sl st in sp between beg ch2 and 1st dc to join, DO NOT TURN [29 sts]
Rounds 16-17. Repeat round 16.
Cut yarn, fasten off and weave in ends.
LEFT SLEEVE
With Yarn A
With the back of your work facing you, attach your yarn to the end of row 9 of the yoke, at the left armhole.
Round 1. Ch2 (does not count as your 1st st), 1dc in same st (at base of ch2), work 4 dc evenly spaced at underarm area, 1dc in next 24 sts around armhole, sl st to 1st dc to join, TURN [29 sts].
Round 2. Ch2 (does not count as your 1st st), 1dc in same st (at base of ch2), 1dc in next 28 sts, sl st to 1st dc to join, TURN [29 sts].
Rounds 3-13: Repeat round 2.
Cut yarn, fasten off and weave in ends.
CUFF
Work cuff for left sleeve by following the instructions for right cuff above.
HOOD
With Yarn A
To begin working on the hood, attach yarn to the marked stitch on the right front.
Follow the pattern below, ensuring that the final stitch of the row is worked into the marked stitch on the left front.
Row 1. Ch3 (counts as your 1st st here and throughout), 1dc in next st, *2dc in next st, 1dc in next 2 sts*, repeat from * to * across row, TURN [57 sts].
Row 2. Ch3, 1dc in next 56 sts, 1dc in top of ch3, TURN [57 sts].
Rows 3-17. Repeat row 2.
Do not cut yarn.
SEAMING THE HOOD
To seam the hood, turn it inside out so that the wrong side is now facing you.
Bring the two sides of the top of the hood together.
Working under both loops on each side, seam the two sides together using the single crochet stitch.
Remember: I show you how to seam the hood together in the video tutorial (linked above).
Once you’ve finished seaming the hood, cut yarn, fasten off and weave in your ends. Turn the hood out so that the right side is now facing you.
FUR TRIM FOR HOOD
Using Yarn B
Attach yarn to the bottom of the hood on the right front, at the end of the first row.
Row 1. Ch2 (counts as your 1st st here and throughout), working through the stitches at each row end (not around) evenly work dc stitches in each row end around hood (For guidance, I made 67 dc in total).
NOTE: Starting from row 2, you’ll work your double crochet stitches in the spaces in between each stitch. You will need to feel your way with the fluffy yarn as it’s difficult to see your stitches. Please take care not to inadvertently work 2 stitches into the same space as this will cause your work to flare / ruffle out.
Row 2. Ch2 (counts as your 1st dc), work 1dc in next sp and in each space around hood, ending 1dc in sp between last st and beg ch2, TURN.
Rows 3-4. Repeat row 2.
Cut yarn, fasten off and weave in ends.
OPTIONAL: Sew each corner of the fur trim to the hood or secure it in place with a button on each side.
PATTERN INSTRUCTIONS (0-3 MONTHS & 6-12 MONTHS)
YOKE
With Yarn A
Chain 53
OPTIONAL (for a neater edge): When working on row 1 below, work your stitches through the back bump.
Row 1. 1dc in 3rd ch from hook (skp’d 2 ch do not count as your 1st dc), 1dc in next 6 ch, V-st in next ch, 1dc in next 9 ch, V-st in next ch, 1dc in next 15 ch, V-st in next ch, 1dc in next 9 ch, V-st in next ch, 1dc in next 7 ch, TURN [55 dc, 4x ch1 sps].
Row 2. Ch2 (does not count as your 1st st here and throughout), 1dc in same st (at base of ch2), 1dc in next 7 sts, V-st in next ch1 sp, 1dc in next 11 sts, V-st in next ch1 sp, 1dc in next 17 sts, V-st in next ch1 sp, 1dc in next 11 sts, V-st in next ch1 sp, 1dc in next 8 sts, TURN [63 dc, 4x ch1 sps].
Row 3. Ch2, 1dc in same st (at base of ch2), 1dc in next 8 sts, V-st in next ch1 sp, 1dc in next 13 sts, V-st in next ch1 sp, 1dc in next 19 sts, V-st in next ch1 sp, 1dc in next 13 sts, V-st in next ch1 sp, 1dc in next 9 sts, TURN [71 dc, 4x ch1 sps].
Row 4. Ch2, 1dc in same st (at base of ch2), 1dc in next 9 sts, V-st in next ch1 sp, 1dc in next 15 sts, V-st in next ch1 sp, 1dc in next 21 sts, V-st in next ch1 sp, 1dc in next 15 sts, V-st in next ch1 sp, 1dc in next 10 sts, TURN [79 dc, 4x ch1 sps].
Row 5. Ch2, 1dc in same st (at base of ch2), 1dc in next 10 sts, V-st in next ch1 sp, 1dc in next 17 sts, V-st in next ch1 sp, 1dc in next 23 sts, V-st in next ch1 sp, 1dc in next 17 sts, V-st in next ch1 sp, 1dc in next 11 sts, TURN [87 dc, 4x ch1 sps].
Row 6. Ch2, 1dc in same st (at base of ch2), 1dc in next 11 sts, V-st in next ch1 sp, 1dc in next 19 sts, V-st in next ch1 sp, 1dc in next 25 sts, V-st in next ch1 sp, 1dc in next 19 sts, V-st in next ch1 sp, 1dc in next 12 sts, TURN [95 dc, 4x ch1 sps].
Row 7. Ch2, 1dc in same st (at base of ch2), 1dc in next 12 sts, V-st in next ch1 sp, 1dc in next 21 sts, V-st in next ch1 sp, 1dc in next 27 sts, V-st in next ch1 sp, 1dc in next 21 sts, V-st in next ch1 sp, 1dc in next 13 sts, TURN [103 dc, 4x ch1 sps].
Row 8. Ch2, 1dc in same st (at base of ch2), 1dc in next 13 sts, V-st in next ch1 sp, 1dc in next 23 sts, V-st in next ch1 sp, 1dc in next 29 sts, V-st in next ch1 sp, 1dc in next 23 sts, V-st in next ch1 sp, 1dc in next 14 sts, TURN [111 dc, 4x ch1 sps].
DIVIDE FOR ARMHOLES
Row 9. Ch2, 1dc in same st (at base of ch2), 1dc in next 14 sts, (1dc, ch1) in next ch1 sp, sk next 25 sts, 1dc in next ch1 sp, 1dc in next 31 sts, (1dc, ch1) in next ch1 sp, sk next 25 sts, 1dc in next ch1 sp, 1dc in next 15 sts [65 dc, 2x ch1 sps].
Do not cut yarn.
SKIRT SECTION
Continuing with the skirt section:
Row 1. Ch2, 1dc in same st (at base of ch2), 1dc in next 4 sts, shell in next st, 1dc in next 5 sts, shell in next st, 1dc in next 4 sts, 1dc in next ch1, 1dc in next 2 sts, shell in next st, (1dc in next 6 sts, shell in next st) 4 times, 1dc in next 2 sts, 1dc in next ch1, 1dc in next 4 sts, (shell in next st, 1dc in next 5 sts) TWICE, TURN [94 sts].
Row 2. Ch2, 1dc in same st (at base of ch2), 1dc in next 4 sts, 2dc in next 4 sts of shell, 1dc in next 5 sts, 2dc in next 4 sts of shell, 1dc in next 7 sts, 2dc in next 4 sts of shell, (1dc in next 6 sts, 2dc in next 4 sts of shell) 4 times, 1dc in next 7 sts, (2dc in next 4 sts of shell, 1dc in next 5 sts) TWICE, TURN [130 sts].
Row 3. Ch2, 1dc in same st (at base of ch2), 1dc in next 129 sts, TURN [130 sts].
Rows 4 – 20: Repeat row 3.
Do not cut yarn.
HOOD PLACEMENT
Before moving on and working on the buttonhole band, you will mark out stitches for the hood.
Please ensure that you mark out these stitches before working on the buttonhole band (it will be easier to distinguish what stitches have to be worked in).
With the front of your work facing you, place a stitch marker into the 3rd stitch from the neck edge on both the right and left side.
Once this has been done, you can commence working on the buttonhole band below.
BUTTONHOLE BAND
Row 1. Ch2 (counts as your 1st dc), work 58 dc up right front, TURN [59 dc].
Row 2. Ch2, (counts as your 1st dc), 1dc in next 2 sts, ch1, sk next st, 1dc in next st (1st buttonhole made), (1dc in next 5 sts, ch1, sk next st, 1dc in next st) TWICE (2nd and 3rd buttonholes made), 1dc in next 39 sts, 1dc in top of ch2, TURN.
Cut yarn, fasten off and weave in ends.
BUTTON BAND
With Yarn A
With the front of your work facing you, attach yarn to the top corner of the left front (in to the first stitch).
Row 1. Ch2 (counts as your 1st dc), 2dc in corner, work 56 dc evenly down left front, TURN [59 dc].
Row 2. Ch2, (counts as your 1st dc), 1dc in next 58 sts, 1dc in top of ch2, TURN [59 dc].
Row 3. Ch5, 1dc in next st, *sk next 2 sts, SL/shell in next st*, repeat from * to * to end of button band, work a SL/shell in bottom corner.
Do not cut yarn.
Sew buttons on left front, ensuring that you align them with the buttonholes on right front.
EDGING AROUND BOTTOM OF COAT
When you have completed row 3 of the button band above, you will continue working the slanted shell stitch (SL/shell) edging around the bottom of your coat:
Row 1. *sk next 2 sts, SL/shell in next st*, repeat from * to * around bottom of coat, work a SL/shell in corner.
Do not cut yarn.
EDGING UP BUTTONHOLE BAND
Continue with the slanted shell stitch (SL/shell) edging up the buttonhole band:
Row 1. *sk next 2 sts, SL/shell in next st*, repeat from * to * up buttonhole band (each ch1 sp = 1 st), ending as follows: sk next ch1, sk next 2 sts, 1hdc in top of ch2 at end of buttonhole band.
Cut yarn, fasten off and weave in ends.
SLEEVES: RIGHT SLEEVE
With Yarn A
It’s time to work on the sleeves now and you’ll begin with the right sleeve first.
You will be working into the 25 stitches that you skipped in row 9.
5 extra stitches will also be created, giving you a total of 30 stitches when working the sleeves.
With the back of your work facing you, attach your yarn to the end of row 9 of the yoke, at the right armhole.
Round 1. Ch2 (does not count as your 1st st), 1dc in same st (at base of ch2), 1dc in next 25 sts around armhole, work an extra 4 dc evenly spaced at underarm area, sl st to 1st dc to join, TURN [30 sts].
Round 2. Ch2 (does not count as your 1st st), 1dc in same st (at base of ch2), 1dc in next 29 sts, sl st to 1st dc to join, TURN [30 sts].
Rounds 3-14: Repeat round 2.
Cut yarn, fasten off and weave in ends.
CUFF
With Yarn B
Attach yarn to last stitch worked.
Round 15. Ch2 (counts as your 1st st), 1dc in next 29 sts, sl st in sp between beg ch2 and 1st dc to join, DO NOT TURN [30 sts].
NOTE: From round 16 onwards, you will work your double crochet stitches in the spaces in between each stitch. You will also need to feel your way with the fluffy yarn as it’s difficult to see your stitches. Please take care not to inadvertently work 2 stitches into the same space as this will cause your work to flare / ruffle out.
Round 16. Ch2 (counts as your 1st st), 1dc in next 29 sps, sl st in sp between beg ch2 and 1st dc to join, DO NOT TURN [30 sts]
Rounds 17-18. Repeat round 16.
Cut yarn, fasten off and weave in ends.
LEFT SLEEVE
With Yarn A
With the back of your work facing you, attach your yarn to the end of row 9 of the yoke, at the left armhole.
Round 1. Ch2 (does not count as your 1st st), 1dc in same st (at base of ch2), work 4 dc evenly spaced at underarm area,1dc in next 25 sts around armhole, sl st to 1st dc to join, TURN [30 sts].
Round 2. Ch2 (does not count as your 1st st), 1dc in same st (at base of ch2), 1dc in next 29 sts, sl st to 1st dc to join, TURN [30 sts].
Rounds 3-14: Repeat round 2.
Cut yarn, fasten off and weave in ends.
CUFF
Work cuff for left sleeve by following the instructions for right cuff above.
HOOD
With Yarn A
To begin working on the hood, attach yarn to the marked stitch on the right front.
Follow the pattern below, ensuring that the final stitch of the row is worked into the marked stitch on the left front.
Row 1. Ch3 (counts as your 1st st here and throughout), 1dc in next st, *2dc in next st, 1dc in next 2 sts*, repeat from * to * across row, TURN [62 sts].
Row 2. Ch3, 1dc in next 60 sts, 1dc in top of ch3, TURN [62 sts].
Rows 3-18. Repeat row 2.
Do not cut yarn.
SEAMING THE HOOD
To seam the hood, turn it inside out so that the wrong side is now facing you.
Bring the two sides of the top of the hood together.
Working under both loops on each side, seam the two sides together using the single crochet stitch.
Remember: For further help, refer to the video tutorial where I show you how to seam the hood together.
Once you’ve finished seaming the hood, cut yarn, fasten off and weave in your ends. Turn the hood out so that the right side is now facing you.
FUR TRIM FOR HOOD
Using Yarn B
Attach yarn to the bottom of the hood on the right front, at the end of the first row.
Row 1. Ch2 (counts as your 1st st here and throughout), working through the stitches at each row end (not around) evenly work dc stitches in each row end around hood (for guidance, I made 71 dc in total).
NOTE: Starting from row 2, you’ll work your double crochet stitches in the spaces in between each stitch. You will need to feel your way with the fluffy yarn as it’s difficult to see your stitches. Please take care not to inadvertently work 2 stitches into the same space as this will cause your work to flare / ruffle out.
Row 2. Ch2 (counts as your 1st dc), work 1dc in next sp and in each space around hood, ending 1dc in sp between last st and beg ch2, TURN.
Rows 3-4. Repeat row 2.
Cut yarn, fasten off and weave in ends.
OPTIONAL: Sew each corner of the fur trim to the hood or secure it in place with a button on each side.
PATTERN INSTRUCTIONS (3-6 MONTHS & 1-2 YEARS)
YOKE
With Yarn A
Chain 56
OPTIONAL (for a neater edge): When working on row 1 below, work your stitches through the back bump.
Row 1. 1dc in 3rd ch from hook (skp’d 2 ch do not count as your 1st dc), 1dc in next 6 ch, V-st in next ch, 1dc in next 10 ch, V-st in next ch, 1dc in next 16 ch, V-st in next ch, 1dc in next 10 ch, V-st in next ch, 1dc in next 7 ch, TURN [58 dc, 4x ch1 sps].
Row 2. Ch2 (does not count as your 1st st here and throughout), 1dc in same st (at base of ch2), 1dc in next 7 sts, V-st in next ch1 sp, 1dc in next 12 sts, V-st in next ch1 sp, 1dc in next 18 sts, V-st in next ch1 sp, 1dc in next 12 sts, V-st in next ch1 sp, 1dc in next 8 sts, TURN [66 dc, 4x ch1 sps].
Row 3. Ch2, 1dc in same st (at base of ch2), 1dc in next 8 sts, V-st in next ch1 sp, 1dc in next 14 sts, V-st in next ch1 sp, 1dc in next 20 sts, V-st in next ch1 sp, 1dc in next 14 sts, V-st in next ch1 sp, 1dc in next 9 sts, TURN [74 dc, 4x ch1 sps].
Row 4. Ch2, 1dc in same st (at base of ch2), 1dc in next 9 sts, V-st in next ch1 sp, 1dc in next 16 sts, V-st in next ch1 sp, 1dc in next 22 sts, V-st in next ch1 sp, 1dc in next 16 sts, V-st in next ch1 sp, 1dc in next 10 sts, TURN [82 dc, 4x ch1 sps].
Row 5. Ch2, 1dc in same st (at base of ch2), 1dc in next 10 sts, V-st in next ch1 sp, 1dc in next 18 sts, V-st in next ch1 sp, 1dc in next 24 sts, V-st in next ch1 sp, 1dc in next 18 sts, V-st in next ch1 sp, 1dc in next 11 sts, TURN [90 dc, 4x ch1 sps].
Row 6. Ch2, 1dc in same st (at base of ch2), 1dc in next 11 sts, V-st in next ch1 sp, 1dc in next 20 sts, V-st in next ch1 sp, 1dc in next 26 sts, V-st in next ch1 sp, 1dc in next 20 sts, V-st in next ch1 sp, 1dc in next 12 sts, TURN [98 dc, 4x ch1 sps].
Row 7. Ch2, 1dc in same st (at base of ch2), 1dc in next 12 sts, V-st in next ch1 sp, 1dc in next 22 sts, V-st in next ch1 sp, 1dc in next 28 sts, V-st in next ch1 sp, 1dc in next 22 sts, V-st in next ch1 sp, 1dc in next 13 sts, TURN [106 dc, 4x ch1 sps].
Row 8. Ch2, 1dc in same st (at base of ch2), 1dc in next 13 sts, V-st in next ch1 sp, 1dc in next 24 sts, V-st in next ch1 sp, 1dc in next 30 sts, V-st in next ch1 sp, 1dc in next 24 sts, V-st in next ch1 sp, 1dc in next 14 sts, TURN [114 dc, 4x ch1 sps].
Row 9. Ch2, 1dc in same st (at base of ch2), 1dc in next 14 sts, V-st in next ch1 sp, 1dc in next 26 sts, V-st in next ch1 sp, 1dc in next 32 sts, V-st in next ch1 sp, 1dc in next 26 sts, V-st in next ch1 sp, 1dc in next 15 sts, TURN [122 dc, 4x ch1 sps].
DIVIDE FOR ARMHOLES
Row 10. Ch2, 1dc in same st (at base of ch1), 1dc in next 15 sts, (1dc, ch1) in next ch1 sp, sk next 28 sts, 1dc in next ch1 sp, 1dc in next 34 sts, (1dc, ch1) in next ch1 sp, sk next 28 sts, 1dc in next ch1 sp, 1dc in next 16 sts, TURN [70 dc, 2x ch1 sps].
Do not cut yarn.
SKIRT SECTION
Continuing with the skirt section:
Row 1. Ch2, 1dc in same st (at base of ch2), 1dc in next 4 sts, shell in next st, 1dc in next 5 sts, shell in next st, 1dc in next 5 sts, 1dc in next ch1, 1dc in next 3 sts, shell in next st, (1dc in next 6 sts, shell in next st) 3 times, 1dc in next 7 sts, shell in next st, 1dc in next 3 sts, 1dc in next ch1, 1dc in next 5 sts, (shell in next st, 1dc in next 5 sts) TWICE, TURN [99 sts].
Row 2. Ch2, 1dc in same st (at base of ch2), 1dc in next 4 sts, 2dc in next 4 sts of shell, 1dc in next 5 sts, 2dc in next 4 sts of shell, 1dc in next 9 sts, 2dc in next 4 sts of shell, 1dc in next 7 sts, 2dc in next 4 sts of shell, (1dc in next 6 sts, 2dc in next 4 sts of shell) 3 times, 1dc in next 9 sts, (2dc in next 4 sts of shell, 1dc in next 5 sts) TWICE, TURN [135 sts].
Row 3. Ch2, 1dc in same st (at base of ch2), 1dc in next 134 sts, TURN [135 sts].
Rows 4 – 21: Repeat row 3.
Do not cut yarn.
HOOD PLACEMENT
Before moving on and working on the buttonhole band, you will mark out stitches for the hood.
Please ensure that you mark out these stitches before working on the buttonhole band (it will be easier to distinguish what stitches have to be worked in).
With the front of your work facing you, place a stitch marker into the 4th stitch from the neck edge on both the right and left side.
Once this has been done, you can commence working on the buttonhole band below.
BUTTONHOLE BAND
Row 1. Ch2 (counts as your 1st dc), work 62 dc up right front, TURN [63 dc].
Row 2. Ch2, (counts as your 1st dc), 1dc in next 2 sts, ch1, sk next st, 1dc in next st (1st buttonhole made), (1dc in next 6 sts, ch1, sk next st, 1dc in next st) TWICE (2nd and 3rd buttonholes made), 1dc in next 41 sts, 1dc in top of ch2, TURN.
Cut yarn, fasten off and weave in ends.
BUTTON BAND
With Yarn A
With the front of your work facing you, attach yarn to the top corner of the left front (in to the first stitch).
Row 1. Ch2 (counts as your 1st dc), 2dc in corner, work 60 dc evenly down left front, TURN [63 dc].
Row 2. Ch2, (counts as your 1st dc), 1dc in next st and in next 61 sts, 1dc in top of ch2, TURN [63 dc].
Row 3. Ch5, 1dc in next st, *sk next 2 sts, SL/shell in next st*, repeat from * to * to end of button band, work a SL/shell in bottom corner.
Do not cut yarn.
Sew buttons on left front, ensuring that you align them with the buttonholes on right front.
EDGING AROUND BOTTOM OF COAT
When you have completed row 3 of the button band above, you will continue working the slanted shell stitch (SL/shell) edging around the bottom of your coat:
Row 1. *sk next 2 sts, SL/shell in next st*, repeat from * to * around bottom of coat, work a SL/shell in corner.
Do not cut yarn.
EDGING UP BUTTONHOLE BAND
Continue with the slanted shell stitch (SL/shell) edging up the buttonhole band:
Row 1. *sk next 2 sts, SL/shell in next st*, repeat from * to * up buttonhole band (each ch1 sp = 1 st), ending sk next 2 sts, SL/shell in top of ch2 at end of buttonhole band.
Cut yarn, fasten off and weave in ends.
SLEEVES: RIGHT SLEEVE
With Yarn A
It’s time to work on the sleeves now and you’ll begin with the right sleeve first.
You will be working into the 28 stitches that you skipped in row 10.
5 extra stitches will also be created, giving you a total of 33 stitches when working the sleeves.
With the back of your work facing you, attach your yarn to the end of row 10 of the yoke, at the right armhole.
Round 1. Ch2 (does not count as your 1st st), 1dc in same st (at base of ch2), 1dc in next 28 sts around armhole, work an extra 4 dc evenly spaced at underarm area, sl st to 1st dc to join, TURN [33 sts].
Round 2. Ch2 (does not count as your 1st st), 1dc in same st (at base of ch2), 1dc in next 32 sts, sl st to 1st dc to join, TURN [33 sts].
Rounds 3-15: Repeat round 2.
Cut yarn, fasten off and weave in ends.
CUFF
With Yarn B
Attach yarn to last stitch worked.
Round 16. Ch2 (counts as your 1st st), 1dc in next 32 sts, sl st in sp between beg ch2 and 1st dc to join, DO NOT TURN [33 sts].
NOTE: From round 17 onwards, you will work your double crochet stitches in the spaces in between each stitch. You will also need to feel your way with the fluffy yarn as it’s difficult to see your stitches. Please take care not to inadvertently work 2 stitches into the same space as this will cause your work to flare / ruffle out.
Round 17. Ch2 (counts as your 1st st), 1dc in next 32 sps, sl st in sp between beg ch2 and 1st dc to join, DO NOT TURN [33 sts]
Rounds 18-19. Repeat round 17.
Cut yarn, fasten off and weave in ends.
LEFT SLEEVE
With Yarn A
With the back of your work facing you, attach your yarn to the end of row 10 of the yoke, at the left armhole.
Round 1. Ch2 (does not count as your 1st st), 1dc in same st (at base of ch2), work 4 dc evenly spaced at underarm area,1dc in next 28 sts around armhole, sl st to 1st dc to join, TURN [33 sts].
Round 2. Ch2 (does not count as your 1st st), 1dc in same st (at base of ch2), 1dc in next 32 sts, sl st to 1st dc to join, TURN [33 sts].
Rounds 3-14: Repeat round 2.
Cut yarn, fasten off and weave in ends.
CUFF
Work cuff for left sleeve by following the instructions for right cuff above.
HOOD
With Yarn A
To begin working on the hood, attach yarn to the marked stitch on the right front.
Follow the pattern below, ensuring that the final stitch of the row is worked into the marked stitch on the left front.
Row 1. Ch3 (counts as your 1st st here and throughout), 1dc in next st, 2dc in next st, *1dc in next 2 sts, 2dc in next st*, repeat from * to * across to end of row, TURN [64 sts].
Row 2. Ch3, 1dc in next 62 sts, 1dc in top of ch3, TURN [64 sts].
Rows 3-19. Repeat row 2.
Do not cut yarn.
SEAMING THE HOOD
To seam the hood, turn it inside out so that the wrong side is now facing you.
Bring the two sides of the top of the hood together.
Working under both loops on each side, seam the two sides together using the single crochet stitch.
Remember: I show you how to seam the hood together in the video tutorial (linked above).
Once you’ve finished seaming the hood, cut yarn, fasten off and weave in your ends. Turn the hood out so that the right side is now facing you.
FUR TRIM FOR HOOD
Using Yarn B
Attach yarn to the bottom of the hood on the right front, at the end of the first row.
Row 1. Ch2 (counts as your 1st st here and throughout), working through the stitches at each row end (not around) evenly work dc stitches in each row end around hood (For guidance, I made 77 dc in total).
NOTE: Starting from row 2, you’ll work your double crochet stitches in the spaces in between each stitch. You will need to feel your way with the fluffy yarn as it’s difficult to see your stitches. Please take care not to inadvertently work 2 stitches into the same space as this will cause your work to flare / ruffle out.
Row 2. Ch2 (counts as your 1st dc), work 1dc in next sp and in each space around hood, ending 1dc in sp between last st and beg ch2, TURN.
Rows 3-4. Repeat row 2.
Cut yarn, fasten off and weave in ends.
OPTIONAL: Sew each corner of the fur trim to the hood or secure it in place with a button on each side.

SHARE YOUR WORK!
I really hope that you enjoyed the free pattern for this crochet baby coat with hood!
I can’t wait to see photos of your finished Arabella Baby Coat 😊… please tag me on Instagram using @maisieandruth
And remember to pin this pattern for later if you can’t make it right now!
Happy crocheting,


Hey Amanda, do you have a suggestion for a substitute for the Sirdar Snowflake Chunky? I’m having trouble finding it in stock. Thanks for teaching me how to crochet through your videos! I’ve made just about every baby pattern on your website 🙂
Hello! Awe, you’re very welcome – that is so lovely to hear! I’m really pleased that my designs appeal to you and that you’re finding the video tutorials helpful 🥰
Yes, I have a few suggestions: King Cole Cuddles Chunky; Rico Baby Teddy Aran; King Cole Truffle; Scheepjes Softy; Sirdar Snuggly Bunny.
Best of luck with your baby coat… I hope that you manage to order some of the fluffy yarn (stocks tend to start running low on everything this time of year!) 💝
I wish there was some way to get the written pattern without all the ads and so many pictures. There are too many to print it – even if I paid it would be better.
Hi Kathy,
Thanks for your interest in this design!
The ad-free, PDF version will be available for purchase from my Etsy shop very soon 😊
The link to my Etsy shop is here: https://www.etsy.com/uk/shop/MaisieAndRuthCrochet
Have a lovely weekend! 💝